Page History
...
| Scroll Title | |||||||||||||||||||||||||||||||||
|---|---|---|---|---|---|---|---|---|---|---|---|---|---|---|---|---|---|---|---|---|---|---|---|---|---|---|---|---|---|---|---|---|---|
| |||||||||||||||||||||||||||||||||
|
...
| Scroll Title | |||||||||||||||||||||||||||||||||||||||
|---|---|---|---|---|---|---|---|---|---|---|---|---|---|---|---|---|---|---|---|---|---|---|---|---|---|---|---|---|---|---|---|---|---|---|---|---|---|---|---|
| |||||||||||||||||||||||||||||||||||||||
|
Hardware Requirements:
| Scroll Title | ||||||||||||||||||||||||||||||
|---|---|---|---|---|---|---|---|---|---|---|---|---|---|---|---|---|---|---|---|---|---|---|---|---|---|---|---|---|---|---|
| ||||||||||||||||||||||||||||||
|
...
| Scroll Title | |||||||||||||||||||||||||||
|---|---|---|---|---|---|---|---|---|---|---|---|---|---|---|---|---|---|---|---|---|---|---|---|---|---|---|---|
| |||||||||||||||||||||||||||
|
Additional Sources
...
| anchor | Table_ADS |
|---|---|
| title | Additional design sources |
Download
Reference Design is only usable with the specified Libero/SoftConsole version. Usage of a different Microsemi Software versions is not recommanded.
...
Reference Design is available on:
...
Design Flow
The reference design is available as a prebuild zip archive, which contains hard and soft ware project folders and the board configuration file "microsemi-smartfusion2-smartberry-ddr.cfg" . It was created and tested in windows environment.
...
Connect the boards Ethernet port to your demo host computer. The demo is configured to establish a network connection via the DHCP protocol, therefore a free router / network port can be used.
A direct port to port connection between the demo host computer and the board is also possible but requires to reconfigure the software project.
Launch
Programming Hardware design
...
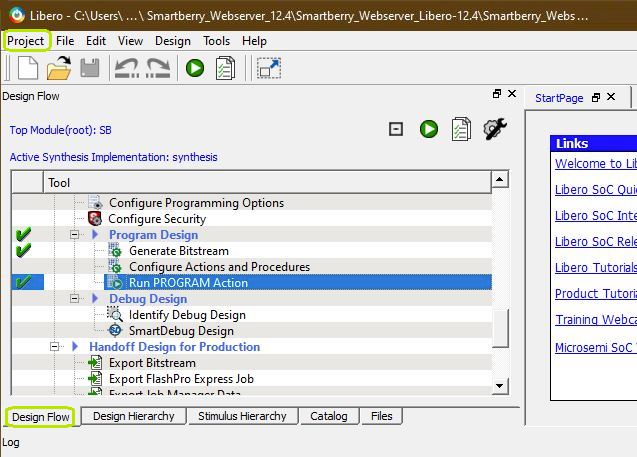
Open Libero 12.4, in the to left corner, open the demo hardware project via "Project > Open Project" and point to file dialog to the demo archives hardware project dicsk:\Path_to_the_hardware_project_inside_the_archive\ , double left mouse click onto the project file "Smartberry_Webserver.prjx" to open it.
...
The hardware design is volatile and therefore lost when powering the board down.
Programming Software project
...
Open SoftConsole 6.2 and point the "Workspace:" to the folder "SmartberrySoftconsole-6.2" inside the demo folder.
...
Switch between Debug and Run perspective (upper right corner program window)
![]()
Static IP configuration
To disengaging the DHCP mode one has to setup up an IP Address in the code unit "main.c" line 274, a gateway address has is not required. Alternativly, the demo hosts IP Address can be changed.
...
Lastly, the project needs to be recompiled. In the top menu of the SoftConsole select "Project > Build ALL / Build Project".
Warnings can be ignored.
...
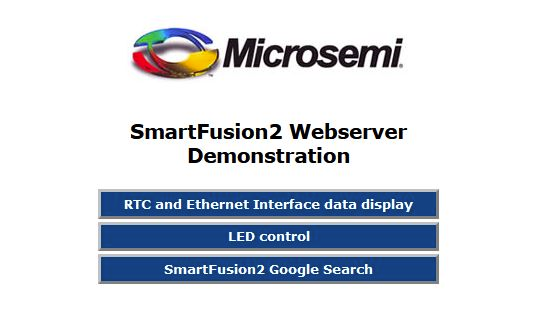
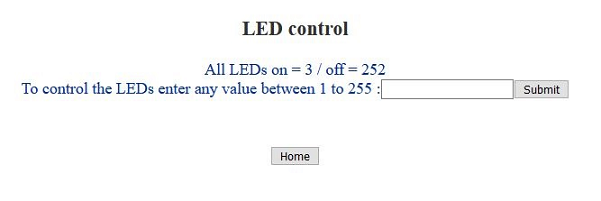
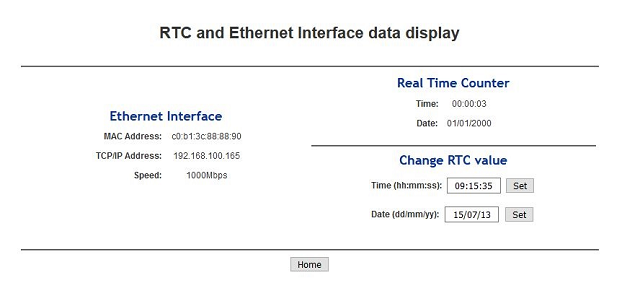
Pictures of the webserver pages
Open a new tab in a web browser and enter the IP Adress from the comport terminal.Pictures of the servers pages.
Design Flow
| Page properties | ||||
|---|---|---|---|---|
| ||||
Notes :
|
...
_create_win_setup.cmd/_create_linux_setup.sh and follow instructions on shell: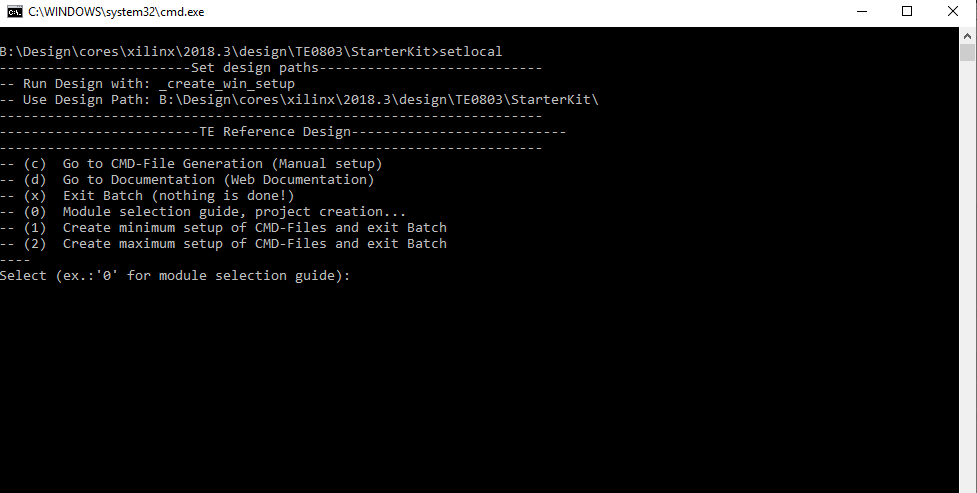
Press 0 and enter to start "Module Selection Guide"(optional Win OS) Generate Virtual Drive or use short directory for the reference design (for example x:\<design name>)Create Project (follow instruction of the product selection guide), settings file will be configured automatically during this process)(optional for manual changes) Select correct device and Xilinx install path on "design_basic_settings.cmd" and create Vivado project with "vivado_create_project_guimode.cmd"Note: Select correct one, see alsoTE Board Part FilesImportant: Use Board Part Files, which ends with *_tebf0808
Create XSA and export to prebuilt folderRun on Vivado TCL: TE::hw_build_design -export_prebuiltNote: Script generate design and export files into \prebuilt\hardware\<short dir>. Use GUI is the same, except file export to prebuilt folder
Create Linux (bl31.elf, uboot.elf , Image and system.dtb) with exported XSAXSA is exported to "prebuilt\hardware\<short name>"Note: HW Export from Vivado GUI create another path as default workspace.Create Linux images on VM, see PetaLinux KICKstartUse TE Template from /os/petalinux/Execute the script file for Debian/Ubuntu
Add Linux files (bl31.elf, uboot.elf , Image and system.dtb) to prebuilt folder"prebuilt\os\petalinux\<ddr size>" or "prebuilt\os\petalinux\<short name>"
Generate Programming Files with VitisRun on Vivado TCL: TE::sw_run_vitis -allNote: Scripts generate applications and bootable files, which are defined in "sw_lib\apps_list.csv"(alternative) Start SDK with Vivado GUI or start with TE Scripts on Vivado TCL: TE::sw_run_vitisNote: TCL scripts generate also platform project, this must be done manuelly in case GUI is used. See Vitis
Preparing SD card for SD Filesystem and hard disk for HD Filesystem → See Programming section
Launch
| Page properties | ||||
|---|---|---|---|---|
| ||||
Note:
|
...
Overview
Content Tools