Page History
| Page properties | ||||||||||||||||||||||||||||
|---|---|---|---|---|---|---|---|---|---|---|---|---|---|---|---|---|---|---|---|---|---|---|---|---|---|---|---|---|
| ||||||||||||||||||||||||||||
Design Name always "TE Series Name" + Design name, for example "TEI0006 Test Board"
|
| Custom_table_size_100 |
|---|
| Page properties | ||||||||||||||||||||||||||||||||||||||||
|---|---|---|---|---|---|---|---|---|---|---|---|---|---|---|---|---|---|---|---|---|---|---|---|---|---|---|---|---|---|---|---|---|---|---|---|---|---|---|---|---|
| ||||||||||||||||||||||||||||||||||||||||
Important General Note:
|
Overview
| Scroll Ignore | ||||||||||||||
|---|---|---|---|---|---|---|---|---|---|---|---|---|---|---|
| ||||||||||||||
| Page properties | ||||
|---|---|---|---|---|
| ||||
Notes :
|
Refer to http://trenz.org/tem0007-info for the current online version of this manual and other available documentation.
Key Features
| Page properties | ||||
|---|---|---|---|---|
| ||||
Notes :
|
| Excerpt |
|---|
|
Revision History
| Page properties | ||||
|---|---|---|---|---|
| ||||
Notes :
|
| Scroll Title | ||||||||||||||||||||||||||||
|---|---|---|---|---|---|---|---|---|---|---|---|---|---|---|---|---|---|---|---|---|---|---|---|---|---|---|---|---|
| ||||||||||||||||||||||||||||
|
Release Notes and Know Issues
| Page properties | ||||
|---|---|---|---|---|
| ||||
Notes :
|
| Scroll Title | ||||||||||||||||||||||||||
|---|---|---|---|---|---|---|---|---|---|---|---|---|---|---|---|---|---|---|---|---|---|---|---|---|---|---|
| ||||||||||||||||||||||||||
|
Requirements
Software
| Page properties | ||||
|---|---|---|---|---|
| ||||
Notes :
|
| Scroll Title | |||||||||||||||||||||||||||||
|---|---|---|---|---|---|---|---|---|---|---|---|---|---|---|---|---|---|---|---|---|---|---|---|---|---|---|---|---|---|
| |||||||||||||||||||||||||||||
|
Additional software requirement
| Scroll Title | |||||||||||||||||||||||
|---|---|---|---|---|---|---|---|---|---|---|---|---|---|---|---|---|---|---|---|---|---|---|---|
| |||||||||||||||||||||||
|
Hardware
| Page properties | ||||
|---|---|---|---|---|
| ||||
Notes :
|
Complete List is available on <project folder>/board_files/*_board_files.csv
Design supports following modules:
| Scroll Title | |||||||||||||||||||||||||||||||||||||||||||||
|---|---|---|---|---|---|---|---|---|---|---|---|---|---|---|---|---|---|---|---|---|---|---|---|---|---|---|---|---|---|---|---|---|---|---|---|---|---|---|---|---|---|---|---|---|---|
| |||||||||||||||||||||||||||||||||||||||||||||
*used as reference |
Design supports following carriers:
| Scroll Title | ||||||||||||||||||||||
|---|---|---|---|---|---|---|---|---|---|---|---|---|---|---|---|---|---|---|---|---|---|---|
| ||||||||||||||||||||||
*used as reference |
Additional HW Requirements:
| Scroll Title | ||||||||||||||||||||||||||||||||||||
|---|---|---|---|---|---|---|---|---|---|---|---|---|---|---|---|---|---|---|---|---|---|---|---|---|---|---|---|---|---|---|---|---|---|---|---|---|
| ||||||||||||||||||||||||||||||||||||
|
Content
| Page properties | ||||
|---|---|---|---|---|
| ||||
Notes :
|
For general structure and usage of the reference design, see Project Delivery - Microchip devices
Design Sources
| Scroll Title | ||||||||||||||||||||||||||
|---|---|---|---|---|---|---|---|---|---|---|---|---|---|---|---|---|---|---|---|---|---|---|---|---|---|---|
| ||||||||||||||||||||||||||
|
Prebuilt
| Page properties | |||||||||||||||||||||||||||||||||||||||||||||||||||||||||||||||||||||
|---|---|---|---|---|---|---|---|---|---|---|---|---|---|---|---|---|---|---|---|---|---|---|---|---|---|---|---|---|---|---|---|---|---|---|---|---|---|---|---|---|---|---|---|---|---|---|---|---|---|---|---|---|---|---|---|---|---|---|---|---|---|---|---|---|---|---|---|---|---|
| |||||||||||||||||||||||||||||||||||||||||||||||||||||||||||||||||||||
Notes :
|
| Scroll Title | |||||||||||||||||||||||||||||||||||||||||||||||||||||||||
|---|---|---|---|---|---|---|---|---|---|---|---|---|---|---|---|---|---|---|---|---|---|---|---|---|---|---|---|---|---|---|---|---|---|---|---|---|---|---|---|---|---|---|---|---|---|---|---|---|---|---|---|---|---|---|---|---|---|
| |||||||||||||||||||||||||||||||||||||||||||||||||||||||||
|
Download
Reference Design is only usable with the specified Libero version. Do never use different versions of Libero software for the same project.
| Page properties | ||||
|---|---|---|---|---|
| ||||
|
Reference design is available on:
Design Flow
| Scroll Ignore | ||||||||||||||
|---|---|---|---|---|---|---|---|---|---|---|---|---|---|---|
| ||||||||||||||
| Page properties | ||||
|---|---|---|---|---|
| ||||
Notes :
|
Libero SoC
| Note |
|---|
Reference Design is available with and without prebuilt files. It's recommended to use TE prebuilt files for first launch. |
Trenz Electronic provides a tcl based built environment based on Libero Design Flow.
See also:
The most Trenz Electronic FPGA Reference Designs are TCL-script based projects.
The "normal" Libero project will be generated in the subfolder "/Libero-<Variant short name>/".
To create project do the following steps:
- Execute "Generate_TEM0007_Hardware-Design_in_Libero_SoC_v2023.1.cmd"
- Choose one of the following options::
- Press 0 , if the path of installed libero software is : C:/Microchip/Libero_SoC_v2023.1/Designer/bin/libero.exe
- Press 1, if it will be entered the path Microchip or Libero SoC installations folder. The script selects automatically the Libero exe.
- Press 2, if it will be entered the full path to the Libero SoC exe.
- Press 3 to exit the script.
- Press 0 , if the path of installed libero software is : C:/Microchip/Libero_SoC_v2023.1/Designer/bin/libero.exe
- Select your board in "Board selection" , if there is more than one variant.
- Choose one of the following options for prefered hardware description language:
- Option 0 : VHDL
- Option 1 : VERILOG
- Option 2 : To exit th script
- If the suggested name for the project is acceptable enter y or t or 1. Otherwise enter n or f or 0 and enter the desired name.
- Project will be generated automatically.
- Open the generated project by entering y or t or 1
Scroll Title title-alignment center title Example 
- After opening Libero project double click on Generate Bitstream menu in Design Flow box to generate the bitstream file.
Expand title Generate Bitstream 
- After generating bit stream file double click on Configure Design Initialization Data and Memories in Design Flow bow. It will be opened a window.
Expand title Configure Memory 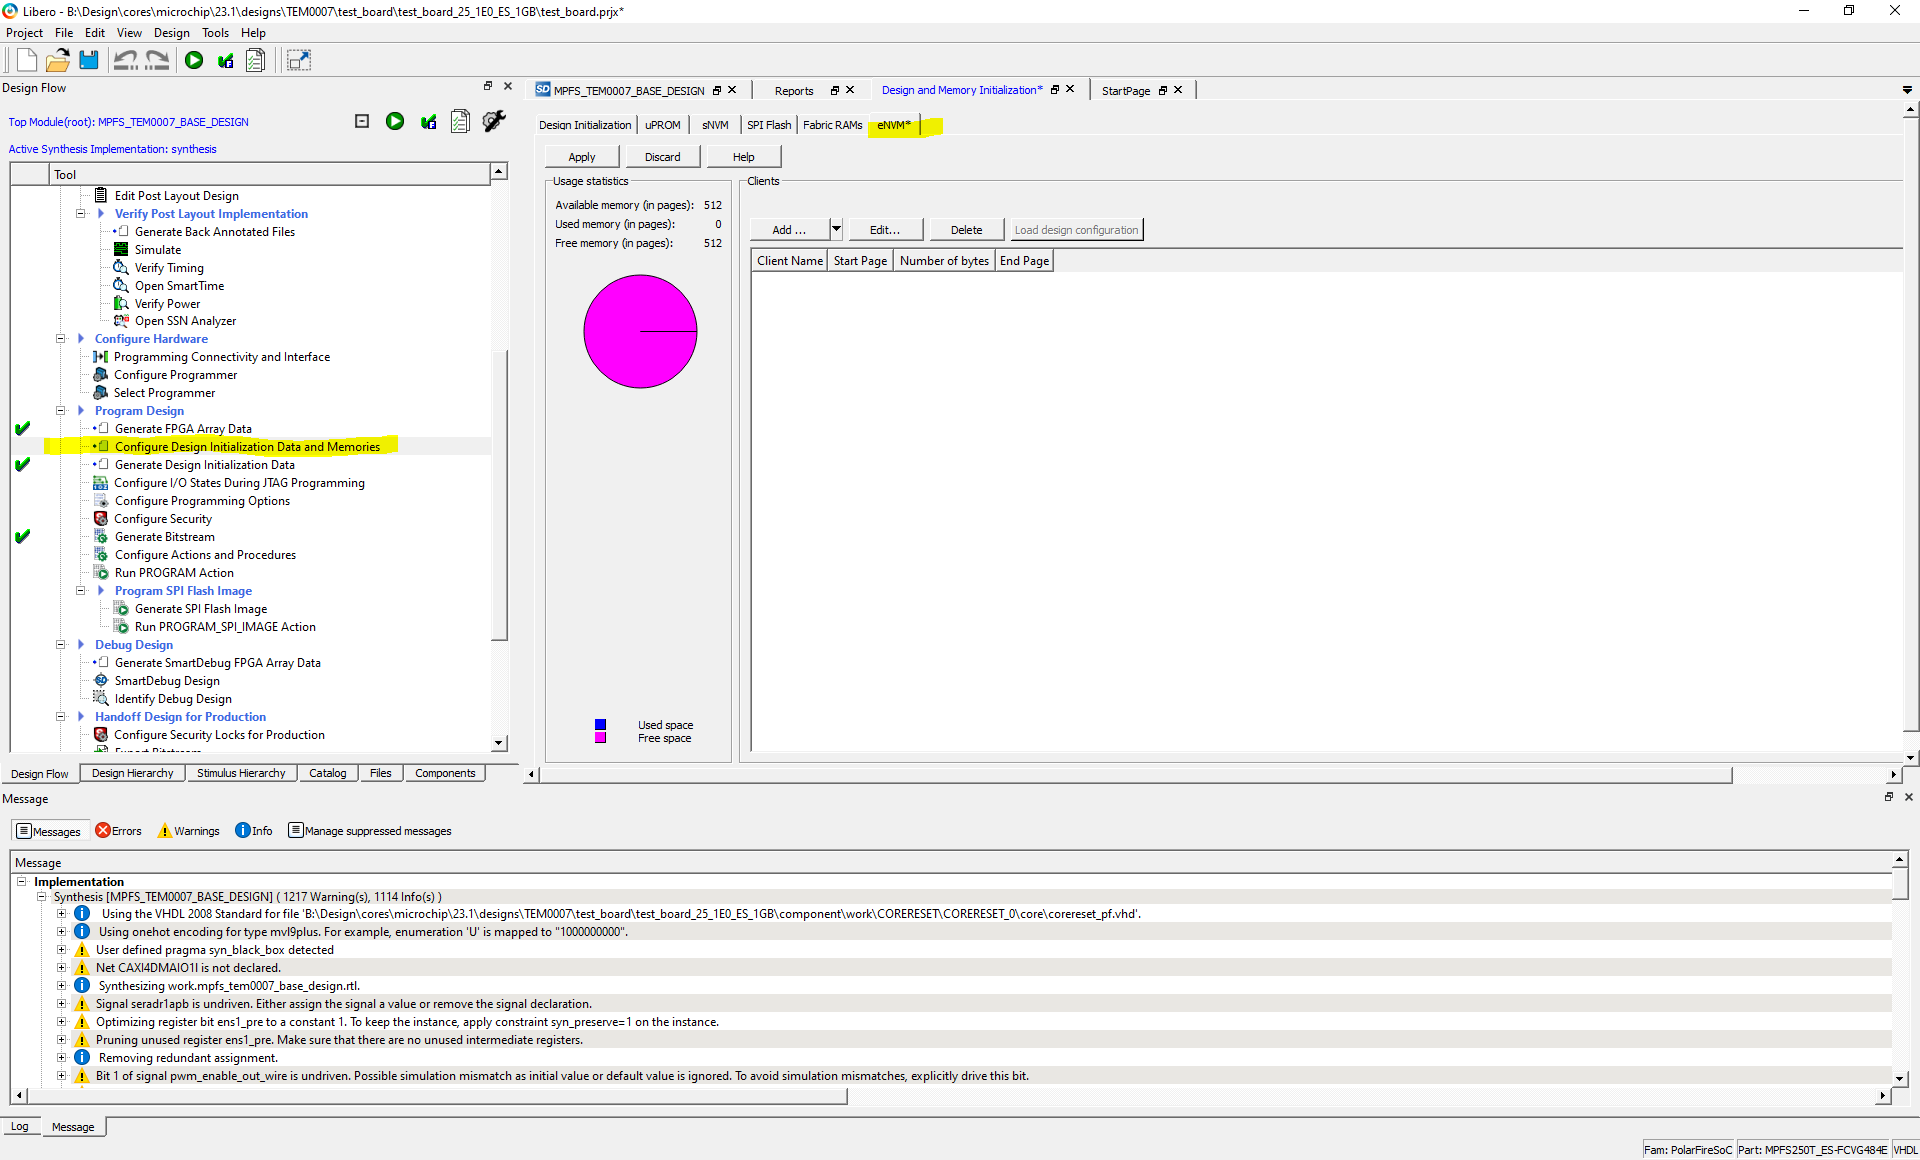
- Click on eNVM and after that on Add and click on Add Boot Mode 1 Client.
- Enter the path of generated *.hex File by SoftConsole software (HSS) and click on OK.
Expand title HSS generated *.hex File attachment 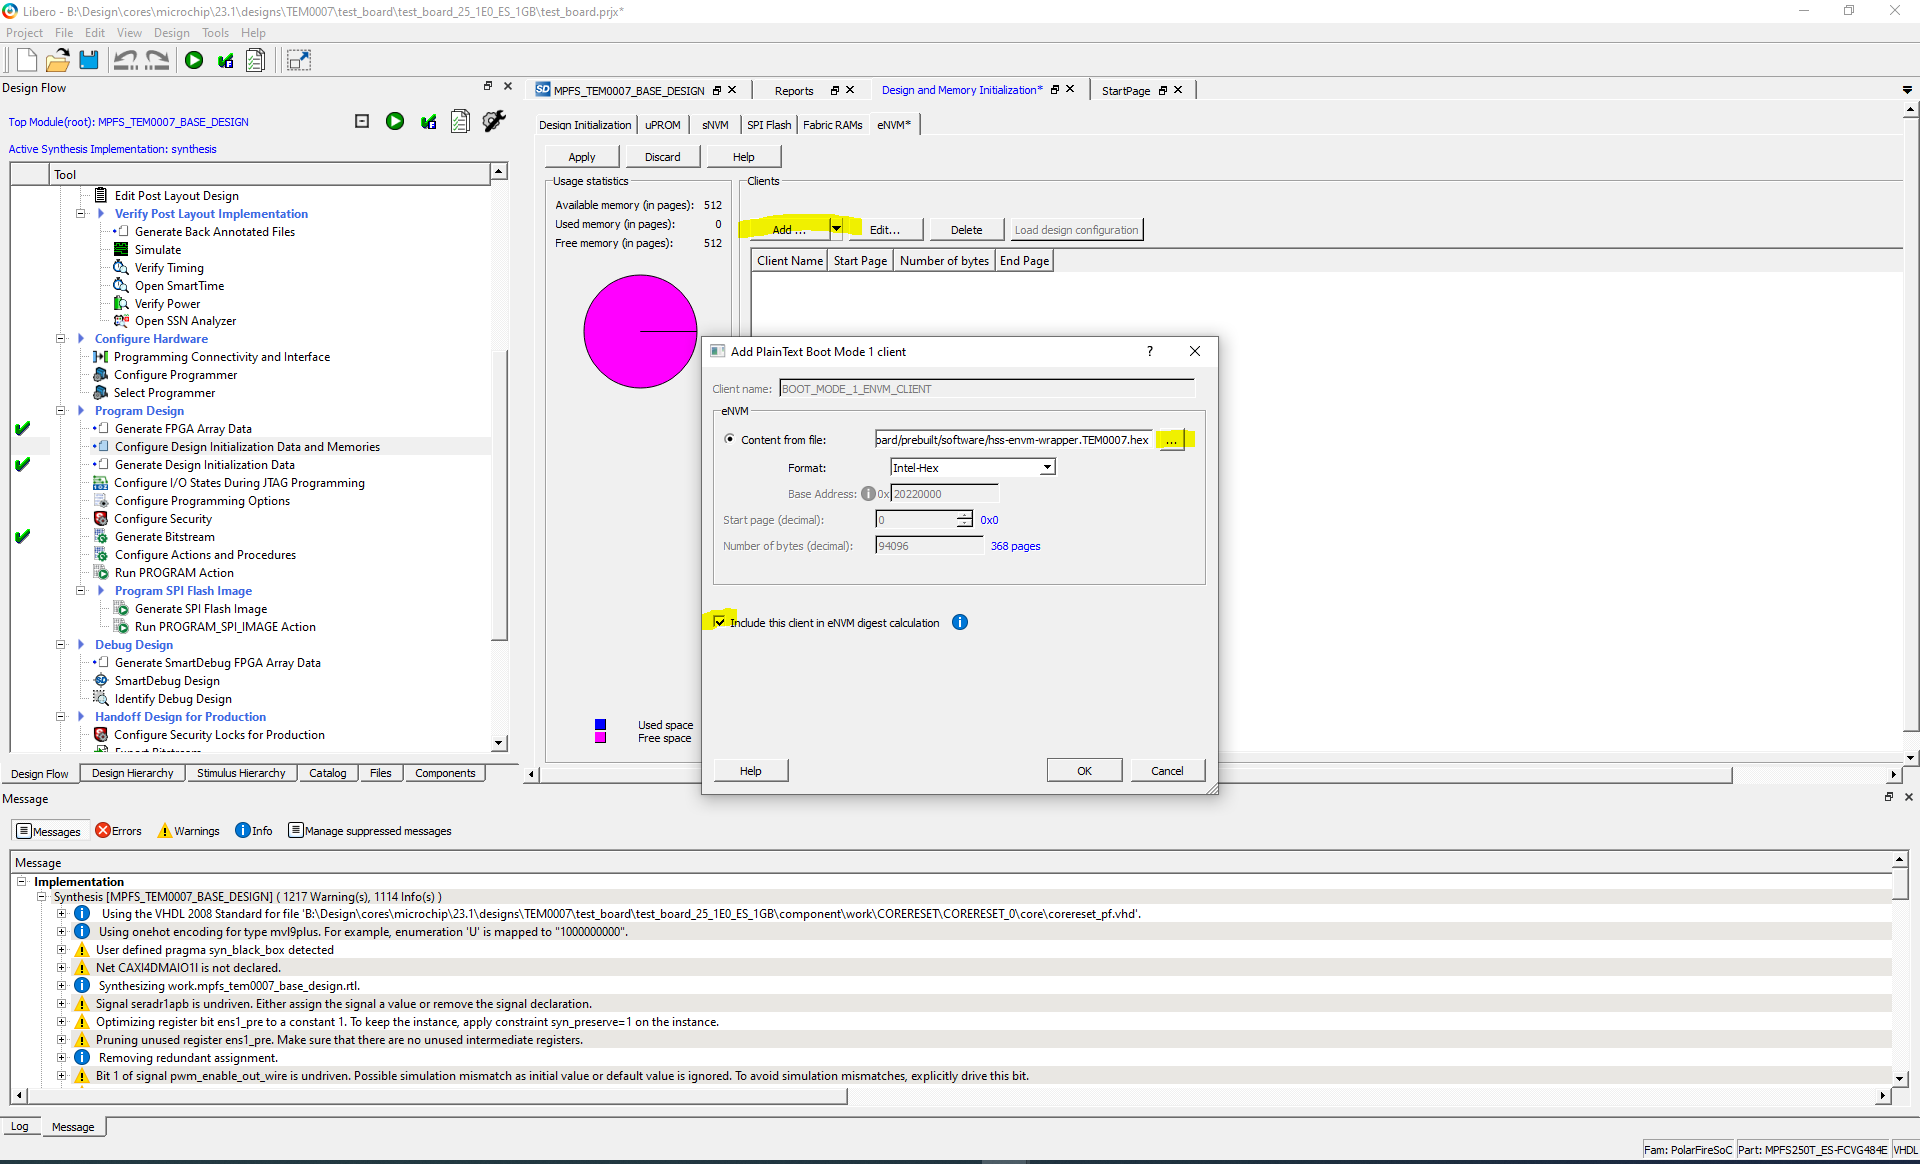
- Save the project and double click on Generate Bitstream again.
Expand title Generate Bitstream again 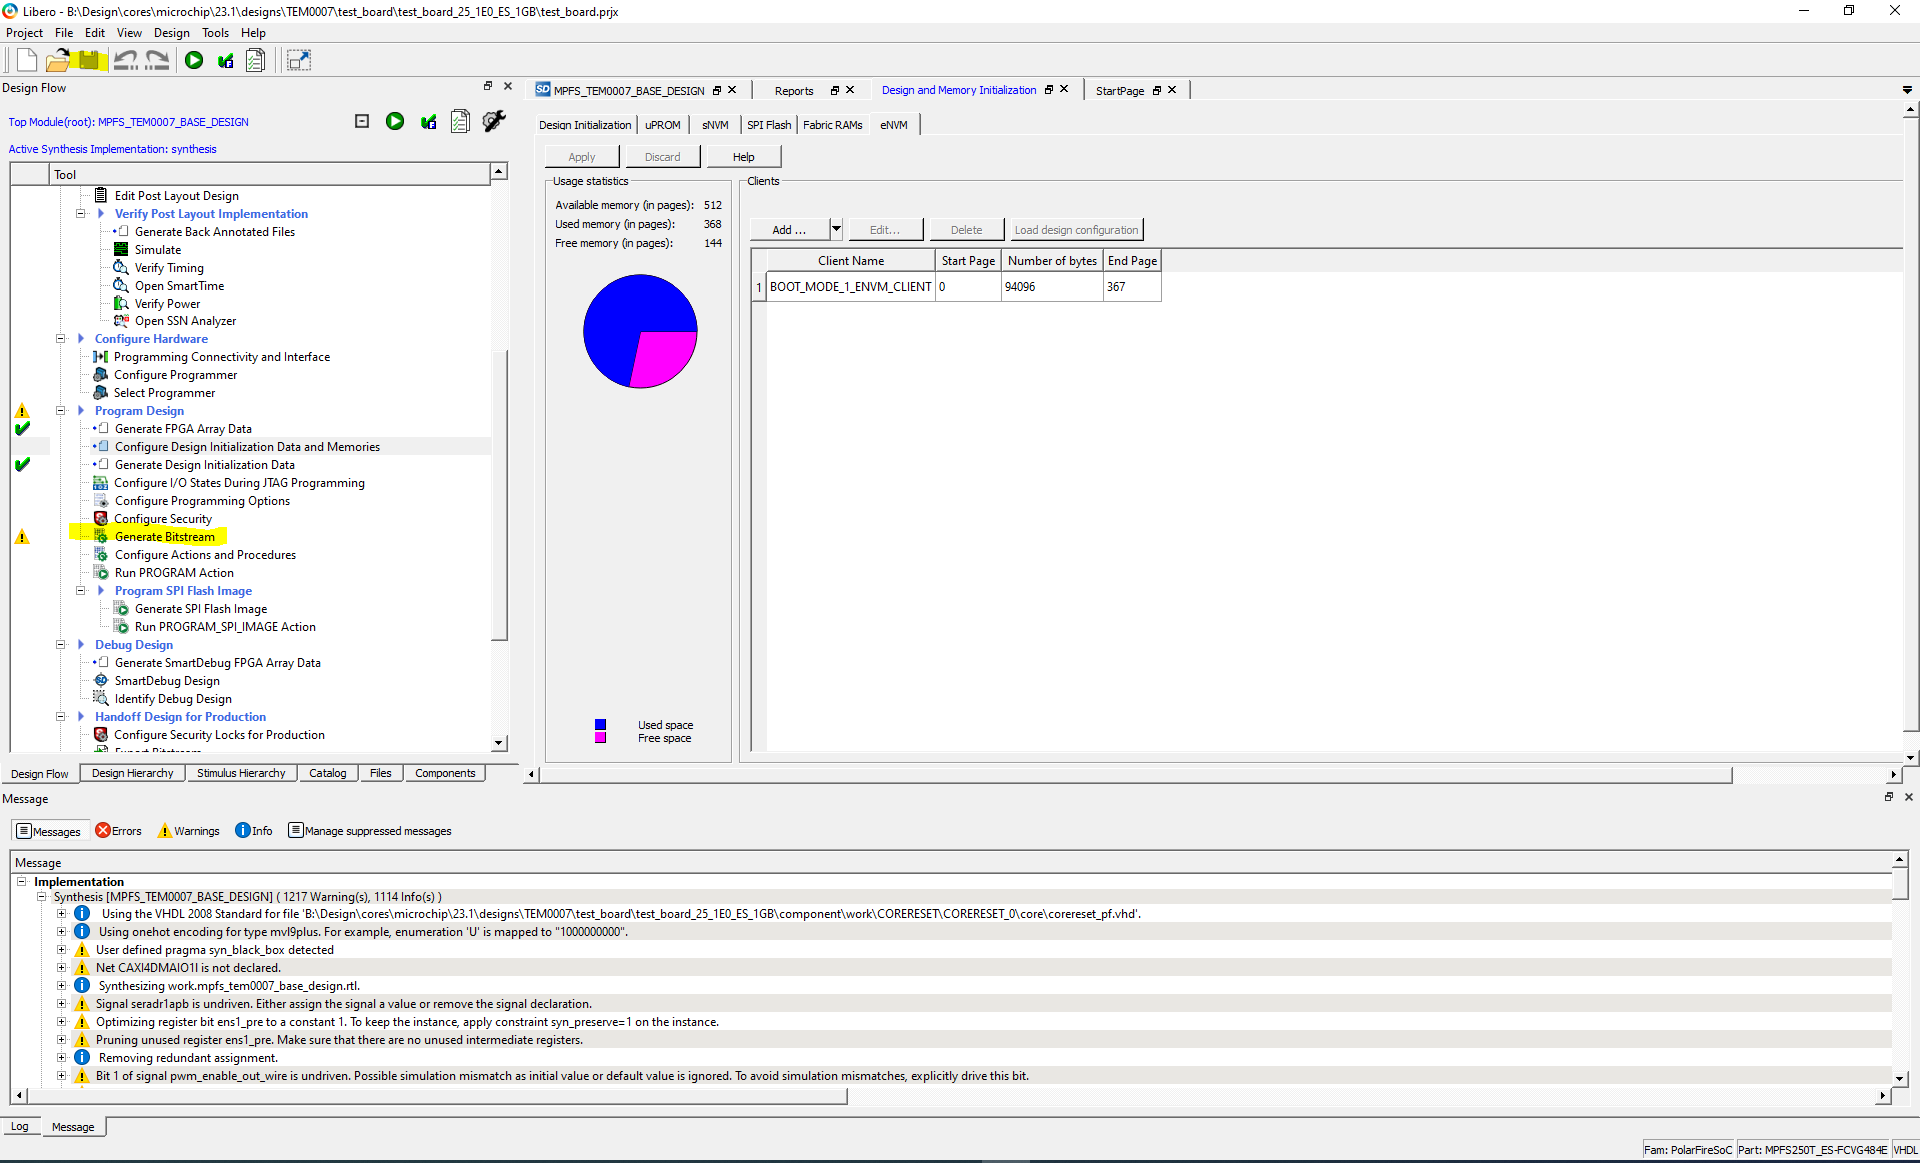
- Double click on Flashpro Express to generate *.job File
Expand title Generate Job File 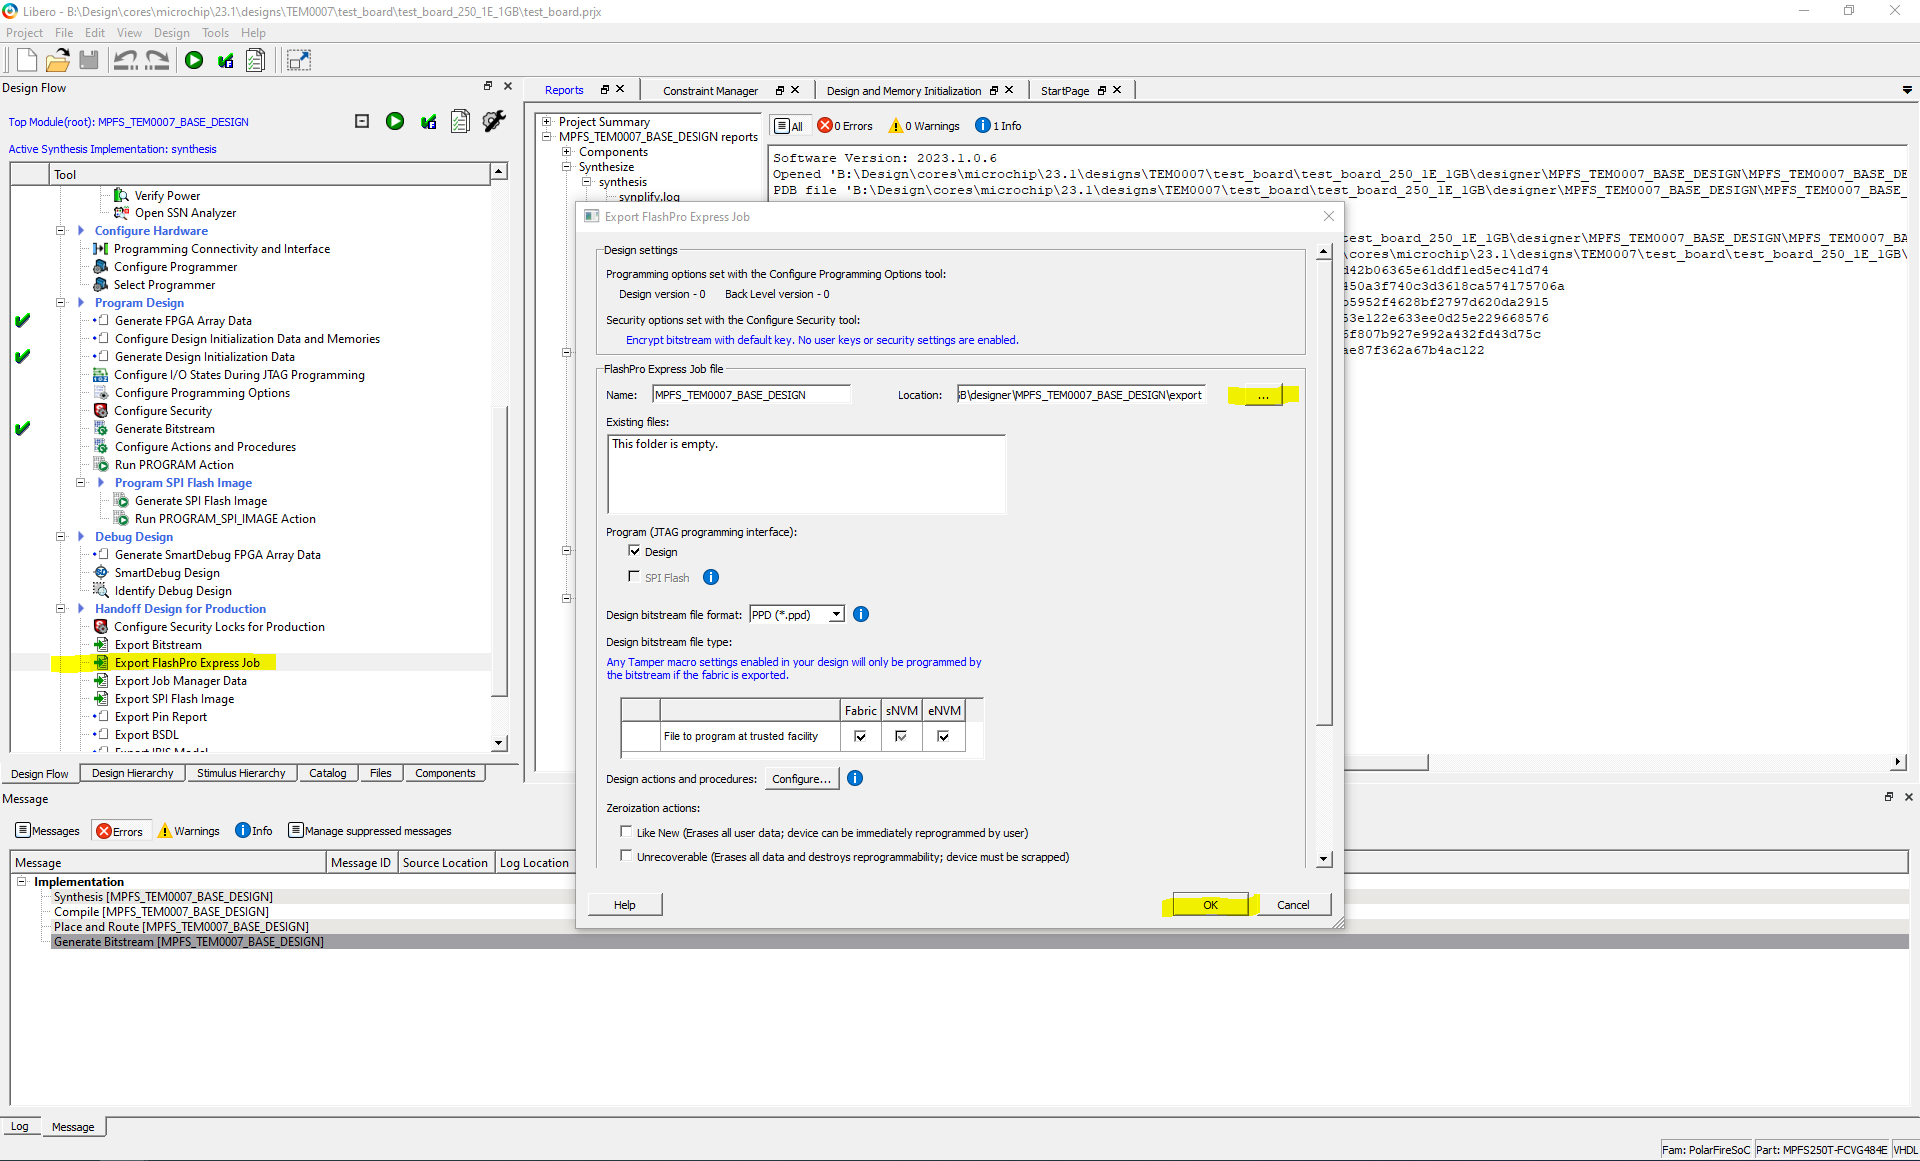
Launch
| Scroll Ignore |
|---|
Hardware Setup
see Modified TE0703 for Microchip Getting Started
| Page properties | ||||
|---|---|---|---|---|
| ||||
Note:
|
Programming
| Note |
|---|
Check Module and Carrier TRMs for proper HW configuration before you try any design. |
Programming eNVM
The eNVM is a user non-volatile flash memory that can be programmed independently. There is two methods to program eNVM:
Programming eNVM in SoftConsole
To program HSS *.elf file on FPGA:
- Prepare the hardware see Hardware Setup
- Open SoftConsole software as administrator, if it is not done yet.
- Select correct directory as workspace directory.
- Build the hart-software-services-master , if it is not done yet.
- Click on Run > External Tools > Polarfire SoC program non-secure boot-mode 1
Programming eNVM in Flashpro Express
The HSS generated hex file can be attached to bitstream file. For more information see Design Flow
To program the eNVM in Flashpro Express see Using FlashPro Express
Programming Bitstream
There is two ways to program bitstream file on FPGA:
Using Libero SoC
- Connect the TEM0703 board via its Mini-USB connector. (J4)
- After generating bitstream in Libero click on Run PROGRAM Action to program bitstream file on FPGA.
Expand title Programming FPGA using Libero SoC 
Using FPExpress software
- Connect the board via USB connector
- Export *.job file , if does not exist yet.
Expand title Job File Exporting using Libero SoC 
Expand title Open FPExpress software 
- Click on new
- Give path of job file by clicking on Browse
- Click on OK
- Click on RUN
Get prebuilt boot binaries
| Note |
|---|
Reference Design is also available with prebuilt files. It's recommended to use TE prebuilt files for first launch. |
Run create_project_win.cmd/create_project_linux.shSelect Module in 'Board selection'Click on 'Export prebuilt files' buttonFolder <project folder>/_binaries_<Article Name> with subfolder boot_linux will be generated and opened
SD-Boot mode
This module supports SD card boot mode. There is no dip switch to select boot mode. The selection between SD card or other boot mode will be done in HSS. TEM0007 module supports SD card boot mode and JTAG boot mode.
Prepare SD card as follows for SD card boot mode:
- Extract SD_Card.zip file
- Now there is a image file (SD_Card.img)
- Alternative SD card can be written via Win32DiskImager or balenaEtcher softwares in Windows OS.
- In the case of writing image file in linux there are two commands to write image file on the SD card after mounting SD card in the host linux same as WSL:
- Insert SD card in the SD card reader
Expand title bmaptool command Code Block theme Midnight linenumbers true bmaptool copy --nobmap <Path of image file *.img> /dev/sdX
- After mounting the SD card in linux the name of SD card recognized via lsblk command. For example SD card name can be sda or sdb.
Expand title dd command Code Block theme Midnight linenumbers true dd if=<Path of image file *.img> of=/dev/sdX
- After mounting the SD card in linux the name of SD card recognized via lsblk command. For example SD card name can be sda or sdb.
JTAG
Not used on this example.
Usage
- Prepare HW like described on section Hardware Setup
- Connect UART USB (most cases same as JTAG)
- Connect your board to the network
- Power on PCB
UART
- Open two serial console for HSS and Linux console (e.g. PuTTY)
Select COM Port of linux console (UART1)
Info Win OS: see device manager
Linux OS: see dmesg | grep tty (UART is *USB1)
- Select COM port if HSS console (UART0)
- Speed for both consoles : 115200
- Press reset button
- Console output depends on used Software project, see Application
- Linux Console (UART1):
Login data:
Info Note: Wait until Linux boot finished
Code Block theme Midnight linenumbers true tem0007 login: root
You can use Linux shell now.
Code Block theme Midnight linenumbers true i2cdetect -l (check I2C Bus) ifconfig -a (ETH0 check) lsusb (USB check)
Expand title Linux Console 
- HSS console (UART0):
- This console can be monitored by user , to know some additional information same as SD card status ( If SD card by booting is detected or not) , U54 cores status or memory size , ....
Expand title HSS Console 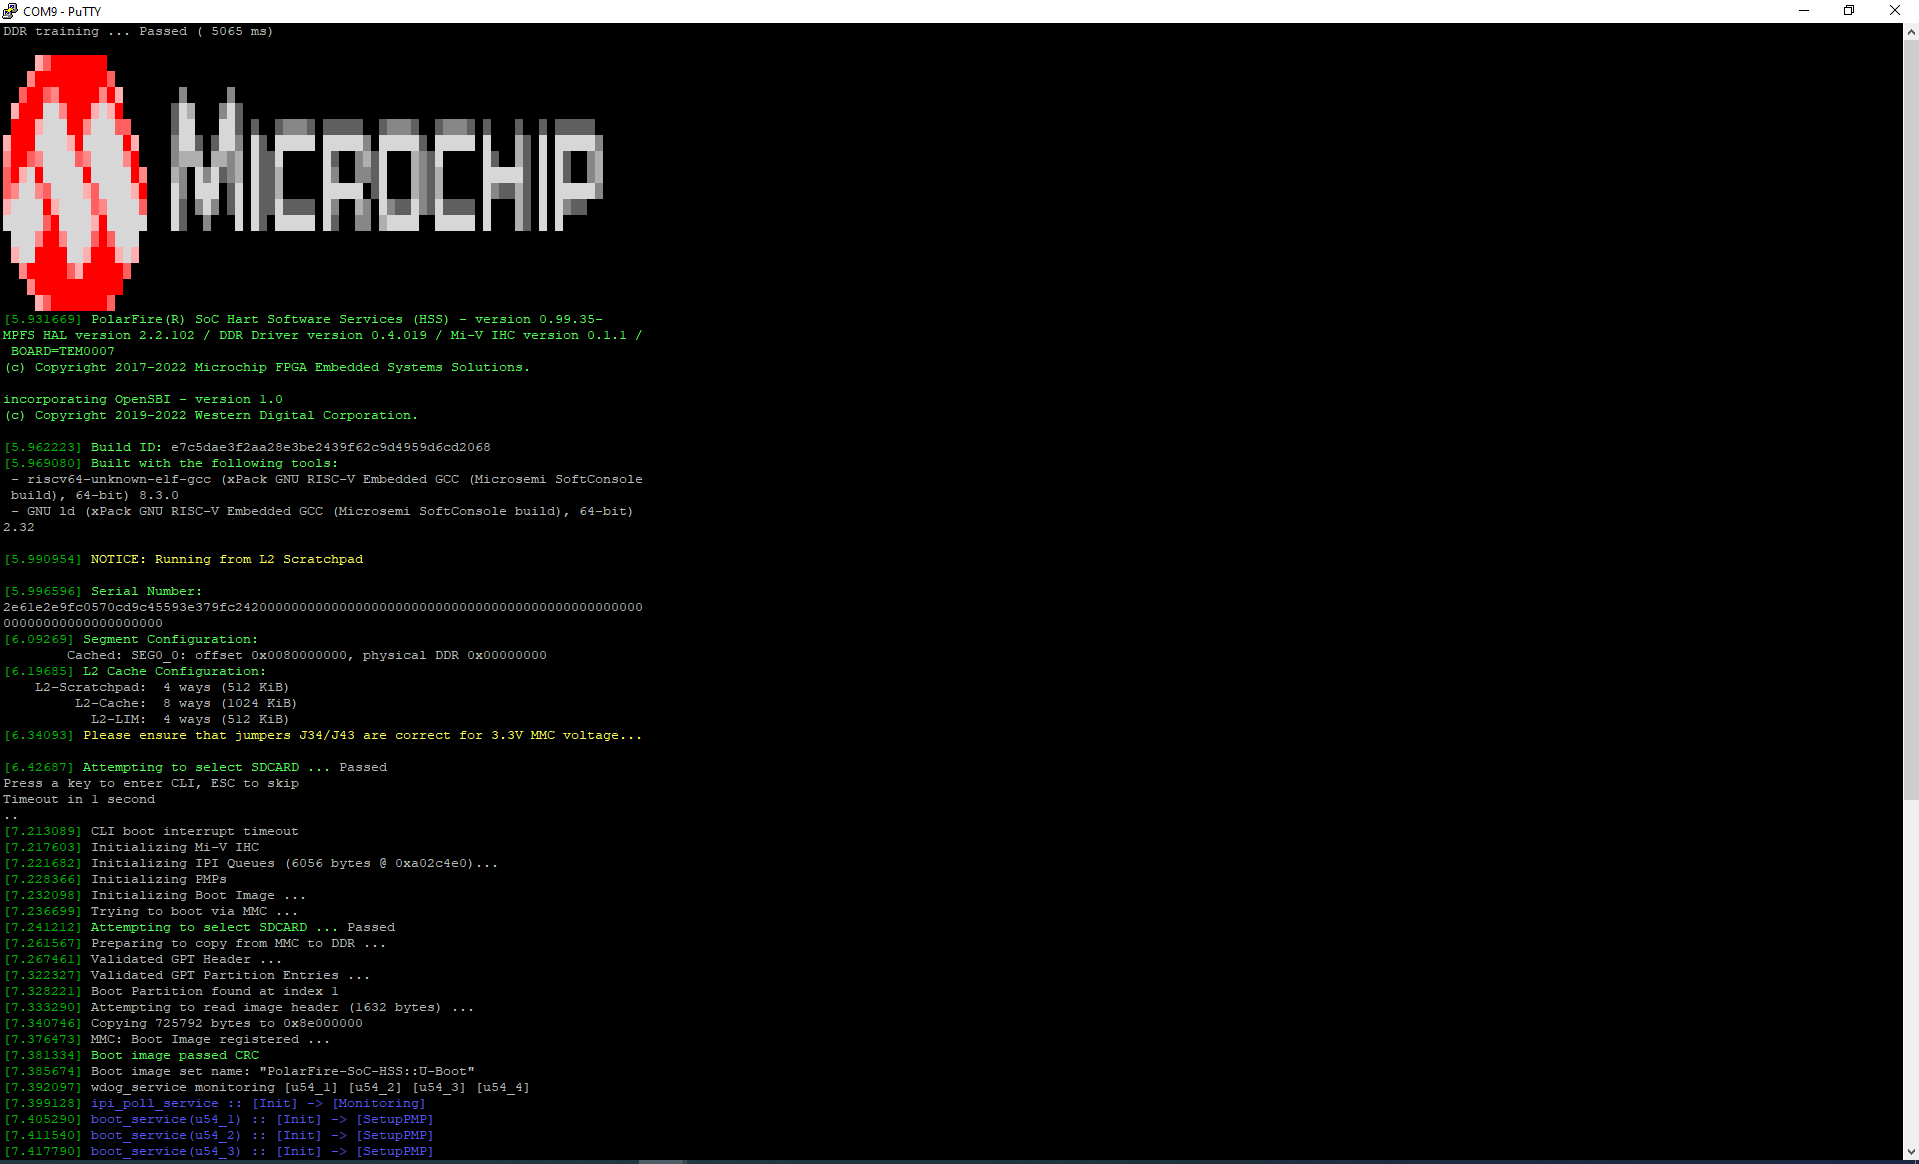
- This console can be monitored by user , to know some additional information same as SD card status ( If SD card by booting is detected or not) , U54 cores status or memory size , ....
System Design - Libero
| Scroll Ignore |
|---|
| Page properties | ||||
|---|---|---|---|---|
| ||||
Note:
|
Block Design
The block designs may differ depending on the assembly variant.
| Scroll Title | ||||
|---|---|---|---|---|
| ||||
|
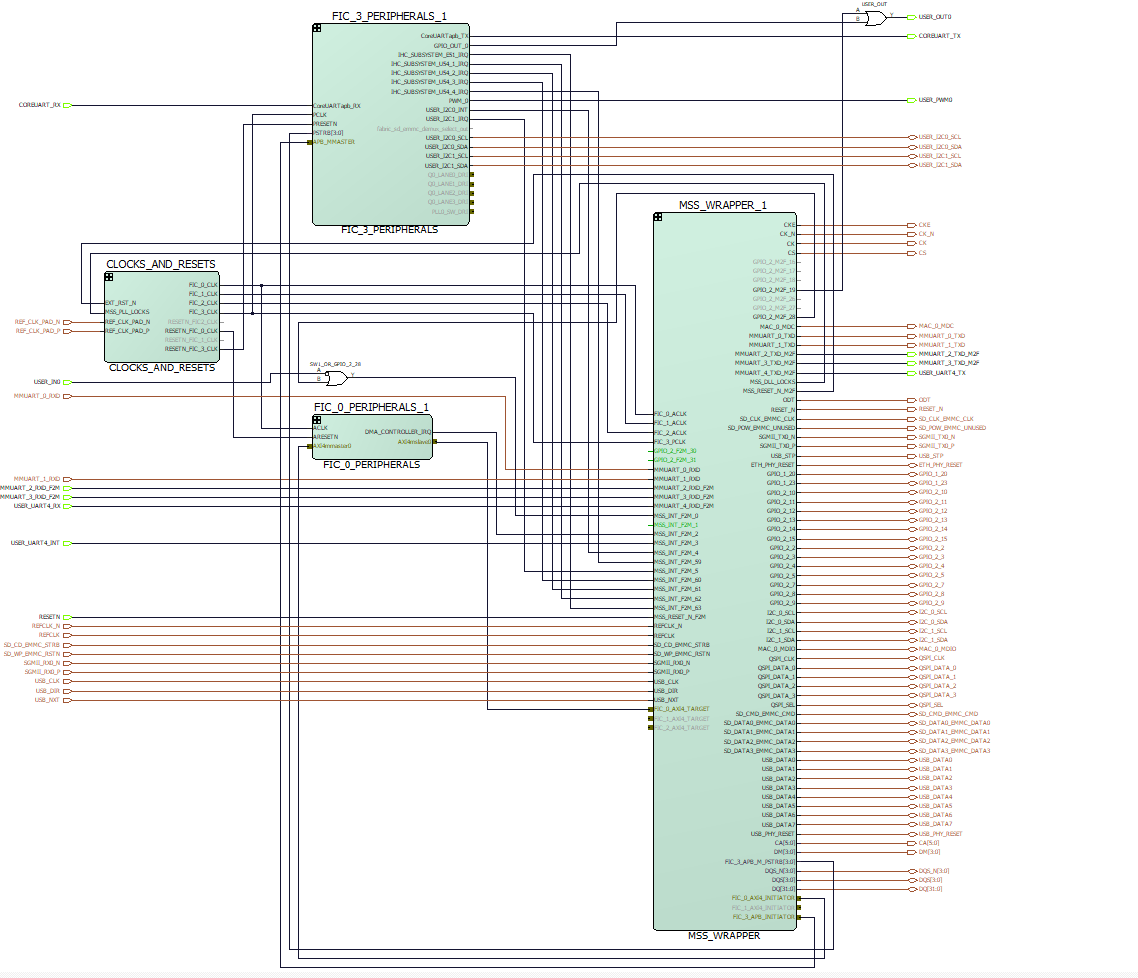
HPS Interfaces
Activated interfaces:
| Type | Note |
| DDR | -- |
| EMAC0 | -- |
| GPIO1 | -- |
| GPIO2 | -- |
| I2C0 | -- |
| I2C1 | -- |
| SPI0 | -- |
| QSPI | -- |
| SDMMC | -- |
| UART0 | -- |
| UART1 | -- |
| UART2 | -- |
| UART3 | -- |
| UART4 | -- |
| USB | -- |
Software Design - SoftConsole
| Scroll Ignore |
|---|
| Page properties | ||||
|---|---|---|---|---|
| ||||
Note:
|
Application
| Page properties | ||||
|---|---|---|---|---|
| ||||
---------------------------------------------------------- General Example: hello_tei0006Hello TEI0006 is a Hello World example as endless loop instead of one console output. |
Template location: <project folder>/softconsole_source/
Hart Software Services (HSS)
This is Hart Software Services (HSS) code.On PolarFire SoC, this is comprised of two portions:
A superloop monitor running on the E51 minion processor, which receives requests from the individual U54 application processors to perform certain services on their behalf;
A Machine-Mode software interrupt trap handler, which allows the E51 to send messages to the U54s, and request them to perform certain functions for it related to rebooting a U54.
The HSS performs boot and system monitoring functions for PolarFire SoC. The HSS is compressed (DEFLATE) and stored in eNVM. On power-up, a small decompressor wrapper inflates the HSS from eNVM flash to L2-Scratchpad memory and starts the HSS.
Creating HSS workspace in SoftConsole
- Download the test board design zip file in the following path : TEM0007 "Test Board" Reference Design
- Unzip the test board zip file
- Copy the HSS folder (hart-software-services-<HSS version>) from softconsole_source folder in the SoftConsole workspace folder
- Open SoftConsole software as administrator
- Select correct directory as workspace directory. The workspace folder must consist of hart-software-services-<HSS version> folder.
- Left click on board folder
- There is created already a subfolder for TEM0007 module and HSS is ready to be compiled as shown:
Expand title TEM0007 HSS 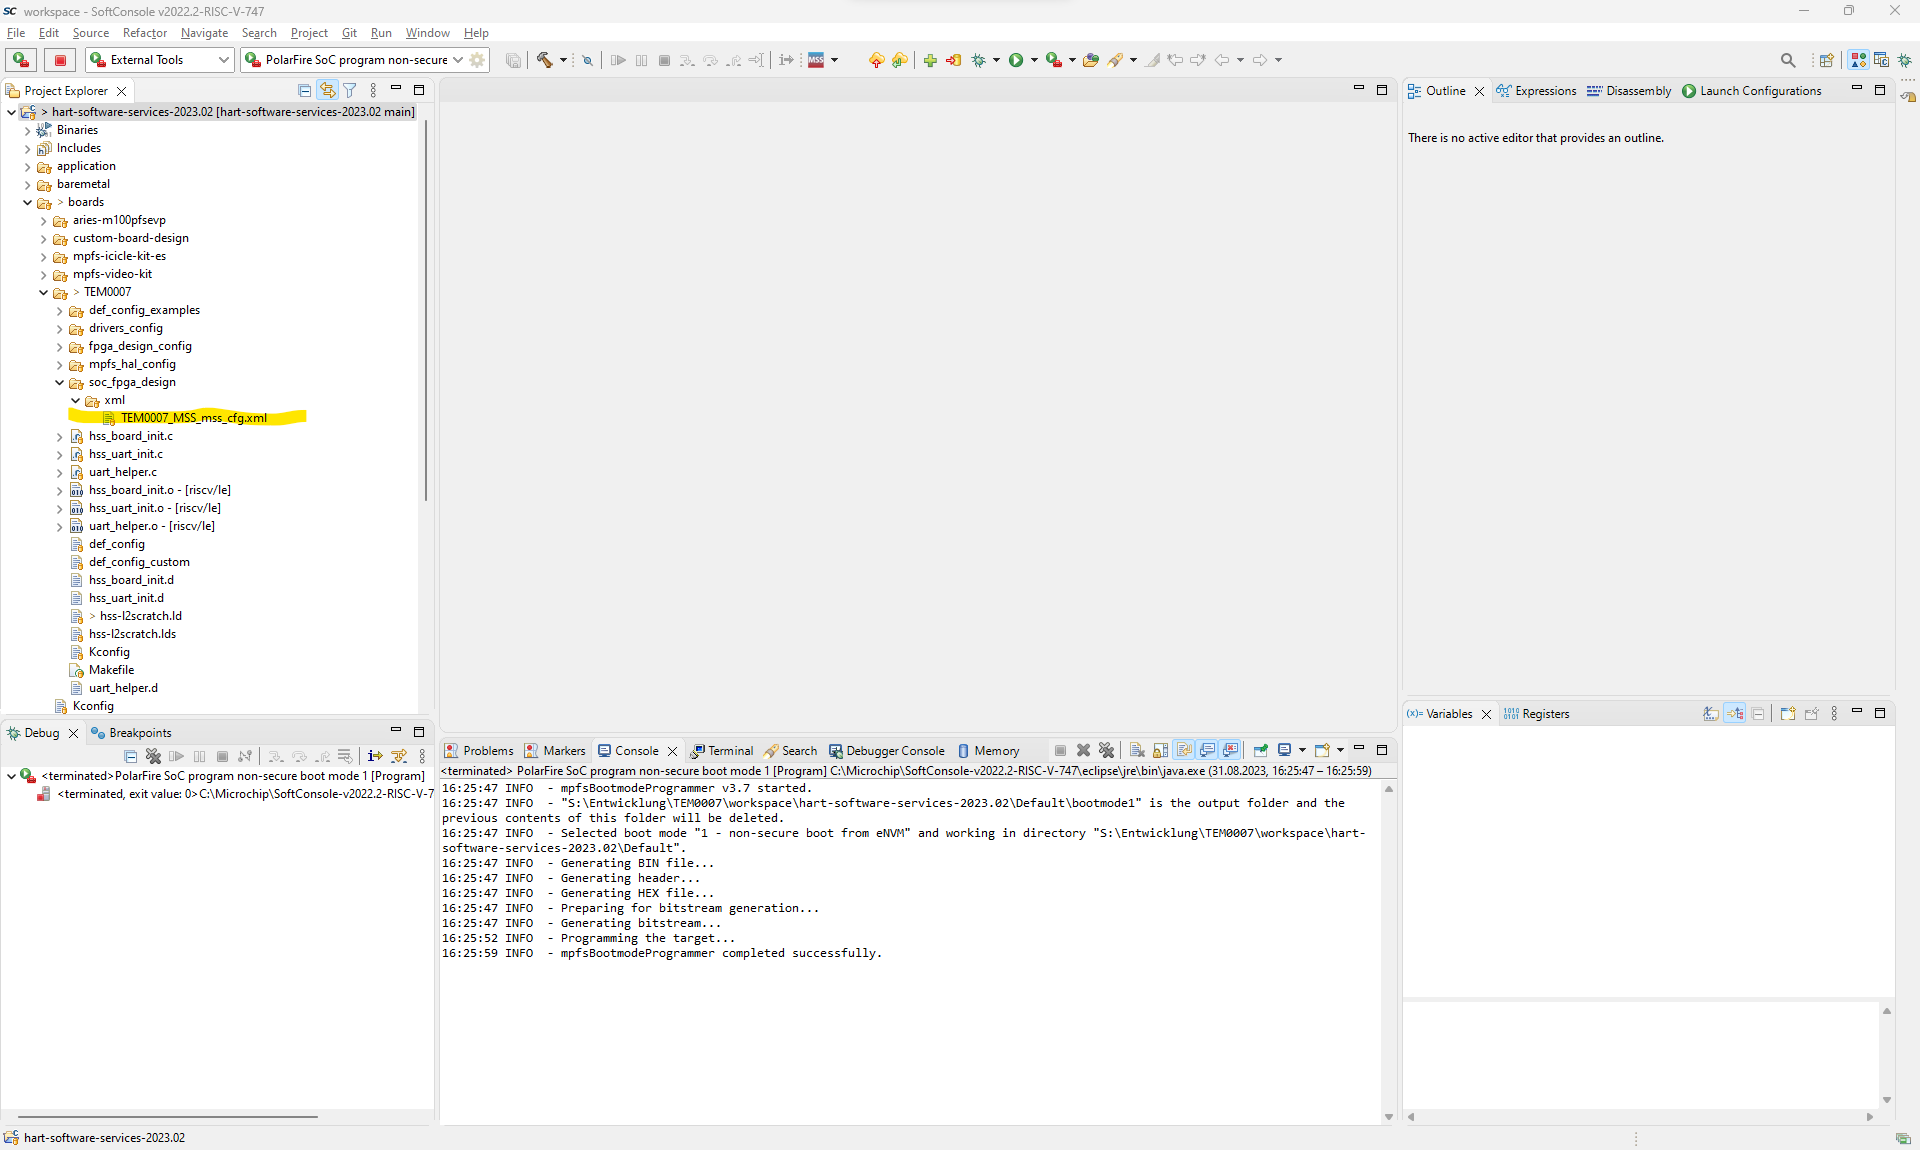
- Right click on hart-software-services-<HSS version> and click on Build project to compile it.
- It is ready to program created hex file on the Polarfire SoC. See Programming
Note that HSS can be changed for every TEM0007 variant. Therefore the hex file for every variant is created and saved in the following path of test design folder separately: (prebuilt/soctware/<short name of the module variant>)
Creating XML file in PolarfireSoC MSS Configurator Software
To create HSS file for a desired module variant the saved MSS configuration xml file in soc_fpgs_design/xml/ folder must be matched for its related xml file. To do it:
- Open the PolarfireSoC MSS Configurator software.
- Click on Project→Open
- Select the generated TEM0007_MSS.cfg file that is saved in the libero_source/mss folder while creating the Libero design.
- Click on Generate icon. It will be opened a window to enter the desired path for generated xml file.
Expand title Creating xml file 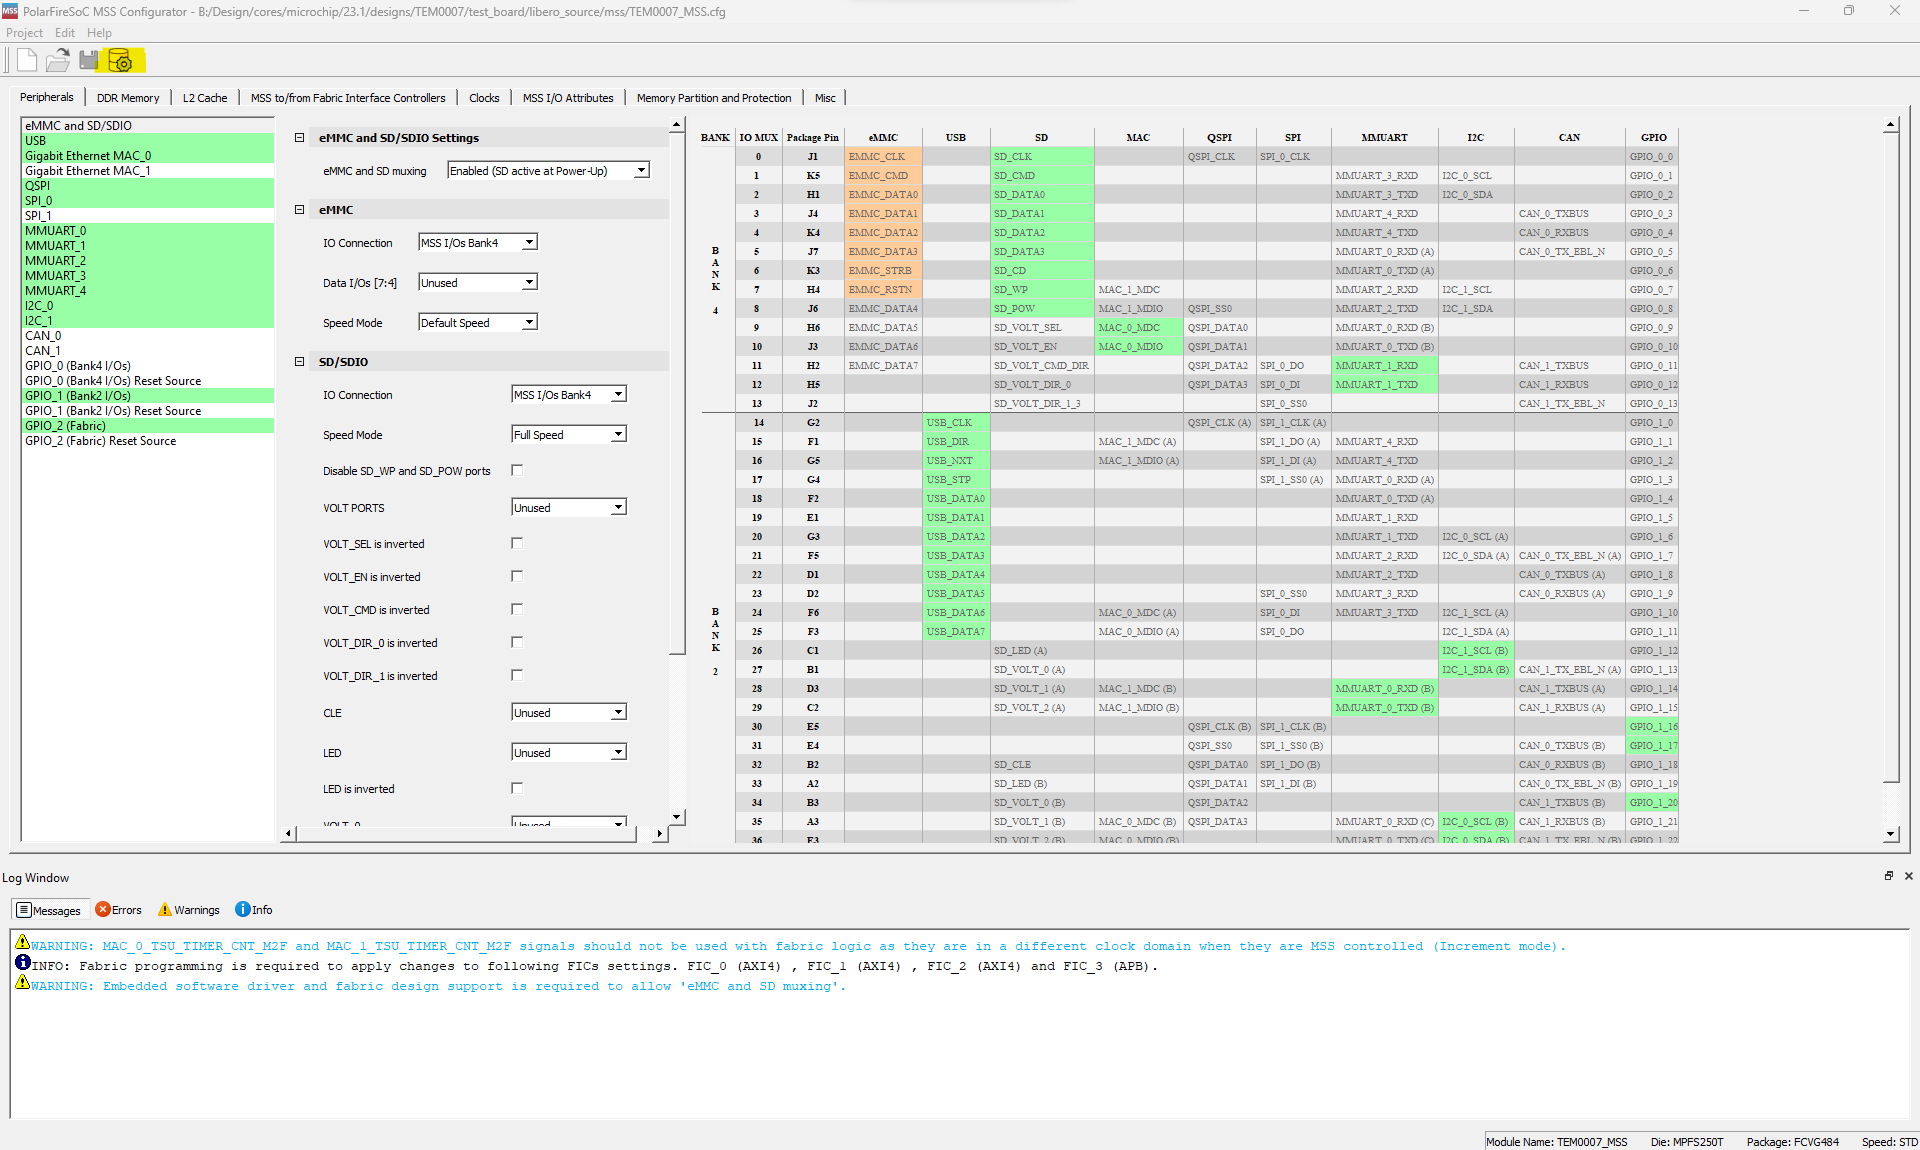
- MSS configuration xml file is generated. This file must be imported in SoftConsole software. To import this file copy the generated MSS configuration xml file and replace it with previous xml file in the following path ( <softconsole workspace folder>/ hart-software-services-<HSS version>/boards/TEM0007/soc_fpga_design/xml ).
- In SoftConsole software click on Project/Clean.
- In SoftConsole software delete all configuration header files in hart-software-services-<HSS version>/boards/TEM0007/fpga_design-config folder.
Expand title Delete configuration header files 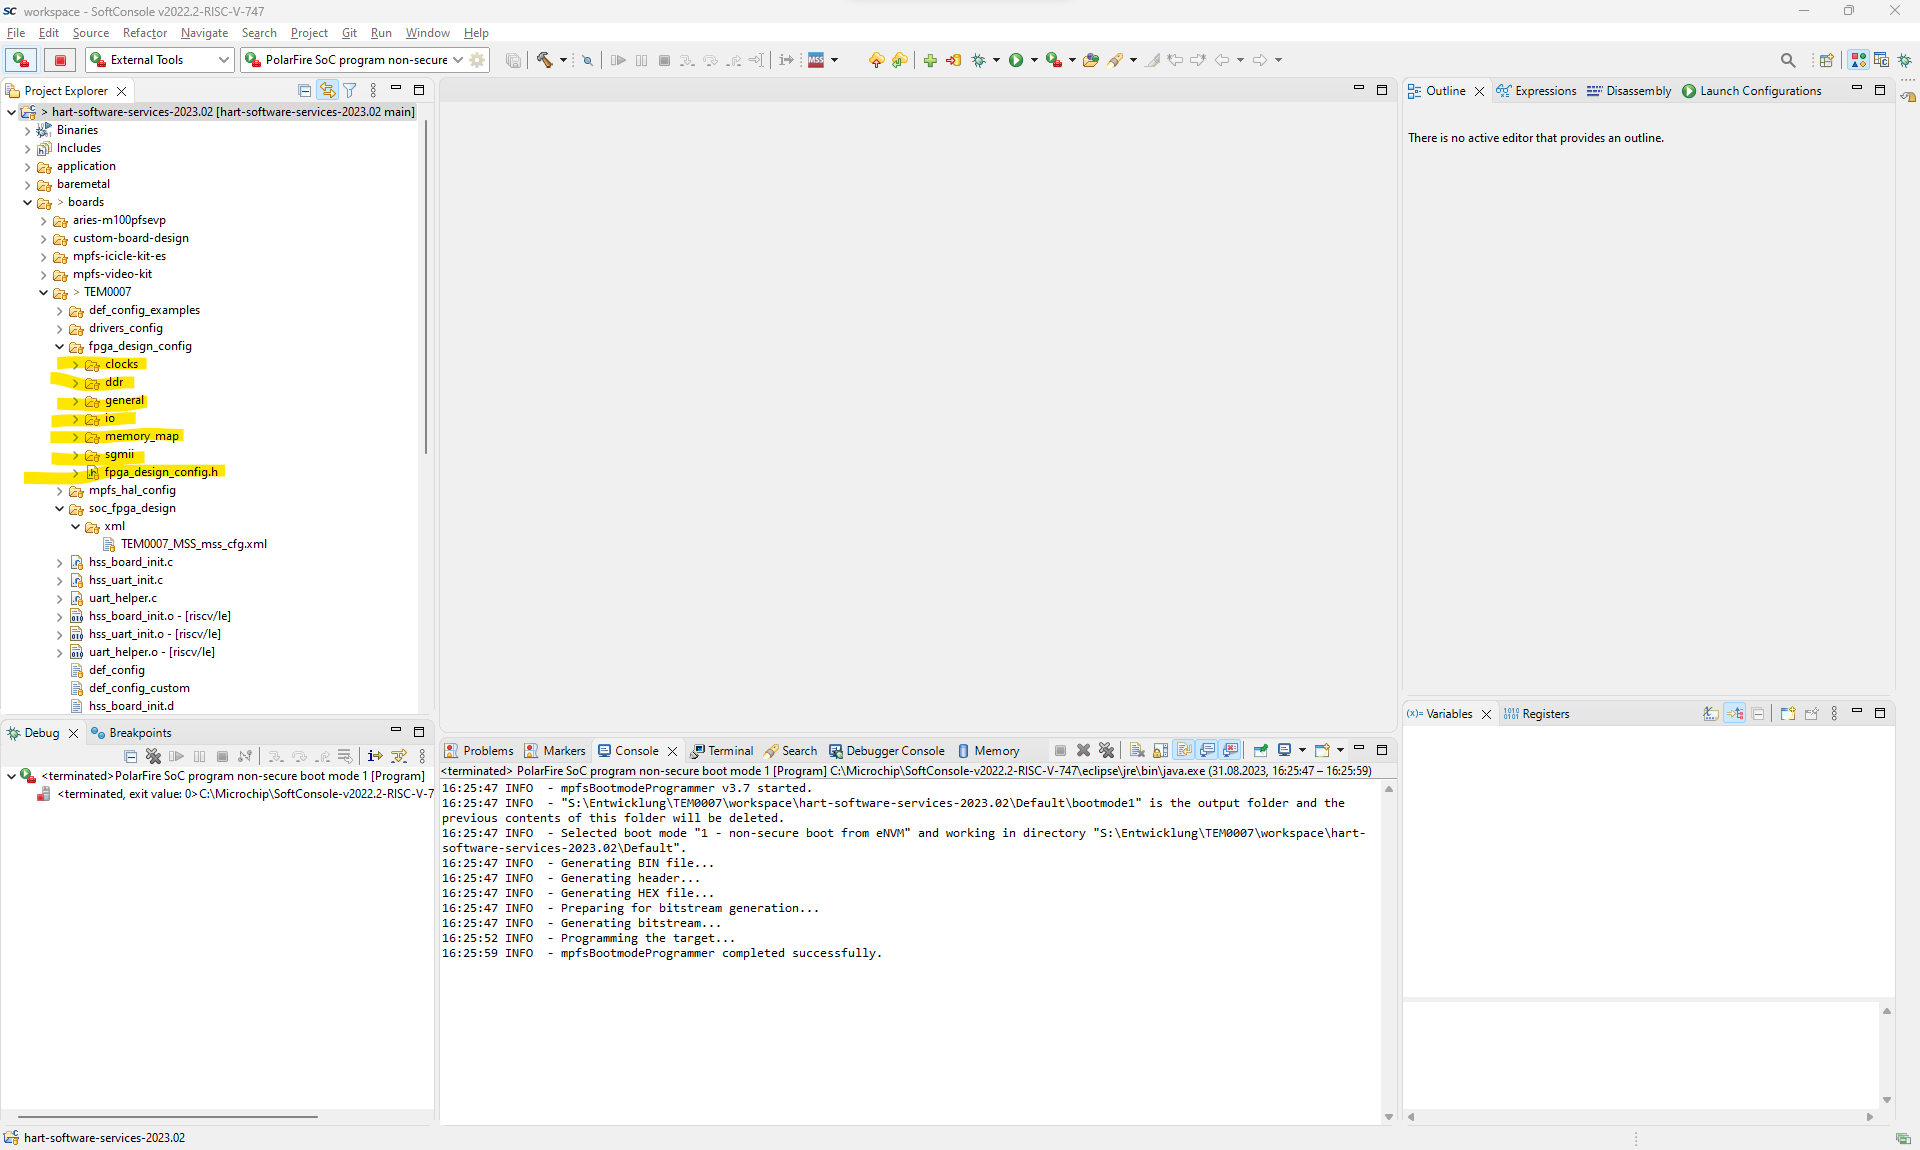
- In SoftConsole software compile HSS again by clicking on Project/Build Project.
- The new configuration header files will be generated again by the python script in hart-software-services-<HSS version>/tools/polarfire-soc-configuration-generator/mpfs_configuration_generator.py folder. The generated hex file can be found in the hart-software-services-<HSS version>/Default folder.
- This new hex file must be replaced in Libero to generate new Bitstream file, if this hex file should be attached in Bitstream file. See Libero SoC
Note that this hex file can be programmed in eNVM in SoftConsole directly. See Programming eNVM in SoftConsole
Software Design - Yocto
| Scroll Ignore |
|---|
The host pc must be prepared for using the yocto. For more information about host pc setup for yocto and the required packets please refer to System Requirements
Trenz electronic has developed his own BSP for Microchip devices same as polarfire soc in Yocto. In the following will be explained the folders in detail.
| meta-trenz-polarfire-bsp Folder | Description |
|---|---|
| recipes-apps | Contains of start up application for executing of init.sh by booting. |
| recipes-bsp | Contains of uboot necessary files same as *.bbappend files, device tree and etc. |
| recipes-core | Contains of *.bb file for Trenz defined image version. In this file are defined necessary packets or files that must be installed in linux. |
| recipes-kernel | Contains of kernel necessary files same as *.bbappend files, device tree, config files and etc. |
| recipes-tools | Contains of *.bbappend file |
| tools | Contains of manifest xml file to define necessary meta data that are required. |
| wic | Contains *.wks file that decrips disk image properteis |
In the following table exists more information about required packets and supported version.
| Meta data | Supported Version | Description |
|---|---|---|
| meta-riscv | Kirkstone | |
| openembedded-core | Kirkstone | |
| meta-openembedded | Kirkstone | |
| meta-polarfire-soc-yocto-bsp | 2022.11 |
Trenz BSP contains of a shell script. If this shell script in be executed , all required processes for making a linux image file will be executed automatically. The user needs only to write the image file on the SD card. To prepare the image file :
- Create a new folder (for example TEM0007) in host linux ( hier tested here Ubuntu18.04 and Ubuntu 20.04 are tested )
- Download the test board design as zip file (See Download) and save meta-trenz-polarefile-bsp bsp folder from <test board folder>/os/yocto/ folder in the created folder. (for example TEM0007)
- Go to the created folder (for example TEM0007) that meta-trenz-polarfire-bsp is saved and execute its shell script as shown:
*Note: The shell script must be executed in created new folder (for example TEM0007) that has bsp folder saved in it.Expand title Execute shell script Code Block theme Midnight linenumbers true . ./meta-trenz-polarfire-bsp/trenz_polarfire_setup.sh
- After compiling image file *.img and its converted zip file *.zip will be saved in trenz bsp folder:
- <trenz bsp folder>/prebuilt/boot/yocto/SD_Card.img
- <trenz bsp folder>/prebuilt/boot/yocto/SD_Card.zip
U-Boot
File location: meta-trenz-<SoC name>-bsp/recipes-bsp/u-boot/
Changes:
CONFIG_PHY_MARVELL=y
CONFIG_DEFAULT_DEVICE_TREE="tem0007"
CONFIG_DEFAULT_FDT_FILE="tem0007.dtb"
CONFIG_OF_LIST="tem0007"
CONFIG_DM_GPIO=y
CONFIG_CMD_GPIO=y
CONFIG_LOG=y
CONFIG_LOG_MAX_LEVEL=y
CONFIG_LOG_CONSOLE=y
CONFIG_NVMEM=y → to be able to read MAC vom EEPROM
CONFIG_DM_RTC=y
Device Tree
U-boot Device Tree
| Code Block | ||||
|---|---|---|---|---|
| ||||
// SPDX-License-Identifier: (GPL-2.0 OR MIT)
/*
 * Copyright (C) 2020 Microchip Technology Inc.
 * Padmarao Begari <padmarao.begari@microchip.com>
 */

/ {
	aliases {
		cpu1 = &cpu1;
		cpu2 = &cpu2;
		cpu3 = &cpu3;
		cpu4 = &cpu4;
	};
}; |
| Code Block | ||
|---|---|---|
| ||
// SPDX-License-Identifier: (GPL-2.0+ OR MIT)
/*
* Copyright (C) 2021 Microchip Technology Inc.
* Padmarao Begari <padmarao.begari@microchip.com>
*/
/dts-v1/;
#include "microchip-mpfs.dtsi"
#include "dt-bindings/gpio/gpio.h"
/* Clock frequency (in Hz) of the rtcclk */
#define RTCCLK_FREQ 1000000
/ {
model = "Microchip PolarFire-SoC Icicle Kit";
compatible = "microchip,mpfs-icicle-kit", "microchip,mpfs";
aliases {
serial1 = &uart1;
ethernet0 = &mac0;
spi0 = &qspi;
};
chosen {
stdout-path = "serial1";
};
cpus {
timebase-frequency = <RTCCLK_FREQ>;
};
ddrc_cache: memory@80000000 {
device_type = "memory";
reg = <0x0 0x80000000 0x0 0x40000000>;
clocks = <&clkcfg CLK_DDRC>;
status = "okay";
};
usb_phy: usb_phy {
#phy-cells = <0>;
compatible = "usb-nop-xceiv";
reset-gpios = <&gpio1 17 GPIO_ACTIVE_LOW>;
reset-names = "OTG_RST";
};
};
&uart1 {
status = "okay";
};
&mmc {
status = "okay";
bus-width = <4>;
disable-wp;
cap-mmc-highspeed;
cap-sd-highspeed;
cd-debounce-delay-ms;
card-detect-delay = <200>;
// mmc-ddr-1_8v;
// mmc-hs200-1_8v;
sd-uhs-sdr12;
sd-uhs-sdr25;
sd-uhs-sdr50;
sd-uhs-sdr104;
};
&i2c1 {
status = "okay";
#address-cells = <1>;
#size-cells = <0>;
eeprom: eeprom@50 {
compatible = "microchip,24aa025", "atmel,24c02";
//compatible = "atmel,24c02";
reg = <0x50>;
#address-cells = <1>;
#size-cells = <1>;
eth0_addr: eth-mac-addr@FA {
reg = <0xFA 0x06>;
};
};
};
&refclk {
clock-frequency = <125000000>;
};
&mac1 {
status = "disabled";
};
&mac0 {
status = "okay";
phy-mode = "sgmii";
nvmem-cells = <ð0_addr>;
nvmem-cell-names = "mac-address";
phy-handle = <&phy0>;
phy0: ethernet-phy@1 {
device-type = "ethernet-phy";
reg = <1>;
reset-names = "ETH_RST";
reset-gpios = <&gpio1 16 GPIO_ACTIVE_LOW>;
};
};
&qspi {
status = "okay";
num-cs = <1>;
flash0: spi-nor@0 {
compatible = "spi-nor";
reg = <0x0>;
spi-tx-bus-width = <4>;
spi-rx-bus-width = <4>;
spi-max-frequency = <20000000>;
spi-cpol;
spi-cpha;
};
};
&usb {
status = "okay";
dr_mode = "otg";
// dr_mode = "host";
phys = <&usb_phy>;
};
|
Kernel Device Tree
| Code Block | ||||
|---|---|---|---|---|
| ||||
// SPDX-License-Identifier: (GPL-2.0 OR MIT)
/* Copyright (c) 2020-2021 Microchip Technology Inc */
/dts-v1/;
#include "mpfs.dtsi"
#include <dt-bindings/gpio/gpio.h>
#include <dt-bindings/phy/phy.h>
/* Clock frequency (in Hz) of the rtcclk */
#define MTIMER_FREQ 1000000
/ {
#address-cells = <2>;
#size-cells = <2>;
model = "Trenz TEM0007";
compatible = "trenz,tem0007","microchip,mpfs";
aliases {
ethernet0 = &mac0;
serial0 = &mmuart0;
serial1 = &mmuart1;
serial2 = &mmuart2;
serial3 = &mmuart3;
serial4 = &mmuart4;
};
chosen {
stdout-path = "serial1:115200n8";
};
cpus {
timebase-frequency = <MTIMER_FREQ>;
};
//******************************************************//
ddrc_cache: memory@80000000 {
device_type = "memory";
reg = <0x0 0x80000000 0x0 0x40000000>;
status = "okay";
};
reserved-memory {
#address-cells = <2>;
#size-cells = <2>;
ranges;
fabricbuf0ddrc: buffer@A0000000 {
compatible = "shared-dma-pool";
reg = <0x0 0xA0000000 0x0 0x2000000>;
no-map;
};
};
udmabuf0 {
compatible = "ikwzm,u-dma-buf";
device-name = "udmabuf-ddr-c0";
minor-number = <0>;
size = <0x0 0x2000000>;
memory-region = <&fabricbuf0ddrc>;
sync-mode = <3>;
};
//******************************************************//
usb_phy: usb_phy {
#phy-cells = <0>;
compatible = "usb-nop-xceiv";
reset-gpios = <&gpio1 17 GPIO_ACTIVE_LOW>;
reset-names = "OTG_RST";
};
soc {
dma-ranges = <0 0 0 0 0x40 0>;
};
};
&gpio1 {
status = "okay";
};
&gpio2 {
interrupts = <53>, <53>, <53>, <53>,
<53>, <53>, <53>, <53>,
<53>, <53>, <53>, <53>,
<53>, <53>, <53>, <53>,
<53>, <53>, <53>, <53>,
<53>, <53>, <53>, <53>,
<53>, <53>, <53>, <53>,
<53>, <53>, <53>, <53>;
status = "okay";
};
&i2c0 {
status = "okay";
};
&i2c1 {
status = "okay";
#address-cells = <1>;
#size-cells = <0>;
eeprom: eeprom@50 {
compatible = "microchip,24aa025", "atmel,24c02";
//compatible = "atmel,24c02";
reg = <0x50>;
#address-cells = <1>;
#size-cells = <1>;
eth0_addr: eth-mac-addr@FA {
reg = <0xFA 0x06>;
};
};
};
&mac0 {
status = "okay";
phy-mode = "sgmii";
nvmem-cells = <ð0_addr>;
nvmem-cell-names = "mac-address";
phy-handle = <&phy0>;
phy0: ethernet-phy@1 {
device-type = "ethernet-phy";
reg = <1>;
reset-names = "ETH_RST";
reset-gpios = <&gpio1 16 GPIO_ACTIVE_LOW>;
};
};
&mbox {
status = "okay";
};
&mmc {
status = "okay";
bus-width = <4>;
disable-wp;
cap-sd-highspeed;
cap-mmc-highspeed;
// mmc-ddr-1_8v;
// mmc-hs200-1_8v;
sd-uhs-sdr12;
sd-uhs-sdr25;
sd-uhs-sdr50;
sd-uhs-sdr104;
};
&mmuart1 {
status = "okay";
};
&mmuart2 {
status = "okay";
};
&mmuart3 {
status = "okay";
};
&mmuart4 {
status = "okay";
};
&qspi {
status = "okay";
num-cs = <1>;
};
&refclk {
clock-frequency = <125000000>;
};
&spi0 {
status = "okay";
};
&usb {
status = "okay";
dr_mode = "otg";
// dr_mode = "host";
phys = <&usb_phy>;
};
&syscontroller {
status = "okay";
};
|
Kernel
File location: meta-trenz-<SoC name>-bsp/recipes-kernel/linux/
Changes:
CONFIG_CMDLINE_BOOL=y
CONFIG_CMDLINE="earlycon=sbi root=/dev/mmcblk0p3 rootwait uio_pdrv_genirq.of_id=generic-uio"
CONFIG_EEPROM_AT24=y
CONFIG_NVMEM=y
CONFIG_NVMEM_SYS=y
CONFIG_REGMAP_I2C=y
- CONFIG_MARVELL_PHY=y
CONFIG_LEDS_GPIO=y
CONFIG_LEDS_CLASS=y
CONFIG_NEW_LEDS=y
CONFIG_GPIOLIB=y
CONFIG_USB_MUSB_HOST=y
CONFIG_USB_MUSB_DUAL_ROLE=y
CONFIG_MTD_SPI_NOR_USE_4K_SECTORS=n
CONFIG_MTD_UBI=y
CONFIG_MTD_CMDLINE_PARTS=y
CONFIG_UBIFS_FS=y
CONFIG_MTD_SPI_NOR=y
CONFIG_OF_OVERLAY=y
CONFIG_OF_CONFIGFS=y
CONFIG_MFD_SENSEHAT_CORE=m
CONFIG_INPUT_JOYDEV=m
CONFIG_INPUT_JOYSTICK=y
CONFIG_JOYSTICK_SENSEHAT=m
CONFIG_AUXDISPLAY=y
CONFIG_SENSEHAT_DISPLAY=m
CONFIG_HTS221=m
CONFIG_IIO_ST_PRESS=m
CONFIG_IIO_ST_LSM6DSX=m
CONFIG_IIO_ST_MAGN_3AXIS=m
#CONFIG_MUSB_PIO_ONLY is not set
CONFIG_USB_INVENTRA_DMA=y
Images
Image recipe for minimal console image
File location: meta-trenz-<SoC name>-bsp/recipes-core/images/
Image recipes:
- te-image-minimal.bb: create minimal linux image
Added packages/recipes:
startup
iputils-ping
expect
rsync
rng-tools
iperf3
devmem2
can-utils
usbutils
pciutils
polarfire-soc-linux-examples
dt-overlay-mchp
libgpiod
libgpiod-tools
libgpiod-dev
i2c-tools
vim vim-vimrc
net-tools
htop
iw
python3
python3-pip
python3-flask
python3-flask-dev
python3-werkzeug
libudev
glib-2.0
sqlite3
dtc
cmake
tar
wget
zip
mtd-utils
mtd-utils-ubifs
Rootfs
Used filesystem: Root file system (RootFS)
Appx. A: Change History and Legal Notices
| Scroll Ignore | ||||||||||||||
|---|---|---|---|---|---|---|---|---|---|---|---|---|---|---|
| ||||||||||||||
Document Change History
To get content of older revision got to "Change History" of this page and select older document revision number.
| Page properties | ||||
|---|---|---|---|---|
| ||||
|
| Scroll Title | ||||||||||||||||||||||||||||||||||||||||||||||||||||||||||||||
|---|---|---|---|---|---|---|---|---|---|---|---|---|---|---|---|---|---|---|---|---|---|---|---|---|---|---|---|---|---|---|---|---|---|---|---|---|---|---|---|---|---|---|---|---|---|---|---|---|---|---|---|---|---|---|---|---|---|---|---|---|---|---|
| ||||||||||||||||||||||||||||||||||||||||||||||||||||||||||||||
|
Legal Notices
| Include Page | ||||
|---|---|---|---|---|
|
| Scroll Only | ||
|---|---|---|
|
| Scroll pdf ignore | ||||||
|---|---|---|---|---|---|---|
|
Overview
Content Tools