| Page properties |
|---|
|
Design Name always "TE Series Name" + Design name, for example "TEI0006 Test Board" | Date | Version | Changes | Author |
|---|
|
|
|
| | 2022-02-28 | 2.0 | - add yocto to
- Overview → Key Features
- Overview → Requirements
- Design Flow
- Launch
- add section 'Software Design - Yocto'
| TD | | 2021-06-15 | 1.2 | - table of content view
- template history
- placed a horizontal separation line under each chapter heading
- replaced <design name> by <project folder>
- changed title-alignment for tables from left to center
- update 19.x to 20.x
| JH,TD | | 2020-11-24 | 1.1 | - add fix table of content
- add table size as macro
| JH | | -- | 1.0 | -- | -- |
|
| Page properties |
|---|
|
Important General Note: Export PDF to download, if quartus revision is changed! Designate all graphics and pictures with a number and a description, Use "Scroll Title" macro - Use "Scroll Title" macro for pictures and table labels. Figure number must be set manually at the moment (automatically enumeration is planned by scrollPDF)
- ...
|
Overview
| Scroll Ignore |
|---|
| scroll-pdf | true |
|---|
| scroll-office | true |
|---|
| scroll-chm | true |
|---|
| scroll-docbook | true |
|---|
| scroll-eclipsehelp | true |
|---|
| scroll-epub | true |
|---|
| scroll-html | true |
|---|
|
|
Refer to http://trenz.org/te0xyzcr00100-info for the current online version of this manual and other available documentation.
Key Features
| Page properties |
|---|
|
Notes : - Add basic key futures, which can be tested with the design
|
| Excerpt |
|---|
- Quartus 20.4 ProYocto1 Lite
- NIOS II
- UART
- ETH
- USB
- I2C
- QSPI flash
- DDR3 memory
- SDRAM memory
- User Buttons
- User LED
|
Revision History
| Page properties |
|---|
|
Notes : - add every update file on the download
- add design changes on description
|
| Scroll Title |
|---|
| anchor | Table_DRH |
|---|
| title-alignment | center |
|---|
| title | Design Revision History |
|---|
|
| Scroll Table Layout |
|---|
| orientation | portrait |
|---|
| sortDirection | ASC |
|---|
| repeatTableHeaders | default |
|---|
| style | |
|---|
| widths | |
|---|
| sortByColumn | 1 |
|---|
| sortEnabled | false |
|---|
| cellHighlighting | true |
|---|
|
| Date | Quartus | Project Built | Authors | Description |
|---|
| 2021-02- |
034 ProTEI0006CR00100-test_board_noprebuilt-quartus_20. |
4020210615152704TEI0006CR00100-test_board-quartus_20. |
402021061515272920220225104254.zip | Thomas Dück | |
|
Release Notes and Know Issues
| Page properties |
|---|
|
Notes :- add known Design issues and general notes for the current revision
- do not delete known issue, add fixed version time stamp if issue fixed
|
| Scroll Title |
|---|
| anchor | Table_KI |
|---|
| title-alignment | center |
|---|
| title | Known Issues |
|---|
|
| Scroll Table Layout |
|---|
| orientation | portrait |
|---|
| sortDirection | ASC |
|---|
| repeatTableHeaders | default |
|---|
| style | |
|---|
| widths | |
|---|
| sortByColumn | 1 |
|---|
| sortEnabled | false |
|---|
| cellHighlighting | true |
|---|
|
| Issues | Description | Workaround | To be fixed version |
|---|
| No known issues | --- | --- | --- |
|
Requirements
Software
| Page properties |
|---|
|
Notes : - list of software which was used to generate the design
|
| Scroll Title |
|---|
| anchor | Table_SW |
|---|
| title-alignment | center |
|---|
| title | Software |
|---|
|
| Scroll Table Layout |
|---|
| orientation | portrait |
|---|
| sortDirection | ASC |
|---|
| repeatTableHeaders | default |
|---|
| sortByColumn | 1 |
|---|
| sortEnabled | false |
|---|
| cellHighlighting | true |
|---|
|
| Software | Version | Note |
|---|
| Quartus Prime ProLite | 20.41 | needed | | NIOS II SBT for Eclipse | --- | optional |
|
Hardware
Hardware
|
| Page properties |
|---|
|
Notes : - list of hardware which was used to generate the design
- mark the module and carrier board, which was used tested with an *
|
Complete List is available on <project folder>/board_files/*_board_files.csv
Design supports following modules:
| Scroll Title |
|---|
| anchor | Table_HWM |
|---|
| title-alignment | center |
|---|
| title | Hardware Modules |
|---|
|
| Scroll Table Layout |
|---|
| orientation | portrait |
|---|
| sortDirection | ASC |
|---|
| repeatTableHeaders | default |
|---|
| style | |
|---|
| widths | |
|---|
| sortByColumn | 1 |
|---|
| sortEnabled | false |
|---|
| cellHighlighting | true |
|---|
|
| Module Model | Board Part Short Name |
|---|
Yocto Machine Name | | PCB Revision Support | DDR | QSPI Flash | EMMC | Others | Notes |
|---|
*used as reference |
Design supports following carriers:
| CR00100-01-DBC82A* | 08_C8_8MB | REV01 | 8MByte | -- | -- | -- | -- | | CR00100-01-FBC82A | 16_C8_8MB | REV01 | 8MByte | -- | -- | -- | -- |
*used as reference |
Design supports following carriers:
| Scroll Title |
|---|
| anchor | Table_HWC |
|---|
| title-alignment |
|---|
|
| Scroll Title |
|---|
| anchor | Table_HWC |
|---|
| title-alignment | center |
|---|
| title | Hardware Carrier |
|---|
|
| Scroll Table Layout |
|---|
| orientation | portrait |
|---|
| sortDirection | ASC |
|---|
| repeatTableHeaders | default |
|---|
| style | |
|---|
| widths | |
|---|
| sortByColumn | 1 |
|---|
| sortEnabled | false |
|---|
| cellHighlighting | true |
|---|
|
*used as reference |
Additional HW Requirements:
| Scroll Title |
|---|
| anchor | Table_AHW |
|---|
| title-alignment | center |
|---|
| title | Additional Hardware |
|---|
|
| Scroll Table Layout |
|---|
| orientation | portrait |
|---|
| sortDirection | ASC |
|---|
| repeatTableHeaders | default |
|---|
| style | |
|---|
| widths | |
|---|
| sortByColumn | 1 |
|---|
| sortEnabled | false |
|---|
| cellHighlighting | true |
|---|
|
| Additional Hardware | Notes |
|---|
| USB cable for JTAG/UART | Check Carrier Board and Programmer for correct type |
*used as reference |
Content
For general structure and usage of the reference design, see Project Delivery - Intel devices
Design Sources
| Scroll Title |
|---|
| anchor | Table_DS |
|---|
| title-alignment | center |
|---|
| title | Design sources |
|---|
|
| Scroll Table Layout |
|---|
| orientation | portrait |
|---|
| sortDirection | ASC |
|---|
| repeatTableHeaders | default |
|---|
| sortByColumn | 1 |
|---|
| sortEnabled | false |
|---|
| cellHighlighting | true |
|---|
|
| Type | Location | Notes |
|---|
| Quartus | <project folder>/source_files/quartus <project folder>/source_files/<Board Part Short Name>/quartus | Quartus project will be generated by TE Scripts optional, source files for specific assembly variants | | Software | <project folder>/source_files/software <project folder>/source_files/<Board Part Short Name>/software | Additional software will be generated by TE Scripts optional, source files for specific assembly variants | | Yocto | <project folder>/source_files/os/yocto | Yocto BSP layer template for linux |
|
Prebuilt
Prebuilt
| Page properties |
|---|
|
Notes : - prebuilt files
- Template Table:
| Scroll Title |
|---|
| anchor | Table_PF |
|---|
| title-alignment | center |
|---|
| title | Prebuilt files (only on ZIP with prebult content) |
|---|
| | Scroll Table Layout |
|---|
| orientation | portrait |
|---|
| sortDirection | ASC |
|---|
| repeatTableHeaders | default |
|---|
| style | |
|---|
| widths | |
|---|
| sortByColumn | 1 |
|---|
| sortEnabled | false |
|---|
| cellHighlighting | true |
|---|
|
File | File-Extension | Description |
|---|
| SOPC Information File | *.sopcinfo | File with description of the .qsys file to create software for the target hardware | | SRAM Object File | *.sof | Ram configuration file | | Programmer Object File | *.pof | FPGA configuration file | | JTAG Indirect Configuration file | *.jic | Flash configuration file | | Raw binary file | *.rbf | FPGA configuration fileDiverse Reports | | --- | Report files in different formats | Software-Application-File | *.elf | Software application for NIOS II processor system | | Diverse Reports | --- | Report files in different formats |
|
|
| Scroll Title |
|---|
| anchor | Table_PF |
|---|
| title-alignment | center |
|---|
| title | Prebuilt files (only on ZIP with prebult content) |
|---|
|
| Scroll Table Layout |
|---|
| orientation | portrait |
|---|
| sortDirection | ASC |
|---|
| repeatTableHeaders | default |
|---|
| style | |
|---|
| widths | |
|---|
| sortByColumn | 1 |
|---|
| sortEnabled | false |
|---|
| cellHighlighting | true |
|---|
|
File | File-Extension | Description |
|---|
| SOPC Information File | *.sopcinfo | File with description of the .qsys file to create software for the target hardware | | SRAM Object File | *.sof | Ram configuration fileJTAG indirect configuration file | | Software-Application-File | *.jic | Flash configuration file | | Raw binary file | *.rbf | FPGA configuration file | | elf | Software application for NIOS II processor system | | Diverse Reports | --- | Report files in different formats | | Software-Application-File | *.elf | Software application for NIOS II processor system |
|
Download
Reference Design is only usable with the specified Quartus version. Do never use different versions of Quartus software for the same project.
Reference Design is available on:
Design Flow
| Scroll Ignore |
|---|
| scroll-pdf | true |
|---|
| scroll-office | true |
|---|
| scroll-chm | true |
|---|
| scroll-docbook | true |
|---|
| scroll-eclipsehelp | true |
|---|
| scroll-epub | true |
|---|
| scroll-html | true |
|---|
|
|
| Note |
|---|
Reference Design is available with and without prebuilt files. It's recommended to use TE prebuilt files for first launch. |
Trenz Electronic provides a tcl based built environment based on Quartus Design Flow.
See also:
- Project Delivery - Intel devices
The Trenz Electronic FPGA Reference Designs are TCL-script based projects. To create a project, open a project or program a device execute "create_project_win.cmd" on Windows OS and "create_project_linux.sh" on Linux OS.
TE Scripts are only needed to generate the quartus project, all other additional steps are optional and can also executed by Intel Quartus/SDK GUI. For currently Scripts limitations on Win OS and Linux OS see: Project Delivery - Intel devices → Currently limitations of functionality
- Open create_project_win.cmd/create_project_linux.sh:
 'Create Project' GUI example
 - Select Board in "Board selection"
- Click on "Create project" button to create project
- (optional for manual changes) Select correct quartus installation path in "<project folder>/settings/design_basic_settings.tcl"
Create and configure your Yocto Linux project, see Yocto KICKstart - Copy the generated meta-<module> folder from <project name>/os/yocto/meta-<module> to the path/to/yocto/poky/ directory
- Follow the steps from Yocto KICKstart#Create a project for an Intel FPGA device without running the 'bitbake' command
Add the generated bsp layer meta-<machine> to path/to/yocto/poky/build/conf/bblayers.conf with:
| Code Block |
|---|
| theme | Midnight |
|---|
| linenumbers | true |
|---|
|
bitbake-layers add-layer ../meta-<module> |
| Info |
|---|
Note: The generated meta-<module> layer depends on the meta-altera layer (for more information see: Yocto KICKstart#Used source files), so you need to add both bsp layers to bblayers.conf |
Redefine the variable MACHINE with '<module>-<Board-Part-Short-Name>' in path/to//yocto/poky/build/conf/local.conf. The correct MACHINE name can be found in the #Hardware table.
| Code Block |
|---|
| theme | Midnight |
|---|
| linenumbers | true |
|---|
|
sed -i '/^MACHINE/s/MACHINE/#MACHINE/g' conf/local.conf
echo -e '\nMACHINE = "<module>-<Board-Part-Short-Name>"' >> conf/local.conf |
Build the image with following command (the image recipes are located in meta-<module>/recipes-images/yocto/):
| Code Block |
|---|
| theme | Midnight |
|---|
| linenumbers | true |
|---|
|
bitbake <module>-image-minimal |
Launch
| Scroll Ignore |
|---|
| Page properties |
|---|
|
Note: - Programming and Startup procedure
|
Programming
| Note |
|---|
Check Module and Carrier TRMs for proper HW configuration before you try any design. |
SD-Boot mode
- Follow the steps described in Yocto KICKstart#Copy image to SD card to copy the generated linux image to the SD card.
- Set Boot Mode to SD-Boot.
- Depends on Carrier, see carrier TRM.
- Insert SD-Card in SD-Slot.
QSPI
- Connect JTAG and power on carrier with module
- Open create_project_win.cmd/create_project_linux.sh
- Select correct board in "Board selection"
- Click on "Program device" button
- if prebuilt files are available: select "Program prebuilt file"
- using own generated programming file: select "Program other file" and click on "Browse ..." to open own generated programming file
- (optional) click on "Open programmer GUI" to program device with Quartus programmer GUI
- Click on "Start program device" button
JTAG
Not used on this example.
Usage
- Prepare HW like described on section Kopie von _template_TEI0000 Intel Reference Design (Access rights for internal use only)
- Connect UART USB (most cases same as JTAG)
- Connect your board to the network
- Power on PCB
UART
Open Serial Console (e.g. PuTTY)select COM Port
| Info |
|---|
Win OS: see device manager Linux OS: see dmesg | grep tty (UART is *USB1) |
Speed: 115200Press reset buttonConsole output depends on used Software project, see Software Design - SDK#ApplicationLinux Console:Login data:
| Info |
|---|
Note: Wait until Linux boot finished |
| Code Block |
|---|
| theme | Midnight |
|---|
| linenumbers | true |
|---|
|
Username: root
Password: root |
You can use Linux shell now.
| Code Block |
|---|
| theme | Midnight |
|---|
| linenumbers | true |
|---|
|
i2cdetect -y -r 1   (check I2C 1 Bus)
dmesg | grep rtc    (RTC check)
udhcpc              (ETH0 check)
lsusb (USB check) |
Launch
| Page properties |
|---|
|
Note: - Programming and Startup procedure
|
Programming
| Note |
|---|
Check Module and Carrier TRMs for proper HW configuration before you try any design. |
MAX10 Flash
- Connect JTAG and power on carrier with module
- Open create_project_win.cmd/create_project_linux.sh
- Select correct board in "Board selection"
- Click on "Program device" button
- if prebuilt files are available: select "Program prebuilt file"
- using own generated programming file: select "Program other file" and click on "Browse ..." to open own generated programming file
- (optional) click on "Open programmer GUI" to program device with Quartus programmer GUI
- Click on "Start program device" button
JTAG
Not used on this example.
Usage
- Prepare HW like described on section Programming
- Connect UART USB (most cases same as JTAG)
- Power on PCB
UART
- Open Serial Console (e.g. PuTTY)
select COM Port
| Info |
|---|
Win OS: see device manager Linux OS: see dmesg | grep tty (UART is *USB1) |
- Speed: 115200
- Press reset button
- Console output depends on used Software project, see Software Design - SDK#Application
System Design - Quartus
Block Design
The block designs may differ depending on the assembly variant.
| Scroll Title |
|---|
| anchor | Figure_BD |
|---|
| title-alignment | center |
|---|
| title | Block Design - Project |
|---|
|
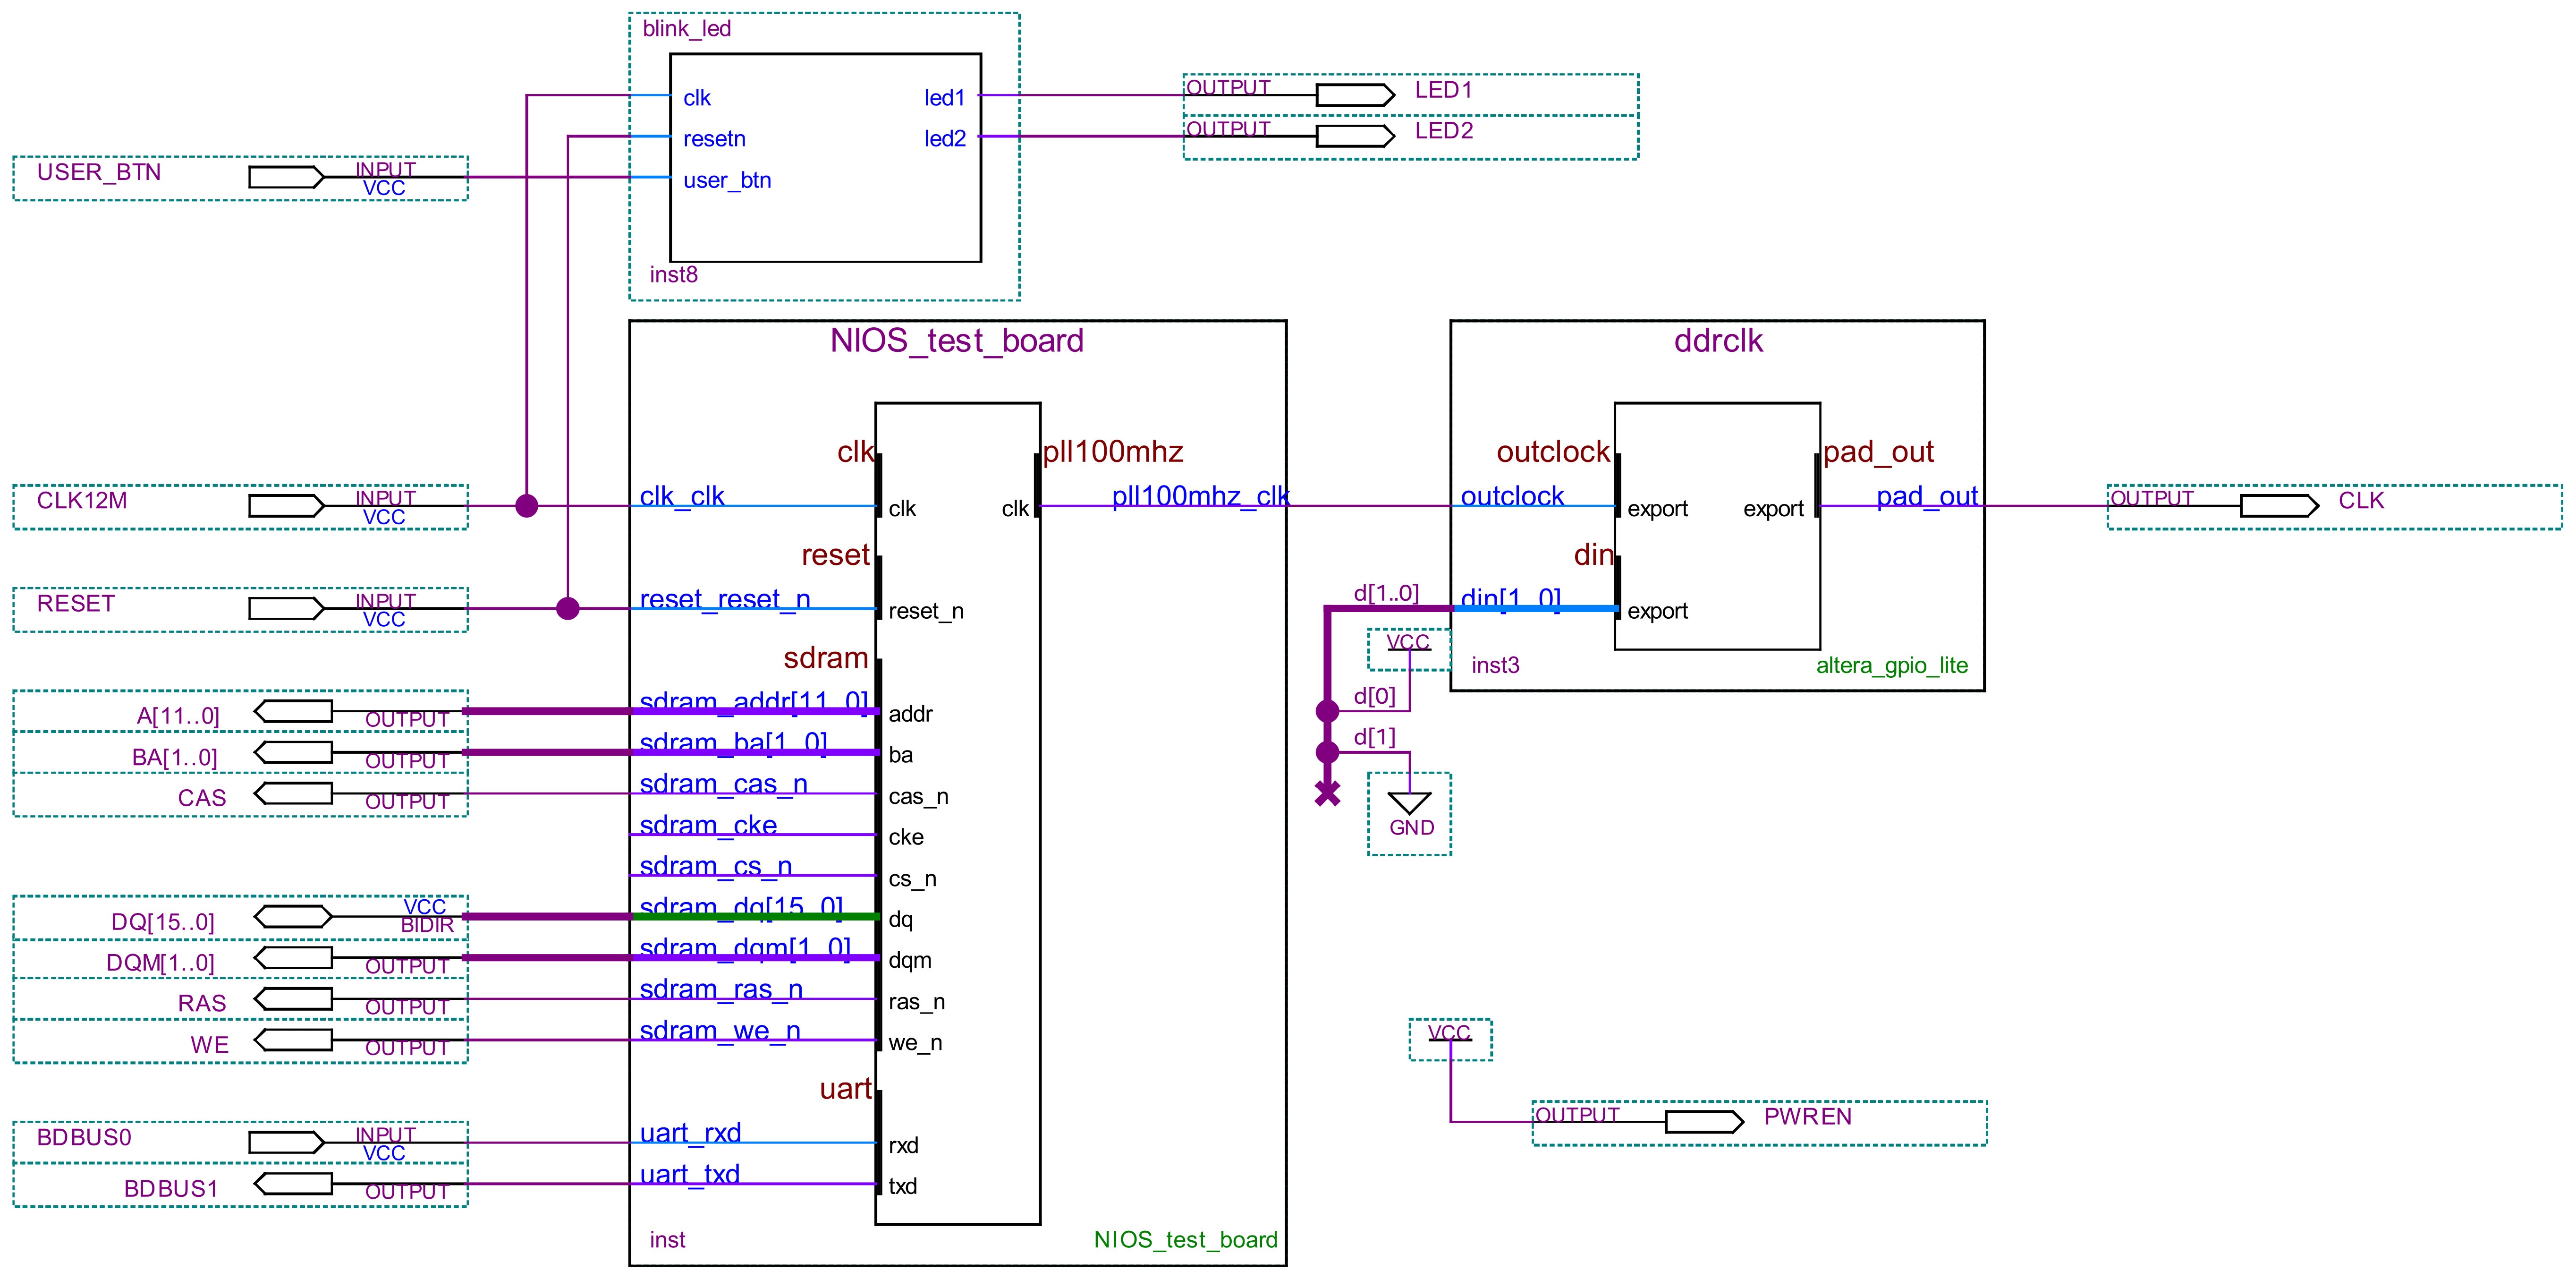 Image Added Image Added |
| Scroll Title |
|---|
| anchor | Figure_BD |
|---|
| title-alignment | center |
|---|
| title | Block Design - Platform Desginer |
|---|
|
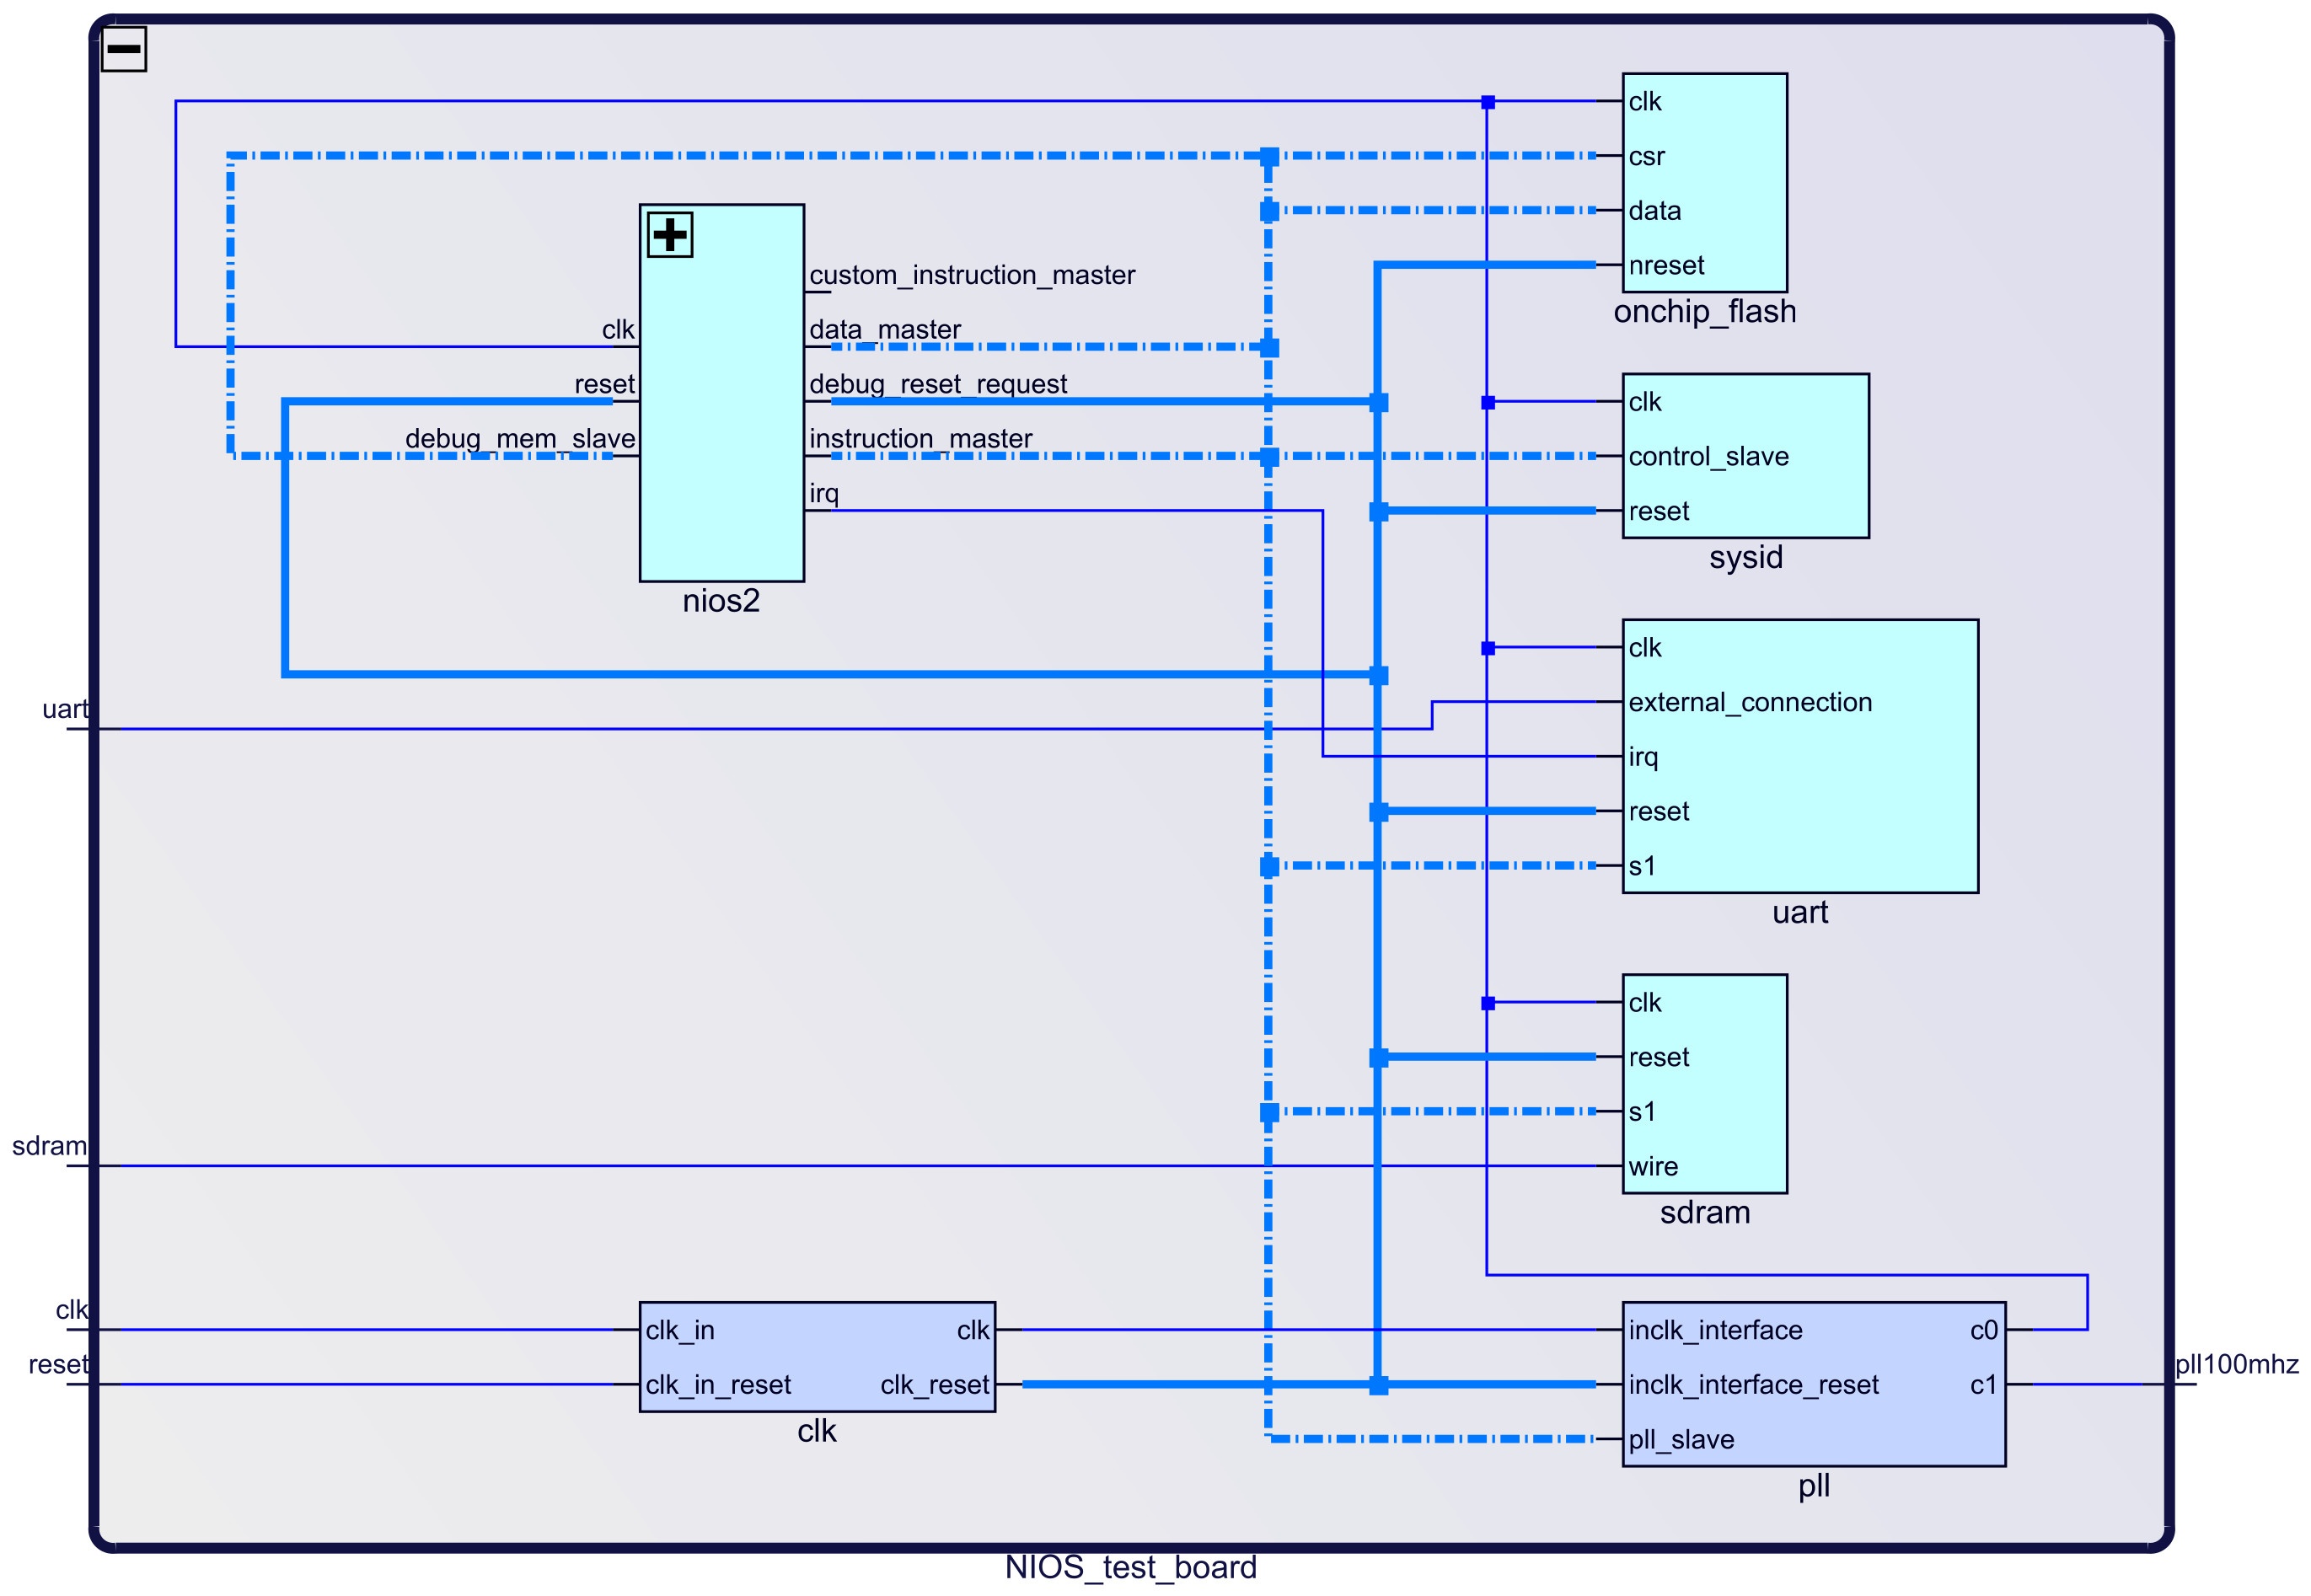 Image Added Image Added |
Software Design - SDK
Application
| Page properties |
|---|
|
---------------------------------------------------------- General Example: hello_tei0006Hello TEI0006 is a Hello World example as endless loop instead of one console output. |
Used software project depends on board assembly variant. Template location: <project folder>/source_files/software/
hello_cr00100
This is a Hello World example as endless loop instead of one console output
...System Design - Quartus
| Scroll Ignore |
|---|
Block Design
The block designs may differ depending on the assembly variant.
| Scroll Title |
|---|
| anchor | Figure_BD |
|---|
| title-alignment | center |
|---|
| title | Block Design - Project |
|---|
|
| >>Project<< |
| Scroll Title |
|---|
| anchor | Figure_BD |
|---|
| title-alignment | center |
|---|
| title | Block Design - Platform Desginer |
|---|
|
| >>Platform Designer<< |
HPS Interfaces
Activated interfaces:
| Type | Note |
| DDR | -- |
| EMAC0 | -- |
| EMAC1 | -- |
| GPIO0 | -- |
| GPIO1 | -- |
| GPIO2 | -- |
| I2C0 | -- |
| I2C1 | -- |
| QSPI | -- |
| SDMMC | -- |
| UART0 | -- |
| UART1 | -- |
| USB0 | -- |
| USB1 | -- |
| CAN0 | -- |
| CAN1 | -- |
Software Design - SDK
| Scroll Ignore |
|---|
Application
| Page properties |
|---|
|
---------------------------------------------------------- General Example: hello_tei0006Hello TEI0006 is a Hello World example as endless loop instead of one console output. |
Used software project depends on board assembly variant. Template location: <project folder>/source_files/software/
...
Software Design - Yocto
| Scroll Ignore |
|---|
For Yocto installation and project creation, follow instructions from:
U-Boot
Start with Create a custom BSP layer for Intel SoC or FPGA#Configure u-boot
File location: meta-<module>/recipes-bsp/u-boot/
Changes:
Device Tree
| Code Block |
|---|
|
#device tree
/ {
};
|
Kernel
Start withCreate a custom BSP layer for Intel SoC or FPGA#Configure linux kernelFile location: meta-<module>/recipes-kernel/linux/
Changes:
Images
Image recipe for minimal console image
File location: meta-<module>/recipes-images/yocto/
Added packages/recipes:
No packages/recipes.
Appx. A: Change History and Legal Notices
| Scroll Ignore |
|---|
| scroll-pdf | true |
|---|
| scroll-office | true |
|---|
| scroll-chm | true |
|---|
| scroll-docbook | true |
|---|
| scroll-eclipsehelp | true |
|---|
| scroll-epub | true |
|---|
| scroll-html | true |
|---|
|
|
Document Change History
To get content of older revision got to "Change History" of this page and select older document revision number.
| Page properties |
|---|
|
- Note this list must be only updated, if the document is online on public doc!
- It's semi automatically, so do following
Add new row below first Copy "Page Information Macro(date)" Macro-Preview, Metadata Version number, Author Name and description to the empty row. Important Revision number must be the same as the Wiki document revision number Update Metadata = "Page Information Macro (current-version)" Preview+1 and add Author and change description. --> this point is will be deleted on newer pdf export template - Metadata is only used of compatibility of older exports
|
| Scroll Title |
|---|
| anchor | Table_dch |
|---|
| title-alignment | center |
|---|
| title | Document change history |
|---|
|
| Scroll Table Layout |
|---|
| orientation | portrait |
|---|
| sortDirection | ASC |
|---|
| repeatTableHeaders | default |
|---|
| style | |
|---|
| widths | 2*,*,3*,4* |
|---|
| sortByColumn | 1 |
|---|
| sortEnabled | false |
|---|
| cellHighlighting | true |
|---|
|
| Date | Document Revision | Authors | Description |
|---|
| Page info |
|---|
| modified-date |
|---|
| modified-date |
|---|
| dateFormat | yyyy-MM-dd |
|---|
|
| | Page info |
|---|
| infoType | Current version |
|---|
| dateFormat | yyyy-MM-dd |
|---|
| prefix | v. |
|---|
| type | Flat |
|---|
|
| | Page info |
|---|
| infoType | Modified by |
|---|
| type | Flat |
|---|
|
| | | -- | all | | Page info |
|---|
| infoType | Modified users |
|---|
| dateFormat | yyyy-MM-dd |
|---|
| type | Flat |
|---|
|
| -- |
|
Legal Notices
| Include Page |
|---|
| IN:Legal Notices |
|---|
| IN:Legal Notices |
|---|
|