...
After this a pop-up will appear.
| Scroll Title |
|---|
|
 Image Added Image Added |
In this pop-up you should choose the SDK_Workspace desired.
| Scroll Title |
|---|
| title | Workspace selected, SDK is loading |
|---|
|
 Image Added Image Added |
After this the SDK will open.starts.
| Scroll Title |
|---|
|
 Image Added Image Added |
If the version of the SDK is higher than the version of the project opened you should follow the instruction and refresh the demo .c and .h files.
| Scroll Title |
|---|
| title | Refresh .c and .h files of demo |
|---|
|
 Image Added Image Added |
After refresh operation this message should appear.
| Scroll Title |
|---|
| title | End of the refresh operation |
|---|
|
 Image Added Image Added |
After this, even if refresh operation appears correct and no errors are reported, you should check the SDK Workspace references to TE EDK IP core drivers.
To open the SDK workspace reference repositories you should click "Xilinx Tools" > "Repositories".
| Scroll Title |
|---|
| title | Open Xilinx SDK Workspace repositories |
|---|
|
 Image Added Image Added |
A new pop-up windows will appear. You should remove the wrong reference clicking/selecting "B:\GIT\TE03XX-Reference-Designs\TE-EDK-IP" and clicking "Remove" button.
| Scroll Title |
|---|
| title | Preference pop-up, repositories selected |
|---|
|
 Image Added Image Added |
You should add the correct reference to TE EDK IP cores drivers.
Click the "New..." button and a pop-up "Select folder" will appear.
 Image Added
You should select the desired folder: "TE-EDK-IP" or "TE-EDK-IP\MyProcessorIPlib" should be both correct
| Note |
|---|
| It is better if you do not alter folder nesting because double nesting of folders is a Xilinx XPS requirements (even if it is not an SDK requirement). |
Then click "OK". A new SDK reference for IP Core drivers should appear.
| Scroll Title |
|---|
| title | TE EDK IP cores drivers referencies added |
|---|
|
 Image Added Image Added |
Then click "OK" button. The pop-up "Preferences" will close and you should wait until the following message appears.
| Scroll Title |
|---|
|
 Image Added Image Added |
You should also check the "Application Project" "demo" references.
Click/select "demo" in "Project Explorer", then click "Project">"Properties".
| Scroll Title |
|---|
| title | Open demo's project properties |
|---|
|
 Image Added Image Added |
The pop-up "Properties for demo" will open on "Resource"
| Scroll Title |
|---|
| title | Demo's project properties opened |
|---|
|
 Image Added Image Added |
You should click /select "Project References". A new window wil appear on the same pop-up.
| Scroll Title |
|---|
| title | "Demo Project References" imported from original SDK workspace |
|---|
|
 Image Added Image Added |
You shoul also check ( ) "reference-TE0300_hw_platform".
| Scroll Title |
|---|
| title | "Demo Project References" modified |
|---|
|
 Image Added Image Added |
After this you should click "OK". You should wait until this mesagge will appear.
| Scroll Title |
|---|
| title | "Demo Project References" compile ends |
|---|
|
 Image Added Image Added |
You should also check the "Board Support Package Project" references.
Click/select "standalone_bsp_0" in "Project Explorer", then click "Project">"Properties".
| Scroll Title |
|---|
| title | Open bsp's project properties |
|---|
|
 Image Added Image Added |
A new pop-up window "Properties for standalone_bsp_0" will appear.
| Scroll Title |
|---|
| title | "standalone_bsp_0 project" references |
|---|
|
...
Change rs232 to debug_module
You should generate a new link script.
STDIO connection of RUN and DEBUG: JTAG UART
|
 Image Added Image Added |
In this case the bsp setting is correct. Only "reference-te0300_hw_platform" shoul be checked ().
Click "OK" and the pop-up will dissapear.
Now, you should select if you desire to debug on a real UART (rs232) or a simulated UART on JTAG (debug_module).
You should click/select "standalone_bsp_0" in "project Explorer", then you should click "Xilinx Tools" > "Board Support Package Settings".
| Scroll Title |
|---|
| title | Board Support Package Settings opening |
|---|
|
 Image Added Image Added |
A new pop-up will appear "Board Support Package Settings".
| Scroll Title |
|---|
| title | "Board Support Package Settings" pop-up |
|---|
|
 Image Added Image Added |
After this, you should click "standalone" and set "stdin" and "stdout" to "rs232" or "debug_module":
- you should select "rs232" if you desire to use a real UART ( and not a simulated UART though JTAG connection);
- you should select "debug_module" if you desire that the XMD_UART works as local UART through the JTAG connection.
| Tip |
|---|
| Demo program (running on MicroBlaze) will work even in case the UART port is left unconnected: it is not necessary to use a USB/Uart converter or Uart port on a PC, if you are using XMD UART HDL block |
| Scroll Title |
|---|
| title | BSP settings: rs232 or debug_module |
|---|
|
 Image Added Image Added |
After this, you should click "drivers" to verify that all Microblaze components are supported by the driver in the repository "C:\XilinxProject\TE-EDK-IP".
| Scroll Title |
|---|
|
 Image Added Image Added |
Click "cpu". In particular you should also verify that "xmdstub_peripheral" is assigned to none if you desire to use debug_module instead of rs232.
| Scroll Title |
|---|
| title | xmdstub_peripheral assigned to none |
|---|
|
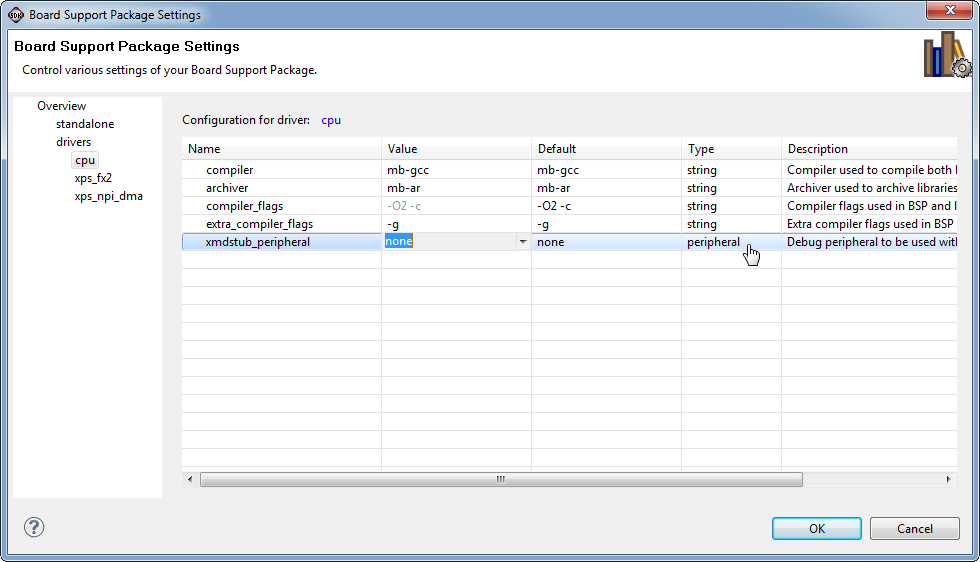 Image Added Image Added |
Click "OK" and the pop-up should dissapear....