Page History
...
- C:\XilinxProject, if you have copied the folder "TE0xxx-Reference-Designs\reference-TE0xxx" to "C:\XilinxProject" ( "C:\XilinxProject\reference-TE0xxx" and "C:\XilinxProject\TE-EDK-IP");
otherwise you must copy the contents of GitHub's 'TE-EDK-IP' folder inside the already existent empty folder "TE0xxx-Reference-Designs\TE-EDK-IP".
Warning You should not alter folder nesting because is a Xilinx Platform Studio requirements
Tip From now on, the choice (a) is assumed.
Warning
- click set_xxxx_project.bat to select your xxxx FPGA mounted on TE module;
- double click the system.xmp;
- the Xilinx Platform Studio should open
- you should click "Project" and then click "Project Options";
| Scroll pdf title | ||
|---|---|---|
| ||
 |
...
under "Advanced Options (Optional) > Project Peripheral Repository Search Path" you must write (if it is not already written) "..TE-EDK-IP\"
Scroll pdf title title Project Peripheral Repository Search Path: "..TE-EDK-IP\" 
...
- after this selection the XPS should appear like in this image.
| Scroll pdf title | ||
|---|---|---|
| ||
 |
- now you can cancel (or move in another folder) the content of TE0xxx-Reference-Designs\reference-TE0xxx\SDK\SDK_Export
- now you can copy all .c and .h files from TE0xxx-Reference-Designs\reference-TE0xxx\SDK\SDK_Workspace\demo\src in a temporary folder (C:\demo_src_TE for example)
- now you can cancel all files and folders from TE0xxx-Reference-Designs\reference-TE0xxx\SDK\SDK_Workspace
- to compile the project you must click "Project" and then "Export Hardware Design to SDK..."
| Scroll pdf title | ||
|---|---|---|
| ||
 |
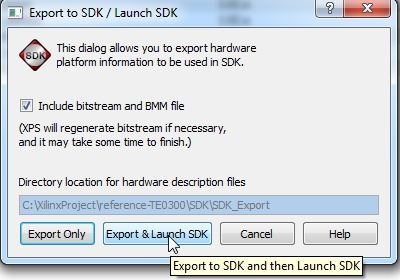
- A new pop-up will appear and you should click "Export and Launch SDK"
| Scroll pdf title | ||
|---|---|---|
| ||
 |
- A new pop-up will appear. Select a proper workspace: for example C:\XilinxProject\reference-TE0300\SDK\SDK_Workspace
| Scroll pdf title | ||
|---|---|---|
| ||
 |
| Tip |
|---|
The HW implementation usually takes some time; if you have a very slow computer, the new synthesis could require an hour. |
- After some times the project is eported from XPS to SDK. system.xml is exported in the hw folder of and SDK project. C:\XilinxProject\reference-TE0300\SDK\SDK_Export\hw\system.xml
(1)xxx is
- 300 for TE0300 project: unfortunately they are in the same folder TE03xx
- 320 for TE0320 project: unfortunately they are in the same folder TE03xx
- 630 for TE0630 project
...
- click Xilinx "Xilinx Tools" and then "Repositories"
| Scroll pdf title | ||
|---|---|---|
| ||
 |
- after this a pop-up "Preferences" will appears
| Scroll pdf title | ||
|---|---|---|
| ||
 |
- click "New..." button of "Local Repositories (available to the current workspace)"
- select C.:\XilinxProject\TE-EDK-IP
| Scroll pdf title | ||
|---|---|---|
| ||
 |
- click "Apply"
- you should click "OK"
- after this you must wait until the building procedure ended.
- You should click "File" >"New" > "Project"
| Scroll pdf title | ||
|---|---|---|
| ||
 |
- a pop up "New Project" will appears
- click"Xilinx">"Hardware Platform Specification", then next
| Scroll pdf title | ||
|---|---|---|
| ||
 |
- a new pop up "New Hardware Project" will appear
| Scroll pdf title | ||
|---|---|---|
| ||
 |
- under "Target Hardware Specification" click "Browse..." button
- a new pop up "Hardware Specification File" will appear

- select "system.xml", "C:\XilinxProject\reference-TE0300\SDK\SDK_Export\hw\system.xml"
- after the selection a new hardware specification (with name "reference-TE0300_hw_platform") appears in the Procject Explorer of SDK.
- the FX2 microcontroller on the TE0300, TE0320 or TE0630 family should contain valid firmware before proceeding. If the FX2 microcontroller has not been programmed before, please follow the instructions in the ????? family User Manuals. You can use Cypress, Python OpenFut or C# OpenFutNet programs.
- If you are sure that the FX2 microcontroller is properly connected, you can connect to the TE0300/TE0320/TE0630 module with a JTAG adapter cable. We recommend using the Xilinx Platform Cable USB. Then connect the TE0300/TE0320/TE0630 module to a USB cable.
...
Overview
Content Tools