Page History
| Page properties | ||||
|---|---|---|---|---|
| ||||
Template Revision 1.0 - on construction Design Name always "TE Series Name" + Design name, for example "TE0720 Test Board" |
| Custom_table_size_100 |
|---|
| Page properties | ||||||||||||||||||||||||||||||||||||||||
|---|---|---|---|---|---|---|---|---|---|---|---|---|---|---|---|---|---|---|---|---|---|---|---|---|---|---|---|---|---|---|---|---|---|---|---|---|---|---|---|---|
| ||||||||||||||||||||||||||||||||||||||||
Important General Note:
|
Overview
| Page properties | ||||
|---|---|---|---|---|
| ||||
Notes :
|
This demo is a Webserver which utilizes SmartFusion2 SoC ARM Cortex-M3, Ethernet, USB / COM-port, Real Time Clock and the on-board LEDs.
The demo is offered in two variants, one which is stored into the embedded non-volatile memory (eNVM) and the seconde one which stored to the external DDR3/L SDRAM memory and therefore volatile.
Refer to http://trenz.org/tem0002-info for the current online version of this manual and other available documentation.
Key Features
| Page properties | ||||
|---|---|---|---|---|
| ||||
Notes :
|
| Excerpt |
|---|
|
Revision History
| Page properties | ||||
|---|---|---|---|---|
| ||||
Notes :
|
| Scroll Title | |||||||||||||||||||||||||||||||||
|---|---|---|---|---|---|---|---|---|---|---|---|---|---|---|---|---|---|---|---|---|---|---|---|---|---|---|---|---|---|---|---|---|---|
| |||||||||||||||||||||||||||||||||
|
Release Notes and Know Issues
| Page properties | ||||
|---|---|---|---|---|
| ||||
Notes :
|
| Scroll Title | ||||||||||||||||||||||||||
|---|---|---|---|---|---|---|---|---|---|---|---|---|---|---|---|---|---|---|---|---|---|---|---|---|---|---|
| ||||||||||||||||||||||||||
|
Requirements
Software
| Page properties | ||||
|---|---|---|---|---|
| ||||
Notes :
|
| Scroll Title | ||||||||||||||||||||||||||||||||||||||||||
|---|---|---|---|---|---|---|---|---|---|---|---|---|---|---|---|---|---|---|---|---|---|---|---|---|---|---|---|---|---|---|---|---|---|---|---|---|---|---|---|---|---|---|
| ||||||||||||||||||||||||||||||||||||||||||
|
Hardware
| Page properties | ||||
|---|---|---|---|---|
| ||||
Notes :
|
Design supports following modules:
| Scroll Title | ||||||||||||||||||||||||||||||||
|---|---|---|---|---|---|---|---|---|---|---|---|---|---|---|---|---|---|---|---|---|---|---|---|---|---|---|---|---|---|---|---|---|
| ||||||||||||||||||||||||||||||||
|
Additional hardware Requirements:
| Scroll Title | ||||||||||||||||||||||||||||||
|---|---|---|---|---|---|---|---|---|---|---|---|---|---|---|---|---|---|---|---|---|---|---|---|---|---|---|---|---|---|---|
| ||||||||||||||||||||||||||||||
|
Content
| Page properties | ||||
|---|---|---|---|---|
| ||||
Notes :
|
Content of the zip archive "TEM0005-01-010C_ReferenceDesigns01_LibXY.Z-SCX.Y_Date-Time":
Design Sources
| Scroll Title | |||||||||||||||||||||||||||||||||
|---|---|---|---|---|---|---|---|---|---|---|---|---|---|---|---|---|---|---|---|---|---|---|---|---|---|---|---|---|---|---|---|---|---|
| |||||||||||||||||||||||||||||||||
|
Download
The Trenz Electronic Reference Designs and Demos are usable with the specified Microsemi Libero / SoftConsole version. Usage of a different Microsemi Libero / SoftConsole software versions is not recommended.
| Page properties | ||||
|---|---|---|---|---|
| ||||
|
Reference Designs / Demos are available via the following link:
The download is a ZIP compressed archive. Extract the archive before usage.
Design Flow
| Page properties | ||||
|---|---|---|---|---|
| ||||
Notes :
|
The Hardware and Software Reference / Demo -Designs Projects are available as a prebuild zip archive. The archive contains a Libero Hardware Project and a SoftConsole Workspace folder, they were created and tested in windows environment.
This SoftConsole Workspace contains the Software Project Hello World and the Demo Webserver, the demo is offered in two variants. The board configuration file "microsemi-smartfusion2-smartberry-ddr.cfg" is required for the usage of the Software projects via the IDE SoftConsole.
Launch
| Page properties | ||||
|---|---|---|---|---|
| ||||
Note:
|
Executing a Reference / Demo Design on a module requires the powering of it and a JTAG or UART Connection for Programming and Communication. Often the programming is a two fold process, where the first programming configures the FPGA and the second programming flashes Software code to be executed inside the FPGA / ARM processor.
Connecting
Connect the modules micro USB connector to your host pc, this enables the powering of the module and a simultaneous JTAG and UART connection .
Only necessary for running the Demo Webserver:
The demo is configured to establish a network connection via the DHCP protocol, therefore, if a a free router port is used, no further port setup is required.
If a "direct Ethernet Connection" between Host PC and module is used, the user must know how to setup this connection type. Further down in this chapter is explained how to setup the Demo Webserver and recompile it, so that it uses a static IP.
Driver check
When the module is connected via USB cable to your demo host computer, in the Windows Device Manager appear the following tree board driver related devices:
In section Ports (COM & LPT):
- FlashPro5 Port (ComX)
In section Universal Serial Bus controllers:
- USB FP5 Serial Converter A
- USB FP5 Serial Converter B
The Device Manager is accessible via "Right mouse click context menu" from the Windows Start Menu Button. When these devices are not visible, the driver installation through libero could be faulty.
Programming the Hardware design
Via Libero
Programming of the Hardware reference Design requires to open the FPGA Design IDE Libero.
| Scroll Title | ||||
|---|---|---|---|---|
| ||||
|

The Hardware Reference Design can be opened via "Project > Open Project" in the top right corner of Libero (picture above - upper green rectangle). A file dialogue opens, point the dialogue along the extracted download to the folder containing the Hardware Reference Design.
Disk :\ Path-to-the-Demodemo-archive \ Extracted ZIP-archive \ Libero-X.y_Referenz-DesignRefDesign_vXY\
Double left mouse click onto the project file "Referenz-Design_XY .prjx" to open it. The board is automatically selected and setup to be flashed by Libero.
In the upper left section of Libero, select the tab "Design Flow" (picture above - lover green rectangle) and flash it to the board via "Program Design > and double left mouse click onto "Run PROGRAM Action" (picture above - row with blue background).
Warnings should not affect the functionality of a Reference / Demo -Design.
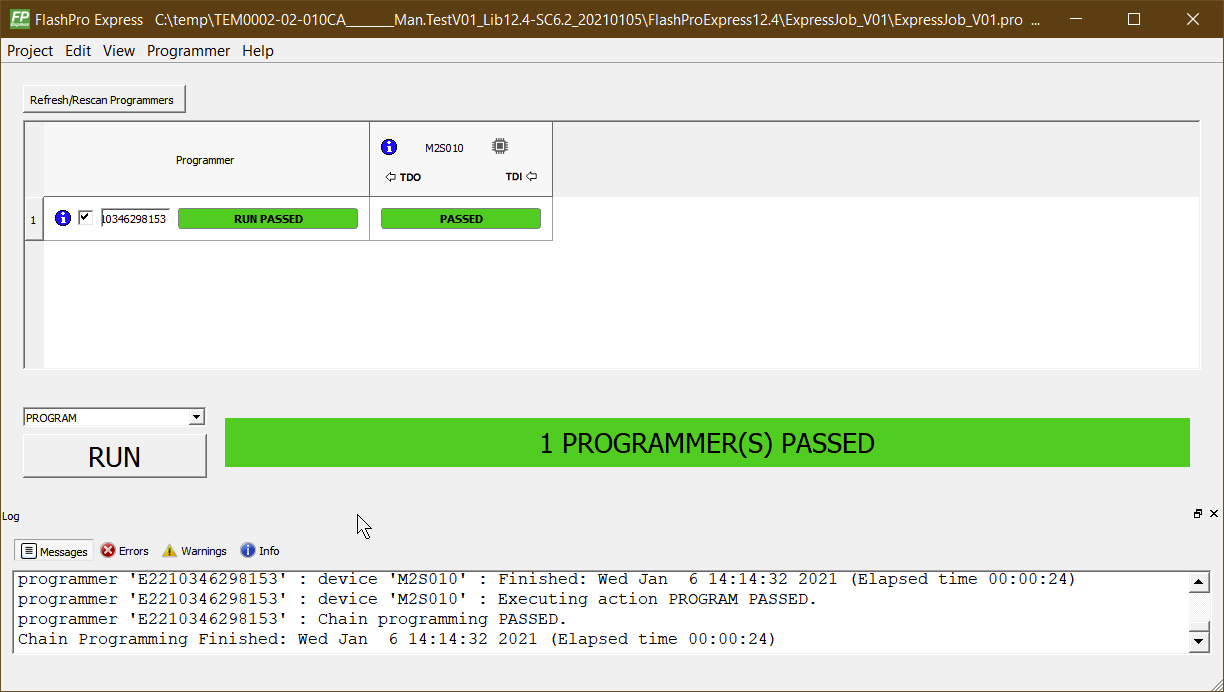
Via FlashPro Express
dfaghdhggf
Open "FlashPro Express":To , to the left, in section "Job Project", use click click on "Open..." .
> In the appearing file dialogue,
> point to the projects projects "Programming job file (.pro-file)"
> and Check OK

and confirm.
The programm windows changes through opening the file. Now click Cycle for each Module to be programmed:
> Connect a module
> Click "Refresh/Rescan Programmers"
> , wait untill the scan is finished.

Click "RUN"
> Disconnect to programm the module.
UART connection
Before flashing any Software Project to the module, open a comport terminal to the boards comport, so that it's messages can be captured.
Programming a Software project
Open SoftConsole and press "Browse..." near the right edge. A file dialogue opens, point the dialogue along the extracted download to the folder containing the SoftConsole Workspace.
Disk :\ Path-to-the-Demo-archive \ Extracted ZIP-archive \ Softconsole-X.y-Workspace \
Confirm your selectioin by pressing "Ok" , the dialogue closes, and open The SoftConsole by pressing "Launch"
| Scroll Title | ||||
|---|---|---|---|---|
| ||||
|

Subsequently the program opens and shows the software project's who which are contained inside the workspace to the left, under . The projects and their files can be accessed in the section "Project Explorer".
| Scroll Title | ||||
|---|---|---|---|---|
| ||||
|

To simply run a Project, press the triangle right to the button marked with a "R" in the picture above and select a variant of the demo.
Pressing the triangle next to the button marked with "D" let you select which variant to be executed in debug mode.
Debug controls - Resume - Pause - Stop
| Scroll Title | ||||
|---|---|---|---|---|
| ||||
Switch between Debug and Run perspective (upper right corner program window)
| Scroll Title | ||||
|---|---|---|---|---|
| ||||
|
System Design - Libero
| Page properties | ||||
|---|---|---|---|---|
| ||||
Note:
|
Smart Design
| Scroll Title | ||||
|---|---|---|---|---|
| ||||
 |
Constrains
IO constrains
| Code Block | ||||||||
|---|---|---|---|---|---|---|---|---|
| ||||||||
# Microsemi I/O Physical Design Constraints file # User I/O Constraints file # Version: v12.4 12.900.0.16 # Family: SmartFusion2 , Die: M2S010 , Package: 400 VF # Date generated: MonWed NovMay 1626 1109:1119:1642 20202021 # # User Locked I/O Bank Settings # # # Unlocked I/O Bank Settings # The I/O Bank Settings can be locked by directly editing this file # or by making changes in the I/O Attribute Editor # # # User Locked I/O settings # set_io EthCLK0_LED1A \ -pinname Y10 \ -fixed yesPAD \ -DIRECTION OUTPUT set_io Eth_LED1B \ -pinname U12 \ -pinname Y12 \ -fixed yes \ -DIRECTION OUTPUTINPUT set_io Eth_LED2AETH_COL \ -pinname V14 D2 \ -fixed yes \ -DIRECTION OUTPUTINPUT set_io EthETH_LED2B CRS \ -pinname U14 E3 \ -fixed yes \ -DIRECTION OUTPUTINPUT set_io GLED ETH_MDC \ -pinname G17 F3 \ -fixed yes \ -DIRECTION OUTPUT set_io GPIO_5_F2M_taster_S4ETH_MDIO \ -pinname E17 F4 \ -fixed yes \ -DIRECTION INPUTINOUT set_io GPIO_6_F2M_taster_S5ETH_RST \ -pinname E16 H6 \ -fixed yes \ -DIRECTION INPUT set_io MAC_GMII_MDC \ -pinname N1 \ -fixed yes \ -iostd LVCMOS15 \ -DIRECTION OUTPUT set_io PHY_LED0ETH_RXC \ -pinname U11 G1 \ -fixed yes \ -DIRECTION INPUT set_io PHYETH_LED1 \ -pinname T14 \ -fixed yesRXDV \ -DIRECTION INPUT set_io PHY_MDIO \ -pinname N2 \ -pinname E1 \ -fixed yes \ -iostd LVCMOS15 \ -DIRECTION INOUTINPUT set_io {PHYETH_RDRXD[0]} \ -pinname J7 K5 \ -fixed yes \ -iostd LVCMOS15 \ -DIRECTION INPUT set_io {PHYETH_RDRXD[1]} \ -pinname F1 H1 \ -fixed yes \ -iostd LVCMOS15 \ -DIRECTION INPUT set_io {PHYETH_RDRXD[2]} \ -pinname H2 H5 \ -fixed yes \ -iostd LVCMOS15 \ -DIRECTION INPUT set_io {PHYETH_RDRXD[3]} \ -pinname J4 H4 \ -fixed yes \ -iostd LVCMOS15 \ -DIRECTION INPUT set_io PHY_RESETNETH_RXER \ -pinname R13 E2 \ -fixed yes \ -DIRECTION OUTPUTINPUT set_io PHY_RX_CTL \ -pinname K1 \ ETH_TXC \ -pinname G2 \ -fixed yes \ -iostd LVCMOS15 \ -DIRECTION INPUT set_io {PHYETH_TDTXD[0]} \ -pinname L1 G4 \ -fixed yes \ -iostd LVCMOS15 \ -DIRECTION OUTPUT set_io {PHYETH_TDTXD[1]} \ -pinname M2 F5 \ -fixed yes \ -iostd LVCMOS15 \ -DIRECTION OUTPUT set_io {PHYETH_TDTXD[2]} \ -pinname M1 G6 \ -fixed yes \ -iostd LVCMOS15 \ -DIRECTION OUTPUT set_io {PHYETH_TDTXD[3]} \ -pinname M3 F7 \ -fixed yes \ -iostd LVCMOS15 \ -DIRECTION OUTPUT set_io PHYETH_TX_CTLEN \ -pinname K3 G3 \ -fixed yes \ -iostd LVCMOS15 \ -DIRECTION OUTPUT set_io RGBLED3_B \ -pinname H6 \ Y13 \ -pinname Y13 \ -fixed yes \ -DIRECTION OUTPUT set_io RGB_GLED4_Y10 \ -pinname F6 Y10 \ -fixed yes \ -DIRECTION OUTPUT set_io RGBTASTER_R \ -pinname H5C19 \ -pinname C19 \ -fixed yes \ -DIRECTION OUTPUTINPUT set_io RLED U6_EN_VADJ_N20 \ -pinname G16 N20 \ -fixed yes \ -DIRECTION OUTPUT set_io RXC U6_SEL_VADJ_R15 \ -pinname J2 \ -fixed yes \ -iostd LVCMOS15 \ -DIRECTION INPUT set_io TXC \ -pinname K7 \ -pinname R15 \ -fixed yes \ -iostd LVCMOS15 \ -DIRECTION OUTPUT # # Dedicated Peripheral I/O Settings # # # Unlocked I/O settings # The I/Os in this section are unplaced or placed but are not locked # the other listed attributes have been applied # # #Ports using Dedicated Pins # set_io DEVRST_N \ -pinname U17 \ -DIRECTION INPUT set_io XTL \ -pinname Y18 \ -DIRECTION INPUT |
Clock constrains
| Code Block | ||||||||
|---|---|---|---|---|---|---|---|---|
| ||||||||
create_clock -name {XTAL_12MHz} -period 83.3333 -waveform {0 41.6667 } [ get_ports { XTL } ]
create_clock -name {Clk0pad_30MHz_Y12} -period 33.3333 -waveform {0 16.6667 } [ get_ports { CLK0_PAD } ]
create_clock -name {SoC_sb_0___SoC_sb_MSS_0___FIC_2_APB_M_PCLK} -period 10 -waveform {0 5 } [ get_nets { SoC_sb_0/SoC_sb_MSS_0/FIC_2_APB_M_PCLK } ]
create_clock -name {SoC_sb_0___FABOSC_0___N_RCOSC_25_50MHZ_CLKOUT} -period 10 -waveform {0 5 } [ get_nets { SoC_sb_0/FABOSC_0/N_RCOSC_25_50MHZ_CLKOUT } ]
create_clock -name {MAC_RXC_TXC} -period 40 -waveform {0 20 } [ get_ports { ETH_RXC ETH_TXC } ]
create_clock -name {SoC_sb_0___CCC_0___GL0} -period 10000 -waveform {0 5000 } [ get_nets { SoC_sb_0/CCC_0/GL0_net } ]
create_clock -name {FCCC_C0_FCCC_C0_0_FCCC___GL0_net_inferred_clock} -period 10000 -waveform {0 5000 } [ get_pins { FCCC_C0_0/FCCC_C0_0/CCC_INST/GL0 } ]
|
Software Design - SoftConsole
| Page properties | ||||
|---|---|---|---|---|
| ||||
Note:
|
Application
| Page properties | ||||
|---|---|---|---|---|
| ||||
---------------------------------------------------------- FPGA Example scuMCS Firmware to configure SI5338 and Reset System. srec_spi_bootloaderTE modified 2019.2 SREC Bootloader to load app or second bootloader from flash into DDR Descriptions:
xilisf_v5_11TE modified 2019.2 xilisf_v5_11
---------------------------------------------------------- Zynq Example: zynq_fsblTE modified 2019.2 FSBL General:
Module Specific:
zynq_fsbl_flashTE modified 2019.2 FSBL General:
ZynqMP Example: ---------------------------------------------------------- zynqmp_fsblTE modified 2019.2 FSBL General:
Module Specific:
zynqmp_fsbl_flashTE modified 2019.2 FSBL General:
zynqmp_pmufwXilinx default PMU firmware. ---------------------------------------------------------- General Example: hello_te0820Hello TE0820 is a Xilinx Hello World example as endless loop instead of one console output. u-bootU-Boot.elf is generated with PetaLinux. SDK/HSI is used to generate Boot.bin. |
Demo - Webserver_...
The demo projects "Smartberry_Webserver_X.y" and "Smartberry_Webserver_DDR_X.y" are identical variants of the demo, they only differ in their memory location:
- Smartberry_Webserver_X.y - Application code is stored to the FPGA's embedded non-volatile memory (eNVM)
- Smartberry_Webserver_DDR_X.y - Application code is stored to the FPGA's external volatile memory (DDR3/L SDRAM) and lost during power down
UART output:
| Scroll Title | ||||
|---|---|---|---|---|
| ||||
|

Static IP configuration
| Scroll Title | ||||
|---|---|---|---|---|
| ||||
|

To disengaging the DHCP mode one has to setup up an IP and Gateway Address in the code unit "main.c" roughly at line 270. Alternativly, the demo hosts IP Address can be changed.
Furthermore the corresponding compiler flag needs to be deleted in the project setting. To do so, in the "Project Explorer" tab, right mouse click onto the project and select Properties in the appearing menu.
| Scroll Title | ||||
|---|---|---|---|---|
| ||||
|

In the left section of the properties window select "C/C++ Build > Settings" in the right section select the tab "Tool Settings > GNU ARM Cross C Compiler > Preprocessor" under "Defined symbols (-D)" delete the compiler flag "NET_USE_DHCP" and press "Apply". Confirm the following dialogue and press "Cancel".
Lastly, the project needs to be recompiled. In the top menu of the SoftConsole select "Project > Build ALL / Build Project".
Warnings should not affect the demo. can be ignored.
Reference Design - HelloWorld_...
Hello World example as endless loop instead of one console output. Each loop lights up each LED. The user buttons responds with a message at any time.
UART output:
| Scroll Title | ||||
|---|---|---|---|---|
| ||||
 |
Appx. A: Change History and Legal Notices
Document Change History
To get content of older revision got to "Change History" of this page and select older document revision number.
| Page properties | ||||
|---|---|---|---|---|
| ||||
|
| Scroll Title | ||||||||||||||||||||||||||||||||||||||||||||||||||||||||||||||||||
|---|---|---|---|---|---|---|---|---|---|---|---|---|---|---|---|---|---|---|---|---|---|---|---|---|---|---|---|---|---|---|---|---|---|---|---|---|---|---|---|---|---|---|---|---|---|---|---|---|---|---|---|---|---|---|---|---|---|---|---|---|---|---|---|---|---|---|
| ||||||||||||||||||||||||||||||||||||||||||||||||||||||||||||||||||
|
Legal Notices
| Include Page | ||||
|---|---|---|---|---|
|
| Custom_fix_page_content | ||||||||
|---|---|---|---|---|---|---|---|---|
|
Overview
Content Tools