Page History
...
| Date | Vivado | Project Built | Authors | Description |
|---|---|---|---|---|
| 2019-06-13 | 2018.3 | TE0724-test_board-vivado_2018.2-build_04_20190613114927.zip | Oleksandr Kiyenko, John Hartfiel |
|
| 2019-02-04 | 2018.2 | TE0724-test_board-vivado_2018.2-build_04_20190204111543.zip TE0724-test_board_noprebuilt-vivado_2018.2-build_04_20190204111557.zip | John Hartfiel |
|
| 2018-08-29 | 2018.2 | TE0724-test_board_noprebuilt-vivado_2018.2-build_03_20180830170634.zip TE0724-test_board-vivado_2018.2-build_03_20180830170621.zip | John Hartfiel |
|
...
| Issues | Description | Workaround | To be fixed version | |||
|---|---|---|---|---|---|---|
| EEPROM U10 is not writeable | WP is fix on on PCB Revisions, which shipped before 2019-06-13 | PCB can be patched, send request to Trenz Electronic support | No known issues | --- | --- | --- |
Requirements
Software
| HTML |
|---|
<!-- Add needed external Software --> |
...
For general structure and of the reference design, see Project Delivery - Xilinx devices
Design Sources
| Type | Location | Notes |
|---|---|---|
| Vivado | <design name>/block_design <design name>/constraints <design name>/ip_lib | Vivado Project will be generated by TE Scripts |
| SDK/HSI | <design name>/sw_lib | Additional Software Template for SDK/HSI and apps_list.csv with settings for HSI |
| PetaLinux | <design name>/os/petalinux | PetaLinux template with current configuration |
| SDSoC | <design name>/../SDSoC_PFM | SDSoC Platform will be generated by TE Scripts or as separate download |
...
Trenz Electronic provides a tcl based built environment based on Xilinx Design Flow.
See also:
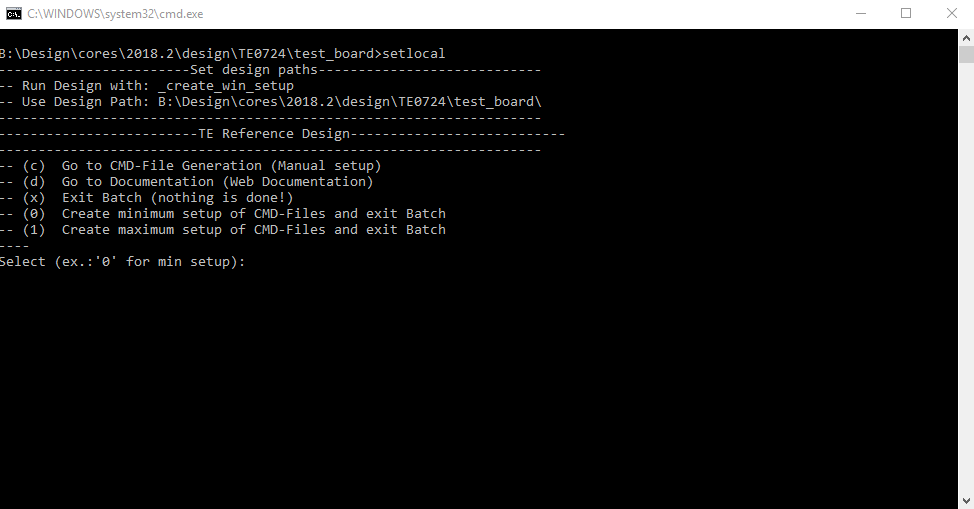
The Trenz Electronic FPGA Reference Designs are TCL-script based project. Command files for execution will be generated with "_create_win_setup.cmd" on Windows OS and "_create_linux_setup.sh" on Linux OS.
TE Scripts are only needed to generate the vivado project, all other additional steps are optional and can also executed by Xilinx Vivado/SDK GUI. For currently Scripts limitations on Win and Linux OS see: Project Delivery Currently limitations of functionality
- _create_win_setup.cmd/_create_linux_setup.sh and follow instructions on shell:
- Press 0 and enter for minimum setup
- (optional Win OS) Generate Virtual Drive or use short directory for the reference design (for example x:\<design name>)
- Create Project
- Select correct device and Xilinx install path on "design_basic_settings.cmd" and create Vivado project with "vivado_create_project_guimode.cmd"
Note: Select correct one, see TE Board Part Files
- Select correct device and Xilinx install path on "design_basic_settings.cmd" and create Vivado project with "vivado_create_project_guimode.cmd"
- Create HDF and export to prebuilt folder
- Run on Vivado TCL: TE::hw_build_design -export_prebuilt
Note: Script generate design and export files into \prebuilt\hardware\<short dir>. Use GUI is the same, except file export to prebuilt folder
- Run on Vivado TCL: TE::hw_build_design -export_prebuilt
- Create Linux (uboot.elf and image.ub) with exported HDF
- HDF is exported to "prebuilt\hardware\<short name>"
Note: HW Export from Vivado GUI create another path as default workspace. - Create Linux images on VM, see PetaLinux KICKstart
- Use TE Template from /os/petalinux
- HDF is exported to "prebuilt\hardware\<short name>"
- Add Linux files (uboot.elf and image.ub) to prebuilt folder
- "prebuilt\os\petalinux\default" or "prebuilt\os\petalinux\<short name>"
Notes: Scripts select "prebuilt\os\petalinux\<short name>", if exist, otherwise "prebuilt\os\petalinux\default"
- "prebuilt\os\petalinux\default" or "prebuilt\os\petalinux\<short name>"
- Generate Programming Files with HSI/SDK
- Run on Vivado TCL: TE::sw_run_hsi
Note: Scripts generate applications and bootable files, which are defined in "sw_lib\apps_list.csv" - (alternative) Start SDK with Vivado GUI or start with TE Scripts on Vivado TCL: TE::sw_run_sdk
Note: See SDK Projects
- Run on Vivado TCL: TE::sw_run_hsi
...
- Open Serial Console (e.g. putty)
- Speed: 115200
- COM Port: Win OS, see device manager, Linux OS see dmesg |grep tty (UART is *USB1)
- Linux Console:
Note: Wait until Linux boot finished For Linux Login use:- User Name: root
- Password: root
- You can use Linux shell now.
- I2C 0 Bus type: i2cdetect -y -r 0
- RTC check: dmesg | grep rtc
- ETH0 works with udhcpc
- I2C 0 Bus type: i2cdetect -y -r 0
- RTC check: dmesg | grep rtc
- ETH0 works with udhcpc
- EEPROM U10:
Write: printf '\xaa' |eeprog /dev/i2c-0 0x50 -16 -f -x -w 7
Read: eeprog /dev/i2c-0 0x50 -16 -f -x -r 0:32
Vivado HW Manager
- CAN Standby control
- module LED control
- TEB0724 LED control
- TEB0724 Button monitoring
- PMIC GPIO monitoring
- PHY 125MHz Monitoring
...
Activate:
- i2c-tools
Applications
eeprog
- I2C access to EEPROM U10(24AA128T-I/ST)
startup
Script App to load init.sh from SD Card if available.
...
| Date | Document Revision | Authors | Description | ||||||||||||||||||||||
|---|---|---|---|---|---|---|---|---|---|---|---|---|---|---|---|---|---|---|---|---|---|---|---|---|---|
|
|
|
| ||||||||||||||||||||||
| 2019-02-04 | v.6 | John Hartfiel |
| ||||||||||||||||||||||
2018-08-30 | v.5 | John Hartfiel |
| ||||||||||||||||||||||
| 2018-08-29 | v.1 |
|
| ||||||||||||||||||||||
| All |
|
...
