...
| Page properties |
|---|
|
Template Revision 21.8 0 - on construction Design Name always "TE Series Name" + Design name, for example "TE0720 TEI0006 Test Board" |
| HTML |
|---|
<!-- tables have all same width (web max 1200px and pdf full page(640px), flexible width or fix width on menu for single column can be used as before) -->
<style>
.wrapped{
  width: 100% !important;
  max-width: 1200px !important;
 }
</style> |
...
...
| Scroll Title |
|---|
| anchor | Table_DRH |
|---|
| title | Design Revision History |
|---|
|
| Scroll Table Layout |
|---|
| orientation | portrait |
|---|
| sortDirection | ASC |
|---|
| repeatTableHeaders | default |
|---|
| style | |
|---|
| widths | |
|---|
| sortByColumn | 1 |
|---|
| sortEnabled | false |
|---|
| cellHighlighting | true |
|---|
|
| Date | Quartus | Project Built | Authors | Description |
|---|
| 2020-0710-0719 | 19.1 Lite | TEI0001-test_board_noprebuilt-quartus_19.1.0-2020070715303320201019101714.zip TEI0001-test_board-quartus_19.1.0-2020070715320520201019101651.zip | Thomas Dück | | | 2020-0507-1207 | 19.1 Lite | TEI0001-test_board_noprebuilt-quartus_19.1.0-2020051209585220200707153033.zip TEI0001-test_board-quartus_19.1.0-2020051210003720200707153205.zip | Thomas Dück | - bugfixes
- script 19.1 update
| | 20192020-1105-1112 | 1819.1 Lite | TEI0001-test_board_noprebuilt-quartus_1819.1.0-2019111110420120200512095852.zip TEI0001-test_board-quartus_1819.1.0-2019111110434820200512100037.zip | Thomas Dück | | | 2019-11-11 | 18.1 | TEI0001-test_board_noprebuilt-quartus_18.1-20191111104201.zip TEI0001-test_board-quartus_18.1-20191111104348.zip | Thomas Dück | - add add bash files for Linux OS
| | 2019-10-28 | 18.1 | TEI0001-test_board_noprebuilt-quartus_18.1-20191028120819.zip TEI0001-test_board-quartus_18.1-20191028120521.zip | Thomas Dück | - create project with TE scripts
- new assembly variants
| | 2019-04-02 | 18.1 | TEI0001-03-08-C8-test_board-quartus_18.1-20190402.zip | Thomas Dück | |
|
...
| Page properties |
|---|
|
Notes : - prebuilt files
- Template Table:
| Scroll Title |
|---|
| anchor | Table_PF |
|---|
| title | Prebuilt files |
|---|
| | Scroll Table Layout |
|---|
| orientation | portrait |
|---|
| sortDirection | ASC |
|---|
| repeatTableHeaders | default |
|---|
| style | |
|---|
| widths | |
|---|
| sortByColumn | 1 |
|---|
| sortEnabled | false |
|---|
| cellHighlighting | true |
|---|
|
File | File-Extension | Description |
|---|
| BIF-SOPC Information File | *.bifsopcinfo | File with description to generate Bin-Fileof the .qsys file to create software for the target hardware | | SRAM Object BIN- File | *.bin | Flash Configuration File with Boot-Image (Zynq-FPGAs) | sof | Ram configuration file | | Programmer Object BIT- File | *.bitpof | FPGA (PL Part) Configuration FileDebugProbes-Fileconfiguration file | | JTAG indirect configuration file | *.ltx | Definition File for Vivado/Vivado Labtools Debugging Interface | Debian SD-Image | *.img | Debian Image for SD-Card | | jic | Flash configuration file | | Diverse Reports | --- | Report files in different formats | | HardwareSoftware-PlatformApplication-Specification-FilesFile | *.hdf | Exported Vivado Hardware Specification for SDK/HSI and PetaLinux | | LabTools Project-File | *.lpr | Vivado Labtools Project File | MCS-File | *.mcs | Flash Configuration File with Boot-Image (MicroBlaze or FPGA part only) | MMI-File | *.mmi | File with BRAM-Location to generate MCS or BIT-File with *.elf content (MicroBlaze only) | | OS-Image | *.ub | Image with Linux Kernel (On Petalinux optional with Devicetree and RAM-Disk) | Software-Application-| elf | Software application for NIOS II processor system |
|
|
| Scroll Title |
|---|
| anchor | Table_PF |
|---|
| title | Prebuilt files (only on ZIP with prebuilt content) |
|---|
|
| Scroll Table Layout |
|---|
| orientation | portrait |
|---|
| sortDirection | ASC |
|---|
| repeatTableHeaders | default |
|---|
| style | |
|---|
| widths | |
|---|
| sortByColumn | 1 |
|---|
| sortEnabled | false |
|---|
| cellHighlighting | true |
|---|
|
File | File-Extension | Description |
|---|
| SOPC Information File | *.sopcinfo | File with description of the *.qsys file to create software for the target hardware | | Programmer Object File | *.pof | FPGA configuration file | | Diverse Reports | --- | Report files in different formats | | Software Application File | *.elf | Software |
|
SREC-File | *.srec | Converted Software Application for MicroBlaze Processor Systems |
| Scroll Title |
|---|
| anchor | Table_PF |
|---|
| title | Prebuilt files (only on ZIP with prebuilt content) |
|---|
|
| Scroll Table Layout |
|---|
| orientation | portrait |
|---|
| sortDirection | ASC |
|---|
| repeatTableHeaders | default |
|---|
style | widths | | sortByColumn | 1 |
|---|
| sortEnabled | false |
|---|
| cellHighlighting | true |
|---|
File | File-Extension | Description |
|---|
| SOPC Information File | *.sopcinfo | File with description of the *.qsys file to create software for the target hardware |
| Programmer Object File | *.pof | FPGA configuration file |
| Diverse Reports | --- | Report files in different formats |
| Software Application File | *.elf | Software application for NIOS II processor system |
Download
Reference design is only usable with the specified Quartus version. Do never use different versions of Quartus software for the same project.
Reference Design is available on:
Design Flow
| Note |
|---|
Reference Design is available with and without prebuilt files. It's recommended to use TE prebuilt files for first launch. |
Trenz Electronic provides a tcl based built environment based on Quartus Design Flow.
See also:
The Trenz Electronic FPGA Reference Designs are TCL-script based projects. To create a project, open a project or program a device execute "create_project_win.cmd" on Windows OS and "create_project_linux.sh" on Linux OS.
TE Scripts are only needed to generate the quartus project, all other additional steps are optional and can also executed by Intel Quartus/SDK GUI. For currently Scripts limitations on Win and Linux OS see: Project Delivery - Intel devices → Currently limitations of functionality
- Open create_project_win.cmd/create_project_linux.sh:
 Image Removed'Create Project' GUI example
 - Select Board in "Board selection"
- Click on "Create project" button to create project
- (optional for manual changes) Select correct quartus installation path in "<design_name>/settings/design_basic_settings.tcl"
Launch
| Page properties |
|---|
|
Note: - Programming and Startup procedure
|
Programming
| Note |
|---|
Check Module and Carrier TRMs for proper HW configuration before you try any design. |
MAX10 Flash
- Connect the Module to USB-Port
- Open create_project_win.cmd/create_project_linux.sh
- Select correct board in "Board selection"
- Click on "Program device" button
- if prebuilt files are available: select "Program prebuilt file"
- using own generated programming file: select "Program other file" and click on "Browse ..." to open own generated programming file
- (optional) click on "Open programmer GUI" to program device with Quartus programmer GUI
- Click on "Start program device" button
JTAG
Not used on this example.
Usage
- Prepare Hardware like described on section 74976247
- Connect UART USB (most cases same as JTAG)
UART
- Open Serial Console (e.g. PuTTY)
- COM Port: Win OS see device manager, Linux OS see dmesg | grep tty (UART is *USB1)
- Speed: 115200
- Press reset button on the module
- Toggle between following modes by pressing user button
- Spirit level
- Winbond SPI flash memory test
- Shift register sequence
- Knightrider sequence
- Case statement sequence
System Design - Quartus
Block Design
| Scroll Title |
|---|
| anchor | Figure_BD |
|---|
| title | Block Design - Project |
|---|
|
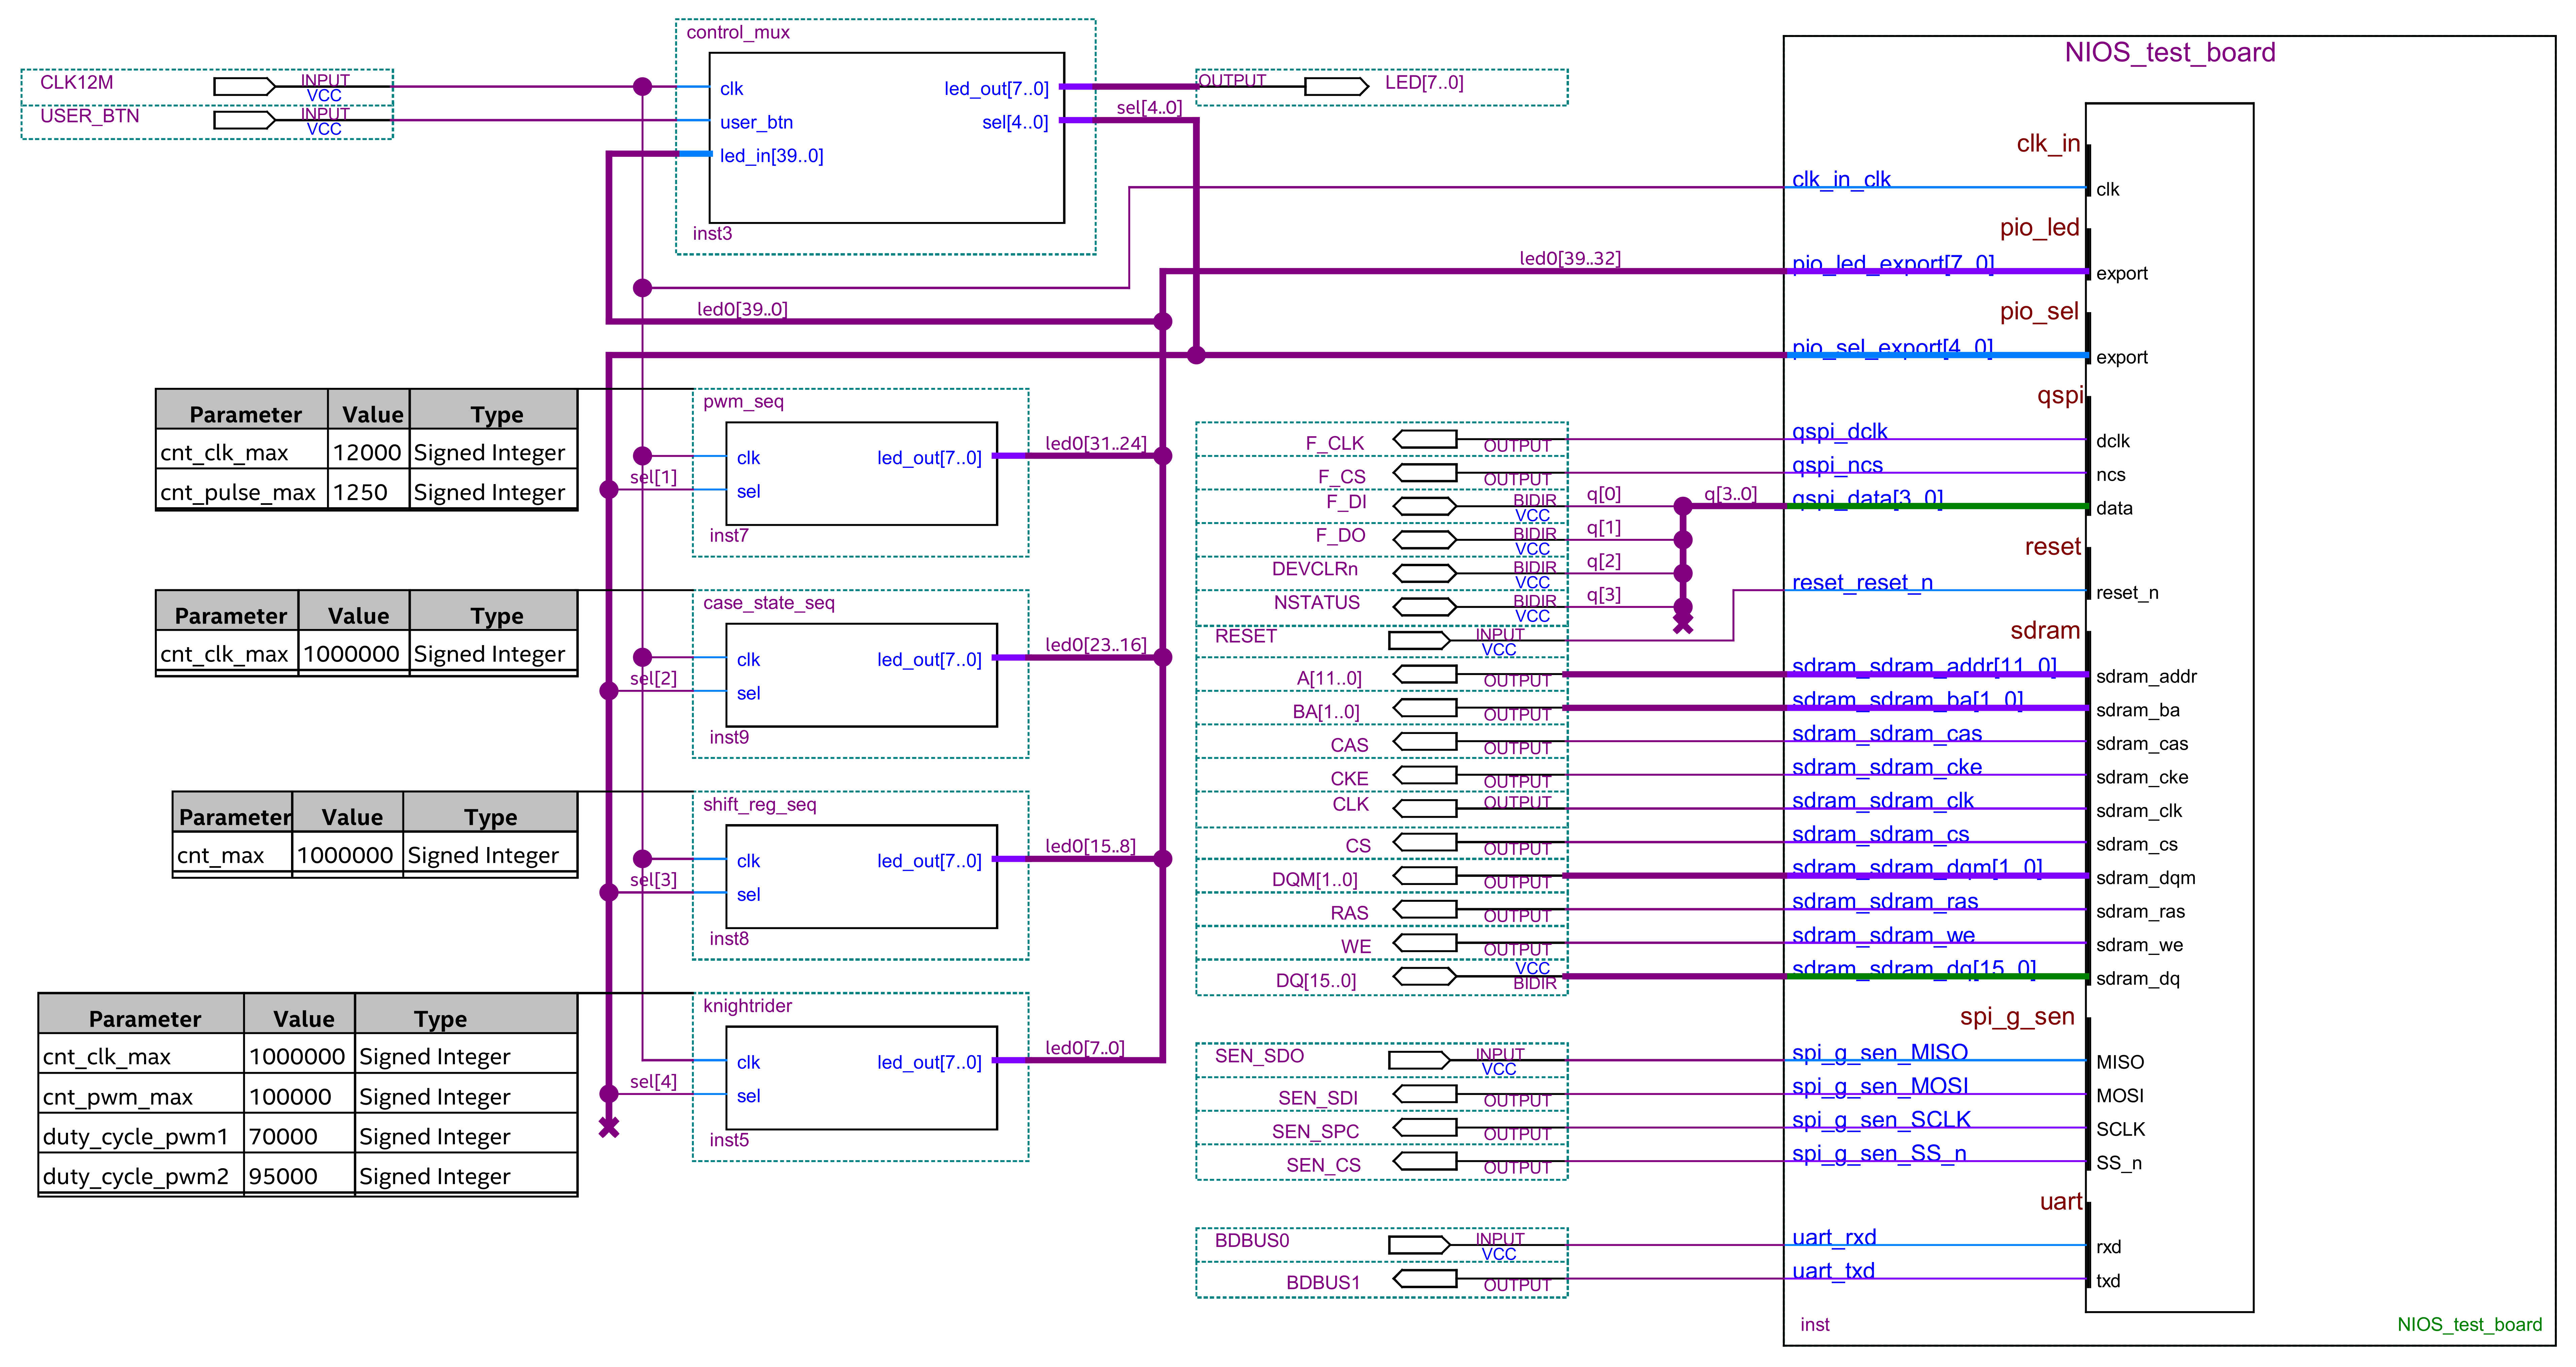 Image RemovedBlock Design - test_board.bdf Image RemovedBlock Design - test_board.bdf |
| Scroll Title |
|---|
| anchor | Figure_BD |
|---|
| title | Block Design - Platform Designer |
|---|
|
| Image RemovedBlock Design - NIOS_test_board.qsys |
Software Design - SDK
Application
| application for NIOS II processor system |
|
Download
Reference Design is only usable with the specified Quartus version. Do never use different versions of Quartus software for the same project.
Reference Design is available on:
Design Flow
| Note |
|---|
Reference Design is available with and without prebuilt files. It's recommended to use TE prebuilt files for first launch. |
Trenz Electronic provides a tcl based built environment based on Quartus Design Flow.
See also:
The Trenz Electronic FPGA Reference Designs are TCL-script based projects. To create a project, open a project or program a device execute "create_project_win.cmd" on Windows OS and "create_project_linux.sh" on Linux OS.
TE Scripts are only needed to generate the quartus project, all other additional steps are optional and can also executed by Intel Quartus/SDK GUI. For currently Scripts limitations on Win and Linux OS see: Project Delivery - Intel devices → Currently limitations of functionality
- Open create_project_win.cmd/create_project_linux.sh:
Image Added'Create Project' GUI example - Select Board in "Board selection"
- Click on "Create project" button to create project
- (optional for manual changes) Select correct quartus installation path in "<design_name>/settings/design_basic_settings.tcl"
Launch
| Page properties |
|---|
|
Note: - Programming and Startup procedure
|
Programming
| Note |
|---|
Check Module and Carrier TRMs for proper HW configuration before you try any design. |
MAX10 Flash
- Connect the Module to USB-Port
- Open create_project_win.cmd/create_project_linux.sh
- Select correct board in "Board selection"
- Click on "Program device" button
- if prebuilt files are available: select "Program prebuilt file"
- using own generated programming file: select "Program other file" and click on "Browse ..." to open own generated programming file
- (optional) click on "Open programmer GUI" to program device with Quartus programmer GUI
- Click on "Start program device" button
JTAG
Not used on this example.
Usage
- Prepare Hardware like described on section 74976247
- Connect UART USB (most cases same as JTAG)
UART
- Open Serial Console (e.g. PuTTY)
- COM Port: Win OS see device manager, Linux OS see dmesg | grep tty (UART is *USB1)
- Speed: 115200
- Press reset button on the module
- Toggle between following modes by pressing user button
- Spirit level
- Winbond SPI flash memory test
- Shift register sequence
- Knightrider sequence
- Case statement sequence
System Design - Quartus
| Page properties |
|---|
|
Note: - Description of Block Design - Project, Block Design - Platform Desginer, ... Block Design Pictures from Export...
|
Block Design
| Scroll Title |
|---|
| anchor | Figure_BD |
|---|
| title | Block Design - Project |
|---|
|
| Image AddedBlock Design - test_board.bdf |
| Scroll Title |
|---|
| anchor | Figure_BD |
|---|
| title | Block Design - Platform Designer |
|---|
|
| Image AddedBlock Design - NIOS_test_board.qsys |
Software Design - SDK
Application
| Page properties |
|---|
|
---------------------------------------------------------- General Example: hello_tei0006Hello TEI0006 is a Quartus Hello World example as endless loop instead of one console output. |
| Page properties |
|---|
|
| hidden | true |
|---|
id | Comments
|
Template location: <design_name>/source_files/software/
...