Page History
| Table of Contents |
|---|
TEI001x Manual Installation Jupyter / Anaconda
TEI001x Manual Installation Jupyter / Anaconda
Installation of Jupyter
Einleitung → Bildchen's der module
...
So running and editing the Demos requires the following steps:
- Step 1 - Installation of Anaconda respectively jupyter
- Step 2 - Installation of "pyserial"
- Step 3 - Driver installation for the module
- Step 4 - Making the demos accessible for Jupyter
- Step 5 - Starting Jupyter
- Step 6 - Opening a demo
- Step 7 - Alter the comport to yours
- Step 8 - Running the demo
- Annotations
| Anchor | ||||
|---|---|---|---|---|
|
Installation of Anaconda respectively Jupyter
The simplest way to execute the demos in Jupyter is accomplished throw the installation of Anaconda.
This will install more than is needed but nearly all requirements in one step.
The Anaconda website provides detailed instructions on how to install the application, just follow the link
http://docs.anaconda.com/anaconda/install/windows/
If the installer offers you the installation of optional application, just skip those, they are
not needed to run the demos or edit their code.
Installation of Pyserial
At least with Anaconda installation on Windows, pyserial (python serial port support library) is not
included and has to be installed. This can be done from the Anaconda command prompt. To open the
Anaconda command prompt, just press the windows key, type Anaconda prompt and open it. Enter
...
into the command prompt an press enter. This starts the search for software dependencies of pyserial,
you are asked to confirm the installation, to proceed press Y.
The console shows a message when pyserial is installed and thereafter the console is no longer needed
and can be closed.
Driver installation for the module
The communication with a module supposes a comport, and therefore a driver is required.
When connecting the module to your computer, windows starts the Automatic driver Installation,
but often the automatic driver installation fails and the driver needs to be installed manually.
...
In dependency to the modules firmware, the driver installation can lead to the appearance of two comports,
in this instance, the higher numbered comport is of importance.
Arrow USB ProgrammerFurther Information and Installation Guide for Linux
Making the demos accessible for Jupyter
The demos for a module are compressed into a zip archive and need to be extracted, to be accessible for
Jupyter. Jupyter has access to the user folder, so a convenient way is to copy the extracted demo folder
into your users folder, for example:
C:\Users\Username\distribution-folder
Starting Jupyter
To open Jupyter, press the windows key and type Jupyter, this presents "Jupyter Notebook (AnacondaX)" to you,
from which one can start Jupyter.
...
So opening it starts the server, which opens a console displaying status messages of the server.
The console must be open all the time, you want Jupyter to run. You can minimize it.
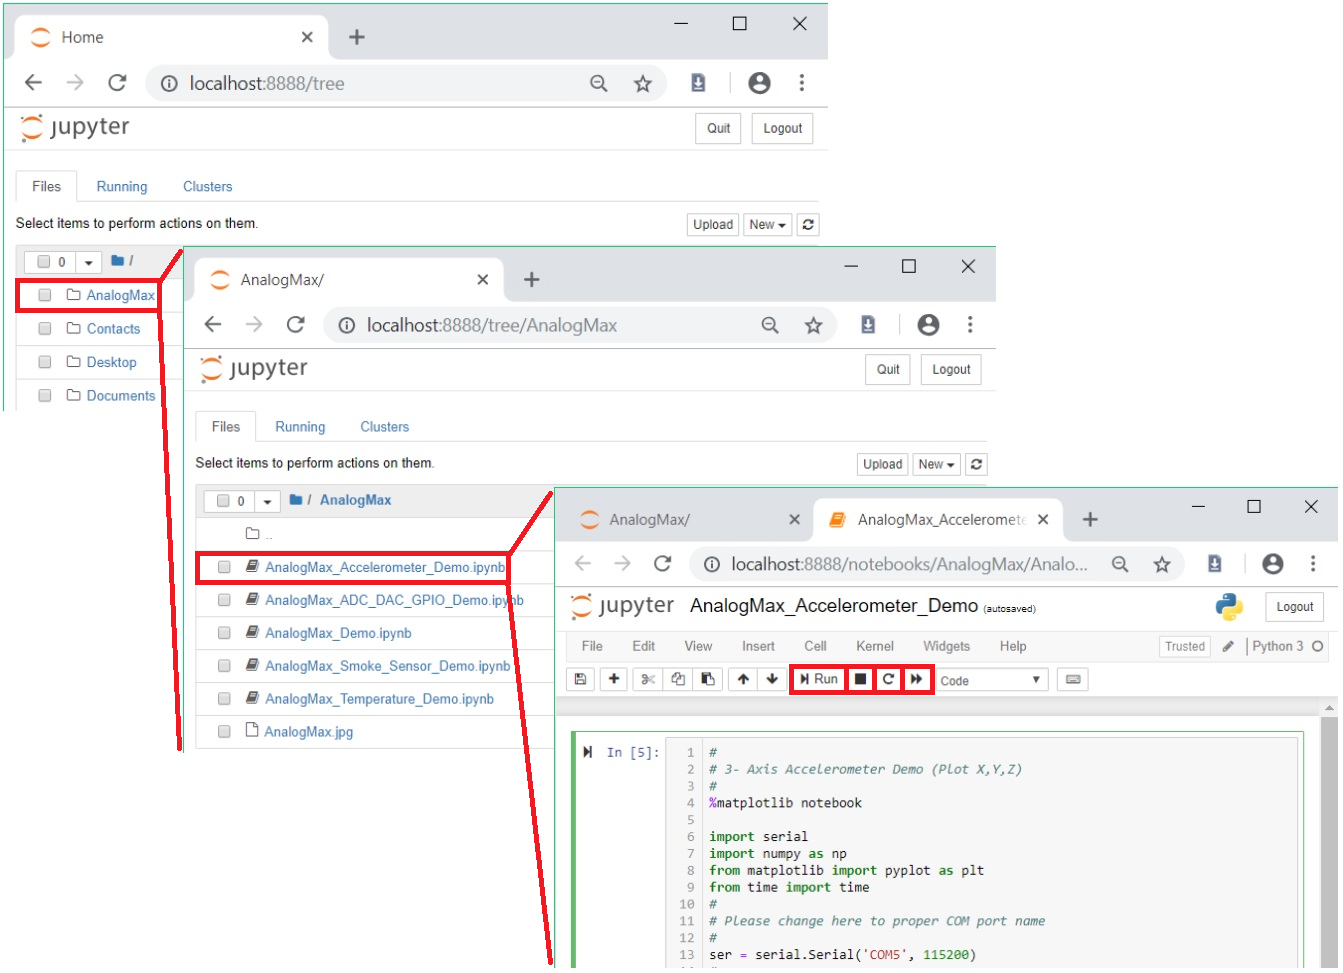
Opening a demo
To open a demo, one hat to navigate to the desired demo via the Jupyter tab. The Jupyter tab inside your browser
displays your user folder, left clicking on a folder opens it. Clicking on a demo file opens it inside its tab.
...
- Home folder / Jupyter tab
- Folder - AnalogMax
- Demo - AnalogMax_Accelerometer_Demo
Alter the comport to yours
Every demo communicates with the module by a serial communication port. This port has been assigned
a number during the driver installation. In our case it is COM5.
At the beginning of each demo is a line:
...
Replace the comport number in red with yours and save this change by pressing "s" whilst holding the
control key (Ctrl + s).
Running the demo
A notebook consists of cells, in which its content resides. Demos so far only contain one cell, to run the demo,
the PC's focus must be upon the cell, left clicking into the cells source code focuses this cell.
...
Often demos gather data from the module and display them in graph plots.
Annotations
- The demos are linked to Jupyter through the import and use of only the following modules:
IPython - Interacting from within the Notebook with its output / plots
ipywidgets - Interactive Widgets/GUI elements for the Jupyter Notebook - Show line numbers inside a notebook: View → Toggle Line Numbers
The Communication Interface
...
Commands
The modules TEI0015 and TEI0016 implements a handler for executing commands. The serial interface speed
must be set to 115200 bits, commands consists of a single character in UTF-8 encoding.
Each command must be transmitted individually.
...
"t" The ADC measures 1 mega samples and saves the values into its SD-RamRAM
"." A single value of stored ADC measurment is transmitted
...
"?" The module returns its ID, TEI0015 returns "1" and TEI0016 returns "2"
ADC data acquisition and Fourier transformation Demo
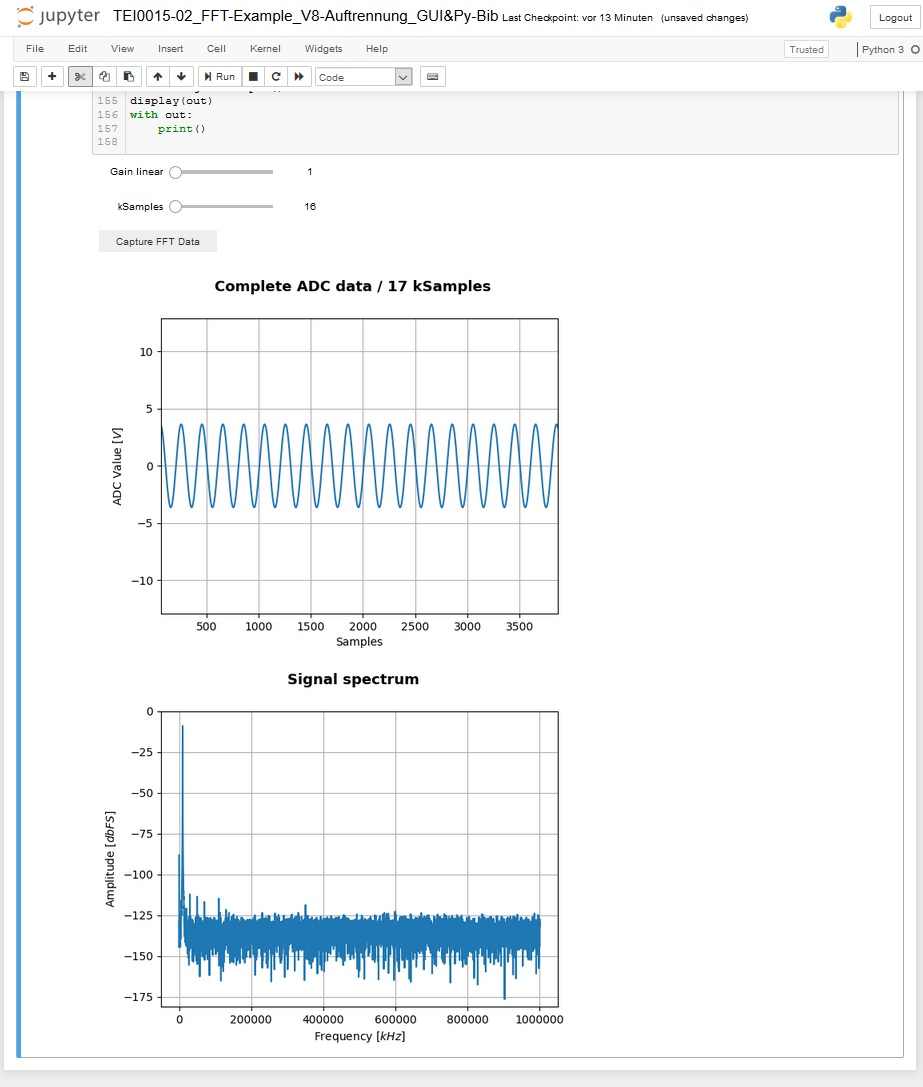
This demo works with the modules TEI0015 and TEI0016. In this example the ADC of the module measures one million samples
and stores them inside its SD-RAM. The data is collected, converted and shown as graph plot, showing its value and
time behaviour and for the second graph a Fourier transformation is performed, showing the Frequency spectrum.
...
In this demo the general approach on how to communicate with the module and perform high speed measurements with
the ADC are shown.
Communicating with module:
To communicate with the module, a serial comport port with a speed set to 115200 bits needs to be opened.
Commands consists of a single character in UTF-8 encoding. The commands are described ... .
It is good practice to communication with the module following these steps:
...
These steps apply also for read operations.
Using the ADC for high speed consecutive measurements
The module provides a method to gather highly accurate consecutive ADC measurements in a single event.
In this mode of operation, one mega sample of ADC values are performed and stored inside the modules
SD-RAM.
...
Overview
Content Tools