Page History
| Table of Contents |
|---|
...
 Example picture
Overview
The modules TEI0010TEI0015, TEI0015 TEI0016 and TEI0016 TEI0023 offer software demonstrations of their basic functionality and
communication interface. This manual provides a step by step guide for installing the required software and
running the demos in generalto run the demo "Jupyter Demo FFT".
For the ease of accessibility and programmability the language Python (since version 3.58) has been chosen.
The project Jupyter provides an excellent and open source entry for beginners and professionals.
Jupyter files are called Notebooks and have the ending fileName .ipynb, this manual refers to them as demodemos source code is contained within a Notebook file.
The following description of steps applies in its details to computers running windows 10, for other
operation systems, the steps are in general similar.
So running and editing the Demos requires the following steps:
- Step 1 - Installation of Anaconda respectively jupyter
- Step 2 - Installation of "pyserial"
- Step 3 - Driver installation for the module
- Step 4 - Making the demos accessible for Jupyter
- Step 5 - Starting Jupyter
- Step 6 - Opening a demo
- Step 7 - Alter the comport to yours
- Step 8 - Running the demo
- Annotations
Download
The demo is available through a link in the parent page.
The download is a folder, containing all the necessary files and documents. The download folder is compressed into a zip archive and needs to be extracted, to be accessible for Jupyter.
Making the demos accessible for Jupyter
Jupyter's file system access is limited to the user folder, so a convenient way is to copy the extracted demo folder into your users folder, for example:
C:\Users\Username\download-folder
Content of the zip
Content of the zip archive - TEI00XY-0x-08-C8A_Jupyter-Demo-FFT-vX.Y_quartusXY.Z_JupX.Y_JupLX.Y_YearMonthDay-Time .zip :
- Folder "Jupyter Demo":
The Notebook / Demo - TEI00-15-16-23_Jupter-Demo-FFT-vX.Y .ipynb
A python code module - TEI00xyCodeModule .py - Folder "Setup-Notebooks":
The Notebook - Python_install_module_dependencies .ipynb
The Notebook - Performs_modifications_to_JupyterLab .ipynb
The Notebook - List_required_modules .ipynb - Board configuration file TEI00xy... .pof
- Manual
...
Installation of "Anaconda Individual Edition" respectively Jupyter and JupyterLab
The simplest way to execute the demos in Jupyter is accomplished throw through the installation of "Anaconda .
Individual Edition" which is free and Open-source. This will install more than is needed but nearly all requirements in one step.
The Anaconda website provides detailed instructions on how to install the application, just follow this link.
It is generally advised to use the default settings of the Anaconda installer. If the installer offers you the installation of optional applications, just skip those, they are
not needed to run the demos or edit their code.
Installation of Pyserial
At least with Anaconda installation on Windows, pyserial (python serial port support library) is not
included and has to be installed. This can be done from the Anaconda command prompt. To open the
Anaconda command prompt, just press the windows key, type Anaconda prompt and open it. Enter
conda install -c anaconda pyserial
into the command prompt an press enter. This starts the search for software dependencies of pyserial,
you are asked to confirm the installation, to proceed press Y.
The console shows a message when pyserial is installed and thereafter the console is no longer needed
and can be closed.
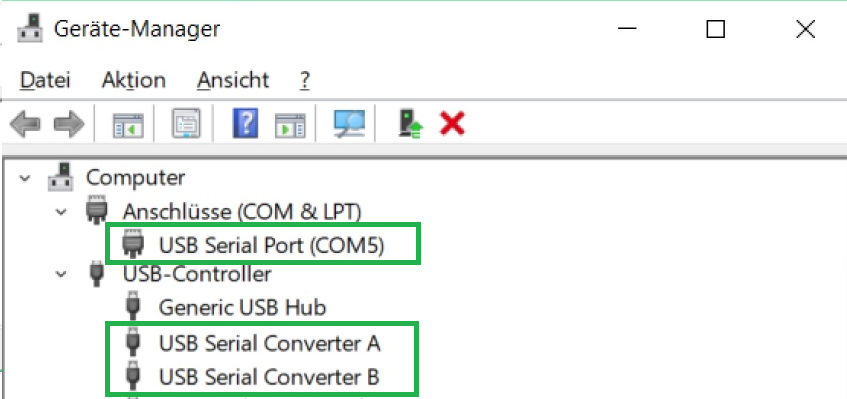
Driver installation for the module
The communication with a module supposes a comport, and therefore a driver is required.
When connecting the module to your computer, windows starts the Automatic driver Installation, but often the automatic driver installation fails and the driver needs to be installed manually.
So it is best practice to connect the module, give the operation system some time, and check
afterwards in the device manager for the appearance of a "comport" and two devices labelled
"USB Serial Convert A and B".
The device manager can be opened either via a right mouse click onto the windows symbol
or by pressing the windows button and typing device manager.
When instead two devices labelled "Arrow USB Blaster" are listed under "other devices", the manual
approach has to be taken.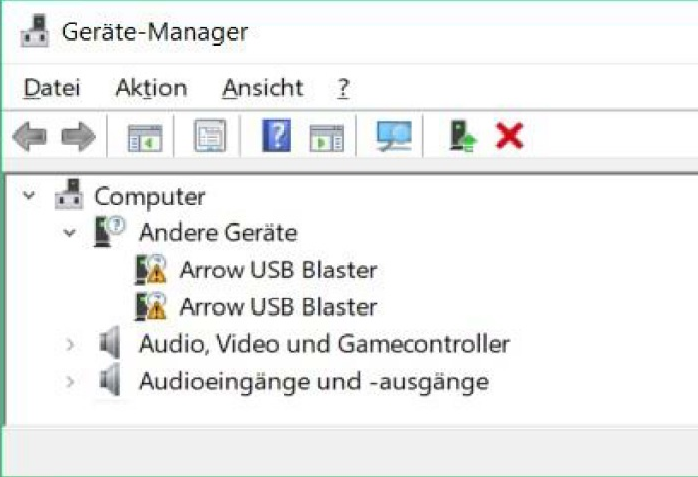
Through a right mouse click on each device, a context menu opens. Chose "Update driver" afterwords chose
"Search automatically for updated driver software", this proper driver installation changes the devices names
into USB Serial Converter A & B, in addition, also the comport is installed.
Check its number (“COMx” ) and memorize it for the later use within the demos.
In dependency to the modules firmware, the driver installation can lead to the appearance of two comports,
in this instance, the higher numbered comport is of importance.
Link to further Information and an Installation Guide for Linux
Making the demos accessible for Jupyter
The demo is available through a link in the parent page. The download is a folder, containing all the necessary
files and documents. The download folder is compressed into a zip archive and need to be extracted, to be accessible for
Jupyter.
Jupyter has access to the user folder, so a convenient way is to copy the extracted demo folder
(TEI001X-0x-08-C8A_Jupyter-ADC-demo_Vx.y_quartusxy.z_...) into your users folder, for example:
C:\Users\Username\download-folder
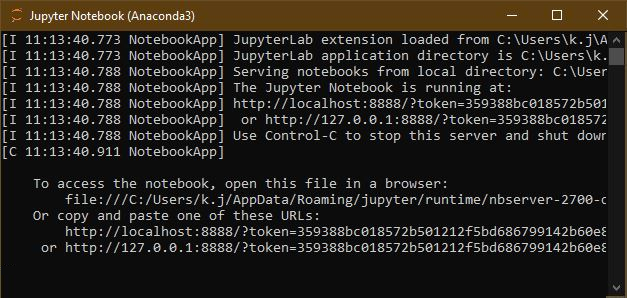
Starting Jupyter
To open Jupyter, press the windows key and type Jupyter, this presents "Jupyter Notebook (AnacondaX)" to you,
from which one can start Jupyter.
Jupyter is based on the "Client-server client structure", the server is executed in the background, and the client is a webpage
inside your default browser. This webpage allows to navigate through the file system and to open and execute the Notebooks.
So opening it starts Jupyter begins by starting the server, which opens is presented as a console displaying status messages of the server, shortly after, the webpage will be opened.
The console must be open all the time, you want Jupyter to run. You can minimize it.

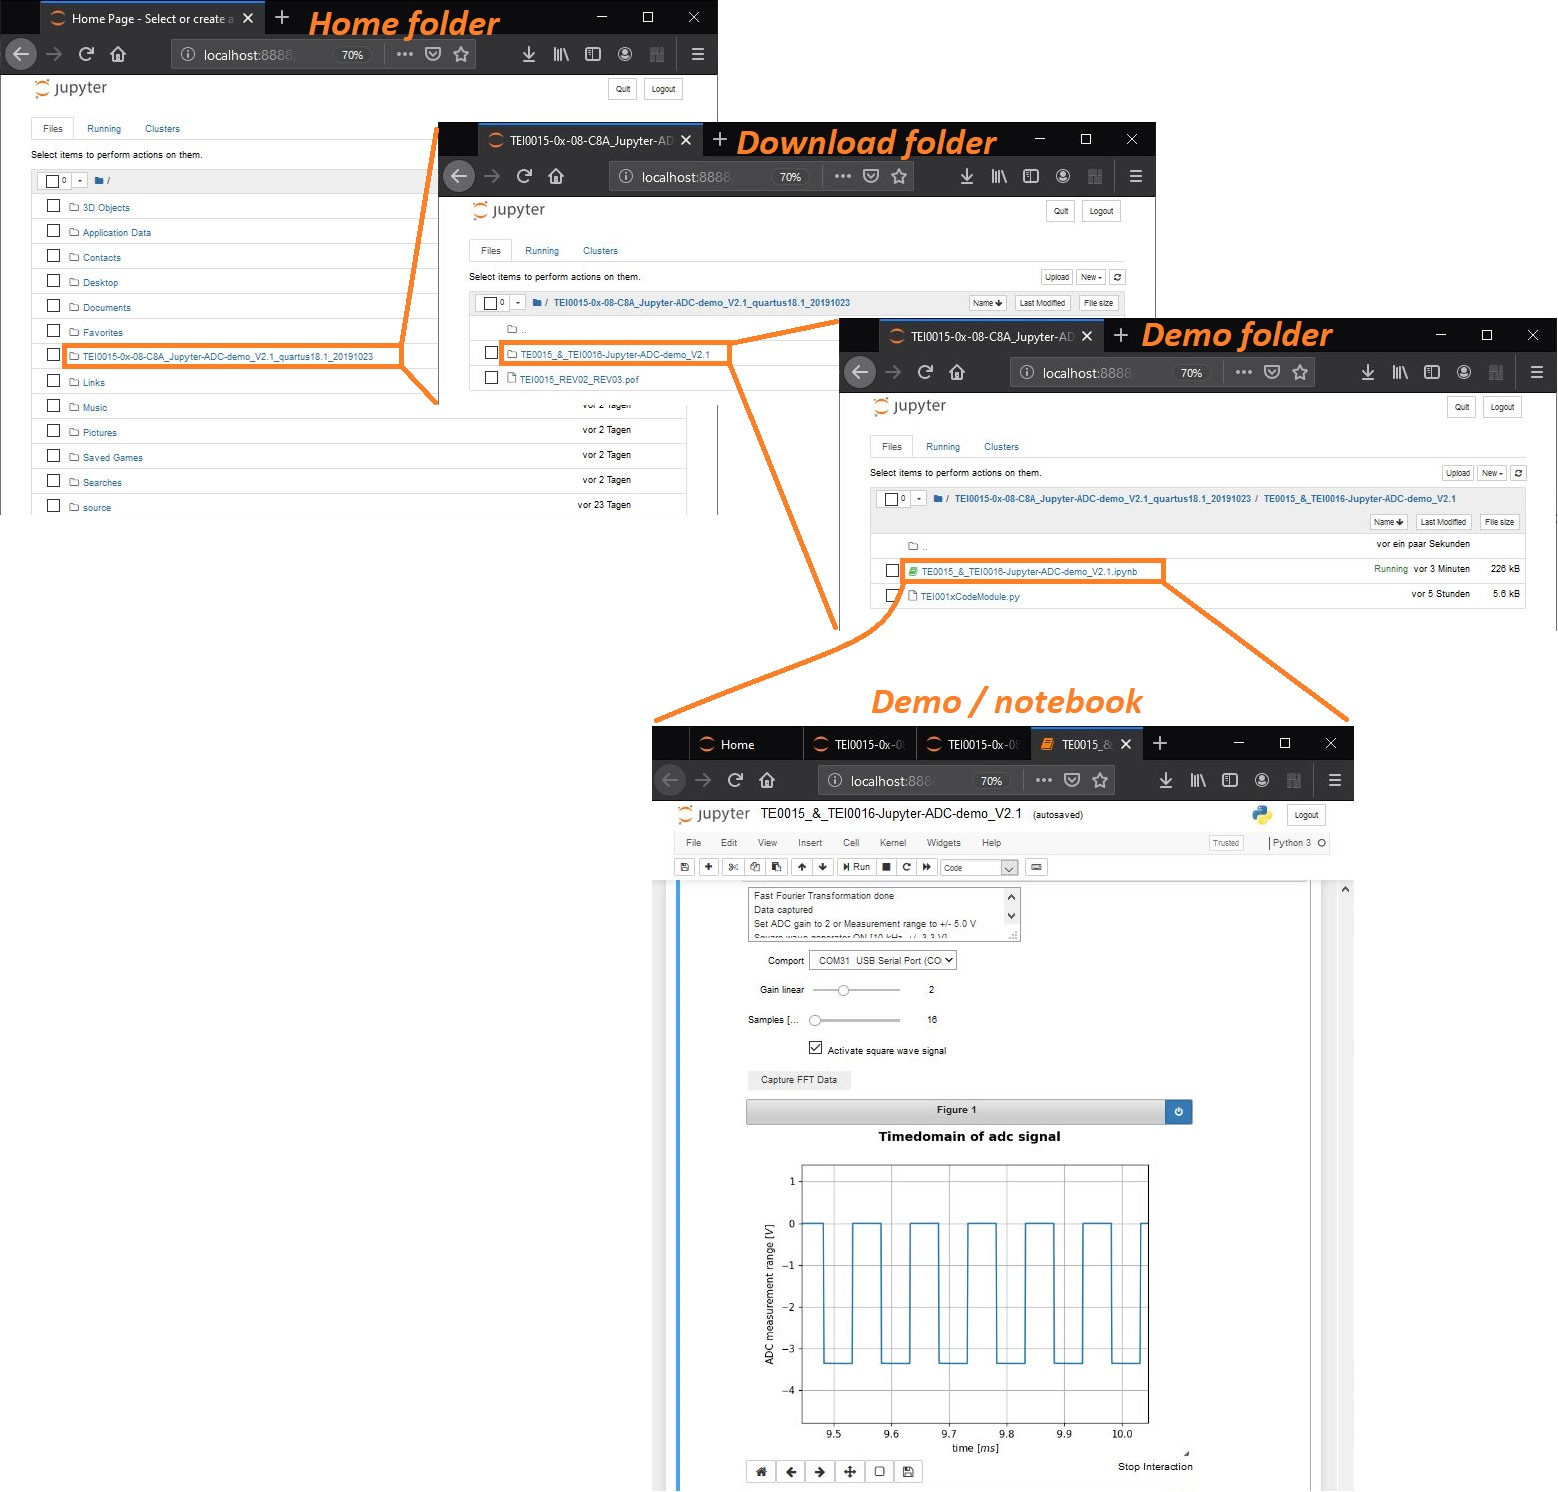
Opening a demo
Using the Jupyter tab to navigate to a Notebook
The following is a general explanation on how to navigate via the Jupyter browser page. Generally, the Jupyter tab inside your browser is in itself a file browser. Jupyter has access only to
your user or home folder which it displays after the program start. To start a notebook, one has to
navigate to the folder containing the notebook file.
Left clicking on a folder opens it. Going back or a level up is accomplished by clicking the back button
of your browser.The path to this demo or notebook is
In the picture below these steps are exemplarily shown:
- Jupyter tab - Home folder
→ Download folder - TEI001X-0x-08-C8A_Jupyter-ADC-demo_Vx.y_quartusxy.z_... - Download folder - TEI001X-0x-08-C8A_Jupyter-ADC-demo_Vx.y_quartusxy.z_...
→ Demo folder - TE0015_&_TEI0016-Jupyter-ADC-demo_Vx.y - Demo folder - TE0015_&_TEI0016-Jupyter-ADC-demo_Vx.y
→ Demo or notebook - TE0015_&_TEI0016-Jupyter-ADC-demo_Vx.y .ipynb
In the picture below these steps are shown.
Alter the comport to yours
Every demo communicates with the module by a serial communication port. This port has been assigned
a number during the driver installation. In our case it is COM5.
In dependency to the code of a demo, there are two variants.
Variant 1:
At the beginning of the Notebook is a line:
ser = serial.Serial('COM5', 115200)
or
comport = 'COM5'
Replace the comport number in red with yours and save this change by pressing "s" whilst holding the
control key (Ctrl + s).
Variant 2:
Some demos contain a graphical user interface. The available comport will be presented
automatically and can be selected trough the GUI.
As an option, a default comport can be set at the beginning of the notebook.
Running the demo
- Notebook
Executing a Notebook
A notebooks browser tab is the combination of a simple IDE together with the capability to directly run scripts.
A notebook consists of cells, in which its content, the applications source code resides. The code can easily be altered and directly executed from within the cell. The output of a cell for data, tables, graphs and GUI elements are below a cell. To a notebook can Cells be added or removed.
Before executing a Notebook, . Demos so far only contain one cell, to run the demo,
the PC's focus must be upon the cell, left clicking into the cells source code focuses this cell.
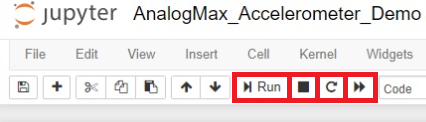
Now the demo can be run through pressing the run Run button,
stopped by the button with the black rectangular,
reloaded through the circular arrow and lastly
reloaded and rerun by the two arrowed button.
Important! When the code of a Notebook was changed, one has to reload the Notebook.
The notebook can be closed either by closing the tab or via File → "Close and Halt".
Installation of Python software modules
Use the Jupyter browser tab to navigate along the path:
→ Jupyter tab - Home folder
→ Extracted demo archive : TEI00XY-0x-08-C8A_Jupyter-Demo-FFT-vX.Y_quartusXY.Z_JupX.Y_JupLX.Y_YearMonthDay-Time .zip
→ Folder: Setup-notebooks
Content:
Python_install_module_dependencies.ipynb
Performs_modifications_to_JupyterLab.ipynb
List_required_modules.ipynb
To install the missing Python code modules for this demo ( serial/ pyserial/ ipympl ), the Notebook Python_install_module_dependencies.ipynb has to be executed. This installs the required Python software modules.
After installation of the modules, Jupyter needs to be restarted.
JupyterLab requires also the execution of the Notebook Performs_modifications_to_JupyterLab.ipynb to function correctly ( This modifies the output for interaction with matplotLib ). Afterwards, JupyterLab can be started.
Executing the Demo Notebook
The parent page provides a link to a detailed description on how to use this Demo and install the module driver.
Connect a module via USB, if necessary install the driver. Every demo communicates with the module by a serial COM-port. This port has been assigned a number during the driver installation. This Demo notebook contains a graphical user interface. The available COM-ports will be scanned when the Notebook is executed. They are presented and selectable through the GUI. The Notebook containing the Demo TEI00XY_Jupter-Demo-FFT_vX.Y .ipynb is stored along the path:
→ Jupyter tab - Home folder
→ Extracted demo archive : TEI00XY-0x-08-C8A_Jupyter-Demo-FFT-vX.Y_quartusXY.Z_JupX.Y_JupLX.Y_YearMonthDay-Time .zip
→ Folder: Jupyter-Demo
Content:
TEI00XY_Jupter-Demo-FFT_vX.Y .ipynb
TEI00xyCodeModule.py
As an option, a default COM-port can be set at the beginning of the notebook and the style of the FFT plot can be altered from logarithmic to linear. At the bottom of the Notebook, the size of the graphs can be alteredOften demos gather data from the module and display them in graph plots.
All output of a notebooks cell is displayed below the cell.
Annotations
- The demos are only linked to Jupyter through the import and use of only the following modules:
IPython - Interacting from within the Notebook with its output / plots
ipywidgets - Interactive Widgets/GUI elements for the Jupyter Notebook - Show line numbers inside a notebook: View → Toggle Line Numbers
Autocomplete is available when pressing the Tab key
- Variables of a notebook cell are not encapsulated from other cells inside the same notebook
Overview
Content Tools