Table of contents
TEI0022 CPLD Access
- CPLD JTAG is selectable with DIP S8-JTAGEN to ON
- Connect your USB cable to USB connector J13
Available CPLD Firmware
- TEI0022 CPLD - Firmware description for PCB Revision 02 and newer
- Default delivered Firmware
- TEI0022-REV01 CPLD - Firmware description for PCB Revision 01
- Default delivered Firmware
Download
- TEI0022/<PCB Revision>/Firmware/
- Use files from the subfolders of your PCB revision
General Instructions
MAX 10 Firmware Update - General Requirements
- Quartus Prime software, available for free (lite version) on https://www.intel.de/
- Arrow USB Programmer Driver
- Quartus compatible JTAG programmer, for example:
- TEI0004 - Arrow USB Programmer2 or carrier board with FTDI for JTAG
- Other JTAG Programmer compatible with Quartus Programmer
- JTAG must be connected to FPGA JTAG
- Correct Firmware (*.pof file) from Download area
MAX 10 Firmware Update - General Procedure
Important:
- Connect only one JTAG device to host PC.
- Close all other JTAG programs.
Procedure:
- Enable FPGA JTAG access (see JTAG section on Firmware description)
- Connect JTAG
- Power on system
- Open Quartus Prime
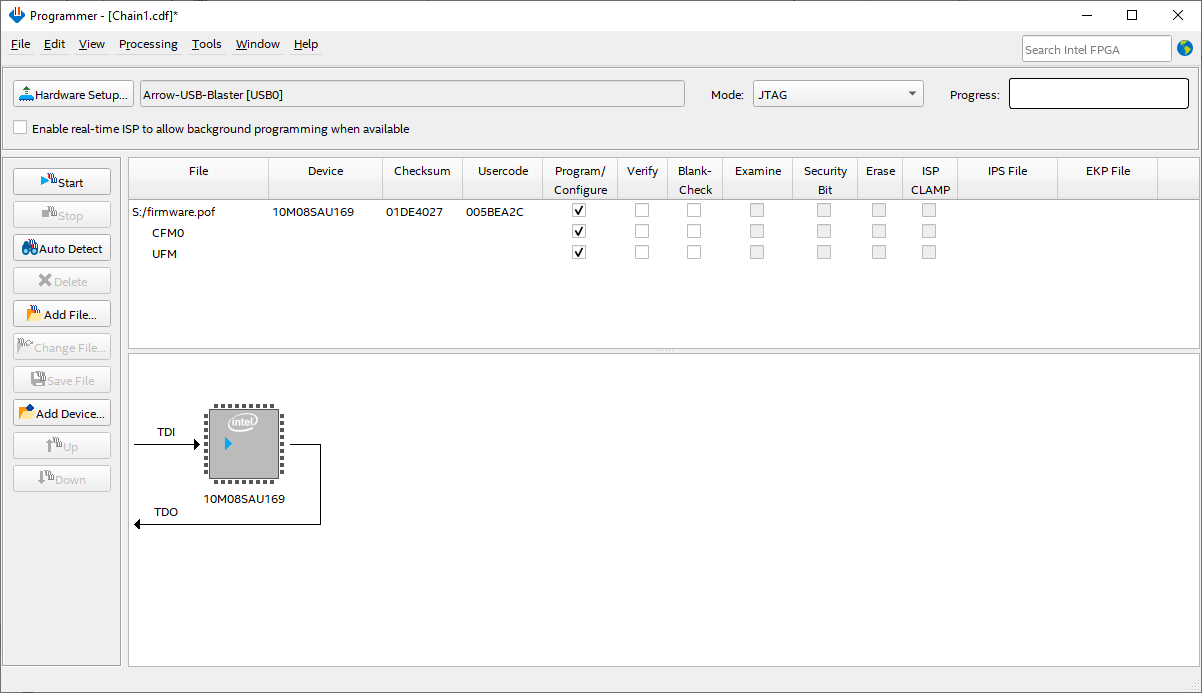
- Open Quartus Programmer from top menu: Tools → Programmer
- Select from Programmer top menu: Edit → Hardware Setup
- Select via the drop down menu: Arrow-USB-Blaster [USB0] (Installation of Arrow USB Programmer needed) and close the window
- Click Add File...
- Select correct Firmware from Download area and press Open
- Click Start to program the device
More information are available on the Firmware description.
JTAG Muxing
Intel MAX 10 - JTAG muxing
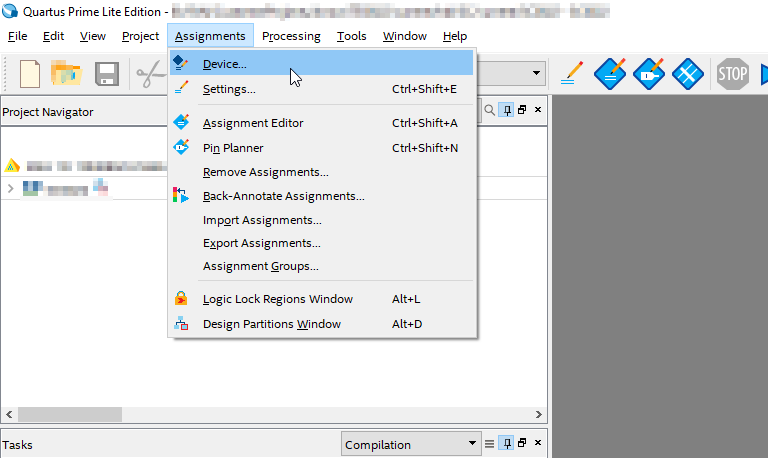
If customer firmware should feature JTAG muxing it is necessary to select "Enable JTAG pin sharing" within Quartus Prime.
This can be done by selecting Assignment → Device, as shown in the following figure.
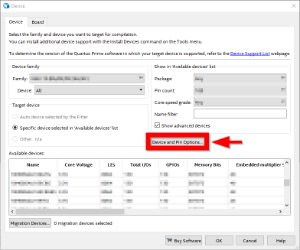
In the next window it is necessary to click on Device and Pin Options..., as visible in the next figure.
Then select "Enable JTAG pin sharing" in the Options box as visible in the next figure.
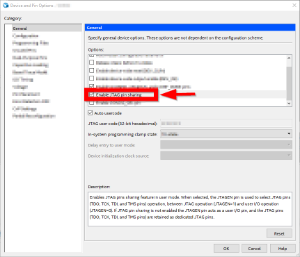
With this option, JTAG muxing should be possible via Intel MAX 10 JTAGEN pin.
Intel MAX 10 - JTAG muxing
If customer firmware should feature JTAG muxing it is necessary to select "Enable JTAG pin sharing" within Quartus Prime.
This can be done by selecting Assignment → Device, as shown in the following figure.
In the next window it is necessary to click on Device and Pin Options..., as visible in the next figure.
Then select "Enable JTAG pin sharing" in the Options box as visible in the next figure.
With this option, JTAG muxing should be possible via Intel MAX 10 JTAGEN pin.
Overview
Content Tools