Starting with release 2026.2, AMD deprecates PetaLinux. Embedded Linux development is now based on a native Yocto/OpenEmbedded workflow within the AMD Embedded Development Framework (EDF).
This tutorial describes the Custom Hardware Development workflow within the Software Hardware Exchange Loop (SHEL) for creating a Linux image for a custom hardware platform. Starting from a Vivado XSA, it demonstrates how to generate the System Device Tree (SDT) using SDTGen, create a Yocto Project machine configuration with gen-machine-conf, and finally build the files required to boot Linux. It also provides a step-by-step guide through the complete workflow.
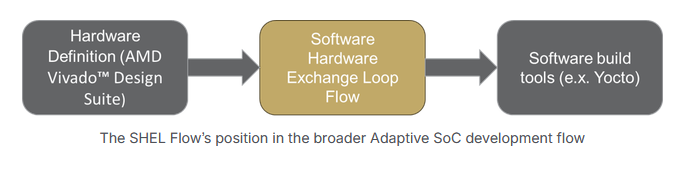
Hardware Definition (AMD Vivado Design Suite)
Hardware development is performed in the AMD Vivado™ Design Suite. Once the hardware development process has been completed successfully, the hardware design is exported as an XSA, which serves as the handoff between hardware and software development. The hardware design process itself is outside the scope of this tutorial.
Software Hardware Exchange Loop (SHEL)
The AMD SHEL (Software Hardware Exchange Loop) serves as the interface between hardware and software. Its purpose is to package the generated hardware data into a standardized format that can be processed by different build systems and operating systems. A key component of this concept is the System Device Tree (SDT). The SHEL flow essentially relies on the SDTGen and Lopper tools, as shown in the diagram below.
This document focuses exclusively on the red path shown in the diagram, representing the Yocto/Linux flow. Other build systems and operating systems, such as FreeRTOS, Zephyr RTOS, or bare-metal applications are not covered by this documentation.
SDTGen, gen-machine-conf and Lopper within the SHEL flow
SDTGen (System Device Tree Generator)
The System Device Tree Generator SDTGen translates the proprietary hardware description generated by the AMD Vivado™ Design Suite into a stable, open-source, text-based format. This format is designed to be reliable and accessible for any tool, vendor, or customer. System Device Tree is an extension of the Device Tree concept that is used in Linux. It is designed to handle heterogeneous SoCs with multiple CPUs and execution domains. It provides a global hardware description for the entire SoC. By comparison, a traditional Device Tree only describes the hardware for a single domain. In this document, that domain refers to an OS, specifically Linux.
An overview of SDTGen, including documentation, READMEs and Tutorials can be found at the following link
gen-machine-conf (Lopper)
The gen-machine-conf tool generates the configuration required to build a Linux-based system from the System Device Tree (SDT). It provides
- configuration data for various operating systems,
- build tools, and
- hypervisors that constitute a complex software system.
The gen-machine-conf tool runs within the AMD EDF environment edf-init-build-env and internally calls Lopper to process and transform the System Device Tree (SDT).
Lopper is a tool for processing and transforming Device Tree data. In the SHEL flow, it is used, for example, to prune the System Device Tree (SDT) into a traditional Device Tree describing the hardware for a single operating system. This enables seamless integration and automation across different software domains.
As part of this process, gen-machine-conf generates both the Linux Device Tree and the required Yocto configuration files.
An overview of gen-machine-conf, including documentation and additional resources, can be found at the following link
Software Build Tools
The SHEL flow provides the hardware information required by the software build environment. As described in the previous chapter, gen-machine-conf processes the System Device Tree and, for the Yocto/Linux flow, generates the Linux Device Tree and the required Yocto configuration files.
Although SHEL supports different build systems and operating systems, this document focuses exclusively on the Yocto/Linux flow. Other build systems and operating systems are not covered.
The following section briefly describes how Yocto uses the generated hardware information to build the Linux-based system. The complete process is then demonstrated step by step in the following tutorial.
Yocto
The Yocto Project is a build framework for creating an embedded Linux distribution. It combines metadata layers and recipes to fetch source code, apply configuration and patches, cross-compile the required components, and assemble bootable images.
In this workflow, the Yocto configuration files generated by gen-machine-conf connect the hardware description to the build system. Yocto uses
- the generated machine configuration,
- the generated Linux Device Tree,
- the layers included in EDF, and
- the Trenz custom layer
meta-trenz-amd
to build the Linux root filesystem and the required boot artifacts.
Yocto requires a Linux-based build environment. For detailed host dependency requirements, refer to: Prerequisites
To help users transitioning from PetaLinux better understand how to work with Yocto, the following table compares the tools/workflows used in PetaLinux and Yocto under AMD EDF:
| Design flow step | PetaLinux Tool/Work flow | Yocto EDF Tool/Work flow |
|---|---|---|
| Hardware platform creation (for custom hardware only) | AMD Vivado design tools | AMD Vivado design tools |
| Create/Set up a project | Create a project template
| Set up a Yocto/EDF build environment
|
| Initialize a PetaLinux project (for custom hardware only) | Initialize
| Initialize
|
| Configure U-Boot |
|
Example
|
| Configure the Linux kernel |
|
Example
|
| Create user applications |
| Create own new recipe: https://docs.yoctoproject.org/dev/dev-manual/new-recipe.html |
| Configure the root filesystem |
| If you build the image edf-linux-disk-image.bbappend IMAGE_INSTALL:append= " \
i2c-tools \
"
to edf-linux-disk-image.bbappend in your layer |
| Build the system | Build
| Build
Example Versal TE0950:
Example ZynqMP TE0820:
|
| Package the system | Package
| Artifacts appear in |
| Boot the system |
|
|
Source: Migration guide: design-overview
Overview of meta-trenz-amd
Folder | File | Type | Description |
|---|---|---|---|
conf | layer.conf | config | Layer configuration (layer name, priority, compatible Yocto releases). A new layer gets this file from
|
recipes-apps | mipi-example/mipi-example.bb | recipe | MIPI camera streaming setup script (cam-setup.sh) |
startup/startup.bb | recipe | Automatic execution of init.sh from the SD card at boot. Deactivated in Yocto due to the EU Cyber Resilience Act (CRA). | |
webfwu/webfwu.bb | recipe | Webserver application suitable for ZynqMP access. Need busybox-httpd. | |
recipes-bsp | device-tree/device-tree.bbappend | bbappend | Add system-user.dtsi |
u-boot/u-boot-xlnx_%.bbappend | bbappend | U-Boot customization: bsp.cfg + UBIFS/distroboot patches | |
u-boot/u-boot-edf-scr_%.bbappend | bbappend | Overrides edf-linux-mmc-boot.cmd from AMD-EDF to generate Trenz version boot.scr | |
bootbin/xilinx-bootbin_1.0.bbappend | bbappend | Add task: collects SPDX docs into .spdx.tar.zst at BOOT.bin deploy | |
embeddedsw/fsbl-firmware_2023.2.bbappend | bbappend | Legacy: FSBL customization for AMD 2023.2 (currently commented out) | |
embeddedsw/fsbl-firmware_2024.2.bbappend | bbappend | Legacy: FSBL customization for AMD 2024.2 (currently commented out) | |
embeddedsw/embeddedsw-source_2025.2.bbappend | bbappend | FSBL customization from 2025.2 version: patches TE hooks (Si5338 clock, UART, I²C, board boot hooks) | |
recipes-core | busybox/busybox_%.bbappend | bbappend | Adds systemd service unit and config for busybox-httpd. |
systemd/systemd-bootconf-edf_1.00.bbappend | bbappend | Overrides EFI boot arguments for te0950 (Versal) | |
recipes-kernel | linux/linux-xlnx_%.bbappend | bbappend | kernel config and patches Add task: generate fitImage image.ub (minimal initramfs image used for internal tests) |
recipes-extended | images/te-image-initramfs.bb | recipe | Configuration of a minimal files system for image.ub |
images/edf-linux-disk-image.bbappend | bbappend | Add packages migrated from previous PetaLinux reference designs | |
wic | edf-disk-single-rootfs-small.wks | wks | wic layout with smaller rootfs and user storage. (currently not used) |
(layer root) | yocto_setup | script | Project setup script, see Quick Start with yocto_setup |
tools | yocto_setup/<module_series>_yocto_setup | script | Series-specific settings for yocto_setup (board machine, common processor machine) |
Prerequisites
AMD Vitis
A corresponding AMD Vitis installation is required for System Device Tree generation (SDTGen). The Vitis version must be compatible with the selected AMD EDF release.
For example:
- AMD EDF 2025.2 → AMD Vitis 2025.2
- AMD EDF 2026.1 → AMD Vitis 2026.1
Yocto Host Dependencies
Install the standard Yocto dependencies for your host machine per the Yocto Reference Manual - Required Packages for the Build Host.
The following commands are used to install the packages needed to build an image on a headless system:
Linux build host (any directory)
sudo apt-get install \
    build-essential chrpath cpio debianutils diffstat \
    file gawk gcc git iputils-ping libacl1 libcrypt-dev locales \
    python3 python3-git python3-jinja2 python3-pexpect python3-pip python3-subunit \
    socat texinfo unzip wget xz-utils zstd
Alternatively, if your Linux machine does not match the host dependencies, a docker image could potentially be used as the build environment - see Building Yocto Images using a Docker Container
Repo
Repo is a repository management tool that is built on top of Git. Repo unifies the many Git repositories when necessary, and automates parts of the development workflow.
Repo is generally available from the OS Package manager, so it is preferred to install it using this method:
Linux build host (any directory)
# Install repo from your package manager
sudo apt-get install repo
# or
sudo yum install repo
However, if you do not have access rights to your Linux machine, or if the distribution does not support repo in this way, it can be installed manually using the instructions from
Linux build host (any directory)
# Download repo from Google
export REPO=$(mktemp /tmp/repo.XXXXXXXXX)
curl -o ${REPO} https://storage.googleapis.com/git-repo-downloads/repo

# Authenticate signature and install
gpg --recv-keys 8BB9AD793E8E6153AF0F9A4416530D5E920F5C65
curl -s https://storage.googleapis.com/git-repo-downloads/repo.asc | gpg --verify - ${REPO} && mkdir -p ~/bin && install -m 755 ${REPO} ~/bin/repo

# Check and if necessary change repo to use python3 command directly instead of python
if grep -q '^#!/usr/bin/env python3$' ~/bin/repo; then
    echo 'Python 3 already present, nothing to do.'
else
    echo 'Python 3 not present, replacing first line with Python 3.'
    sed -i '1c\#!/usr/bin/env python3' ~/bin/repo
fi

# Test repo is working
export PATH=~/bin:$PATH
repo --help
Step-by-Step Tutorial
Setup Using the meta-trenz-amd Layer
Starting with version 2025.2, Trenz reference designs will include a Yocto layer named meta-trenz-amd. This layer is used to build the reference designs and also provides board-specific configurations and modifications for the customers. Users can use meta-trenz-amd as a basis for developing their own Yocto projects.
The following sections provide a step-by-step guide to creating a complete Yocto project based on this layer and building the boot files.
The sections below describe each step. The Trenz script yocto_setup performs the setup steps automatically, see Quick Start with yocto_setup.
Generate the SDT Output
Once the Hardware Platform Description File '*.xsa' has been generated by Vivado, the System Device Tree (SDT) can be generated using SDTGen. Optionally, a user-provided Device Tree fragment *.dtsi can also be specified.
Syntax
<AMD_Embedded_install_path>/<version>/Vitis/bin/sdtgen -xsa <design_wrapper_name>.xsa -dir <sdt_dir> [-user_dts <dtsi_file>]
Examples for TE0820 (module variant 2eg_1e_2gb), run from the reference design folder:
Windows (PowerShell):
reference design folder (Windows PowerShell)
& "<AMD_Embedded_install_path>\<version>\Vitis\bin\sdtgen.bat" `
    -xsa "./prebuilt/hardware/2eg_1e_2gb/te0820-rd_2eg_1e_2gb.xsa" `
    -dir "./os/yocto/sdt_outdir"
Linux (bash):
reference design folder (Linux bash)
source <AMD_Embedded_install_path>/<version>/.settings.sh
sdtgen \
    -xsa ./prebuilt/hardware/2eg_1e_2gb/te0820-rd_2eg_1e_2gb.xsa \
    -dir ./os/yocto/sdt_outdir
AMD_Embedded_install_path: Path to the AMD Embedded Installation
version: Vitis version corresponding to the selected EDF release (
SDTGenis included in the Vitis installation).design_wrapper_name: path to the XSA file generated by AMD Vivado.
sdt_dir: Output directory for the generated System Device Tree.
dtsi_file: Path to the custom user Device Tree include file (.dtsi). This option should not be used with
meta-trenz-amd, as the .dtsi files required for the development board are already provided by this layer.
The reference design ZIP with prebuilt files already contains the generated SDT for each module variant under prebuilt/platform/<short name>/hw/sdt. Copy it to os/yocto/sdt_outdir to skip this step.
This only applies to the unmodified reference design. If the Vivado design is changed, generate the SDT again.
Quick Start with yocto_setup
The Trenz Yocto layer includes a script yocto_setup that generates a complete Yocto build environment for a specific board. The script downloads the layers required by AMD-EDF, configures the necessary environment variables, and generates the machine configuration. After running the script, users just need to call BitBake to build the edf-linux-disk-image and xilinx-bootbin recipes, which generate the Linux image and boot files.
It requires Google's repo tool (see Repo).
Before proceeding, make sure that the SDTGen output directory is located at os/yocto/sdt_outdir. The script expects exactly this path. Then change to the os/yocto directory and run:
os/yocto
source ./meta-trenz-amd/yocto_setup <module_series> [--no-genconf] [--no-imageub] [--id <N>]
module_series: Trenz module series, e.g. te0820 or te0950. The series-specific settings are stored inmeta-trenz-amd/tools/yocto_setup/<module_series>_yocto_setup.--no-genconf(-n): skipgen-machine-conf, e.g. if the machine configuration has already been generated.--no-imageub(-I): do not copy image.ub withcopy_build_artifacts.--id <N>: ID of the module variant in the board files CSV, used for the variant-specific clock configuration.
Examples:
os/yocto
# TE0820 (Zynq UltraScale+ MPSoC)
source ./meta-trenz-amd/yocto_setup te0820

# TE0950 (Versal)
source ./meta-trenz-amd/yocto_setup te0950
The script must be sourced (source), not executed. It defines the functions bitbake and copy_build_artifacts in the current shell.
yocto_setup automates the AMD EDF project initialization for the given module series:
- Downloads the required Yocto layer repositories via repo (only if they are not complete yet).
- Loads the EDF build environment (
edf-init-build-env). - Generates the board machine configuration with
gen-machine-conf. - Adds the
meta-trenz-amdlayer to the project. - Sets the board machine and the corresponding common processor machine as build variables.
After sourcing the script, the shell is in os/yocto/build. All following commands are run from there.
yocto_setup has performed all setup steps. Continue with Build the Images.
The following sections describe the same steps without the script. They are not needed if you used yocto_setup.
Set Up the Yocto Project
Only needed when yocto_setup is not used. If you used yocto_setup, continue with Build the Images.
The following steps set up the project without the yocto_setup script, for a better understanding of the Yocto build process.
Use a new terminal. If yocto_setup was sourced before in the same shell, its bitbake wrapper and copy_build_artifacts are still active.
If yocto_setup was already used in the same os/yocto directory, build/conf/local.conf also contains the board override (block # TE-mod start … # TE-mod end). Use a new directory or remove this block to follow the manual steps.
This step is equivalent to petalinux-create in the PetaLinux workflow. It requires Google's repo tool (see Repo). After installing repo run:
os/yocto
repo init -u https://github.com/Xilinx/yocto-manifests -b rel-v2025.2 -m default-edf.xml
repo sync
Repo fetches all the Yocto layer repositories defined in the manifest into the sources directory, as well as the edf-init-build-env script, which initializes a build environment.
Generate the Hardware Configuration
This step is equivalent to petalinux-config --get-hw-description in the PetaLinux workflow.
Before running other commands, load the EDF environment setup script.
os/yocto
source ./edf-init-build-env
os/yocto/build
cd ..
gen-machine-conf parse-sdt \
    --hw-description <sdt_dir> \
    --machine-name <board_name> \
    -c "$(pwd)/build/conf"
Examples:
os/yocto
# TE0820, SDT generated with SDTGen (see Generate the SDT output)
gen-machine-conf parse-sdt \
    --hw-description sdt_outdir \
    --machine-name te0820 \
    -c "$(pwd)/build/conf"

# TE0820, prebuilt SDT from the reference design ZIP (module variant 2eg_1e_2gb)
gen-machine-conf parse-sdt \
    --hw-description ../../prebuilt/platform/2eg_1e_2gb/hw/sdt \
    --machine-name te0820 \
    -c "$(pwd)/build/conf"
- sdt_dir: the path to the SDT output generated by
SDTGen. - board_name: the name of this custom machine configuration. For users of
meta-trenz-amd, please use the board name (e.g., te0950 or te0820) as the machine name.
For more information about gen-machine-conf, refer to:
gen-machine-conf usage (GitHub)
Add the Trenz Layer
Add the meta-trenz-amd layer to the Yocto project.
os/yocto
bitbake-layers add-layer meta-trenz-amd
Without this step, BitBake builds without the Trenz changes (e.g. U-Boot and kernel configuration, device tree, FSBL patches). Check that meta-trenz-amd is listed:
bitbake-layers show-layers
Add the Board Override
Board-specific settings in meta-trenz-amd use the board machine as override (e.g. :te0820), for example:
- additional packages
- kernel patches and configuration
Because edf-linux-disk-image is built with the common processor machine, these settings are not applied automatically.
yocto_setup does this automatically. Without yocto_setup, add the following line at the end of os/yocto/build/conf/local.conf, e.g. with a text editor. The line is a BitBake setting, not a shell command.
os/yocto/build/conf/local.conf
MACHINEOVERRIDES .= "${@':<board-machine>' if d.getVar('MACHINE') == '<common-processor-machine>' else ''}"
Example for TE0820: run the following commands from os/yocto. The first command changes to os/yocto/build, the second appends the line to conf/local.conf (run it only once):
os/yocto
cd build
cat >> conf/local.conf << 'EOF'
MACHINEOVERRIDES .= "${@':te0820' if d.getVar('MACHINE') == 'amd-cortexa53-mali-common' else ''}"
EOF
Check the setting from os/yocto/build. The output must contain :te0820:
os/yocto/build
MACHINE=amd-cortexa53-mali-common bitbake -e edf-linux-disk-image | grep '^MACHINEOVERRIDES='
Build the Images
This step is equivalent to petalinux-build in the PetaLinux workflow.
Two recipes are required to boot the board:
Recipe | MACHINE | Output | Description |
|---|---|---|---|
| common processor machine, e.g. |
| SD card image with the Linux kernel and root file system. The same for all boards of a device family. |
| board machine, e.g. |
| BOOT.bin with FSBL, PMUFW, bitstream, TF-A, U-Boot and device tree. Depends on the board and the hardware design. |
Example TE0820: …/images/amd-cortexa53-mali-common/ and …/images/te0820/. The file names are symbolic links to the newest files with time stamp, so they stay the same after each build.
The kernel FIT image image.ub (with the minimal ramdisk te-image-initramfs) is generated automatically when the kernel is built. The other images listed by edf-init-build-env (SDK, containers, edf-qspi, edf-ospi, kria-qspi) are not required for Trenz boards.
With yocto_setup, the bitbake wrapper selects MACHINE automatically. copy_build_artifacts then collects the output files in os/yocto/<machine>-images (see Output Files).
os/yocto/build
bitbake edf-linux-disk-image
bitbake xilinx-bootbin
copy_build_artifacts
Without yocto_setup, set MACHINE for each call.
os/yocto/build
MACHINE=<common-processor-machine> bitbake edf-linux-disk-image
MACHINE=<board-machine> bitbake xilinx-bootbin
Example:
os/yocto/build
# TE0820
MACHINE=amd-cortexa53-mali-common bitbake edf-linux-disk-image
MACHINE=te0820 bitbake xilinx-bootbin
Both recipes are described in more detail below.
edf-linux-disk-image
edf-linux-disk-image produces a .wic SD card image containing a complete Linux root filesystem. It is intentionally designed to be independent of a specific board and built with the common processor machine. For example, the common machine for all Versal boards (Cortex-A72) is amd-cortexa72-common.
The relationship between the common machine names and the device families are listed in the table below: (source: EDF Common Specifications)
| Devices | Common disk image machine name | EDF Linux® disk image supported recipes | EDF platform disk image supported recipes |
|---|---|---|---|
| Zynq-7000 | MACHINE=amd-cortexa9thf-neon-common | edf-linux-disk-image | No |
| Zynq UltraScale+ MPSoC | MACHINE=amd-cortexa53-mali-common | edf-linux-disk-image | edf-platform-disk-image |
| Zynq RFSoC, ZynqMP SC | MACHINE=amd-cortexa53-common | edf-linux-disk-image | edf-platform-disk-image |
| Versal | MACHINE=amd-cortexa72-common | edf-linux-disk-image | edf-platform-disk-image |
| Versal-2ve-2vm | MACHINE=amd-cortexa78-mali-common | edf-linux-disk-image | edf-platform-disk-image |
xilinx-bootbin
This recipe uses the AMD bootgen tool to assemble BOOT.bin.
According to the AMD guidelines for custom hardware, boards not made by AMD use the xilinx-bootbin recipe.
It bundles all board-specific firmware components. For example, the BOOT.bin file contains the following for a Zynq UltraScale+ MPSoC device (file names from the TE0820 build):
- FSBL (First Stage Bootloader):
fsbl.elf - PMUFW (Platform Management Unit Firmware):
pmufw.elf - PL bitstream:
download-te0820.bit - TF-A (Arm Trusted Firmware, BL31):
arm-trusted-firmware.elf(in PetaLinux:bl31.elf) - U-Boot:
u-boot.elf - Device tree blob:
cortexa53-linux.dtb - Boot header user defined field (UDF, version information):
bootbin-version-header-te0820.bin
These components are either derived from or generated from the specific hardware design (.xsa). Therefore, xilinx-bootbin must be built using the board-specific machine configuration generated by gen-machine-conf
Output Files
The output files of both recipes are located under os/yocto/build/tmp/deploy/images/. With yocto_setup, copy_build_artifacts copies them to os/yocto/<machine>-images/.
File | Found in | Copied by |
|---|---|---|
SD card image |
|
|
BOOT.bin |
|
|
BOOT.bin components |
| single files (e.g. |
U-Boot boot script |
|
|
FIT image (kernel, device tree, minimal ramdisk) |
|
|
SPDX (software bill of materials) |
|
|
Trenz reference designs already contain these files in the prebuilt folder:
prebuilt/os/yocto/images: .wic, boot.scr, image.ub (same for all module variants)prebuilt/os/yocto/bootbin/<short name>: BOOT.bin for each module variant
See the page of the reference design for details.
The actual output files generated by Yocto include timestamps in their filenames. Therefore, files such as edf-linux-disk-image-<common-processor-machine>.rootfs.wic and boot.bin are symbolic links that point to the corresponding timestamped output files.
To copy the actual file to another location, use the cp command to copy the link. By default, cp follows the link and copies the file it points to rather than the link itself.
Boot the Board
Both output files are required to boot the board from the SD card:
- .wic image: SD card image, the same for all boards of a device family. The partitions are listed in the table below. It does not contain BOOT.bin.
- BOOT.bin: depends on the board and the hardware design. It contains:
- FSBL (Zynq-7000, Zynq UltraScale+ MPSoC) or PLM (Versal)
- PMUFW (Zynq UltraScale+ MPSoC) or PSM firmware (Versal)
- bitstream
- TF-A,
bl31.elf(Zynq UltraScale+ MPSoC, Versal) - U-Boot
- device tree
The file names for TE0820 are listed in Build the Images → xilinx-bootbin.
Partitions of the .wic image:
Partition (label) | Format | Size (example TE0820) | Content |
|---|---|---|---|
| FAT | 512 MB | BOOT.bin (copy after writing the image), EFI firmware update capsules |
| ext4 | 512 MB | Linux kernel ( |
root file system | ext4 | 6 GB | Yocto root file system |
| FAT | 1 GB | additional user storage |
The partition layout for Zynq-7000 and Zynq UltraScale+ MPSoC is defined by AMD EDF (edf-disk-single-rootfs.wks). The partition layout for Versal is defined by edf-disk-single-rootfs-efi.wks (EFI boot, without a separate boot partition).
With yocto_setup, all files are in os/yocto/<machine>-images after copy_build_artifacts (see Build the Images → Output Files).
Prepare the SD Card
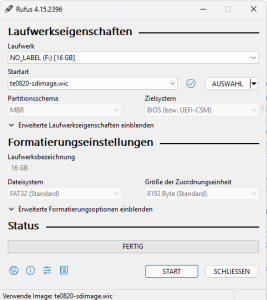
Step 1: Write the .wic image to the SD card. The partitions are created automatically, formatting is not necessary.
- Windows: use tools like Rufus
- Linux: run from the folder that contains the .wic file, e.g.
os/yocto/build/tmp/deploy/images/<common-processor-machine>:
os/yocto/build/tmp/deploy/images/<common-processor-machine>
sudo dd if=edf-linux-disk-image-<common-processor-machine>.rootfs.wic of=/dev/sdX bs=4M status=progress && sync
Replace <common-processor-machine> with the common machine of your device (see the table in Build the Images → edf-linux-disk-image, e.g. amd-cortexa53-mali-common for TE0820) and /dev/sdX with the device node of your SD card. If copy_build_artifacts was used, the file is named <machine>-sdimage.wic.
After writing the .wic image, Windows Explorer shows only the FAT partitions esp and storage. The ext4 partitions boot and root file system are not shown, because Windows cannot read ext4. If Windows asks to format a drive, cancel. Formatting deletes the image.
The rest of the SD card remains unallocated, also after the first boot (example: 6 GB root file system on a 16 GB SD card).
Step 2: Copy BOOT.bin to the first partition of the SD card. This partition is in FAT format and has the label esp.
QSPI Boot (Optional)
In QSPI boot mode, BOOT.bin is programmed into the QSPI flash, the root file system remains on the SD card (.wic image). Whether QSPI boot is supported with Yocto depends on the reference design, see the page of the reference design.
Start the Board
- Set the boot mode (SD or QSPI), see the page of the reference design.
- Insert the SD card and connect the serial console (115200 baud, 8N1).
- Power on the board. The boot messages of U-Boot and Linux appear on the serial console.
- Log in with the user
amd-edf. There is no automatic login (EU Cyber Resilience Act). At the first login, you are asked to set a new password. It is stored in the root file system on the SD card and remains valid after a restart.
Example for TE0820, end of the serial console output and first login:
Output (serial console)
AMD Embedded Development Framework Linux distribution 25.11.1+release-fb2d654ac25ecf08a6023fa570c1871305361af1 amd-edf ttyPS0

amd-edf login: amd-edf
You are required to change your password immediately (administrator enforced).
New password:
Customizing with Your Own Layer (meta-custom)
The meta-trenz-amd layer provides board support for Trenz hardware and is maintained by Trenz Electronic. In the Yocto layer hierarchy, this layer should be treated as a BSP layer and kept unchanged. Customers building their own product or project on top of the Trenz platform should create a separate Yocto layer for their project-specific configuration, recipes, and patches.
Machines: the components are built with two different machines.
Component | MACHINE | Example TE0820 |
|---|---|---|
U-Boot, device tree | board machine (module series) |
|
Linux kernel, root file system | common processor machine |
|
Common processor machines:
amd-cortexa9thf-neon-common: Zynq-7000amd-cortexa53-mali-common: Zynq UltraScale+ MPSoCamd-cortexa53-common: Zynq UltraScale+ RFSoC, ZynqMP SCamd-cortexa72-common: Versalamd-cortexa78-mali-common: Versal 2VE/2VM
The following sections use TE0820. For another Trenz module, replace te0820 and amd-cortexa53-mali-common. With yocto_setup, the common processor machine of your module is also available as $CORE_MACHINE.
All commands are run from os/yocto. All paths are relative to this directory.
Create the Layer
1. Set up the build environment.
In a new terminal: run yocto_setup again. Skip generating the machine configuration with the option --no-genconf, if it has already been done once.
os/yocto
source ./meta-trenz-amd/yocto_setup te0820 --no-genconf
2. Create the layer and add it to the build:
After the script is sourced, the shell enters a new build directory. Return to the parent directory os/yocto and run:
os/yocto/build
cd ..
bitbake-layers create-layer meta-custom
bitbake-layers add-layer meta-custom
3. Check that meta-trenz-amd and meta-custom are listed:
os/yocto
bitbake-layers show-layers
Always set MACHINE for BitBake and devtool commands, as shown in the following sections. Without MACHINE, devtool uses the default machine qemuarm64 from build/conf/local.conf, which is not a Trenz board.
How devtool works: devtool copies the source of a recipe into a workspace (build/workspace). You change and test it there. BitBake then builds from the workspace instead of the original source. Finally, devtool exports your changes as patches, configuration fragments and a .bbappend into meta-custom. The original layers stay unchanged.
The following tutorial shows how to create a simple new layer. For more complicated projects, refer to Yocto Project devtool Quick Reference and Creating Your Own General Layer.
Customize U-Boot
U-Boot is part of BOOT.bin (xilinx-bootbin) and is built with the board machine te0820.
1. Open the source in the workspace. The source is copied to build/workspace/sources/u-boot-xlnx.
os/yocto
MACHINE=te0820 devtool modify -O u-boot-xlnx
2. Change the configuration (optional). Save the configuration before leaving the menu. The changes are stored as a configuration fragment.
os/yocto
MACHINE=te0820 devtool menuconfig u-boot-xlnx
3. Change the source code (optional) in build/workspace/sources/u-boot-xlnx.
4. Build and test. BitBake now builds U-Boot from the workspace. To test on the board, build BOOT.bin and copy it to the esp partition.
os/yocto
# optional: build U-Boot only (quick compile check)
MACHINE=te0820 bitbake u-boot-xlnx
# build BOOT.bin (also rebuilds U-Boot if needed)
MACHINE=te0820 bitbake xilinx-bootbin
5. Commit the changes (only needed if you changed source code in step 3; menuconfig changes are stored in devtool-fragment.cfg automatically). devtool uses Git to find the changes to export. Check with git status which files you changed and add only those. Do not add files that the build copied into the source, e.g. include/configs/amd_edf.h (added by AMD EDF).
os/yocto
git -C build/workspace/sources/u-boot-xlnx status
git -C build/workspace/sources/u-boot-xlnx add <changed-files>
git -C build/workspace/sources/u-boot-xlnx commit -m "Customize U-Boot for te0820"
6. Export the changes to meta-custom:
os/yocto
MACHINE=te0820 devtool update-recipe u-boot-xlnx -a meta-custom -O -w
-a meta-custom(--append): writes the changes as .bbappend tometa-custom; the original recipe stays unchanged.-O(--no-overrides): exports only your own changes. Without it, machine-specific patches from other layers (e.g.meta-trenz-amd) can be exported again.-w(--wildcard-version): names the append fileu-boot-xlnx_%.bbappend, so it also applies after a U-Boot version update.
Result in meta-custom:
File | Content |
|---|---|
| adds the patches and the configuration fragment to SRC_URI and extends FILESEXTRAPATHS |
| one patch per commit |
| configuration changes from menuconfig |
7. Finish. Remove the recipe from the workspace. BitBake then builds U-Boot from the original source with the patches from meta-custom. The source in build/workspace/sources/u-boot-xlnx is kept.
os/yocto
MACHINE=te0820 devtool reset u-boot-xlnx
Alternatively, devtool finish u-boot-xlnx meta-custom exports the committed changes and also deletes the source in the workspace.
Customize the Linux Kernel
The Linux kernel is part of edf-linux-disk-image and is built with the common processor machine amd-cortexa53-mali-common. The steps are the same as for U-Boot (see Customize U-Boot).
1. Open the source in the workspace:
os/yocto
MACHINE=amd-cortexa53-mali-common devtool modify -O linux-xlnx
2. Change the configuration (optional):
os/yocto
MACHINE=amd-cortexa53-mali-common devtool menuconfig linux-xlnx
3. Change the source code (optional) in build/workspace/sources/linux-xlnx.
4. Build and test. To test on the board, build the image and write the .wic file to the SD card.
os/yocto
# optional: build the kernel only (quick compile check)
MACHINE=amd-cortexa53-mali-common bitbake linux-xlnx
# build the SD card image (also rebuilds the kernel if needed)
MACHINE=amd-cortexa53-mali-common bitbake edf-linux-disk-image
5. Commit the changes (only needed if you changed source code in step 3; menuconfig changes are stored in devtool-fragment.cfg automatically). Check with git status which files you changed and add only those.
os/yocto
git -C build/workspace/sources/linux-xlnx status
git -C build/workspace/sources/linux-xlnx add <changed-files>
git -C build/workspace/sources/linux-xlnx commit -m "<commit message>"
6. Export the changes to meta-custom. The patches and the configuration fragment are stored in meta-custom/recipes-kernel/linux/linux-xlnx/, the append file linux-xlnx_%.bbappend in meta-custom/recipes-kernel/linux/.
os/yocto
MACHINE=amd-cortexa53-mali-common devtool update-recipe linux-xlnx -a meta-custom -O -w
7. Finish:
os/yocto
MACHINE=amd-cortexa53-mali-common devtool reset linux-xlnx
Customize the Device Tree
The device tree has no menuconfig. You write a .dtsi file and include it with a .bbappend. The device tree is built with the board machine te0820.
1. Create the .dtsi file. A .dtsi usually extends or changes existing nodes and refers to them by their labels (e.g. &i2c1). The main device tree generated by gen-machine-conf is located in build/conf/dts/te0820. Example: add an I2C EEPROM, meta-custom/recipes-bsp/device-tree/files/custom-eeprom.dtsi:
meta-custom/recipes-bsp/device-tree/files/custom-eeprom.dtsi
&i2c1 {
    eeprom@50 {
        compatible = "atmel,24c02";
        reg = <0x50>;
    };
};
Labels (the name before the colon, e.g. eeprom in eeprom: eeprom@50 {) must be unique in the whole device tree. The TE0820 device tree from meta-trenz-amd already uses some labels, e.g. eeprom for the on-board EEPROM. Use your own label (e.g. custom_eeprom:) or none.
2. Include the .dtsi in meta-custom/recipes-bsp/device-tree/device-tree.bbappend:
meta-custom/recipes-bsp/device-tree/device-tree.bbappend
FILESEXTRAPATHS:prepend := "${THISDIR}/files:"

SRC_URI:append = " file://custom-eeprom.dtsi"
EXTRA_DT_INCLUDE_FILES:append = " custom-eeprom.dtsi"
FILESEXTRAPATHSadds thefiles/directory of this layer to the search path.SRC_URImakes the .dtsi available in the work directory of the recipe.EXTRA_DT_INCLUDE_FILESincludes the file in the generated device tree.
3. Build the device tree and BOOT.bin, which contains the device tree:
os/yocto
# optional: build the device tree only (quick compile check)
MACHINE=te0820 bitbake device-tree
# build BOOT.bin (also rebuilds the device tree if needed)
MACHINE=te0820 bitbake xilinx-bootbin
4. Check the result. The .dtb files are stored in build/tmp/deploy/images/te0820/. Convert them back into source with dtc:
os/yocto/build/tmp/deploy/images/te0820
dtc -I dtb -O dts <device-tree-file>.dtb | less
Customize the Root Filesystem
The root file system is part of edf-linux-disk-image and is built with the common processor machine amd-cortexa53-mali-common.
1. Check the current content. The following commands display the final values of IMAGE_INSTALL and IMAGE_FEATURES:
os/yocto
MACHINE=amd-cortexa53-mali-common bitbake -e edf-linux-disk-image | grep '^IMAGE_INSTALL='
MACHINE=amd-cortexa53-mali-common bitbake -e edf-linux-disk-image | grep '^IMAGE_FEATURES='
The output looks like this (shortened and one package per line for readability; the actual output is a single line):
Output
IMAGE_INSTALL="
    packagegroup-core-boot
    packagegroup-core-full-cmdline
    ...
    i2c-tools
    mtd-utils
    ...
    webfwu
    e2fsprogs-mke2fs
    util-linux
    ...
"
2. Add packages and image features in meta-custom/recipes-extended/images/edf-linux-disk-image.bbappend (create the file and its directories if they do not exist). Add only your own lines. The .bbappend from meta-trenz-amd is applied as well, so do not copy it:
meta-custom/recipes-extended/images/edf-linux-disk-image.bbappend
IMAGE_INSTALL:append = " <package-name>"
IMAGE_FEATURES:append = " <feature-name>"
A package can only be installed if a recipe in one of the active layers provides it. The recipes are located in the layers under sources, most of them in sources/poky/meta (OpenEmbedded-Core) and sources/meta-openembedded. A recipe can provide several packages (e.g. recipe e2fsprogs → package e2fsprogs-mke2fs). To list the recipes and the layer they come from:
os/yocto
# all recipes of the active layers
bitbake-layers show-recipes > recipes.txt
# search by name (wildcards allowed)
bitbake-layers show-recipes "*i2c*"
Tip: The OpenEmbedded Layer Index (branch scarthgap) shows the recipes of each layer under Layers.
3. Add your own application (optional). This is equivalent to petalinux-create apps in the PetaLinux workflow. The recipe meta-trenz-amd/recipes-apps/webfwu/webfwu.bb can serve as a reference. A minimal recipe for a shell script (create the directories and files):
meta-custom/recipes-apps/myapp/myapp.bb:
meta-custom/recipes-apps/myapp/myapp.bb
SUMMARY = "Example application"
LICENSE = "MIT"
LIC_FILES_CHKSUM = "file://${COMMON_LICENSE_DIR}/MIT;md5=0835ade698e0bcf8506ecda2f7b4f302"

SRC_URI = "file://myapp.sh"
S = "${WORKDIR}"

do_install() {
    install -d ${D}${bindir}
    install -m 0755 myapp.sh ${D}${bindir}/myapp
}
Create the script in meta-custom/recipes-apps/myapp/files/myapp.sh, e.g. with the content echo "Hello from myapp". If the application needs other packages at runtime, add them with RDEPENDS:${PN} (webfwu, for example, needs busybox-httpd).
Add the application to the image in meta-custom/recipes-extended/images/edf-linux-disk-image.bbappend:
meta-custom/recipes-extended/images/edf-linux-disk-image.bbappend
IMAGE_INSTALL:append = " myapp"
4. Build the image:
os/yocto
MACHINE=amd-cortexa53-mali-common bitbake edf-linux-disk-image
Table of contents
Overview
Content Tools