Vitis AI 3.5 DPUCV2DX8G Installation
The archive It TE0950_2023_2_1_dpucv2dx8g_AI_3_5.zip contains files for directories:
dpucv2dx8g-trd\app
dpucv2dx8g-trd\vitis_prj
dpucv2dx8g-trd\xv2dpu_ip
This chapter describes compilation and integration of the AMD DPUCV2DX8G (imlemented in AI-ML engines of the XCVE2302 device) in the Vitis 2023.2.1. custom extensible platform. We have to install correct Vitis 2023.2.1 compatible project with the AMD DPUCV2DX8G.
Copy dpucv2dx8g-trd.zip archive acompanying this application note to:
~/Downloads/dpucv2dx8g-trd_vitis_prj.zip
Unzip the file to the directory:
~/work/dpucv2dx8g-trd
The archive TE0950_2023_2_1_dpucv2dx8g_AI_3_5.zip also contains precompiled firmware for the AI-ML engines in XCVE2302 device in the directory:
dpucv2dx8g-trd\vitis_prj\aie
This directory contains AI-ML engine library:
dpucv2dx8g-trd\vitis_prj\aie\ip\libadf.a
This precompiled library libadf.a can be used for faster integration of the AMD DPUCV2DX8G.
Firmware compilation step can be skipped, if the make process finds the precompiled library libadf.a for the XCVE2302 AI-ML engines.
The AMD license features AIE2build and AIE2sim are not needed, as compilation of firmware for the AMD DPUCV2DX8G unit was already done.
Note:
AMD provided an option to select the license features AIE2build and AIE2sim (free of charge) in the time frame
- from the introduction of the Vitis 2023.1 with continuous support for the Vitis 2023.2
- to the introduction of the Vitis 2024.1 (May 30, 2024).
If you have these license features AIE2build and AIE2sim installed in that time period, you can delete the precompiled directory:
dpucv2dx8g-trd\vitis_prj\aie
and compile the firmware from the encrypted source code as part of the make process.
Modifications of installation package for the TE0950-02 ES1 device
If you target the TE0950-02 with XCVE2302-ES1 device, the package dpucv2dx8g-trd_vitis_prj.zip for requires one additional change for compilation of the AMD DPUCV2DX8G for ES1 device. Change in ~/work/dpucv2dx8g-trd/vitis_prj/Makefile file:
110 PHYDEVICE = xcve2302-sfva784-1LP-e-S
To
110 PHYDEVICE = xcve2302-sfva784-1LP-e-S-es1
Installation package with this change will integrate the AMD DPUCV2DX8G for the TE0950-02 board with XCVE2302-ES1 device.
Installation package without this change will integrate the AMD DPUCV2DX8G for the TE0950-03 board with XCVE2302 device.
Next steps are identical for the TE0950-02 board with XCVE2302-ES1 device as well a for the TE0950-03 board with XCVE2302 device.
Compile Vitis AI 3.5 DPUCV2DX8G
File ~/work/dpucv2dx8g-trd/vitis_prj/env_user_config.mk
defines actual data paths:
TRD_PATH – defines absolute path to the main directory.
PFM_PATH – defines absolute path to XPFM generated in [1].
ROOTFS_PATH – defines absolute path to Petalinux image FS generated in [1].
IMAGE_PATH – defines absolute path to vygenerovanému image generated in [1].
/**********************************************************************# edit this section
# ***********************************************************************
TRD_PATH    = /home/devel/work/dpucv2dx8g-trd
PFM_PATH    = $(TRD_PATH)/te0950_pfm/te0950_300_pfm/export/te0950_300_pfm/te0950_300_pfm.xpfm
ROOTFS_PATH = $(TRD_PATH)/te0950_platform/sw/te0950/images/linux/rootfs.ext4
IMAGE_PATH  = $(TRD_PATH)/te0950_platform/sw/te0950/images/linux/Image
# *********************************************************************
# Set number of jobs of the HW compilation
JOBS = $(shell nproc)

# or set your own number
# JOBS = 12
If you decide to compile the AMD DPUCV2DX8G firmware, modify in
~/work/dpucv2dx8g-trd/vitis_prj/Makefile
From:
219 # -@rm -rf aie
To:
219 -@rm -rf aie
Note (reduce number of processors)
The AI compiler requires relatively large size of memory for compilation of AMD DPUCV2DX8G Versal AI-ML engine firmware. It is in the range of 60 GBytes in case of 12 processors. It depends on number of processors available. Therefore, to be on safe side, you can close the virtual machine and reopen it with small number of processors for this step. We recommend to set it to 4 processors for this firmware compilation step). Without this reduction, the AI compiler compiling the complex AMD DPUCV2DX8G Versal AI-ML engines firmware might fail or lock your virtual machine due to the PC system memory overflow.
But if you decide to use the already precompiled firmware for AMD DPUCV2DX8G, you do not need to configure your virtual machine with small number of processors.
In file ~/work/dpucv2dx8g-trd/vitis_prj/Makefile keep line 219 unchanged:
219 # -@rm -rf aie
As next step, change the directory to:
$ cd ~/work/dpucv2dx8g-trd/vitis_prj
In Ubuntu terminal, source script defining paths to Vitis and Vivado 2023.2.1 tools by
$ source /tools/Xilinx/Vitis/2023.2/settings64.sh
Use make clean by typing :
$ make clean
Use make to compile and integrate the AMD DPUCV2DX8G to the TE0950-03 reference platform by typing :
$ make all
SD-card image is created in:
~/work/dpucv2dx8g-trd/vitis_prj/package_out/sd_card.img
Created sd_card.img serves for testing of design with integrated AMD DPUCV2DX8G running in AI-ML engines with 1 GHz clock.
Note (restore back number of processors)
If you have reduced the number of processors for your virtual machine, you can close and reopen the virtual machine and set again the large number of processors for the virtual machine.
In file ~/work/dpucv2dx8g-trd/vitis_prj/Makefile change line 219 back to:
219 # -@rm -rf aie
Command:
$ make clean
will keep the compiled AMD DPUCV2DX8G firmware for Versal AI-ML engines undeleted.
Command:
$ make all
will reuse the compiled AMD DPUCV2DX8G firmware for Versal AI-ML engines, skips firmware compilation and continues directly with the Vivado compilation steps.
Prepare SD card with test_dpu_trd DPU
Write generated sd_card.img to SD card using SD card reader.
The sd_card.img file is output of the compilation and packing by Vitis. It is located in the directory:
~/work/dpucv2dx8g-trd/te0950_test_dpu_trd/dpu_trd_system/Hardware/package
In Windows 10 (or Windows 11) PC, inst all program Win32DiskImager for this task.
Boot the board and open terminal on the board either by connecting serial console connection, or by opening ethernet connection to ssh server on the board, or by opening terminal directly using window manager on board. Continue using the embedded board terminal.
Resize EXT4 Partition
Check ext4 partition size by:
sh-5.1# cd /
sh-5.1# df .
Filesystem           1K-blocks      Used Available Use% Mounted on
/dev/root               564048    398340    122364  77% /
Resize partition
sh-5.1# resize-part /dev/mmcblk1p2
Check ext4 partition size again, you should see:
sh-5.1# df . –h
Filesystem                Size      Used Available Use% Mounted on
/dev/root                 6.1G    390.8M      5.4G   7% /
The available size would be different according to your SD card size.
Set path to the VART firmware:
sh-5.1# export XLNX_VART_FIRMWARE=/run/media/mmcblk1p1/dpu.xclbin
Test the Integrated DPUCV2DX8G
The integrated DPU can be tested by command:
sh-5.1# xdputil query
System reply:
XAIEFAL: INFO: Resource group Avail is created.
XAIEFAL: INFO: Resource group Static is created.
XAIEFAL: INFO: Resource group Generic is created.
{
    "DPU IP Spec":{
        "DPU Core Count":1,
        "IP version":"v1.0.0",
        "generation timestamp":"2024-10-20 16-15-00",
        "git commit id":"b3bdea2",
        "git commit time":2023060418,
        "regmap":"1toN version"
    },
    "VAI Version":{
    "libvart-runner.so":"Xilinx vart-runner Version: 3.5.0
     b7953a2a9f60e23efdfced5c186328dd1449665c
     2024-04-18-10:03:55
    ",
    "libvitis_ai_library-dpu_task.so":
    "Advanced Micro Devices vitis_ai_library dpu_task Version: 3.5.0
     b7953a2a9f60e23efdfced5c186328dd1449665c
     2023-06-29 03:20:28 [UTC]
    ",
    "libxir.so":
    "Xilinx xir Version: xir
     b7953a2a9f60e23efdfced5c186328dd1449665c
     2024-04-18-09:27:26",
    "target_factory":"target-factory.3.5.0
     b7953a2a9f60e23efdfced5c186328dd1449665c
    "
    },
    "kernels":[
        {
            "AIE Frequency (Hz)":999999990,
            "DPU Arch":"DPUCV2DX8G_ISA1_C20B1",
            "DPU Batch Number":1,
            "DPU Frequency (MHz)":250,
            "IP Type":"DPU",
            "Load Parallel":3,
            "Load augmentation":"enable",
            "Load minus mean":"disable",
            "Save Parallel":1,
            "XRT Frequency (MHz)":150,
            "cu_addr":"0xa4000000",
            "cu_handle":"0xaaaae1611cd0",
            "cu_idx":0,
            "cu_mask":1,
            "cu_name":"DPUCV2DX8G:DPUCV2DX8G_1",
            "device_id":0,
            "fingerprint":"0x901400044000144",
            "name":"DPU Core 0"
        }
    ]
}
sh-5.1#
Test resnet50pt model
The DPUCV2DX8G can be tested with AI 3.5 resnet50_pt model.
Copy precompiled AI 3.5 resnet50_pt model files accompanying this application note:
md5sum.txt
meta.json
resnet50_pt.prototxt
resnet50_pt.xmodel
to the directory
~/app/model
Change directory to ~/app/model and test the resnet50_pt.xmodel by command:
sh-5.1# cd ~/app/model
sh-5.1# xdputil benchmark resnet50_pt.xmodel 1
See result:
XAIEFAL: INFO: Resource group Avail is created.
XAIEFAL: INFO: Resource group Static is created.
XAIEFAL: INFO: Resource group Generic is created.
WARNING: Logging before InitGoogleLogging() is written to STDERR
I20241029 13:20:28.855104   772 test_dpu_runner_mt.cpp:477]
                                shuffle results for batch...
I20241029 13:20:28.855654   772 performance_test.hpp:73] 0% ...
I20241029 13:20:34.855819   772 performance_test.hpp:76] 10% ...
I20241029 13:20:40.855970   772 performance_test.hpp:76] 20% ...
I20241029 13:20:46.856119   772 performance_test.hpp:76] 30% ...
I20241029 13:20:52.856261   772 performance_test.hpp:76] 40% ...
I20241029 13:20:58.856418   772 performance_test.hpp:76] 50% ...
I20241029 13:21:04.856575   772 performance_test.hpp:76] 60% ...
I20241029 13:21:10.856725   772 performance_test.hpp:76] 70% ...
I20241029 13:21:16.856874   772 performance_test.hpp:76] 80% ...
I20241029 13:21:22.857023   772 performance_test.hpp:76] 90% ...
I20241029 13:21:28.857164   772 performance_test.hpp:76] 100% ...
I20241029 13:21:28.857223   772 performance_test.hpp:79] stop and
                                waiting for all threads terminated....
I20241029 13:21:28.860080   772 performance_test.hpp:85] thread-0
                                processes 15735 frames
I20241029 13:21:28.860105   772 performance_test.hpp:93] it takes
                                2867 us for shutdown
I20241029 13:21:28.860121   772 performance_test.hpp:94] FPS= 262.23
                                number_of_frames= 15735
                                time= 60.0045 seconds.
I20241029 13:21:28.860162   772 performance_test.hpp:96] BYEBYE
Test PASS.
sh-5.1#
Compilation of resnet50_pt model as well as compilation of large collection of trained Vitis AI 3.5 models for the TE0950 with AMD DPUCV2DX8G is described in [5].
System with Integrated AMD DPUCV2DX8G
The system with integrated AMD DPUCV2DX8G can be open in Vivado 2023.2.1.
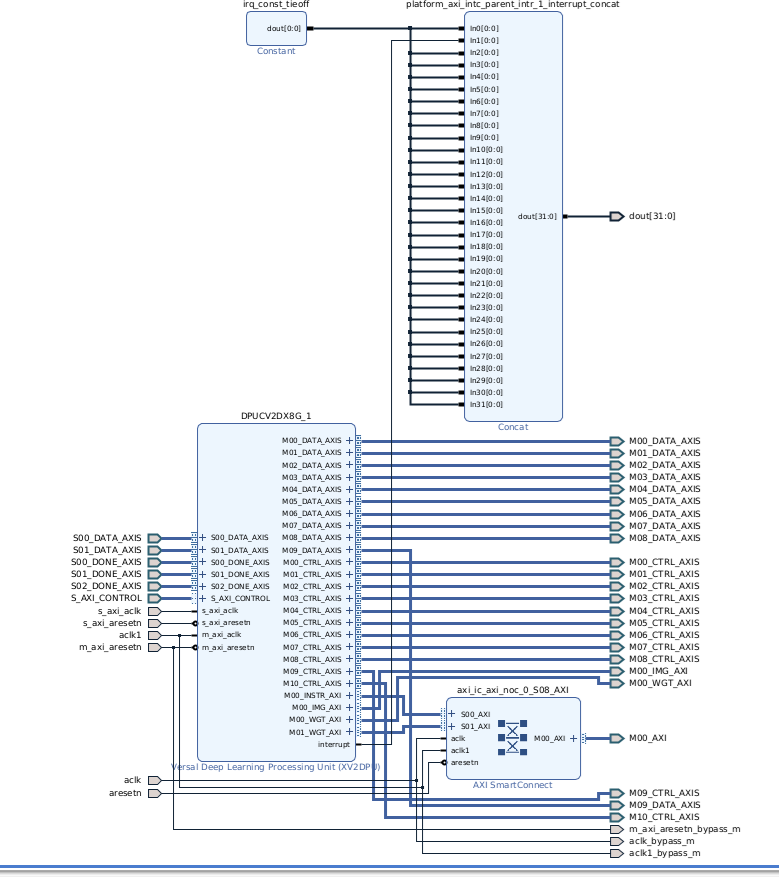
The DPUCV2DX8G_1 HW IP is instantiated in the programmable logic. It connects the AI-ML engines with AXI and connects to the A72 PS via NoC.
It also generates an interrupt to indicate the end of operation.
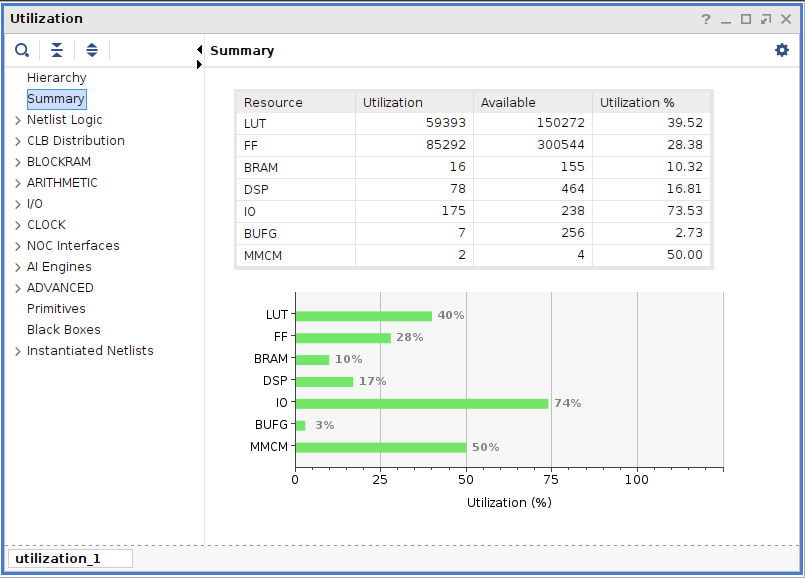
Used resources
System extensions
The default list of templates for Vitis 2023.2.1 contains set of host_xrt templates.
It can be extended by Vitis 2023.1 set of host OpenCL templates.
Open and download github page:
https://github.com/Xilinx/Vitis_Accel_Examples/tree/2023.1
Download it as zip archive:
Vitis_Accel_Examples-2023.1.zip
Open this archive and copy the directory:
host
to
~/.Xilinx/Vitis/2023.2/vitis_examples/host
This will enable these additional OpenCL application templates for your Vitis 2023.2.1:
[host_xrt]
 	concurrent_kernel_execution  	iops_test
 	copy_buffer                  	mult_compute_units
 	data_transfer                	multiple_cus_asymmetrical
 	debug_profile                	overlap
 	device_only_buffer           	p2p_bandwidth
 	device_query                 	p2p_fpga2fpga
 	errors                       	p2p_overlap_bandwidth
 	errors_cpp                   	p2p_simple
 	hbm_large_buffers            	streaming_free_running_k2k
 	hbm_rama_ip                  	streaming_k2k_mm
 	hbm_simple
 	host_memory_copy_buffer
 	host_memory_copy_kernel
 	host_memory_simple
These application templates will become visible in your next call to vitis –-classic.
Create test_free_run application without AMD DPUCV2DX8G
DPUCV2DX8GFree run kernel can be integrated in Vitis 2023.2.1 to platform te0950_300_pfm in system without the AMD DPUCV2DX8G.
Create new directory te0950_test_free_run to test Vitis extendable flow example test_free_run based on [host] streaming_free_running_k2k template project.
~/work/dpucv2dx8g-trd/te0950_test_free_run
Current directory structure:
~/work/dpucv2dx8g-trd/te0950_platform
~/work/dpucv2dx8g-trd/te0950_pfm
~/work/dpucv2dx8g-trd/te0950_test_vadd
~/work/dpucv2dx8g-trd/te0950_test_free_run
Change working directory:
$ cd ~/work/dpucv2dx8g-trd/te0950_test_free_run
In Ubuntu terminal, start vitis --classic version of Vitis 2023.2.1 by:
$ vitis --classic –workspace . &
Click on Launch to launch Vitis.
Select File -> New -> Application project. Click Next.
Skip welcome page, if shown.
Click on [+ Add] icon and select the custom extensible platform in the directory:
~/work/dpucv2dx8g-trd/te0950_pfm/te0950_300_pfm/export/te0950_300_pfm
We can see available PL clocks and frequencies. PL4 with 300 MHz clock was set as default in the platform creation process.
Click Next.
In Application Project Details window type into Application project name: test_vadd
Click Next.
In Domain window type (or select by browse):
Sysroot path:
~/work/dpucv2dx8g-trd/te0950_pfm/sysroots/cortexa72-cortexa53-xilinx-linux
Root FS:
~/work/dpucv2dx8g-trd/te0950_platform/sw/te0950/images/linux
rootfs.ext4
Kernel Image:
~/work/dpucv2dx8g-trd/te0950_platform/sw/te0950/images/linux/
Image
Click Next.
In Templates window, if not done before, update Vitis IDE Examples and Vitis IDE Libraries.
Select Host Examples select: [host] streaming_free_running_k2k template project.
Click Finish
New project template is created.
In test_free_run window menu “Active build configuration” switch
from SW Emulation to Hardware.
In Explorer, open test_free_run_system_hw_link.prj
Right click on krnl_incr and modify the default V++ configuration settings from
[connectivity]
stream_connect=mem_read_1.stream:increment_1.input
stream_connect=increment_1.output:mem_write_1.stream
to
[clock]
freqHz=200000000:mem_read_1.ap_clk
freqHz=200000000:increment_1.ap_clk
freqHz=200000000:mem_write_1.ap_clk
[connectivity]
stream_connect=mem_read_1.stream:increment_1.input
stream_connect=increment_1.output:mem_write_1.stream
New section [clock] defines clocks for all three IP cores are set to 200 MHz. The default connections without [clock] section would be 300 MHz clock.
Section [connectivity] is required. It defines these two AXI stream connections:
From mem_read_1.stream output to increment_1.input input.
From inkrement_1.output output to men_write.stream input.
Optionally, you can add to V++ command line options these commands for Vitis:
--hls.jobs 12 --vivado.synth.jobs 12 --vivado.impl.jobs 12
This sets the maximal number of threads for HLS, Vivado Synthesis, and Vivado Implementation to 12.
In Explorer section of Vitis --classic IDE, click on: test_free_run_system to select it.
Right Click on: test_free_run_system and select in the opened sub-menu: Build project
Vitis will compile HW and SW. This step can take some time.
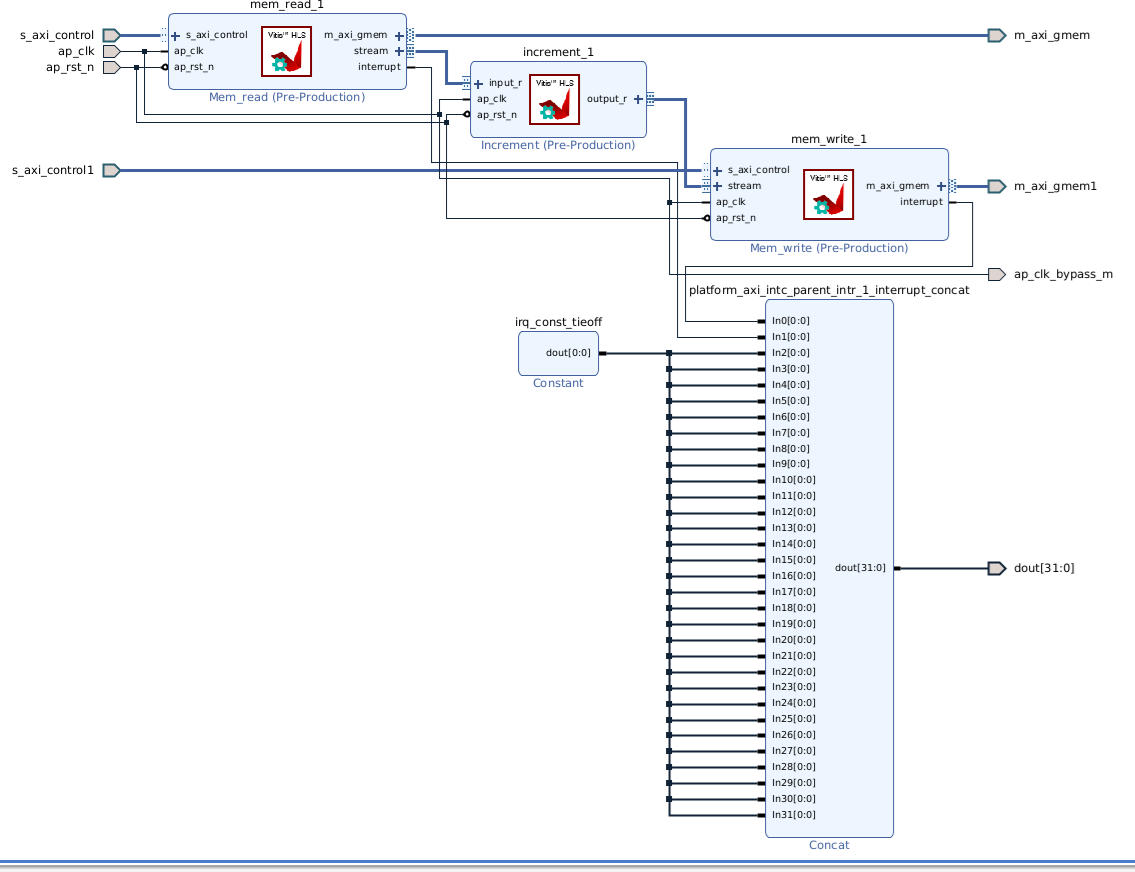
Created system with integrated free_run HW IP blocks can be open and analysed in Vivado 2023.2.1 .
The Vitis section contains HW IPs mem_read_1, increment_1 and mem_write_1 all connected to ap_clk clock 200 MHz. IPs mem_read_1 and mem_write_1 signal end of operation by interrupts.
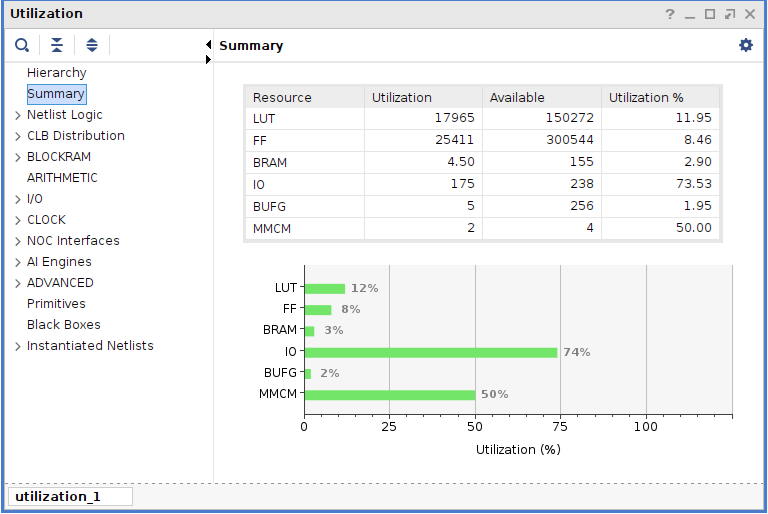
The device utilization:
Run test_free_run
The sd_card.img file is output of the compilation and packing made by Vitis 2023.2.1. I tis SD card image:
~/work/dpucv2dx8g-trd/te0950_test_free_run/test_free_run_system/
Hardware/package/sd_card.img
Write the sd card image sd_card.img to the SD card. Application Win32DiskImager can be used for this task in Windows Pro 10 (or Windows 11 Pro) PC. It can be downloaded from
- Insert the SD card to the board.
- Connect PC USB terminal (115200 bps) to the board.
- Connect Ethernet cable to the board.
- Power on the board.
- In PC, find the assigned serial line COM port number for the USB terminal.
In case of Win 10 Pro or Win 11 Pro, use Device manager to find it. - In PC, open serial line terminal with the assigned COM port number. Speed 115200 bps.
- In PC terminal, type:
sh-5.1# cd /run/media/mmcblk1p1/
sh-5.1# ./test_free_run krnl_incr.xclbin
The application test_free_run should run with this output:
sh-5.1# ./test_free_run krnl_incr.xclbin
INFO: Reading krnl_incr.xclbin
Loading: 'krnl_incr.xclbin'
Trying to program device[0]: edge
Device[0]: program successful!
Creating Buffers...
Copying data...
Getting Results...
TEST PASSED
sh-5.1#
- To halt Linux system, type in the USB terminal:
# halt
- Petalinux system is halted and all file system related caches are closed.
- Messages related to halt of the system can be seen on the USB terminal.
- The SD card can be safely removed from the TE0950-03 board in halt state.
- The terminal can be closed and USB terminal cable can be disconnected.
- Board can be disconnected from power.
Create test_free_run application together with AMD DPUCV2DX8G
The test_free_run cores can be also integrated to platform te0950_300_pfm together with the AMD DPUCV2DX8G.
Modify lines 87, 88, 89 in file:
/home/devel/work/dpucv2dx8g-trd/vitis_prj/Makefile
From:
87
88
89
To:
87 BINARY_CONTAINER_1_OBJS += /home/devel/work/dpucv2dx8g-trd/te0950_test_free_run/test_free_run_kernels/Hardware/build/mem_read.xo
88 BINARY_CONTAINER_1_OBJS += /home/devel/work/dpucv2dx8g-trd/te0950_test_free_run/test_free_run_kernels/Hardware/build/increment.xo
89 BINARY_CONTAINER_1_OBJS += /home/devel/work/dpucv2dx8g-trd/te0950_test_free_run/test_free_run_kernels/Hardware/build/mem_write.xo
Write these paths as long, unbroken lines
Modify lines 197-200 in file:
/home/devel/work/dpucv2dx8g-trd/vitis_prj/Makefile
From:
197 --clock.freqHz 150000000:$(DPU_s_axi_clk)
198
199
200
To:
197 --clock.freqHz 150000000:$(DPU_s_axi_clk) \
198 --clock.freqHz 200000000:mem_read_1.ap_clk \
199 --clock.freqHz 200000000:increment_1.ap_clk \
200 --clock.freqHz 200000000:mem_write_1.ap_clk
Modify lines 43-48 in python file:
/home/devel/work/dpucv2dx8g-trd/vitis_prj/scripts/xv2dpu_aie_noc.py
From:
43
44
45
46
47
48
To:
43 result += "nk=mem_read:1:mem_read_1\n"
44 result += "nk=mem_write:1:mem_write_1\n"
45 result += "nk=increment:1:increment_1\n"
46
47 result += "stream_connect=mem_read_1.stream:increment_1.input\n"
48 result += "stream_connect=increment_1.output:mem_write_1.stream\n"
This modification of the python script will enable configuration of Vitis tool required for the free_run IP cores mem_read_1 , increment_1 and mem_write_1.
In Ubuntu terminal, change directory to:
$ cd ~/work/dpucv2dx8g-trd/vitis_prj
In Ubuntu terminal, source paths to Vitis and Vivado 2023.2.1 tools by
$ source /tools/Xilinx/Vitis/2023.2/settings64.sh
Use make clean hardware by typing :
$ make clean
Use make to compile and integrate free_run HW IP cores together with AMD DPUCV2DX8G to the TE0950-03 reference platform hardware by typing :
$ make all
SD-card image is created in:
~/work/dpucv2dx8g-trd/vitis_prj/package_out/sd_card.img
Created sd_card.img serves for testing of design with free_run HW IP cores integrated together with the AMD DPUCV2DX8G running in AI-ML engines with 1 GHz clock.
System with integrated test_free_run IP cores and AMD DPUCV2DX8G
The system with integrated test_free_run IP cores and AMD DPUCV2DX8G can be open in Vivado 2023.2.1.
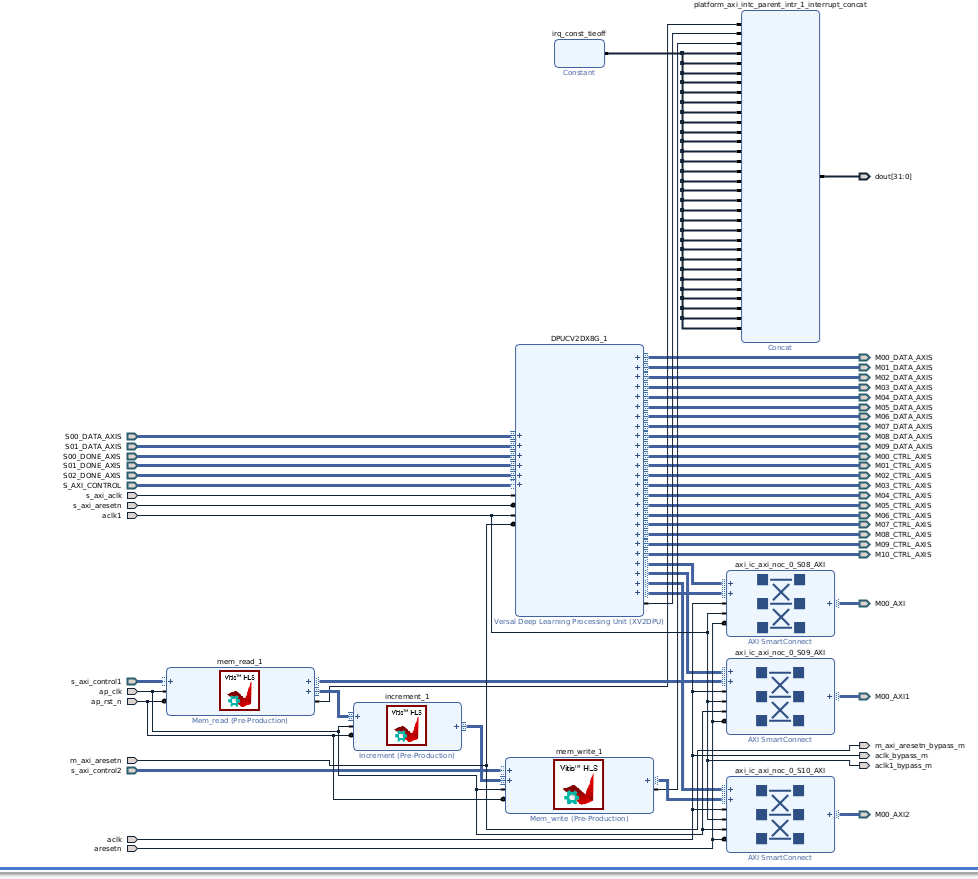
The DPUCV2DX8G_1 HW IP is instantiated in the PL. It connects the AI-ML engines with AXI and connects to the A72 PS via NoC. It also generates an interrupt. The test_free_run related IP cores use the 200 MHz clock.
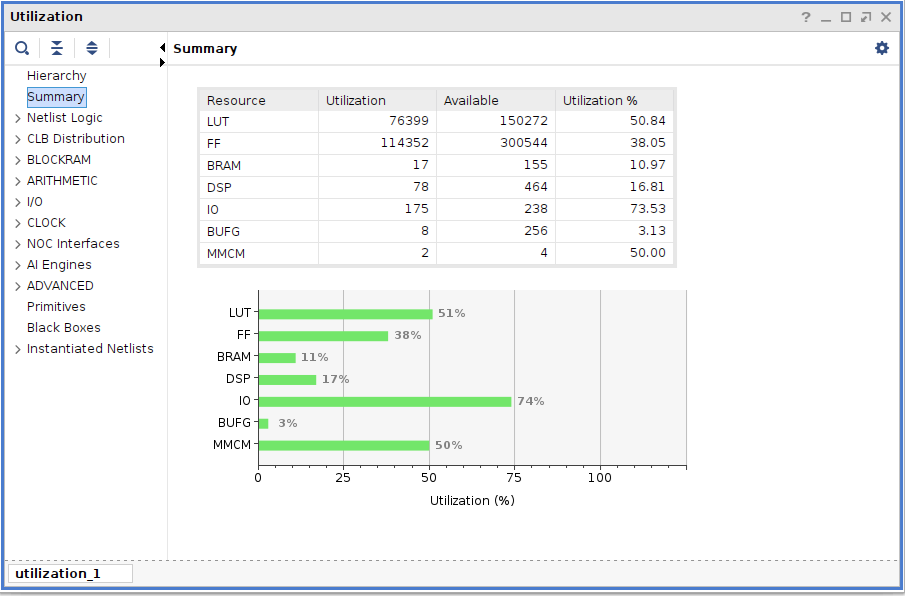
Used resources for system with integrated test_free_run IP cores and AMD DPUCV2DX8G.
Prepare SD card with test_dpu_trd DPU
Write generated sd_card.img to SD card using SD card reader.
The sd_card.img file is output of the compilation and packing by Vitis. It is in:
~/work/dpucv2dx8g-trd/te0950_test_dpu_trd/dpu_trd_system/Hardware/package/sd_card.img
In Windows 10 (or Windows 11) PC, inst all program Win32DiskImager for this task.
The SD cart contains Linux image together with these IP cores:
- DPUCV2DX8G_1 (AI 3.5 applicatios, interface to AI-ML)
- mem_read_1 (test_free_run application, 200 MHz clock)
- increment_1 (test_free_run application, 200 MHz clock)
- mem_write_1 (test_free_run application, 200 MHz clock)
Test the test_free_run and the resnet50 benchmark
Boot the board and open terminal on the board either by connecting serial console connection, or by opening ethernet connection to ssh server on the board, or by opening terminal directly using window manager on board. Continue using the embedded board terminal.
In Win 10 Pro or Win 11 Pro the utility WinSCP can be used for secure copy of files from PC to the TE0950 board over local Ethernet connection.
Use WinSCP to copy application test_free_run compiled in Vitis 2023.2.1.
From
~/work/dpucv2dx8g-trd/te0950_test_free_run/test_free_run_system/Hardware/package/sd_card/test_free_run
To
/run/media/mmcblk1p1/test_free_run
In TE0950 terminal, test the test_free_run application:
sh-5.1# cd /run/media/mmcblk1p1/
sh-5.1# ./test_free_run dpu.xclbin
Please notice, that the test_free_run is using the container dpu.xclbin , now. The container dpu.xclbin contains kernels for the tes_free_run application and also kernel and AI-ML firmware for the AMD DPUCV2DX8G benchmark application.
Set path to Xilinx Firmware:
sh-5.1# export XLNX_VART_FIRMWARE=/run/media/mmcblk1p1/dpu.xclbin
Copy precompiled AI 3.5 resnet50_pt model files accompanying this application note:
md5sum.txt
meta.json
resnet50_pt.prototxt
resnet50_pt.xmodel
to directory
~/app/model/
In second TE0950 terminal test the AI 3.5 resnet50_pt application.
Change directory to ~/app/model and test the benchmark application with resnet50_pt.xmodel inferenced by the AMD DPUCV2DX8G. Use command:
sh-5.1# cd ~/app/model
sh-5.1# xdputil benchmark resnet50_pt.xmodel 1
The benchmark application with resnet50_pt.xmodel inferenced by the AMD DPUCV2DX8G s executed.
Execute the test_free_run and the resnet50 benchmark in parallel
Both test applications can run in parallel.
In second TE0950 terminal, start the resnet50 benchmark application by the command:
sh-5.1# xdputil benchmark resnet50_pt.xmodel 1
While the resne50 benchmark is running, go to the first TE0950 terminal. Change directory to /run/media/mmcblk1p1 . Run the test_free_run application.
sh-5.1# cd /run/media/mmcblk1p1
sh-5.1# ./test_free_run dpu.xclbin
Both applications (benchmark and test_free_run) can run in parallel and both terminate successfully.
Compilation of large collection of trained Vitis AI 3.5 models for the TE0950 with AMD DPUCV2DX8G is described in [5].
References
- TE0950, Vitis 2023.2.1, Extensible Platform
- TE0950, Vitis 2023.2.1, Integration of DPUCZDX8G
- TE0950, Vitis 2023.2.1, Integration of DPUCV2DX8G
- TE0950, Vitis 2023.2.1, AI 3.0 Models for DPUCZDX8G
- TE0950, Vitis 2023.2.1, AI 3.5 Models for DPUCV2DX8G
- AMD Versal™ AI Edge Evalboard with VE2302 device, 8 GB DDR4 SDRAM, 15 x12 cm
https://shop.trenz-electronic.de/en/TE0950-03-EGBE21C-AMD-Versal-AI-Edge-Evalboard-with-VE2302-device-8-GB-DDR4-SDRAM-15-x12-cm?path=Trenz_Electronic/Development_Boards/TE0950/Reference_Design/2023.2/test_board - TE0950 Basic Linux Example archive for Vivado 2023.2.1, build 4, from 31.05.2024 - Versal device
https://shop.trenz-electronic.de/trenzdownloads/Trenz_Electronic/Development_Boards/TE0950/Reference_Design/2023.2/test_board/
TE0950-test_board-vivado_2023.2-build_4_20240531092954.zip - TE0950 Basic Linux Example archive for Vivado 2023.2.1, build 4, from 31.05.2024 - Artix device
https://shop.trenz-electronic.de/trenzdownloads/Trenz_Electronic/Development_Boards/TE0950/Reference_Design/2023.2/test_board/
TE0950-test_board_artix-vivado_2023.2-build_4_20240531084104.zip - DPUCV2DX8G for Versal Adaptive SoCs Product Guide (PG425)
https://docs.amd.com/r/en-US/pg338-dpu/Introduction?tocId=3xsG16y_QFTWvAJKHbisEw
Table of contents
Overview
Content Tools