Page History
...
- Check <design_name>/board_files/<board_series>_board_files.csv for available board part of the reference design:
- The table shows all available board parts, which are delivered with the reference design
- "Product ID" is only the newest one and in the most cases the same as the model number on your order or shop page.
- Revision number of the PRODID (-03- in this example) is the last one, which was available on last board part update. If there is no special board part for older revisions, this will be backward compatible. Please verify this on Vivado, see 4.
- "Part Name" is the FPGA device setting of Vivado for the assembly variant
- "Board Name" is the hole board part name
- "Short Name" is the name for the board part specific sub folders in the reference design
- "Zynq Flash Typ" is the setting to configure the Flash via SDK
- "FPGA Flash Typ" is the setting to configure the Flash via Vivado (first part only), the second and third part are QSPI mode and memory size in MB
- Check your order number and/or TE shop page to get module information of your PCB:
- https://shop.trenz-electronic.de/en/Products/Trenz-Electronic/<device familie>/<TE module serie>
!How to Do will be coming soon!- "Model Overview" shows the basic difference between the assembly options, in the most cases different footprint compatible FPGAs or RAM size. Assembly options (like different connector) which has no affect on board parts settings, has no separate board part files.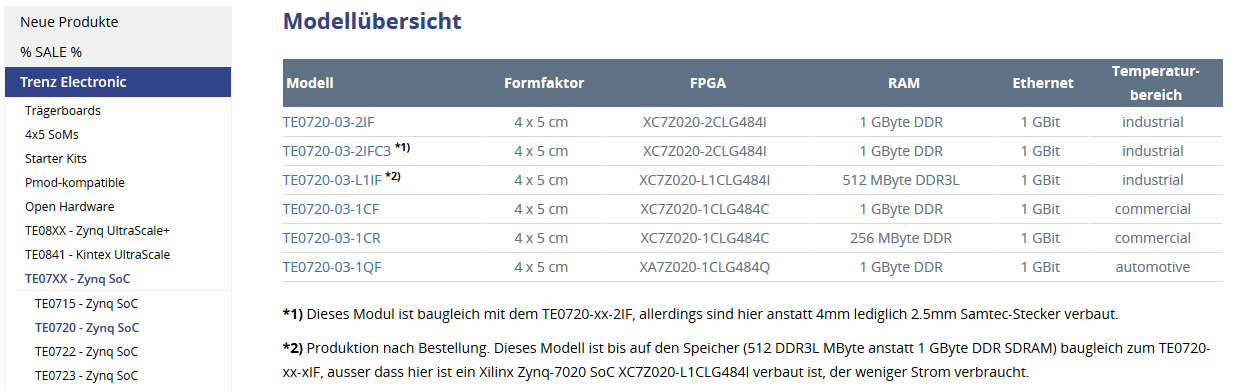
- Select your board part file on design_basic_settings.cmd/sh:
Use unique name from CSV list (see 1.)
- Unique names are ID or PRODID (in the most cases) or BOARDNAME or SHORTNAME
- Revision number of the PRODID is the last one, which was available on last board part update. If there is no special board part for older revisions, this will be backward compatible. Please verify this on Vivado, see 4.
See Reference Design: Getting Started for more details. - Create Vivado Project with vivado_create_project_guimode.cmd/sh
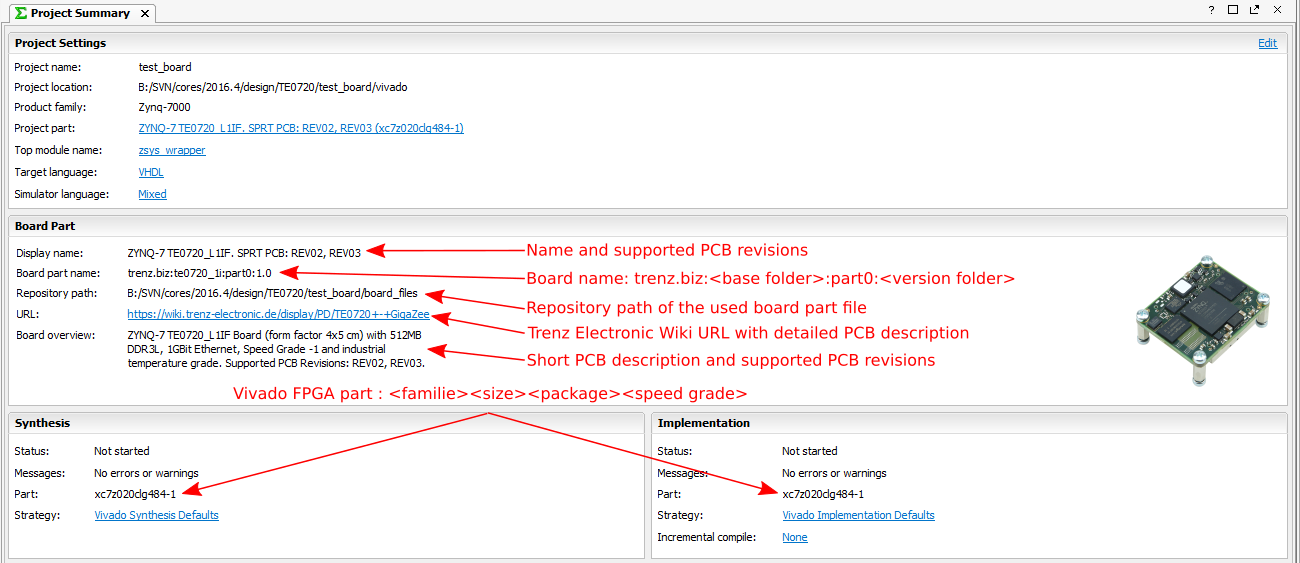
- Verify your board part selection on Vivado "Project Summary" tap:
...
Overview
Content Tools