Page History
...
Key Features
Revision History
| Date | Vivado | Project Built | Authors | Description |
|---|---|---|---|---|
| 2017-09- |
| 22 | 2017.2 | te0715-test_board-vivado_2017.2-build_02_20170922131837.zip te0715-test_board_noprebuilt-vivado_2017. |
| 2-build_ |
| 02_ |
| 20170922131853.zip | John Hartfiel | initial release |
Release Notes and Know Issues
...
| Software | Version | Note |
|---|---|---|
| Vivado | 2017.12 | needed |
| SDK | 2017.12 | needed |
| PetaLinux | 2017.12 | needed |
| SDx | 2017.1 | needed |
| SI5345 Clock Builder | --- | optional |
Hardware
...
Hardware
Basic description of TE Board Part Files is available on TE Board Part Files.
Basic description of TE Board Part Files is available on TE Board Part Files.
Complete List is available on <design name>/board_files/*_board_files.csv
Design supports following modules:
| Module Model | Model Board Short NameCarrier Model | Notes | |||
|---|---|---|---|---|---|
| te0715-03-15-1c | 03_15_1c | ||||
| te0715-03-15-1i | 03_15_1i | Additional Hardware | Notes
Content
| HTML |
|---|
<!--
Remove unused content
--> |
For general structure and of the reference design, see Project Delivery
Design Sources
...
| te0715-03-15-2i | 03_15_2i | |
| te0715-03-30-1c | 03_30_1c | |
| te0715-03-30-1i | 03_30_1i | |
| te0715-03-30-3e | 03_30_3e | |
| te0715-04-15-1c | 04_15_1c | |
| te0715-04-15-1i | 04_15_1i | |
| te0715-04-15-2i | 04_15_2i | |
| te0715-04-30-1c | 04_30_1c | |
| te0715-04-30-1i | 04_30_1i | |
| te0715-04-30-3e | 04_30_3e | |
| te0715-04-12s-1c | 12s |
Design supports following modules:
| Carrier Model | Notes |
|---|---|
| TE0701 | |
| TE0703 | |
| TE0705 | |
| TE0706 | used as reference carrier |
| TEBA0841 |
Additional HW Requirements
| Additional Hardware | Notes |
|---|---|
| USB Cable | |
| XMOD Programmer | Carrier dependent, if carrier has no own FTDI |
Content
| HTML |
|---|
<!--
Remove unused content
--> |
For general structure and of the reference design, see Project Delivery
Design Sources
| Type | Location | Notes |
|---|---|---|
| Vivado | <design name>/block_design <design name>/constraints <design name>/ip_lib | Vivado Project will be generated by TE Scripts |
| SDK/HSI | <design name>/sw_lib | Additional Software Template for SDK/HSI and apps_list.csv with settings for HSI |
| PetaLinux | <design name>/os/petalinux | PetaLinux template with current configuration |
Additional Sources
| Type | Location | Notes |
|---|---|---|
| --- | --- | --- |
Download
Reference Design is only usable with the specified Vivado/SDK/PetaLinux/SDx version. Do never use different Versions of Xilinx Software for the same Project.
| HTML |
|---|
<!--
Add correct path:https://shop.trenz-electronic.de/en/Download/?path=Trenz_Electronic/TE0803/Reference_Design/2017.1/Starterkit
--> |
Reference Design is available on:
Design Flow
| HTML |
|---|
<!--
Basic Design Steps
Add/ Remove project specific
--> |
| Note |
|---|
Reference Design is also available with prebuilt files. It's recommended to use TE prebuilt files for first lunch. |
Trenz Electronic provides a tcl based built environment based on Xilinx Design Flow. See: Vivado/SDK/SDSoC#XilinxSoftware-BasicUserGuides and Project Delivery
The most Trenz Electronic FPGA Reference Designs are TCL-script based project. Command files for execution will be generated with "_create_win_setup.cmd" on Windows OS and "_create_linux_setup.sh" on Linux OS.
TE Scripts are only needed to generate the vivado project, all other additional steps are optional and can also executed by Xilinx Vivado/SDK GUI. For currently limitations on Win and Linux OS see: Project Delivery Currently limitations of functionality
- Run _create_win_setup.cmd/_create_linux_setup.sh and follow instructions on shell:
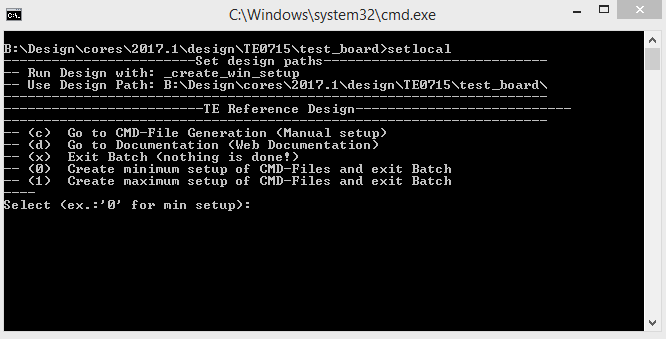
- Press 0 and enter for minimum setup
- (optional) Generate Virtual Drive or use short directory for the reference design (for example x:\<design name>)
- Create Project
- Select correct device on "design_basic_settings.cmd" and create Vivado project with "vivado_create_project_guimode.cmd"
Note: Select correct one, see TE Board Part Files
- Select correct device on "design_basic_settings.cmd" and create Vivado project with "vivado_create_project_guimode.cmd"
- Create HDF and export to prebuilt folder
- Run on Vivado TCL: TE::hw_build_design -export_prebuilt
Note: Script generate design and export files into \prebuilt\hardware\<short dir>. Use GUI is the same, except file export to prebuilt folder
- Run on Vivado TCL: TE::hw_build_design -export_prebuilt
- Create Linux (uboot.elf and image.ub) with exported HDF
- HDF is exported to "prebuilt\hardware\<short name>"
Note: HW Export from Vivado GUI used default another path. - Create Linux images on VM, see PetaLinux KICKstart
- Use TE Template from /os/petalinux
- HDF is exported to "prebuilt\hardware\<short name>"
- Add Linux files (uboot.elf and image.ub) to prebuilt folder
- "prebuilt\os\petalinux\default" or "prebuilt\os\petalinux\<short name>"
Notes: Scrips select "prebuilt\os\petalinux\<short name>", if exist, otherwise "prebuilt\os\petalinux\default"
- "prebuilt\os\petalinux\default" or "prebuilt\os\petalinux\<short name>"
- Generate Programming Files with HSI/SDK
- Run on Vivado TCL: TE::sw_run_hsi
Note: Scripts generate applications and bootable files, which are defined in "sw_lib\apps_list.csv" - (alternative) Use start SDK with Vivado GUI or start with TE Scripts on Vivado TCL: TE::sw_run_sdk
Note: See SDK Projects
- Run on Vivado TCL: TE::sw_run_hsi
Launch
Additional Sources
...
Download
Reference Design is only usable with the specified Vivado/SDK/PetaLinux/SDx version. Do never use different Versions of Xilinx Software for the same Project.
| HTML |
|---|
<!--
Add correct path:https://shop.trenz-electronic.de/en/Download/?path=Trenz_Electronic/TE0803/Reference_Design/2017.1/Starterkit
--> |
Reference Design is available on:
Design Flow
| HTML |
|---|
<!--
Basic Design Steps
Add/ Remove project specific
--> |
Trenz Electronic provides a tcl based built environment based on Xilinx Design Flow. See: Vivado/SDK/SDSoC#XilinxSoftware-BasicUserGuides and Project Delivery
TE Scripts are only needed to generate the vivado project, all other additional steps are optional and can also executed by Xilinx Vivado/SDK GUI
Important Vivado and SDSoC Project need a very short path on Win OS. Project delivery provides a "_use_virtual_drive.cmd" to generate a virtual drive.
- _create_win_setup.cmd/_create_linux_setup.sh and follow instructions on shell:
- Reference Design (only tested on Win OS, but Linux should also works)
- Generate Virtual Drive or use short directory (for example x:\<design name>)
- Create Project
- Select correct device on "design_basic_settings.cmd" and create Vivado project with "vivado_create_project_guimode.cmd"
- Create HDF and export to prebuilt folder
- TE::hw_build_design -export_prebuilt
- Create Linux with HDF
- HDF is exported to "prebuilt\hardware\<short name>"
- Create Linux images on VM, see PetaLinux KICKstart
- Use TE Template from /o
- Add Linux files to prebuilt folder
- Generate Programming Files with HSI/SDK
SDSoC (only tested on Win OS)
- Generate Platform Project or use prebuilt from download
...
| HTML |
|---|
<!-- Description of Block Design, Constrains... BD Pictures from Export... --> |
| Note |
|---|
Check Module and Carrier TRMs for proper HW configuration before you try any design. Reference Design is also available with prebuilt files. It's recommended to use TE prebuilt files for first lunch. |
Programming
QSPI
Xilinx documentation for programming and debugging: Vivado/SDK/SDSoC-Xilinx Software Programming and Debugging
QSPI
TodoNot used on this Example.
SD
Not used on this Example.
JTAG
Not used on this Example.
Usage
System Design - Vivado
| HTML |
|---|
<!-- Description of Block Design, Constrains... BD Pictures from Export... --> |
...
Description currently not available.
...
Overview
Content Tools