Page History
| HTML |
|---|
<!-- tables have all same width (web max 1200px and pdf full page(640px), flexible width or fix width on menu for single column can be used as before) -->
<style>
.wrapped{
  width: 100% !important;
  max-width: 1200px !important;
 }
</style> |
...
| hidden | true |
|---|---|
| id | Comments |
Important General Note:
...
Export PDF to download, if vivado revision is changed!
Designate all graphics and pictures with a number and a description, Use "Scroll Title" macro
...
...
...
Create DrawIO object here: Attention if you copy from other page, use
| Scroll Only |
|---|
image link to the generate DrawIO PNG file of this page. This is a workaround until scroll pdf export bug is fixed |
...
Table template:
- Layout macro can be use for landscape of large tables
- Set column width manually(can be used for small tables to fit over whole page) or leave empty (automatically)
...
| anchor | Table_xyz |
|---|---|
| title | Text |
...
...
Table of contents
...
...
Overview
...
| hidden | true |
|---|---|
| id | Comments |
...
...
...
...
...
...
...
...
...
- Ported from 11.8
...
...
...
...
...
...
...
...
...
...
...
...
...
...
...
...
- Libero Hardware Project
- SoftConsole Workspace, containing:
Software Project - Smartberry_Webserver_6.2
Software Project - Smartberry_Webserver_DDR_6.2
Board configuration file - Manual
...
...
...
...
...
...
...
...
...
...
Download
...
...
...
...
...
...
...
...
...
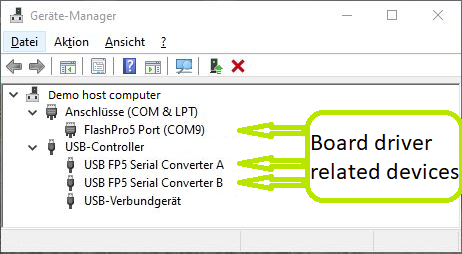
Connect the board via USB cable to your demo host computer. Check in the Windows Device Manager the appearance of the tree board driver related devices:
- FlashPro5 Port (ComX)
- USB FP5 Serial Converter A
- USB FP5 Serial Converter B
The Device Manager is accessible via "Right mouse click context menu" from the Windows Start Menu Button.
Connect the boards Ethernet port to your demo host computer. The demo is configured to establish a network connection via the DHCP protocol, therefore a free router / network port can be used.
A direct port to port connection between the demo host computer and the board is also possible but requires to reconfigure the software project.
Launch
| Page properties | ||||
|---|---|---|---|---|
| ||||
Note:
|
Programming Hardware design
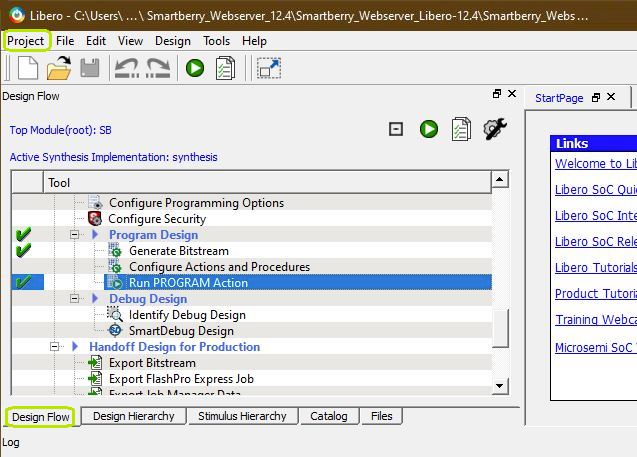
Open Libero 12.4, in the to left corner, open the demo hardware project via "Project > Open Project" and point the file dialogue to the demo archives hardware project Disk:\Path_to_the_Demo_archive\Smartberry_Webserver_Libero-12.4\ , double left mouse click onto the project file "Smartberry_Webserver.prjx" to open it.
The board is automatically selected and setup to be flashed by Libero.
In the upper left section of Libero, select the tab "Design Flow" (picture above - green rectangle) and flash it to the board via "Program Design > and double left mouse click onto Run PROGRAM Action" (picture above - row with blue background).
Warnings should not affect the demo.
The hardware design is volatile and therefore lost when powering down the board.
Programming Software project
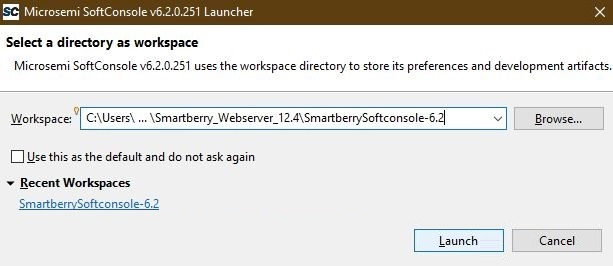
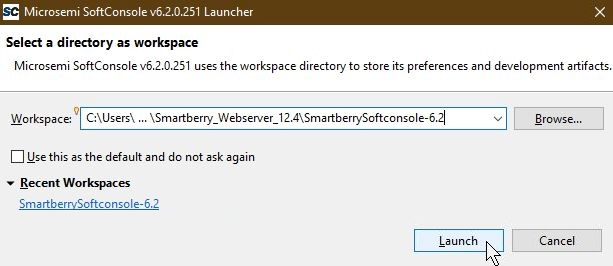
Open SoftConsole 6.2 and point the "Workspace:" to the folder "SmartberrySoftconsole-6.2" inside the demo folder.
Subsequently the program opens.
The SoftConsole display to the left the projects which the Workspace contains.
The two demo projects "Smartberry_Webserver_6.2" and "Smartberry_Webserver_DDR_6.2" are identical variants of the demo, they only differ in their memory location. The first one is stored in embedded non volatile memory (eNVM) and the later is stored volatile in the external DDR ram and therefore lost during power down.
Before flashing the demo, open a comport terminal to the boards comport, so that its messages about the used IP Address and executed Demo-Variant can be captured.
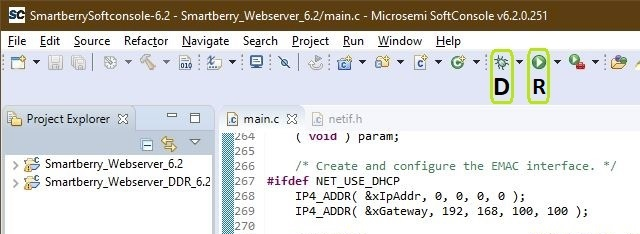
To simply run the demo press the triangle right to the button marked with a "R" in the picture above and select a variant of the demo.
Pressing the triangle next to the button marked with "D" let you select which variant to be executed in debug mode.
Debug controls - Resume - Pause - Stop
Switch between Debug and Run perspective (upper right corner program window)
Static IP configuration
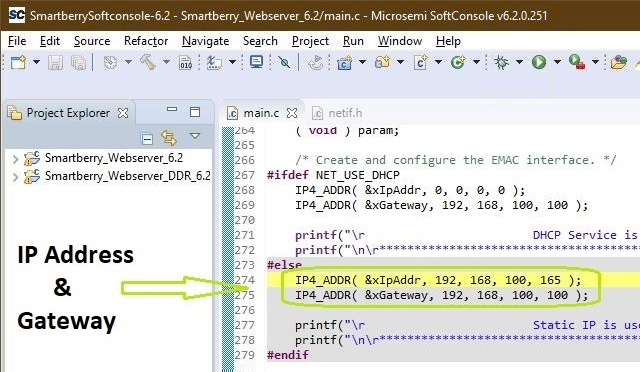
To disengaging the DHCP mode one has to setup up an IP and Gateway Address in the code unit "main.c" line 274. Alternativly, the demo hosts IP Address can be changed.
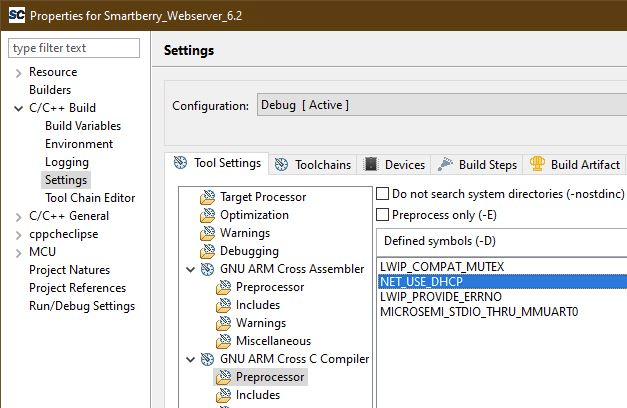
Furthermore the corresponding compiler flag needs to be deleted in the project setting. To do so, in the "Project Explorer" tab, right mouse click onto the project and select Properties in the appearing menu.
In the left section of the properties window select "C/C++ Build > Settings" in the right section select the tab "Tool Settings > GNU ARM Cross C Compiler > Preprocessor" under "Defined symbols (-D)" delete the compiler flag "NET_USE_DHCP" and press "Apply". Confirm the following dialogue and press "Cancel".
Lastly, the project needs to be recompiled. In the top menu of the SoftConsole select "Project > Build ALL / Build Project".
Warnings should not affect the demo. can be ignored.
Pictures of the Webserver pages
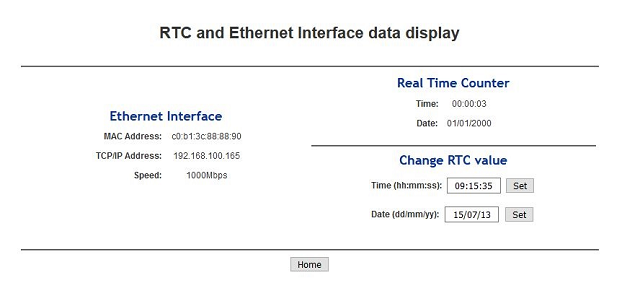
Open a new tab in a web browser and enter the IP Address from the comport terminal. The start page, picture below, should appear immediately.
...
System Design - Libero
...
| hidden | true |
|---|---|
| id | Comments |
...
...
...
set_property BITSTREAM.GENERAL.COMPRESS TRUE [current_design]
set_property BITSTREAM.CONFIG.UNUSEDPIN PULLNONE [current_design]
Software Design - SoftConsole
| Page properties | ||||
|---|---|---|---|---|
| ||||
Note:
|
Application
...
| hidden | true |
|---|---|
| id | Comments |
----------------------------------------------------------
FPGA Example
scu
MCS Firmware to configure SI5338 and Reset System.
srec_spi_bootloader
TE modified 2019.2 SREC
Bootloader to load app or second bootloader from flash into DDR
Descriptions:
- Modified Files: blconfig.h, bootloader.c
- Changes:
- Add some console outputs and changed bootloader read address.
- Add bugfix for 2018.2 qspi flash
xilisf_v5_11
TE modified 2019.2 xilisf_v5_11
...
Zynq Example:
...
...
...
...
- Add Files: all TE Files start with te_*
- READ MAC from EEPROM and make Address accessible by UBOOT (need copy defines on uboot platform-top.h)
- CPLD access
- Read CPLD Firmware and SoC Type
- Configure Marvell PHY
...
ZynqMP Example:
...
zynqmp_fsbl
TE modified 2019.2 FSBL
General:
- Modified Files: xfsbl_main.c, xfsbl_hooks.h/.c, xfsbl_board.h/.c(search for 'TE Mod' on source code)
- Add Files: te_xfsbl_hooks.h/.c (for hooks and board)\n\
- General Changes:
- Display FSBL Banner and Device Name
Module Specific:
- Add Files: all TE Files start with te_*
- Si5338 Configuration
- ETH+OTG Reset over MIO
zynqmp_fsbl_flash
TE modified 2019.2 FSBL
General:
- Modified Files: xfsbl_initialisation.c, xfsbl_hw.h, xfsbl_handoff.c, xfsbl_main.c
- General Changes:
- Display FSBL Banner
- Set FSBL Boot Mode to JTAG
- Disable Memory initialisation
zynqmp_pmufw
Xilinx default PMU firmware.
----------------------------------------------------------
General Example:
hello_te0820
Hello TE0820 is a Xilinx Hello World example as endless loop instead of one console output.
u-boot
U-Boot.elf is generated with PetaLinux. SDK/HSI is used to generate Boot.bin.
SDK template in ./sw_lib/sw_apps/ available.
zynqmp_fsbl
TE modified 2019.2 FSBL
General:
- Modified Files: xfsbl_main.c, xfsbl_hooks.h/.c, xfsbl_board.h/.c(search for 'TE Mod' on source code)
- Add Files: te_xfsbl_hooks.h/.c (for hooks and board)\n\
- General Changes:
- Display FSBL Banner and Device Name
Module Specific:
- Add Files: all TE Files start with te_*
- Si5345 Configuration
- OTG+PCIe Reset over MIO
- I2C MUX for EEPROM MAC
zynqmp_fsbl_flash
TE modified 2019.2 FSBL
General:
- Modified Files: xfsbl_initialisation.c, xfsbl_hw.h, xfsbl_handoff.c, xfsbl_main.c
- General Changes:
- Display FSBL Banner
- Set FSBL Boot Mode to JTAG
- Disable Memory initialisation
zynqmp_pmufw
Xilinx default PMU firmware.
hello_te0808
...
...
