Page History
Overview
The Vivado® Design Suite allows you to create projects based on specific boards. Trenz Electronic provides Vivado Board Part files in the download area. Please choose the BSP folder This files are included into the reference projects, please choose a reference design under the proper module.
There are two three options for installing the Board Part files
- Option1: Use Trenz Electronic Reference Design with local board part file
- Option2: Xilinx Git Hub for Vivado
- Option3: Install into a User Repository
- Option2Option4: Install into the Vivado installation
Option1: Install into a User Repository
This Option allows you to install the Vivado Board Part files to any location of your choosing. The disadvantage is that it required an additional command to point the tools to your repository.
Attention: The board part files of our reference designs are for the corresponding Vivado version of the project delivery. It's possible to use them with other Vivado versions, but maybe it's not working correctly, if this is done.
Option 1: Use Trenz Electronic Reference Design with local board part file
| Note |
|---|
Trenz Electronic will provide board part files for new assembly variants at first with the latest reference designs version.
|
- Download the reference design from the corresponding download area of the Trenz Electronic Product
- Since 2018.3 special "Module Selection Guide" is included into "_create_win_setup.cmd" and "_create_linux_setup.sh"
- Unzip download (use short directory name)
- Execute "_create_win_setup.cmd" or "_create_linux_setup.sh" (depending on the used OS)
- Follow instruction on the console window
- (optional) Select Vivado Installation path and Version (will be possible in the expected version wasn't found on Xilinx installation path)
- Console will show a list of available assembly versions (board files) for the reference design:
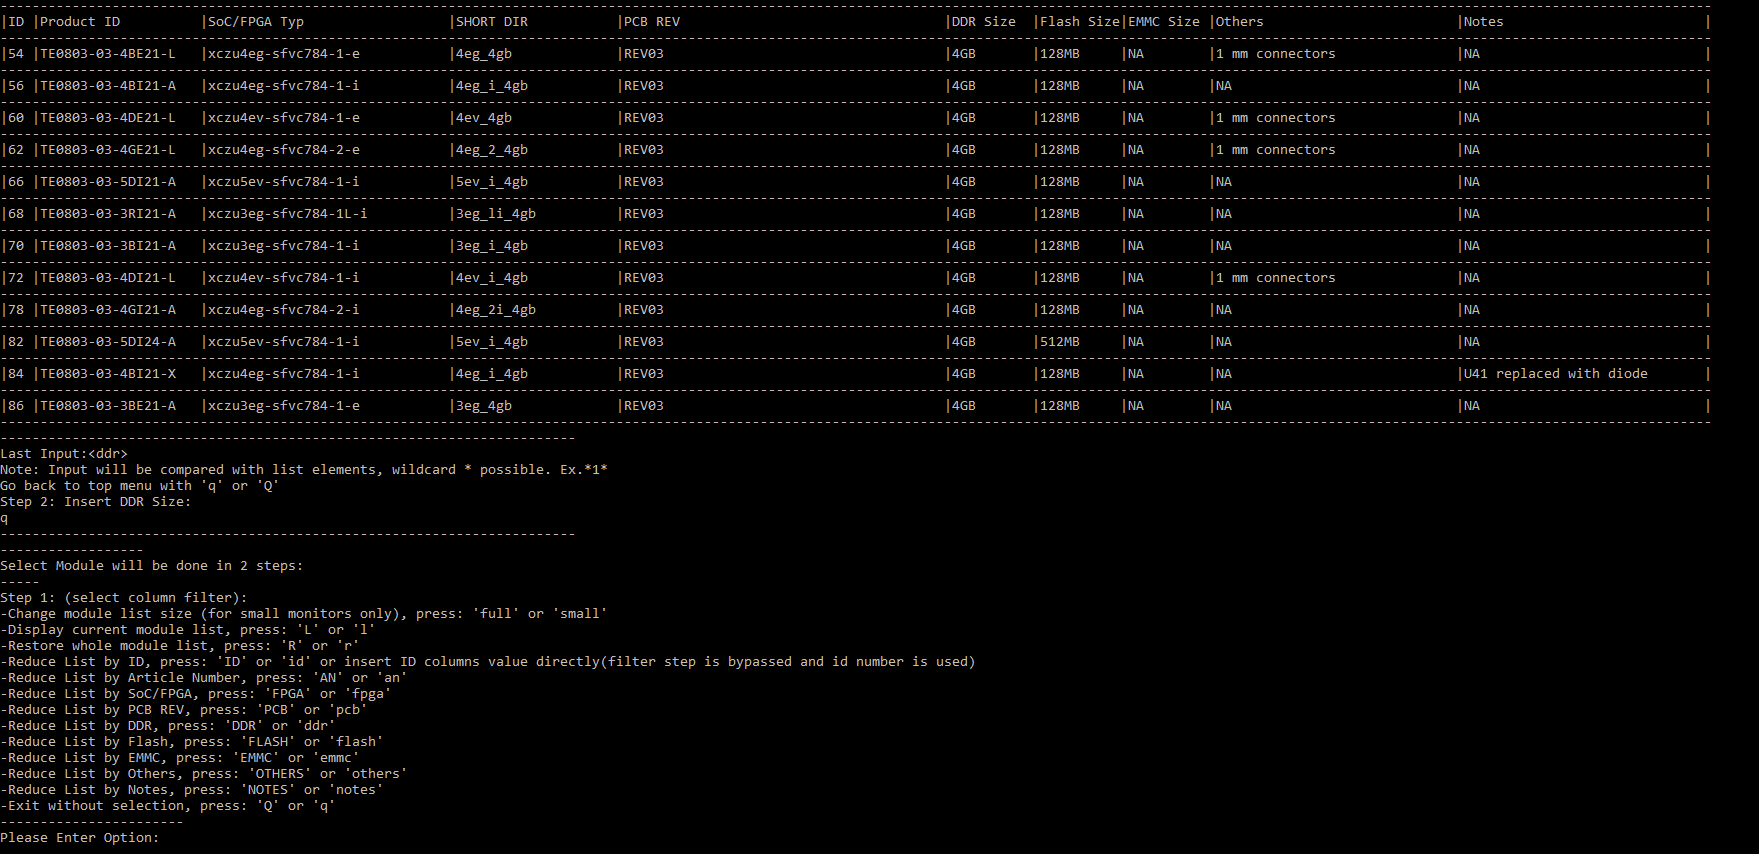
- Select ID number to select the board or use filter function to reduce the table with one of the other categories from the table header
- Verify selection and create project
Option 2: Xilinx Git Hub for Vivado (not recommended at the moment, git hub is currently not up to date)
| Note |
|---|
Board Files for Trenz Electronic Modules will be available on Xilinx Git Hub store for Vivado 2020.1 and newer Trenz Electronic will update board files which are available the Github regularly, but latest board part files tested with the corresponding Vivado version will be still delivered first with the reference designs. Xilinx Git Hub Link: https://github.com/Xilinx/XilinxBoardStore |
- Open Vivado
- Select download path for Git Hub Store (got to Tools → Settings):

- Open XHub Store and select "Boards" Tab
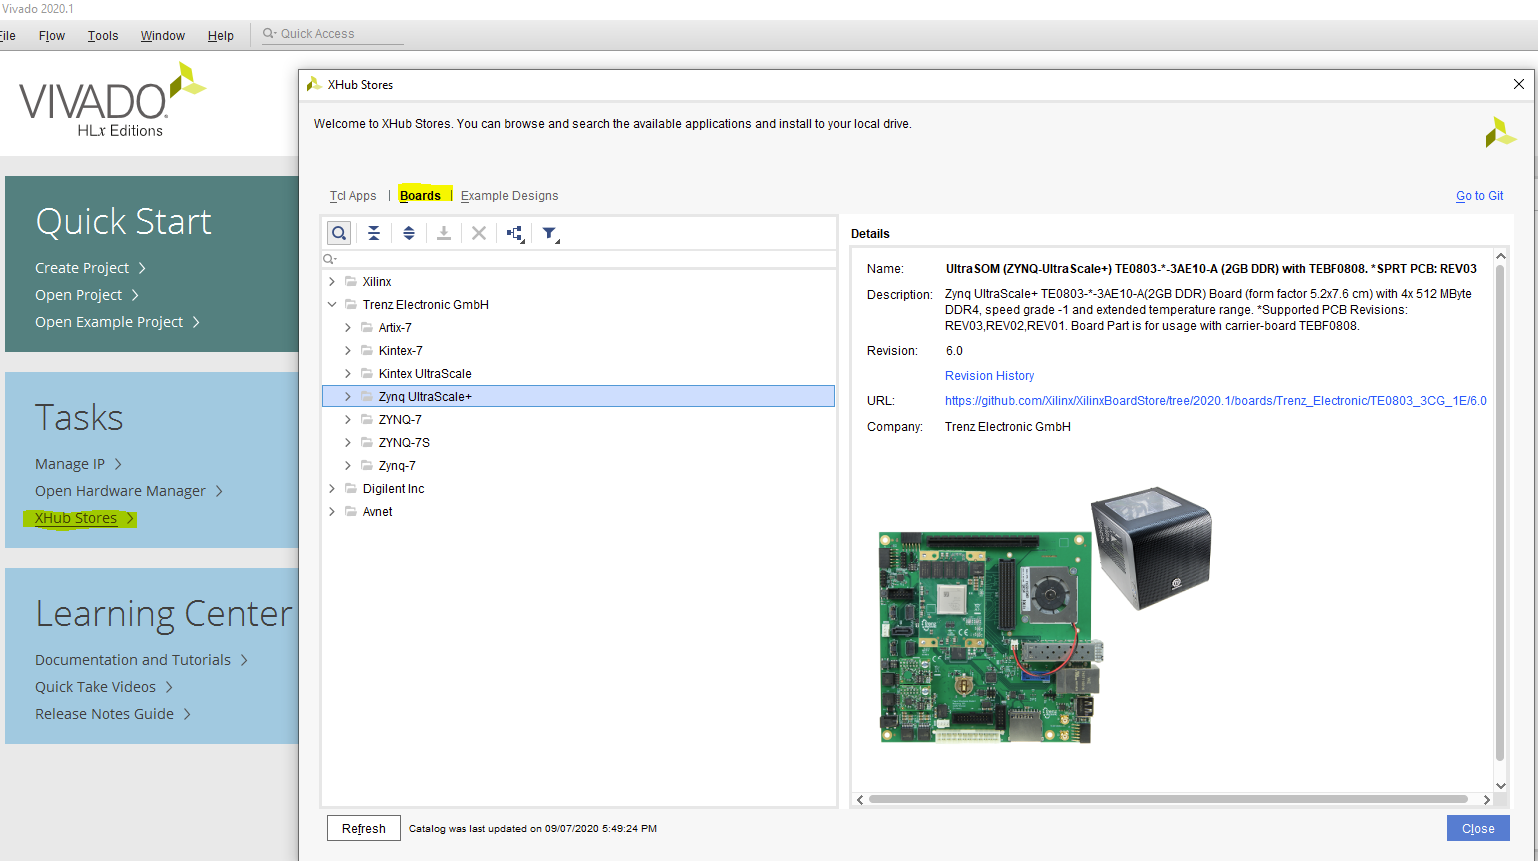
- Go to the device category of your Trenz Electronic SoC/FPGA Module, select the device and press Download Button

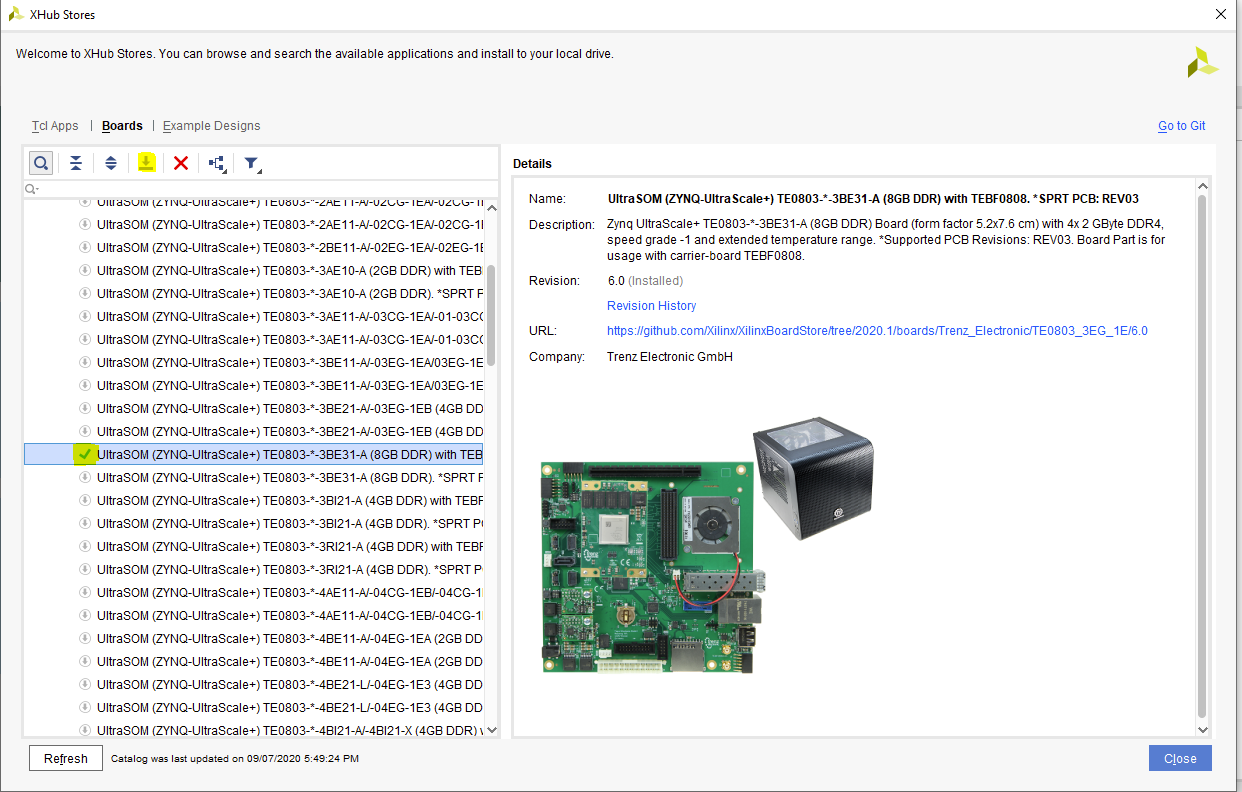
- Installed Board files will be marked with the green check mark.
Option 3: Install into a User Repository
This Option allows you to install the Vivado Board Part files to any location of your choosing. The disadvantage is that it required an additional command to point the tools to your repository.
| Note |
|---|
This description is for Vivado 2015.1 and higher. Older Vivado versions used other variable names, so some changes are necessary. Since Vivado 2017.1, "init.tcl" should be renamed to "Vivado_init.tcl" |
Create init.tcl with following content:
Code Block language text if { [catch { # ############################# # insert settings here: set tepath "C:/TE" if {[file exists ${tepath}/]} { set_param board.repoPaths $tepath puts "Set Board Part RepoPath: [get_param board.repoPaths]" } # ############################# }] } { puts "Info: (TE) init.tcl failed" }- Put init.tcl in one of the possible locations for init.tcl:
- Vivado Project (For current version only): <installdir>/vivado/<version>/scripts/
- User Data(For all versions): C:/Users/<user>/AppData/Roaming/Xilinx/Vivado/
- Copy the Board part files folder from the reference project (<reference_design>/board_files/) into the folder C:/TE (the folder location can be changed in the init.tcl script). The *.csv file from <reference_design>/board_files/ is not necessary for this way.
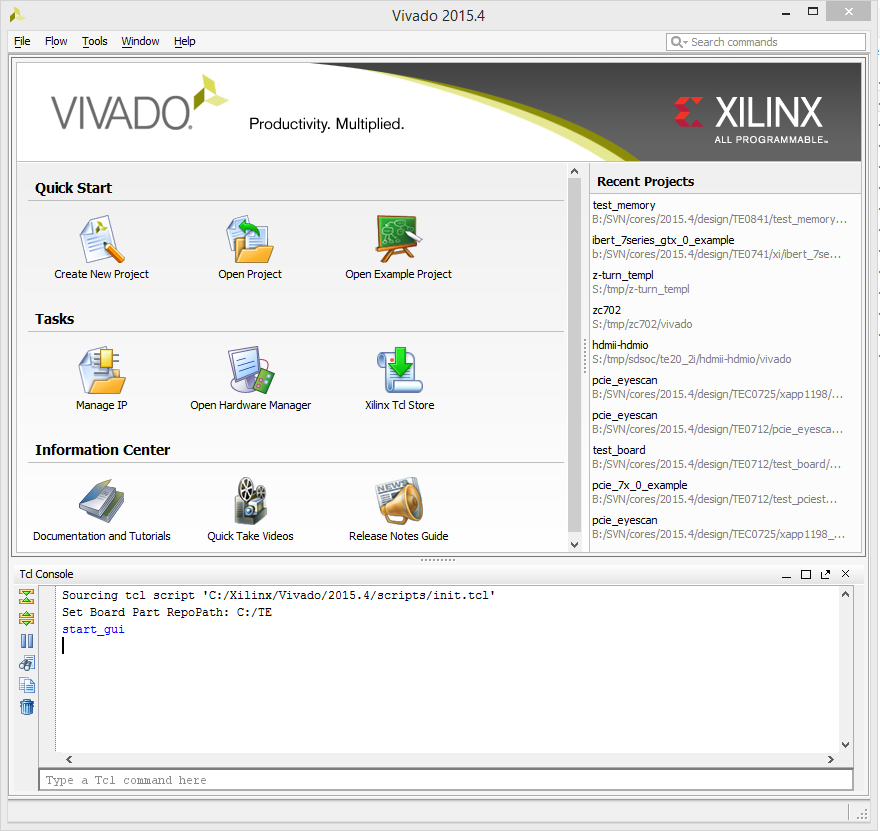
Start your Vivado Version and the TCL-console printout should be the following:
- Extract the archive to a location of you choosing.This document and the included init.tcl file will use C:/TE for the path. You will need to modify the instructions and edit the init.tcl file to match your location. When editing the TCL file, be sure to use the forward slash / for the path.
- Note that this location will have a boards sub-directory as shown below.
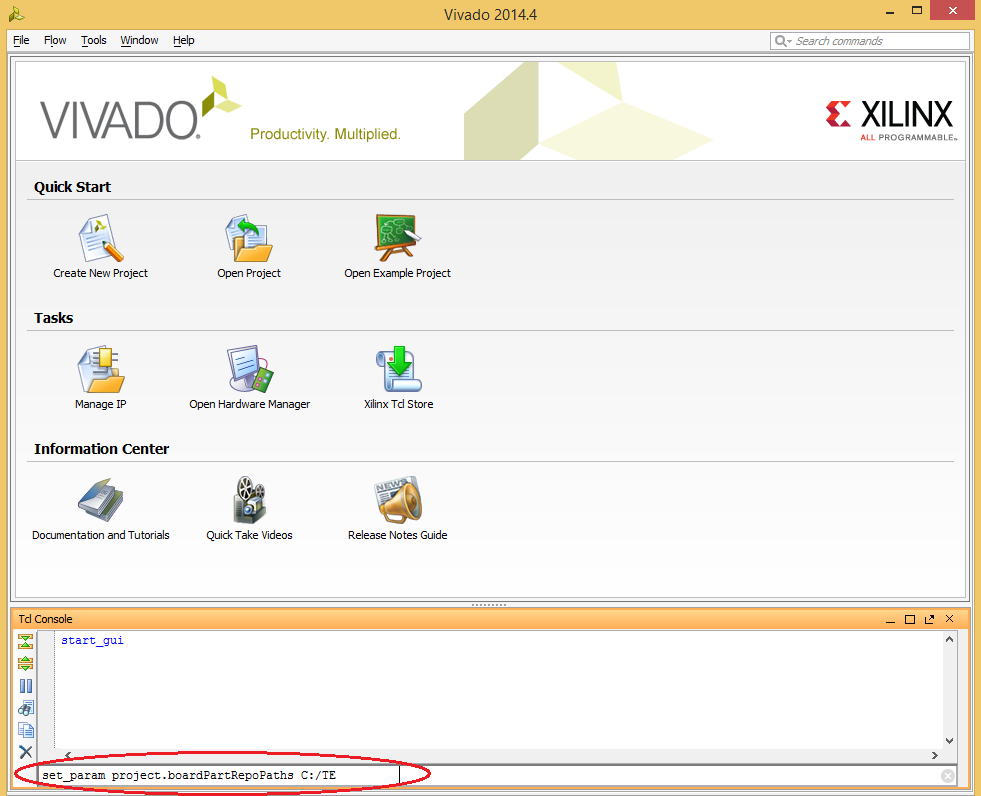
To make this User Repository visible to Vivado, you can either use the Vivado TCL Console to set the Parameter or set the Parameter in the init.tcl file.Setting this parameter in the Vivado TCL Console is shown below. Set the following parameter as the first command after the Vivado integrated design environment (IDE) opens. Notice the direction of the ‘/’ forward slash. A backward slash will be accepted, but the path will not be registered correctly. To use this method you will need issue the command each time you launch Vivado.
For the Vivado 2014.4 please use the command:
set_param project.boardPartRepoPaths C:/TE
For the vivado 2015.1 please use the command:
set_param board.repoPaths {C:/TE/}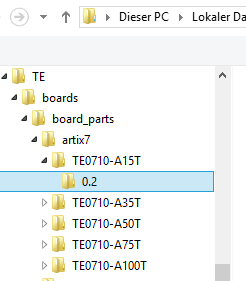 If you choose to use the init.tcl file method, then you will need to create a init.tcl file,
For the Vivado version 2014.4:
first add the following command as the first line in your init.tcl:
set_param project.boardPartRepoPaths.editable true
then give the following command to set the parameter:
set_param project.boardPartRepoPaths C:/TE (if get some problem,please try to give this command : set_param project.boardPartRepoPaths {C:/TE} )
For the Vivado version 2015.1:
you need only to add one command in your init.tcl:
set_param board.repoPaths {C:/TE/}If you finish to create the init.tcl file, place this file in the software installation:
installdir/Vivado/version/scripts/init.tcl
Note Please make sure you use plain ASCII text editor when creating the init.tcl file, any non ASCII character in the file will make Vivado to freeze on startup. A working init.tcl file is provided in the archive with this tutorial. With this method you can set up a permanent initialization TCL that is read by Vivado each time it launches. Details about the init.tcl file are included in UG835 Vivado Design Suite Tcl Command Reference Guide. UG835 describes where to put the init.tcl file.
...
Option 4: Install into the Vivado installation
This is the quickest option, but it is not recommended by Xilinx. Use at your own risk.
...
- Copy the Board part files folder from the reference project (<reference_design>/board_files/) into the folder <installdir>/vivado/<version>/data/boards/board_files/. Create this folder if it does not exist yet. The *.csv file from <reference_design>/board_files/ is not necessary for this way.
Load on
...
Vivado
Regardless of which method you choose, the new boards should now be visible in Vivado 20142015.4 1 or higher for vendor trenz.biz . To test this out, do the following.
- Launch Vivado 2014.4.
- Select Create New Project.
- Click Next> to get started.
- Set the project name and location. Press Next>.
- Select project type Click Next>.
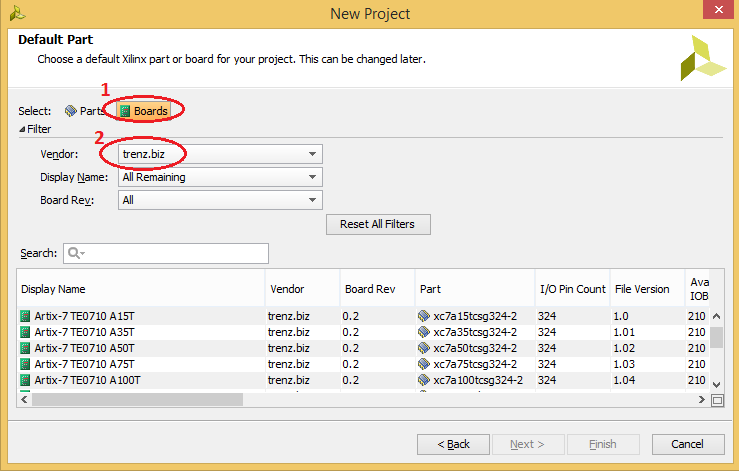
- At the Default Part screen,
a, Click Boards under Specify.
b, Click trenz.biz under Vendor.
The options should appear as shown.
For more information about this capability, please refer to the following Quick Take video.
Software Requirements
The software used is
- Windows-7 64-bit
- Xilinx Vivado 2014.4
...
- Xilinx Vivado 2015.4 or higher ( for install option 1, 3, 4)
- Xilinx Vivado 2019.1.3 or higher ( for install option 1, 2, 3, 4)
Overview
Content Tools