Versions Compared

Key

  • This line was added.
  • This line was removed.
  • Formatting was changed.


Page properties
hiddentrue
idComments

Template Revision 1.0 - on construction

Design Name always "TE Series Name" + Design name, for example "TE0720 Test Board"

HTML
<!-- tables have all same width (web max 1200px and pdf full page(640px), flexible width or fix width on menu for single column can be used as before) -->
<style>
.wrapped{
  width: 100% !important;
  max-width: 1200px !important;
 }
</style>

...

hiddentrue
idComments

Important General Note:

Custom_table_size_100


Page properties
hiddentrue
idComments

Important General Note:

  • Export PDF to download, if Libero or SoftConsole revision is changed!

  • Designate all graphics and pictures with a number and a description, Use "Scroll Title" macro

    • Use "Scroll Title" macro for pictures and table labels. Figure number must be set manually at the moment (automatically enumeration is planned by scrollPDF)
      • Figure template (note: inner scroll ignore/only with drawIO object):

        Scroll Title
        anchorFigure_xyz
        titleText


        Scroll Ignore

        Create DrawIO object here: Attention if you copy from other page, use


        Scroll Only

        image link to the generate DrawIO PNG file of this page. This is a workaround until scroll pdf export bug is fixed


      • Table template:

        • Layout macro can be use for landscape of large tables
        • Set column width manually(can be used for small tables to fit over whole page) or leave empty (automatically)

...

Export PDF to download, if vivado revision is changed!

Designate all graphics and pictures with a number and a description, Use "Scroll Title" macro

...

        • Scroll Title
          anchor

...

        • Table_xyz
          titleText

          scroll-

...

Create DrawIO object here: Attention if you copy from other page, use

Scroll Only

image link to the generate DrawIO PNG file of this page. This is a workaround until scroll pdf export bug is fixed

...

Table template:

  • Layout macro can be use for landscape of large tables
  • Set column width manually(can be used for small tables to fit over whole page) or leave empty (automatically)

...

anchorTable_xyz
titleText

...

Scroll pdf ignore

Table of contents

Table of Contents
outlinetrue
excludeTable of contents

Overview

...

hiddentrue
idComments

Notes :

...

short description of the design

Short Link of "Scroll only" macro:

...

        • tablelayout
          orientationportrait
          sortDirectionASC
          repeatTableHeadersdefault
          style
          widths
          sortByColumn1
          sortEnabledfalse
          cellHighlightingtrue

          ExampleComment
          12


  • ...

Overview

Page properties
hiddentrue
idComments

Notes :

This demo is a Webserver which utilizes SmartFusion2 SoC ARM Cortex-M3, Ethernet, USB / COM-port, Real Time Clock and the on-board LEDs.

The demo is offered in two variants, one which is stored into the embedded non-volatile memory (eNVM) and the seconde one which stored to the external DDR3/L SDRAM memory and therefore volatile.

Refer to

...

...

List of available short links: https://wiki.trenz-electronic.de/display/CON/Redirects

This demo is a Webserver which utilizes SmartFusion2 SoC ARM Cortex-M3 core, Ethernet, USB / COM-port, Real Time Clock and the on-board LEDs.

The demo is offered in two variants, one which is stored into the embedded non-volatile memory (eNVM) and the other executed from the external DDR3/L SDRAM memory.

Refer to http://trenz.org/tem0002-info for the current online version of this manual and other available documentation.

Key Features

Page properties
hiddentrue
idComments

Notes :

  • Add basic key futures, which can be tested with the design

...

for the current online version of this manual and other available documentation.

Key Features

Page properties
hiddentrue
idComments

Notes :

  • Add basic key futures, which can be tested with the design


Excerpt
  • Libero 12.4           (FPGA IDE)
  • SoftConsole 6.2   (Software IDE)
  • FreeRTOS V7.0.1  (

...

  • Free real time operating system)
  • lwIP 1.4.

...

  • 1             (lightweight IP) 
  • ETH
  • UART
  • DDR
  • eNVM
  • User LED access
  • Real Time Clock

Revision History

Page properties
hiddentrue
idComments

Notes :

  • add every update file on the download
  • add design changes on description

...

  •  
  • Datum & Ordnernamen UPDATEN / CHECKEN


Scroll Title
anchor

...

Table_DRH
titleDesign Revision History

Scroll Table Layout
orientationportrait
sortDirectionASC
repeatTableHeadersdefault
style
widths
sortByColumn1
sortEnabledfalse
cellHighlightingtrue

DateLiberoProject BuiltAuthorsDescription
2020-

...

11-

...

2312.4

...

TEM0002-SmartBerry_Webserver-Demo_Libero-12.4_

...

20201123-1511 .zip

...

Kilian Jahn

...

  • Added "Hello World" (into SoftConsole workspace)
  • Demo Webserver ported from Libero 11.8
  • Improved its User Interface
2018-02-2611.8Smartberry_Webserver_Demo.zip--
  • Initial release


Release Notes and Know Issues

Page properties
hiddentrue
idComments
Notes :
  • add known Design issues and general notes for the current revision
  • do not delete known issue, add fixed version time stamp if  issue fixed


Scroll Title
anchorTable_KI
titleKnown Issues

Scroll Table Layout
orientationportrait
sortDirectionASC
repeatTableHeadersdefault
style
widths
sortByColumn1
sortEnabledfalse
cellHighlightingtrue

IssuesDescriptionWorkaround/SolutionTo be fixed version

...

Webserver Demo
  • Google search page
Search failsUnknownUnknown

...


Requirements

Software

Page properties
hiddentrue
idComments

Notes :

  • list of software which was used to generate the design


Scroll Title
anchorTable_SW
titleSoftware

Scroll Table Layout
orientationportrait
sortDirectionASC
repeatTableHeadersdefault
style
widths
sortByColumn1
sortEnabledfalse
cellHighlightingtrue

SoftwareVersionNote
Windows 102004 / 19041
Libero Release12.4
SoftConsole6.2

...

Included in the Libero installation
Microsemi Flash Pro 5

...

module driver2.10.0.0Utilize onboard programmer and USB / comport connection. Included in the Libero installation
FTDI Driver for the TEM0002 module2.12.28.0
UART / COM-port terminal
Capturing the modules messages
Web browser

...


Optional for the Demo Webserver, an ordinary Web browser

...

(supporting MS-HTML > 6.0)


Hardware

Page properties
hiddentrue
idComments

Notes :

  • list of

...

  • hardware which was used to generate the design

Design supports following modules:

Scroll Title
anchorTable_HWM
titleHardware Modules

Scroll Table Layout
orientationportrait
sortDirectionASC
repeatTableHeadersdefault
style
widths
sortByColumn1
sortEnabledfalse
cellHighlightingtrue

Module ModelBoard Part Short NamePCB Revision SupportDDRembedded SRAMembedded FlashNotes
TEM0002-01-

...

010CSmartBerry

...

REV011 GBit / 128 MB64 kB256 kB       NA

...


Additional hardware Requirements:

Scroll Title
anchorTable_AHW
titleAdditional Hardware

Scroll Table Layout
orientationportrait
sortDirectionASC
repeatTableHeadersdefault
style
widths
sortByColumn1
sortEnabledfalse
cellHighlightingtrue

Additional HardwareNotes
Demo host computerDemo was created and tested on windows

...

Micro USB to USB Type A CablePower supply

...

,  JTAG: Programming the board

...

, UART: Communication Interface

...

to the board.
ETH cable

...

Hardware for the Demo Webserver.
Router / LAN to USB bridgeHardware for the Demo Webserver.

...

  • Libero Hardware Project
  • SoftConsole Software Project
  • Board configuration file
  • Manual


Content

Page properties
hiddentrue
idComments

Notes :

  • content of the zip file
  •  

Content of the zip archive

...

"TEM0002-SmartBerry_Webserver-Demo_Libero-X.y_Datum-Time":

Additional Sources

...

anchorTable_ADS
titleAdditional design sources

Download

Reference Design is only usable with the specified Libero/SoftConsole version. Usage of a different Microsemi Software versions is not recommanded.

Page properties
hiddentrue
idComments

Reference Design is available on:

Preparations

The reference design is available as a prebuild zip archive, which contains hard and soft ware project folders and the board configuration file "microsemi-smartfusion2-smartberry-ddr.cfg" . It was created and tested in windows environment.

The zip archive must to be extracted. The board configuration file needs to copied into your SoftConsole installation directory. When taking the required SoftConsole version into account, SoftConsole version 6.2, and the default installation path, copy the board configuration file into:
"C:\Microsemi\SoftConsole_v6.2\openocd\share\openocd\scripts\board\"

mit thomas bereden

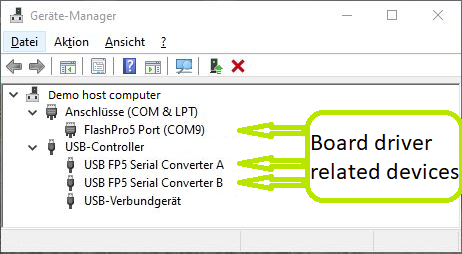
Connect the board via USB cable to your demo host computer. Check in the Windows Device Manager the appearance of the tree board driver related devices:

  • FlashPro5 Port (ComX) 
  • USB FP5 Serial Converter A
  • USB FP5 Serial Converter B

The Device Manager is accessible via "Right mouse click context menu" from the Windows Start Menu Button.

Image Removed

Connect the boards Ethernet port to your demo host computer. The demo is configured to establish a network connection via the DHCP protocol, therefore a free router / network port can be used.
A direct port to port connection between the demo host computer and the board is also possible but requires to reconfigure the software project.

Hardware design flashing

Image Removed

Open Libero 12.4, in the to left corner, open the demo hardware project via   "Project > Open Project" and point to file dialog to the demo archives hardware project dicsk:\Path_to_the_hardware_project_inside_the_archive\ , double left mouse click onto the project file "Smartberry_Webserver.prjx" to open it.

The board is automatically selected and setup to be flashed by Libero.

In the upper left section of Libero, select the tab "Design Flow" and flash it to the board via   "Program Design > and double left mouse click onto   Run PROGRAM Action".

Warnings can be ignored.

The hardware design is volatile and therefore lost when powering the board down.

Software project flashing

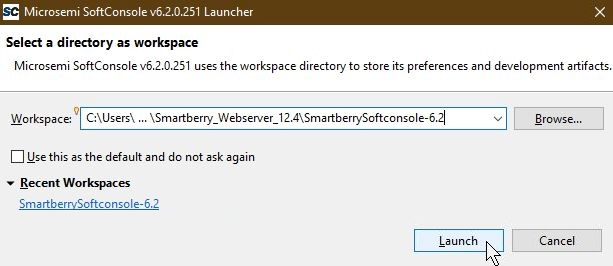
Open SoftConsole 6.2 and point the "Workspace:" to the folder "SmartberrySoftconsole-6.2" inside the demo folder.

Image Removed

Subsequently the program opens.

Image Removed

The SoftConsole display to the left the projects which the Workspace contains.

The two demo projects "Smartberry_Webserver_6.2" and "Smartberry_Webserver_DDR_6.2" are identical variants of the demo, they only differ in the memory location. The first one is stored in embedded non volatile memory (eNVM) and the later is stored volatile in the external DDR ram and therefore lost during power down.

Before flashing the demo, open a comport terminal to the boards comport, so that its messages about the used IP Adress and Mode can be captured.

Image Removed

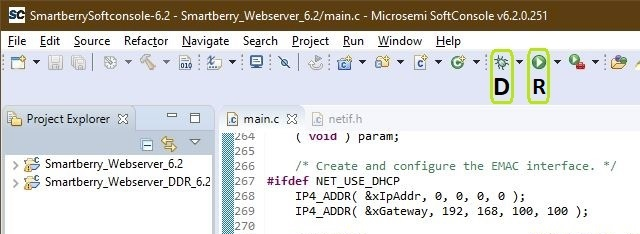
To simply run the demo press the triangle right to the button marked with a "R" in the picture above and select the variant of the demo.

Pressing the triangle next to the button marked with "D" let you select which variant to be executed in debug mode.

Debug controlls - Resume - Pause - Stop

Image Removed

Switch between Debug and Run perspective (upper right corner program window)

Image Removed

Static IP configuration

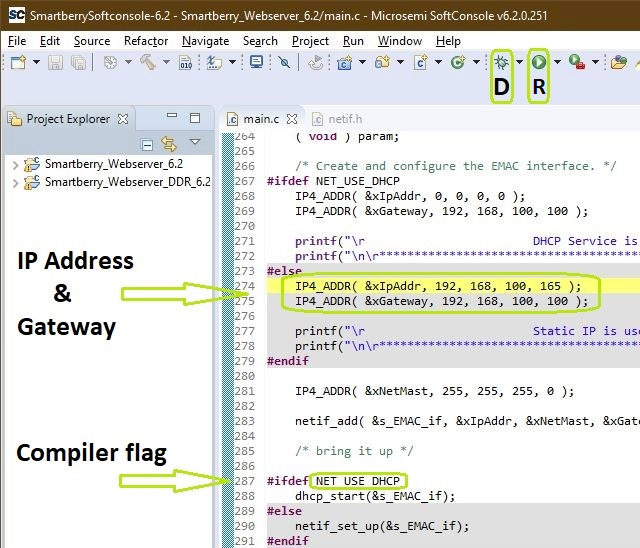
To disengaging the DHCP mode one has to setup up an IP Address in the code unit "main.c" line 274, a gateway address has is not required. Alternativly, the demo hosts IP Address can be changed.

Furthermore the corresponding compiler flag needs to be deleted in the project setting. To do so, in the "Project Explorer" tab, right mouse click onto the project and select Properties in the appearing menu.

Image Removed

In the left section of the properties window select "C/C++ Build   >   Settings" in the right section select the tab "Tool Settings   >   GNU ARM Cross C Compiler   >   Preprocessor" under "Defined symbols (-D)" delete the compiler flag "NET_USE_DHCP" and press "Apply". Confirm the following dialog and press "Cancel".

Lastly, the project needs to be recompiled. In the top menu of the SoftConsole select "Project   >   Build ALL / Build Project".

Warnings can be ignored.

Demo usage

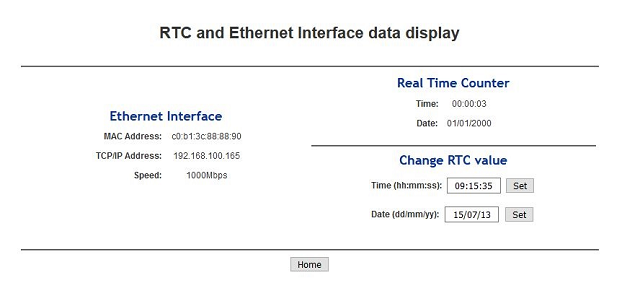
Open a new tab in a web browser and enter the IP Adress from the comport terminal.

Pictures of the servers pages.

...

Image Removed

Design Flow

Page properties
hiddentrue
idComments
Notes :
  • Basic Design Steps

  • Add/ Remove project specific description

Note

Reference Design is available with and without prebuilt files. It's recommended to use TE prebuilt files for first lunch.

Trenz Electronic provides a tcl based built environment based on Xilinx Design Flow.

See also:

The Trenz Electronic FPGA Reference Designs are TCL-script based project. Command files for execution will be generated with "_create_win_setup.cmd" on Windows OS and "_create_linux_setup.sh" on Linux OS.

TE Scripts are only needed to generate the vivado project, all other additional steps are optional and can also executed by Xilinx Vivado/SDK GUI.  For currently Scripts limitations on Win and Linux OS see: Project Delivery Currently limitations of functionality

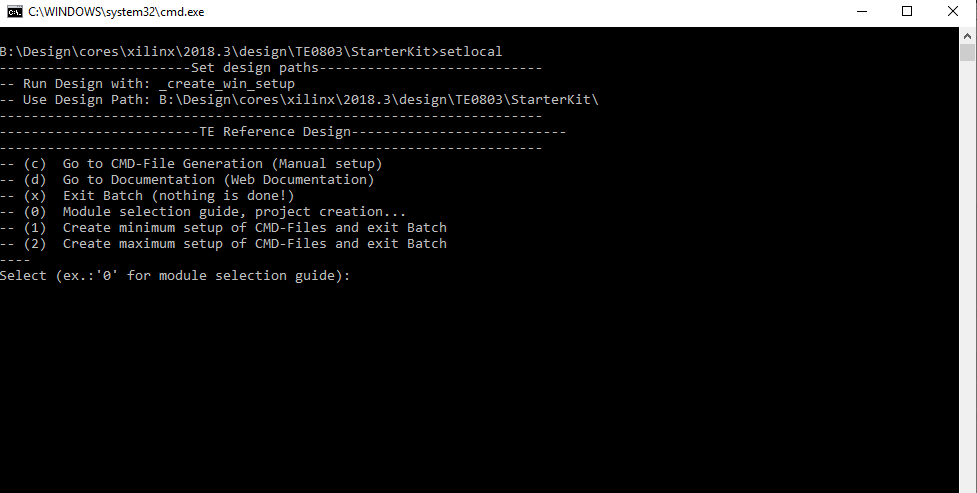
  1. _create_win_setup.cmd/_create_linux_setup.sh and follow instructions on shell:
    Image Removed
  2. Press 0 and enter to start "Module Selection Guide"
  3. (optional Win OS) Generate Virtual Drive or use short directory  for the reference design (for example x:\<design name>)
  4. Create Project (follow instruction of the product selection guide), settings file will be configured automatically during this process)
    1. (optional for manual changes) Select correct device and Xilinx install path on "design_basic_settings.cmd" and create Vivado project with "vivado_create_project_guimode.cmd"
      Note: Select correct one, see alsoTE Board Part Files
      1. Important: Use Board Part Files, which ends with *_tebf0808
  5. Create XSA and export to prebuilt folder
    1. Run on Vivado TCL: TE::hw_build_design -export_prebuilt
      Note: Script generate design and export files into \prebuilt\hardware\<short dir>. Use GUI is the same, except file export to prebuilt folder
  6. Create Linux (bl31.elf, uboot.elf , Image and system.dtb) with exported XSA
    1. XSA is exported to "prebuilt\hardware\<short name>"
      Note: HW Export from Vivado GUI create another path as default workspace.
    2. Create Linux images on VM, see PetaLinux KICKstart
      1. Use TE Template from /os/petalinux/
      2. Execute the script file for Debian/Ubuntu
  7. Add Linux files (bl31.elf, uboot.elf , Image and system.dtb) to prebuilt folder
    1. "prebuilt\os\petalinux\<ddr size>" or "prebuilt\os\petalinux\<short name>"
  8. Generate Programming Files with Vitis
    1. Run on Vivado TCL: TE::sw_run_vitis -all
      Note: Scripts generate applications and bootable files, which are defined in "sw_lib\apps_list.csv"
    2. (alternative) Start SDK with Vivado GUI or start with TE Scripts on Vivado TCL: TE::sw_run_vitis
      Note:  TCL scripts generate also platform project, this must be done manuelly in case GUI is used. See Vitis
  9. Preparing SD card for SD Filesystem and hard disk for HD Filesystem → See Programming section

Launch

Design Sources

Scroll Title
anchorTable_DS
titleDesign sources

Scroll Table Layout
orientationportrait
sortDirectionASC
repeatTableHeadersdefault
style
widths
sortByColumn1
sortEnabledfalse
cellHighlightingtrue

TypeLocation

Notes

Libero

...

<zip archive>
      / Libero-X.y_Referenz-Design_XY

Libero Project containing the modules
Hardware Reference Design

SoftConsole<zip archive>
      / Softconsole-X.y-Workspace
            / Smartberry_Hello_World_X.y
            / Smartberry_Webserver_X.y
            / Smartberry_Webserver_DDR_X.y

SoftConsole Workspace
contains the Software Projects :

  • Hello_World

and two variants of the Demo :

  • Smartberry_Webserver
SoftConsole<zip archive>
      / Softconsole-X.y-Workspace
            / microsemi-smartfusion2-smartberry-ddr .cfg

Board configuration file, needed to

debug / run applications


Download

The Trenz Electronic Reference Designs and Demos are usable with the specified Microsemi Libero / SoftConsole version. Usage of a different Microsemi Libero / SoftConsole software versions is not recommended.

Page properties
hiddentrue
idComments

Reference Designs / Demos are available via the following link:

The download is a ZIP compressed archive. Extract the archive before usage.

Design Flow

Page properties
hiddentrue
idComments
Notes :
  • Basic Design Steps

  • Add/ Remove project specific description

The Hardware and Software Reference / Demo -Designs Projects are available as a prebuild zip archive. The archive contains a Libero Hardware Project and a SoftConsole Workspace folder, they were created and tested in windows environment.

This SoftConsole Workspace contains the Software Project Hello World and the Demo Webserver, the demo is offered in two variants. The board configuration file "microsemi-smartfusion2-smartberry-ddr.cfg" is required for the usage of the Software projects via the IDE SoftConsole.

Launch

Page properties
hiddentrue
idComments

Note:

  • Programming and Startup procedure
  •  

Executing a Reference / Demo Design on a module requires the powering of it and a JTAG or UART Connection for Programming and Communication. Often the programming is a two fold process, where the first programming configures the FPGA and the second programming flashes Software code to be executed inside the FPGA / ARM processor.

Connecting

Connect the modules micro USB connector to your host pc, this enables the powering of the module and a simultaneous JTAG and UART connection .

Only necessary for running the Demo Webserver:
The demo is configured to establish a network connection via the DHCP protocol, therefore, if a a free router port is used, no further port setup is required.
If a "direct Ethernet Connection" between Host PC and module is used, the user must know how to setup this connection type. Further down in this chapter is explained how to setup the Demo Webserver and recompile it, so that it uses a static IP.

Driver check

When the module is connected via USB cable to your demo host computer, in the Windows Device Manager appear the following tree board driver related devices:

In section Ports (COM & LPT):

  • FlashPro5 Port (ComX)

In section Universal Serial Bus controllers:

  • USB FP5 Serial Converter A
  • USB FP5 Serial Converter B

The Device Manager is accessible via "Right mouse click context menu" from the Windows Start Menu Button. When these devices are not visible, the driver installation through libero could be faulty.

Programming the Hardware design

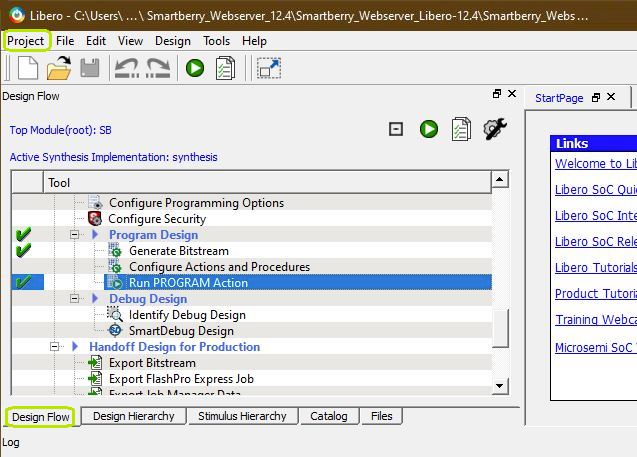
Programming of the Hardware reference Design requires to open the FPGA Design IDE Libero

Scroll Title
anchorFigure_1
titleLibero GUI "Run PRGORAMM ACTION"

Image Added


The Hardware Reference Design can be opened via   "Project > Open Project" in the top right corner of Libero (picture above - upper green rectangle). A file dialogue opens, point the dialogue along the extracted download to the folder containing the Hardware Reference Design.

Disk :\ Path-to-the-Demo-archive \ Extracted ZIP-archive \ Libero-X.y_Referenz-Design\

Double left mouse click onto the project file "Referenz-Design_XY .prjx" to open it. The board is automatically selected and setup to be flashed by Libero.

In the upper left section of Libero, select the tab "Design Flow" (picture above - lover green rectangle) and flash it to the board via   "Program Design > and double left mouse click onto   "Run PROGRAM Action" (picture above - row with blue background).

Warnings should not affect the functionality of a Reference / Demo -Design.

UART connection

Before flashing any Software Project to the module, open a comport terminal to the boards comport, so that it's messages can be captured.

Programming a Software project

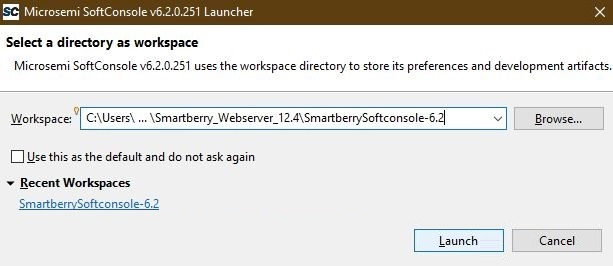
Open SoftConsole and press "Browse..." near the right edge. A file dialogue opens, point the dialogue along the extracted download to the folder containing the SoftConsole Workspace.

Disk :\ Path-to-the-Demo-archive \ Extracted ZIP-archive \ Softconsole-X.y-Workspace \

Confirm your selectioin by pressing "Ok" , the dialogue closes, and open The SoftConsole by pressing "Launch"

Scroll Title
anchorFigure_2
titleSoftConsole "Select the Workspace"

Image Added

Subsequently the program opens and shows the software project's who are contained inside the workspace to the left, under "Project Explorer".

Scroll Title
anchorFigure_3
titleSoftConsole GUI

Image Added

To simply run a Project, press the triangle right to the button marked with a "R" in the picture above and select a variant of the demo.

Pressing the triangle next to the button marked with "D" let you select which variant to be executed in debug mode.

Debug controls - Resume - Pause - Stop

Scroll Title
anchorFigure_4
titleSoftConsole "Debug controlls"
Image Added

Switch between Debug and Run perspective (upper right corner program window)

Scroll Title
anchorFigure_5
titleSoftConsole "Switch GUI layout"

Image Added

System Design - Libero

Page properties
hiddentrue
idComments

Note:

  • Description of Block Design, Constrains... BD Pictures from Export...

Smart Design

Scroll Title
anchorFigure_BD
titleBlock Design
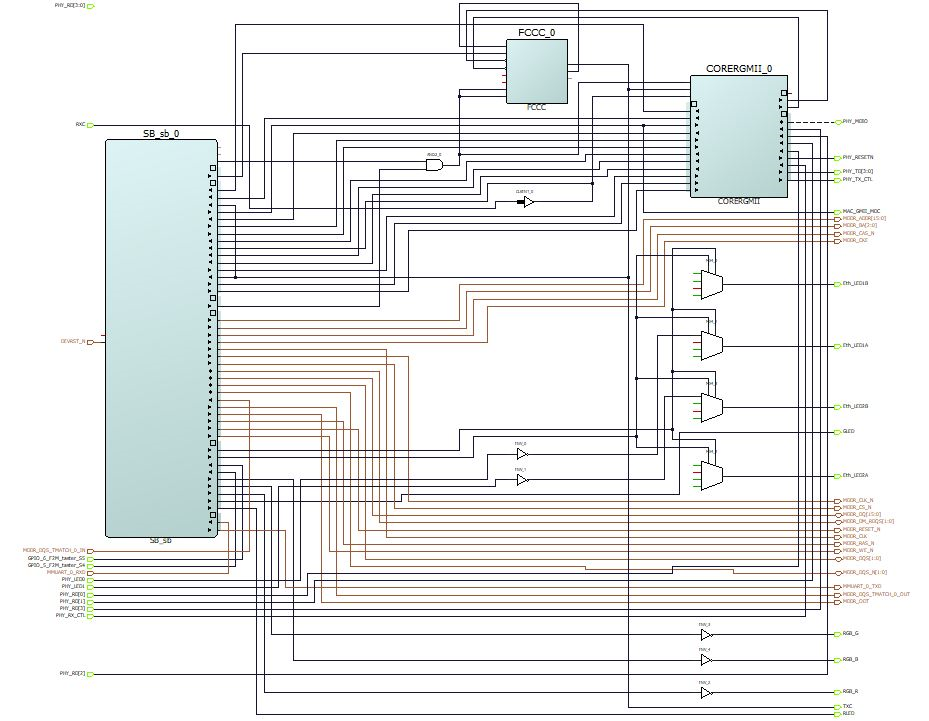
Image Added

Constrains

Code Block
languageruby
titleuser.pdc
linenumberstrue
collapsetrue
# Microsemi I/O Physical Design Constraints file

# User I/O Constraints file 

# Version: v12.4 12.900.0.16

# Family: SmartFusion2 , Die: M2S010 , Package: 400 VF

# Date generated: Mon Nov 16 11:11:16 2020 


# 
# User Locked I/O Bank Settings
# 


# 
# Unlocked I/O Bank Settings
# The I/O Bank Settings can be locked by directly editing this file
# or by making changes in the I/O Attribute Editor
# 


# 
# User Locked I/O settings
# 

set_io Eth_LED1A \
-pinname Y10 \
-fixed yes \
-DIRECTION OUTPUT


set_io Eth_LED1B \
-pinname U12 \
-fixed yes \
-DIRECTION OUTPUT


set_io Eth_LED2A \
-pinname V14 \
-fixed yes \
-DIRECTION OUTPUT


set_io Eth_LED2B \
-pinname U14 \
-fixed yes \
-DIRECTION OUTPUT


set_io GLED \
-pinname G17 \
-fixed yes \
-DIRECTION OUTPUT


set_io GPIO_5_F2M_taster_S4 \
-pinname E17 \
-fixed yes \
-DIRECTION INPUT


set_io GPIO_6_F2M_taster_S5 \
-pinname E16 \
-fixed yes \
-DIRECTION INPUT


set_io MAC_GMII_MDC \
-pinname N1 \
-fixed yes \
-iostd LVCMOS15 \
-DIRECTION OUTPUT


set_io PHY_LED0 \
-pinname U11 \
-fixed yes \
-DIRECTION INPUT


set_io PHY_LED1 \
-pinname T14 \
-fixed yes \
-DIRECTION INPUT


set_io PHY_MDIO \
-pinname N2 \
-fixed yes \
-iostd LVCMOS15 \
-DIRECTION INOUT


set_io {PHY_RD[0]} \
-pinname K5 \
-fixed yes \
-iostd LVCMOS15 \
-DIRECTION INPUT


set_io {PHY_RD[1]} \
-pinname H1 \
-fixed yes \
-iostd LVCMOS15 \
-DIRECTION INPUT


set_io {PHY_RD[2]} \
-pinname H2 \
-fixed yes \
-iostd LVCMOS15 \
-DIRECTION INPUT


set_io {PHY_RD[3]} \
-pinname J4 \
-fixed yes \
-iostd LVCMOS15 \
-DIRECTION INPUT


set_io PHY_RESETN \
-pinname R13 \
-fixed yes \
-DIRECTION OUTPUT


set_io PHY_RX_CTL \
-pinname K1 \
-fixed yes \
-iostd LVCMOS15 \
-DIRECTION INPUT


set_io {PHY_TD[0]} \
-pinname L1 \
-fixed yes \
-iostd LVCMOS15 \
-DIRECTION OUTPUT


set_io {PHY_TD[1]} \
-pinname M2 \
-fixed yes \
-iostd LVCMOS15 \
-DIRECTION OUTPUT


set_io {PHY_TD[2]} \
-pinname M1 \
-fixed yes \
-iostd LVCMOS15 \
-DIRECTION OUTPUT


set_io {PHY_TD[3]} \
-pinname M3 \
-fixed yes \
-iostd LVCMOS15 \
-DIRECTION OUTPUT


set_io PHY_TX_CTL \
-pinname K3 \
-fixed yes \
-iostd LVCMOS15 \
-DIRECTION OUTPUT


set_io RGB_B \
-pinname H6 \
-fixed yes \
-DIRECTION OUTPUT


set_io RGB_G \
-pinname F6 \
-fixed yes \
-DIRECTION OUTPUT


set_io RGB_R \
-pinname H5 \
-fixed yes \
-DIRECTION OUTPUT


set_io RLED \
-pinname G16 \
-fixed yes \
-DIRECTION OUTPUT


set_io RXC \
-pinname J2 \
-fixed yes \
-iostd LVCMOS15 \
-DIRECTION INPUT


set_io TXC \
-pinname K7 \
-fixed yes \
-iostd LVCMOS15 \
-DIRECTION OUTPUT


# 
# Dedicated Peripheral I/O Settings
# 


# 
# Unlocked I/O settings
# The I/Os in this section are unplaced or placed but are not locked
# the other listed attributes have been applied
# 


#
#Ports using Dedicated Pins

#

set_io DEVRST_N \
-pinname U17 \
-DIRECTION INPUT

Software Design - SoftConsole

Page properties
hiddentrue
idComments
Note:

...

  • Programming and Startup procedure

Programming

Usage

System Design - Libero

Page properties
hiddentrue
idComments

Note:

  • Description of Block Design, Constrains... BD Pictures from Export...

Smart Design

Scroll Title
anchorFigure_BD
titleBlock Design
Image Removed

Constrains

Code Block
languageruby
title_i_bitgen.xdc
set_property BITSTREAM.GENERAL.COMPRESS TRUE [current_design]
set_property BITSTREAM.CONFIG.UNUSEDPIN PULLNONE [current_design]

Software Design - SoftConsole

Page properties
hiddentrue
idComments
Note:
  • optional chapter separate

  • sections for different apps

Application

...

hiddentrue
idComments

----------------------------------------------------------

FPGA Example

scu

MCS Firmware to configure SI5338 and Reset System.

srec_spi_bootloader

TE modified 2019.2 SREC

Bootloader to load app or second bootloader from flash into DDR

Descriptions:

  • Modified Files: blconfig.h, bootloader.c
  • Changes:
    • Add some console outputs and changed bootloader read address.
    • Add bugfix for 2018.2 qspi flash

xilisf_v5_11

TE modified 2019.2 xilisf_v5_11


  • optional chapter separate

  • sections for different apps

Application

Page properties
hiddentrue
idComments

----------------------------------------------------------

FPGA Example

scu

MCS Firmware to configure SI5338 and Reset System.

srec_spi_bootloader

TE modified 2019.2 SREC

Bootloader to load app or second bootloader from flash into DDR

Descriptions:

  • Modified Files: blconfig.h, bootloader.c
  • Changes:
    • Add some console outputs and changed bootloader read address.
    • Add bugfix for 2018.2 qspi flash

xilisf_v5_11

TE modified 2019.2 xilisf_v5_11

  • Changed default Flash type to 5.

----------------------------------------------------------

Zynq Example:

zynq_fsbl

TE modified 2019.2 FSBL

General:

  • Modified Files:main.c, fsbl_hooks.h/.c (search for 'TE Mod' on source code)
  • Add Files: te_fsbl_hooks.h/.c(for hooks and board)\n\

  • General Changes: 
    • Display FSBL Banner and Device ID

Module Specific:

  • Add Files: all TE Files start with te_*
    • READ MAC from EEPROM and make Address accessible by UBOOT (need copy defines on uboot  platform-top.h)
    • CPLD access
    • Read CPLD Firmware and SoC Type
    • Configure Marvell PHY

zynq_fsbl_flash

TE modified 2019.2 FSBL

General:

  • Modified Files: main.c
  • General Changes:
    •  Display FSBL Banner
    • Set FSBL Boot Mode to JTAG
    • Disable Memory initialisation

ZynqMP Example:

...

----------------------------------------------------------

Zynq Example:

zynqmp_fsbl

TE modified 2019.2 FSBL

General:

  • Modified Files: xfsbl_main.c,

...

  • xfsbl_hooks.h/.c, xfsbl_board.h/.c(search for 'TE Mod' on source code)
  • Add Files:  te_

...

  • xfsbl_hooks.h/.c (for hooks and board)\n\
  • General Changes: 
    • Display FSBL Banner and Device

...

    • Name

Module Specific:

  • Add Files: all TE Files start with

...

  • READ MAC from EEPROM and make Address accessible by UBOOT (need copy defines on uboot  platform-top.h)
  • CPLD access
  • Read CPLD Firmware and SoC Type
  • Configure Marvell PHY
  • te_*
    • Si5338 Configuration
    • ETH+OTG Reset over MIO

zynqmp

...

_fsbl_flash

TE modified 2019.2 FSBL

General:

  • Modified Files: xfsbl_initialisation.c, xfsbl_hw.h, xfsbl_handoff.c, xfsbl_main.c
  • General Changes:
    •  Display FSBL Banner
    • Set FSBL Boot Mode to JTAG
    • Disable Memory initialisation

ZynqMP Example:


zynqmp_pmufw

Xilinx default PMU firmware.

--------------------------

...

zynqmp_fsbl

TE modified 2019.2 FSBL

General:

  • Modified Files: xfsbl_main.c, xfsbl_hooks.h/.c, xfsbl_board.h/.c(search for 'TE Mod' on source code)
  • Add Files:  te_xfsbl_hooks.h/.c (for hooks and board)\n\
  • General Changes: 
    • Display FSBL Banner and Device Name

Module Specific:

  • Add Files: all TE Files start with te_*
    • Si5338 Configuration
    • ETH+OTG Reset over MIO

zynqmp_fsbl_flash

TE modified 2019.2 FSBL

General:

  • Modified Files: xfsbl_initialisation.c, xfsbl_hw.h, xfsbl_handoff.c, xfsbl_main.c
  • General Changes:
    •  Display FSBL Banner
    • Set FSBL Boot Mode to JTAG
    • Disable Memory initialisation

zynqmp_pmufw

Xilinx default PMU firmware.

----------------------------------------------------------

General Example:

hello_te0820

Hello TE0820 is a Xilinx Hello World example as endless loop instead of one console output.

u-boot

U-Boot.elf is generated with PetaLinux. SDK/HSI is used to generate Boot.bin.

--------------------------------

General Example:

hello_te0820

Hello TE0820 is a Xilinx Hello World example as endless loop instead of one console output.

u-boot

U-Boot.elf is generated with PetaLinux. SDK/HSI is used to generate Boot.bin.

Demo - Webserver_...

The demo projects "Smartberry_Webserver_X.y" and "Smartberry_Webserver_DDR_X.y" are identical variants of the demo, they only differ in their memory location:

  • Smartberry_Webserver_X.y - Application code is stored to the FPGA's embedded non-volatile memory (eNVM)
  • Smartberry_Webserver_DDR_X.y - Application code is stored to the FPGA's external volatile memory (DDR3/L SDRAM) and lost during power down

UART output:

Scroll Title
anchorFigure_6
titleCOM-port Terminal Webserver "Welcome / IP -message"

Image Added

Static IP configuration
Scroll Title
anchorFigure_7
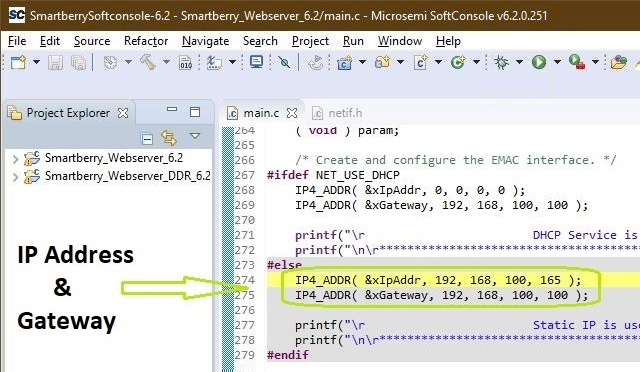
titleSoftConsole "main.c - Set IP"

Image Added

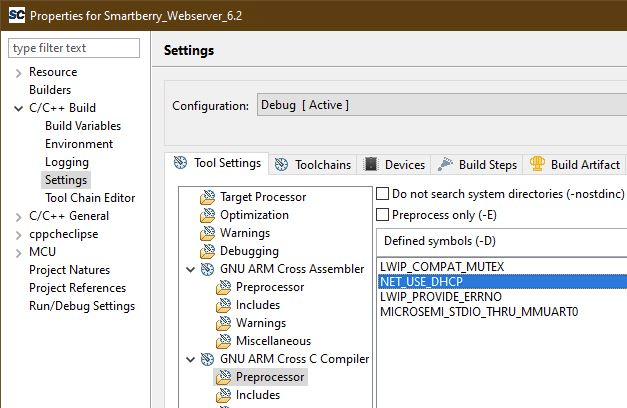
To disengaging the DHCP mode one has to setup up an IP and Gateway Address in the code unit "main.c" roughly at line 270. Alternativly, the demo hosts IP Address can be changed.

Furthermore the corresponding compiler flag needs to be deleted in the project setting. To do so, in the "Project Explorer" tab, right mouse click onto the project and select Properties in the appearing menu.

Scroll Title
anchorFigure_8
titleSoftConsole "Static IP- Change Defines""

Image Added

In the left section of the properties window select "C/C++ Build   >   Settings" in the right section select the tab "Tool Settings   >   GNU ARM Cross C Compiler   >   Preprocessor" under "Defined symbols (-D)" delete the compiler flag "NET_USE_DHCP" and press "Apply". Confirm the following dialogue and press "Cancel".

Lastly, the project needs to be recompiled. In the top menu of the SoftConsole select "Project   >   Build ALL / Build Project".

Warnings should not affect the demo. can be ignored.

Reference Design - HelloWorld_...

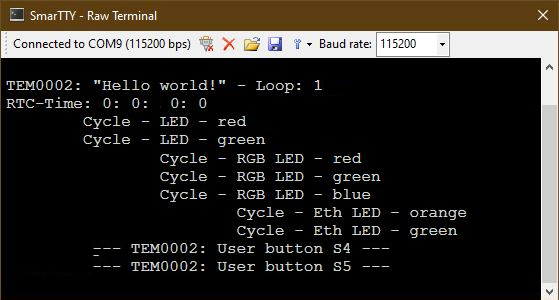
Hello World example as endless loop instead of one console output. Each loop lights up each LED. The user buttons responds with a message at any time.

UART output:

Scroll Title
anchorFigure_9
titleCOM-port Terminal "Hello World loop"
Image Added

SDK template in ./sw_lib/sw_apps/ available.

zynqmp_fsbl

TE modified 2019.2 FSBL

General:

  • Modified Files: xfsbl_main.c, xfsbl_hooks.h/.c, xfsbl_board.h/.c(search for 'TE Mod' on source code)
  • Add Files:  te_xfsbl_hooks.h/.c (for hooks and board)\n\
  • General Changes: 
    • Display FSBL Banner and Device Name

Module Specific:

  • Add Files: all TE Files start with te_*
    • Si5345 Configuration
    • OTG+PCIe Reset over MIO
    • I2C MUX for EEPROM MAC

zynqmp_fsbl_flash

TE modified 2019.2 FSBL

General:

  • Modified Files: xfsbl_initialisation.c, xfsbl_hw.h, xfsbl_handoff.c, xfsbl_main.c
  • General Changes:
    •  Display FSBL Banner
    • Set FSBL Boot Mode to JTAG
    • Disable Memory initialisation

zynqmp_pmufw

Xilinx default PMU firmware.

hello_te0808

Hello TE0808 is a Xilinx Hello World example as endless loop instead of one console output.

u-boot

U-Boot.elf is generated with PetaLinux. Vitis is used to generate Boot.bin.

Additional Software

Page properties
hiddentrue
idComments
Note:
  • Add description for other Software, for example SI CLK Builder ...
  • SI5338 and SI5345 also Link to:

...

Appx. A: Change History and Legal Notices

Document Change History

To get content of older revision  got to "Change History"  of this page and select older document revision number.

Page properties
hiddentrue
idComments
  • Note this list must be only updated, if the document is online on public doc!
  • It's semi automatically, so do following
    • Add new row below first

    • Copy "Page Information Macro(date)" Macro-Preview, Metadata Version number, Author Name and description to the empty row. Important Revision number must be the same as the Wiki document revision number Update Metadata = "Page Information Macro (current-version)" Preview+1 and add Author and change description. --> this point is will be deleted on newer pdf export template

    • Metadata is only used of compatibility of older exports


Scroll Title
anchorTable_dch
titleDocument change history.

Scroll Table Layout
orientationportrait
sortDirectionASC
repeatTableHeadersdefault
style
widths2*,*,3*,4*
sortByColumn1
sortEnabledfalse
cellHighlightingtrue

DateDocument Revision

Authors

Description

Page info
infoTypeModified date
dateFormatyyyy-MM-dd
typeFlat

Page info
infoTypeCurrent version
dateFormatyyyy-MM-dd
prefixv.
typeFlat

Page info
infoTypeModified by
typeFlat

  • Download Link update
2021-01-29v.45John Hartfiel
  • Link updates
  • table of content update
2020-11-24v.41Kilian Jahn
  • Libero12.4 release
--all

Page info
infoTypeModified users
dateFormatyyyy-MM-dd
typeFlat

--


Legal Notices

Include Page
IN:Legal Notices
IN:Legal Notices


Custom_fix_page_content


Scroll pdf ignore

Table of contents

Table of Contents
outlinetrue
excludeTable of contents