Page History
...
- Libero Hardware Project
Hardware Reference Design. Setup of MSS (ARM Cortex-m3 + DDR), Ethernet, buttons and LED's - SoftConsole Workspace, containing:
Software Project - Smartberry_HelloWorld_X.y
Software Project - Smartberry_Webserver_X.y
Software Project - Smartberry_Webserver_DDR_X.y
Board configuration file - Manual (This wiki page as PDF)
...
| Page properties | ||||
|---|---|---|---|---|
| ||||
Notes :
|
The Demo Webserver design is Hardware and Software Reference / Demo -Designs Projects are available as a prebuild zip archive, which contains a Libero hardware project folder, a SoftConsole Workspace with the 2 variants of the demo and the board configuration file "microsemi-smartfusion2-smartberry-ddr.cfg". It was . The archive contains at least a Libero Hardware Project and a SoftConsole Workspace folder, they were created and tested in windows environment.
Board configuration file
This SoftConsole Workspace contains the Software Reference Design Hello World and the Demo Webserver, the demo is offered in two variants. For software development via the IDE SoftConsole a board configuration file "microsemi-smartfusion2-smartberry-ddr.cfg" is included.
Board configuration file
Copy the board configuration file "microsemi-smartfusion2-smartberry-ddr.cfg" along the following default installation path inside you Microsemi / SoftConsole installation into the folder board:
C:\Microsemi\SoftConsole_v6.2\openocd\share\openocd\scripts\board\
Launch
| Page properties | ||||
|---|---|---|---|---|
| ||||
Note:
|
Running this demonstration requires a USB and a Ethernet connection to the module. Programming the demo into the module is a three fold process, programming the FPGA Design, establishing a COM-port terminal connection to the module and programming the web server program code into the modules FPGA's embedded flash or it's external DDR memory.
...
Connect the modules micro USB connector to your host pc, this enables the powering of the module and a simultaneous JTAG and UART connection .
Connect the boards Ethernet port to either your demo host computer, via it's second Ethernet port or a USB to Ethernet bridge, or to a free router port inside your local network. Only necessary for running the Demo Webserver:
The demo is configured to establish a network connection via the DHCP protocol, therefore, if a a free router port is used, no further port setup is required.
If a "direct connection" via bridge or host pc port Ethernet Connection" between Host PC and module is used, the ports IP of pc and module must match, more about this is explained further user must know how to setup this connection type. Further down in this chapter is explained how to setup the Demo Webserver and recompile it, so that it uses a static IP.
Driver check
When the module is connected via USB cable to your demo host computer, in the Windows Device Manager appear the following tree board driver related devices:
In section Ports (COM & LPT):
- FlashPro5 Port (ComX)
...
In section Universal Serial Bus controllers:
- USB FP5 Serial Converter A
- USB FP5 Serial Converter B
The Device Manager is accessible via "Right mouse click context menu" from the Windows Start Menu Button.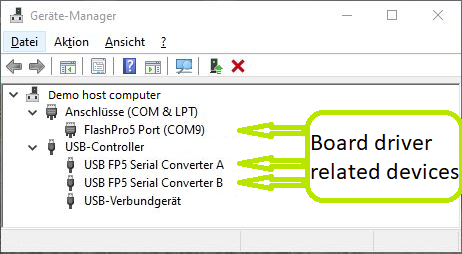
Programming Hardware design
...
Open Libero 12.4, in the to left corner, open the Webserver Demo hardware project inside the extracted ZIP download via "Project > Open Project" and point the file dialogue to the demo archives hardware project:
Disk :\ Path-to-the-Demo_-archive \ Extracted ZIP-archive \ Smartberry_Webserver_ Libero-12.4X.y_Referenz-Design\
double left mouse click onto the project file "Smartberry_Webserver.prjx" to open it.
...
Overview
Content Tools