Page History
Overview
| Scroll Ignore | ||||||||||||||
|---|---|---|---|---|---|---|---|---|---|---|---|---|---|---|
| ||||||||||||||
This tutorial guides you from inital test_board reference design for TE0802 board with 1cg Zynq device (No. 3) to custom extensible vitis platfom and then shows how to test it by running basic VADD example and also how to run Vitis-AI 2.0 dpu_trd examples facedetect and ResNet50.
| Page properties | ||||
|---|---|---|---|---|
| ||||
Notes :
|
Key Features
| Page properties | ||||
|---|---|---|---|---|
| ||||
Notes :
|
| Scroll Ignore | ||||||||||||||||
|---|---|---|---|---|---|---|---|---|---|---|---|---|---|---|---|---|
| ||||||||||||||||
| Excerpt |
|---|
|
Requirements
| Scroll Ignore | ||||||||||||||||
|---|---|---|---|---|---|---|---|---|---|---|---|---|---|---|---|---|
| ||||||||||||||||
| Scroll Title | ||||||||||||||||||||||||||||||||||||||||||||||||
|---|---|---|---|---|---|---|---|---|---|---|---|---|---|---|---|---|---|---|---|---|---|---|---|---|---|---|---|---|---|---|---|---|---|---|---|---|---|---|---|---|---|---|---|---|---|---|---|---|
| ||||||||||||||||||||||||||||||||||||||||||||||||
|
| Page properties | ||||
|---|---|---|---|---|
| ||||
General Chapter Vitis AI Prepare Development Environment 2021.2 is included |
| Excerpt Include | ||||||
|---|---|---|---|---|---|---|
|
| Page properties | ||||
|---|---|---|---|---|
| ||||
| end of chapter "Prepare Development Environment2 |
Prepare Reference Design for Extensible Custom Platform
| Scroll Ignore | ||||||||||||||||
|---|---|---|---|---|---|---|---|---|---|---|---|---|---|---|---|---|
| ||||||||||||||||
Update Vivado Project for Extensible Platform
| Scroll Ignore | ||||||||||||||||
|---|---|---|---|---|---|---|---|---|---|---|---|---|---|---|---|---|
| ||||||||||||||||
| Note |
|---|
Trenz Electronic Scripts allows posibility change some setup via enviroment variables, which depends on the used OS and PC performace. To improve performance on multicore CPU add global envirment on line 64: to /etc/bash.bashrc or local to design_basic_settings.sh For othervariables see also: |
In Ubuntu terminal, source paths to Vitis and Vivado tools by
| Code Block | ||
|---|---|---|
| ||
$ source /tools/Xilinx/Vitis/2021.2/settings64.sh |
Download TE0802 StarterKit Linux Design file(see Reference Design download link on chapter Requirements) with pre-build files to
~/Downloads/TE0802-test_board-vivado_2021.2-build_20_20230210132253.zip
This TE0802 test_board file contains bring-up scripts for creation of Petalinux for range of modules in zipped directory named “test_board”.
Unzip the file to directory:
~/work/TE0802_03_240
| Note |
|---|
| All supported modules are identified in file: ~/work/TE0802_03_240/test_board/board_files/TE0802_board_files.csv |
We will select design ID 03 with name TE0802-02-1AEV2-A, with device xczu1cg-sbva484-1-e. We will use default clock 240 MHz.
That is why we name the package TE0802_03_240 and proposed to unzip the TE0802 test_board Linux Design files into the directory:
~/work/TE0802_03_240
In Ubuntu terminal, change directory to the test_board directory:
| Code Block | ||
|---|---|---|
| ||
$ cd ~/work/TE0802_03_240/test_board |
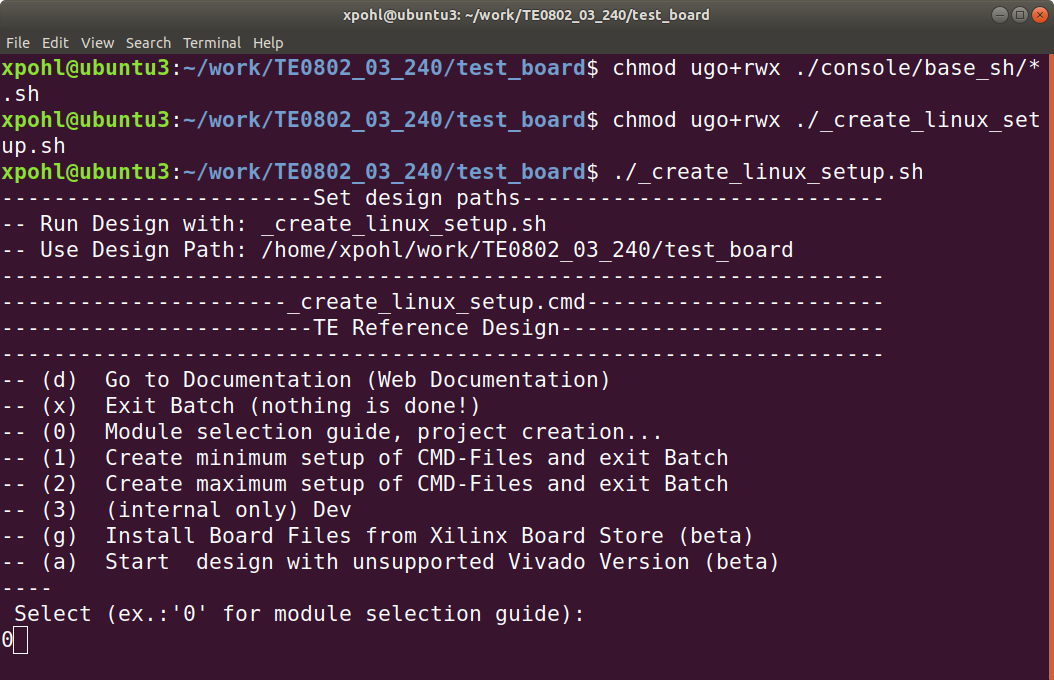
Setup the StarterKit directory files for a Linux host machine.
In Ubuntu terminal, execute:
| Code Block | ||
|---|---|---|
| ||
$ chmod ugo+rwx ./console/base_sh/*.sh $ chmod ugo+rwx ./_create_linux_setup.sh $ ./_create_linux_setup.sh |
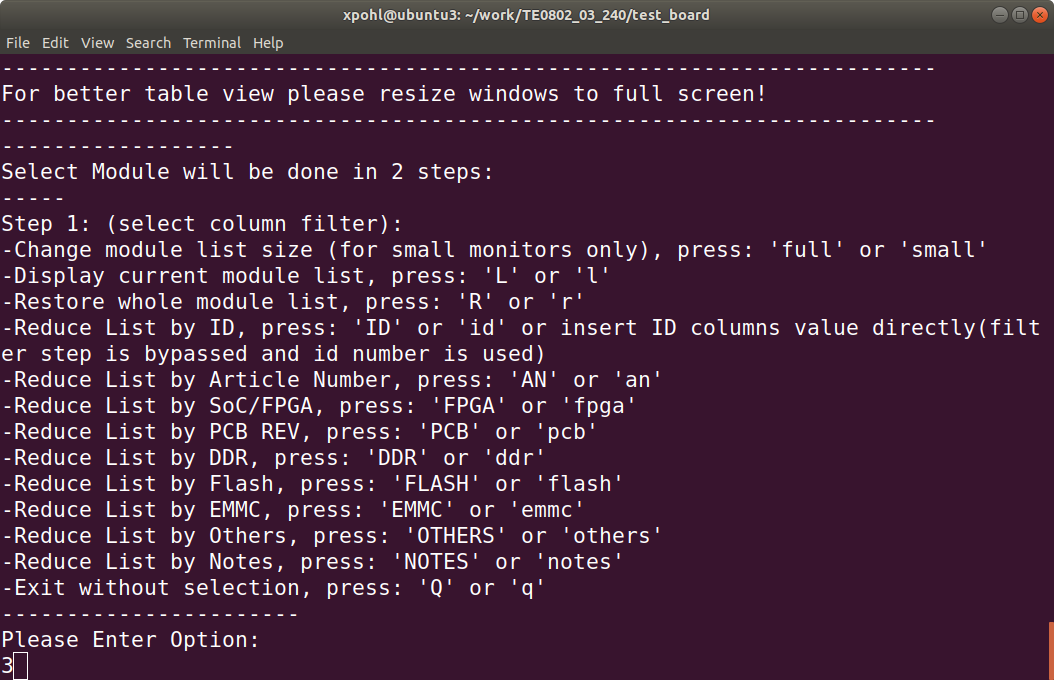
Select option (0) to open Selection Guide and press Enter
| Scroll Title | ||||
|---|---|---|---|---|
| ||||
|
Select variant 3 from the selection guide, press enter and agree selection
| Scroll Title | ||
|---|---|---|
| ||
|
Create Vivado Project with option 1
| Scroll Title | ||
|---|---|---|
| ||
|

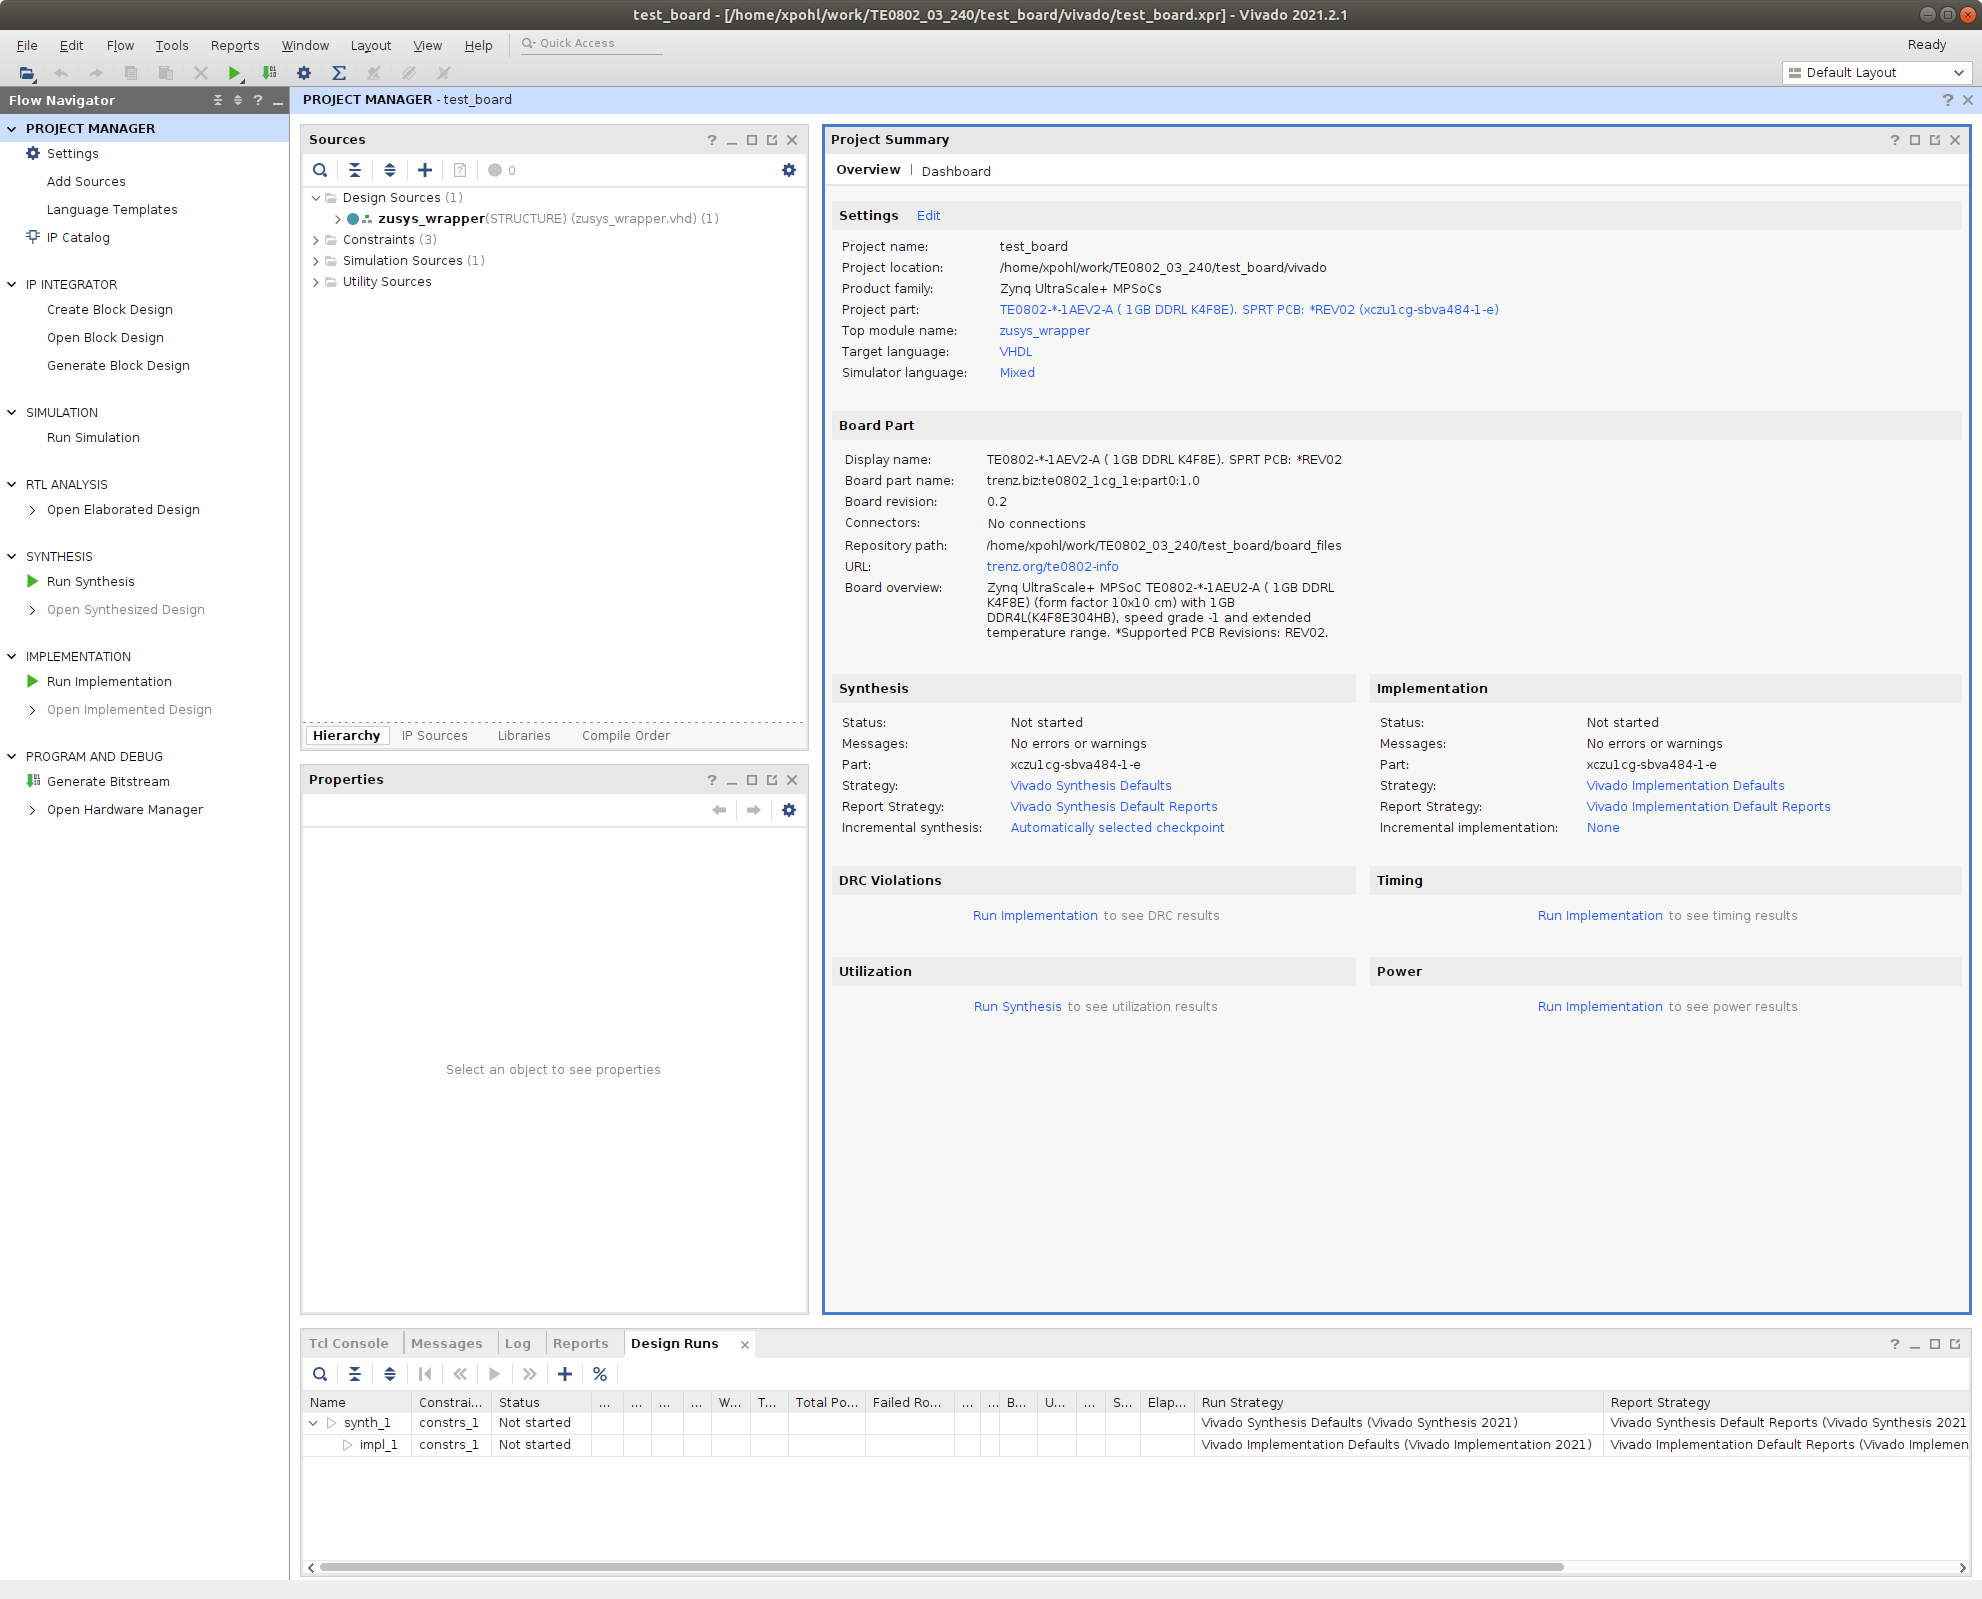
Vivado Project will be generated for the selected variant.
| Note | |||||||||||||||||
|---|---|---|---|---|---|---|---|---|---|---|---|---|---|---|---|---|---|
Selection Guide automatically modified ./design_basic_settings.sh with correct variant, so other provided bash files to recreate or open Vivado project again can be used later also. In case of using selection guide, variant can be selected also manually:
|
The Vivado tool will be opened and Trenz Electronic HW project for the TE0802 test_board Linux Design, option 3 will be generated.
| Scroll Title | ||
|---|---|---|
| ||
|
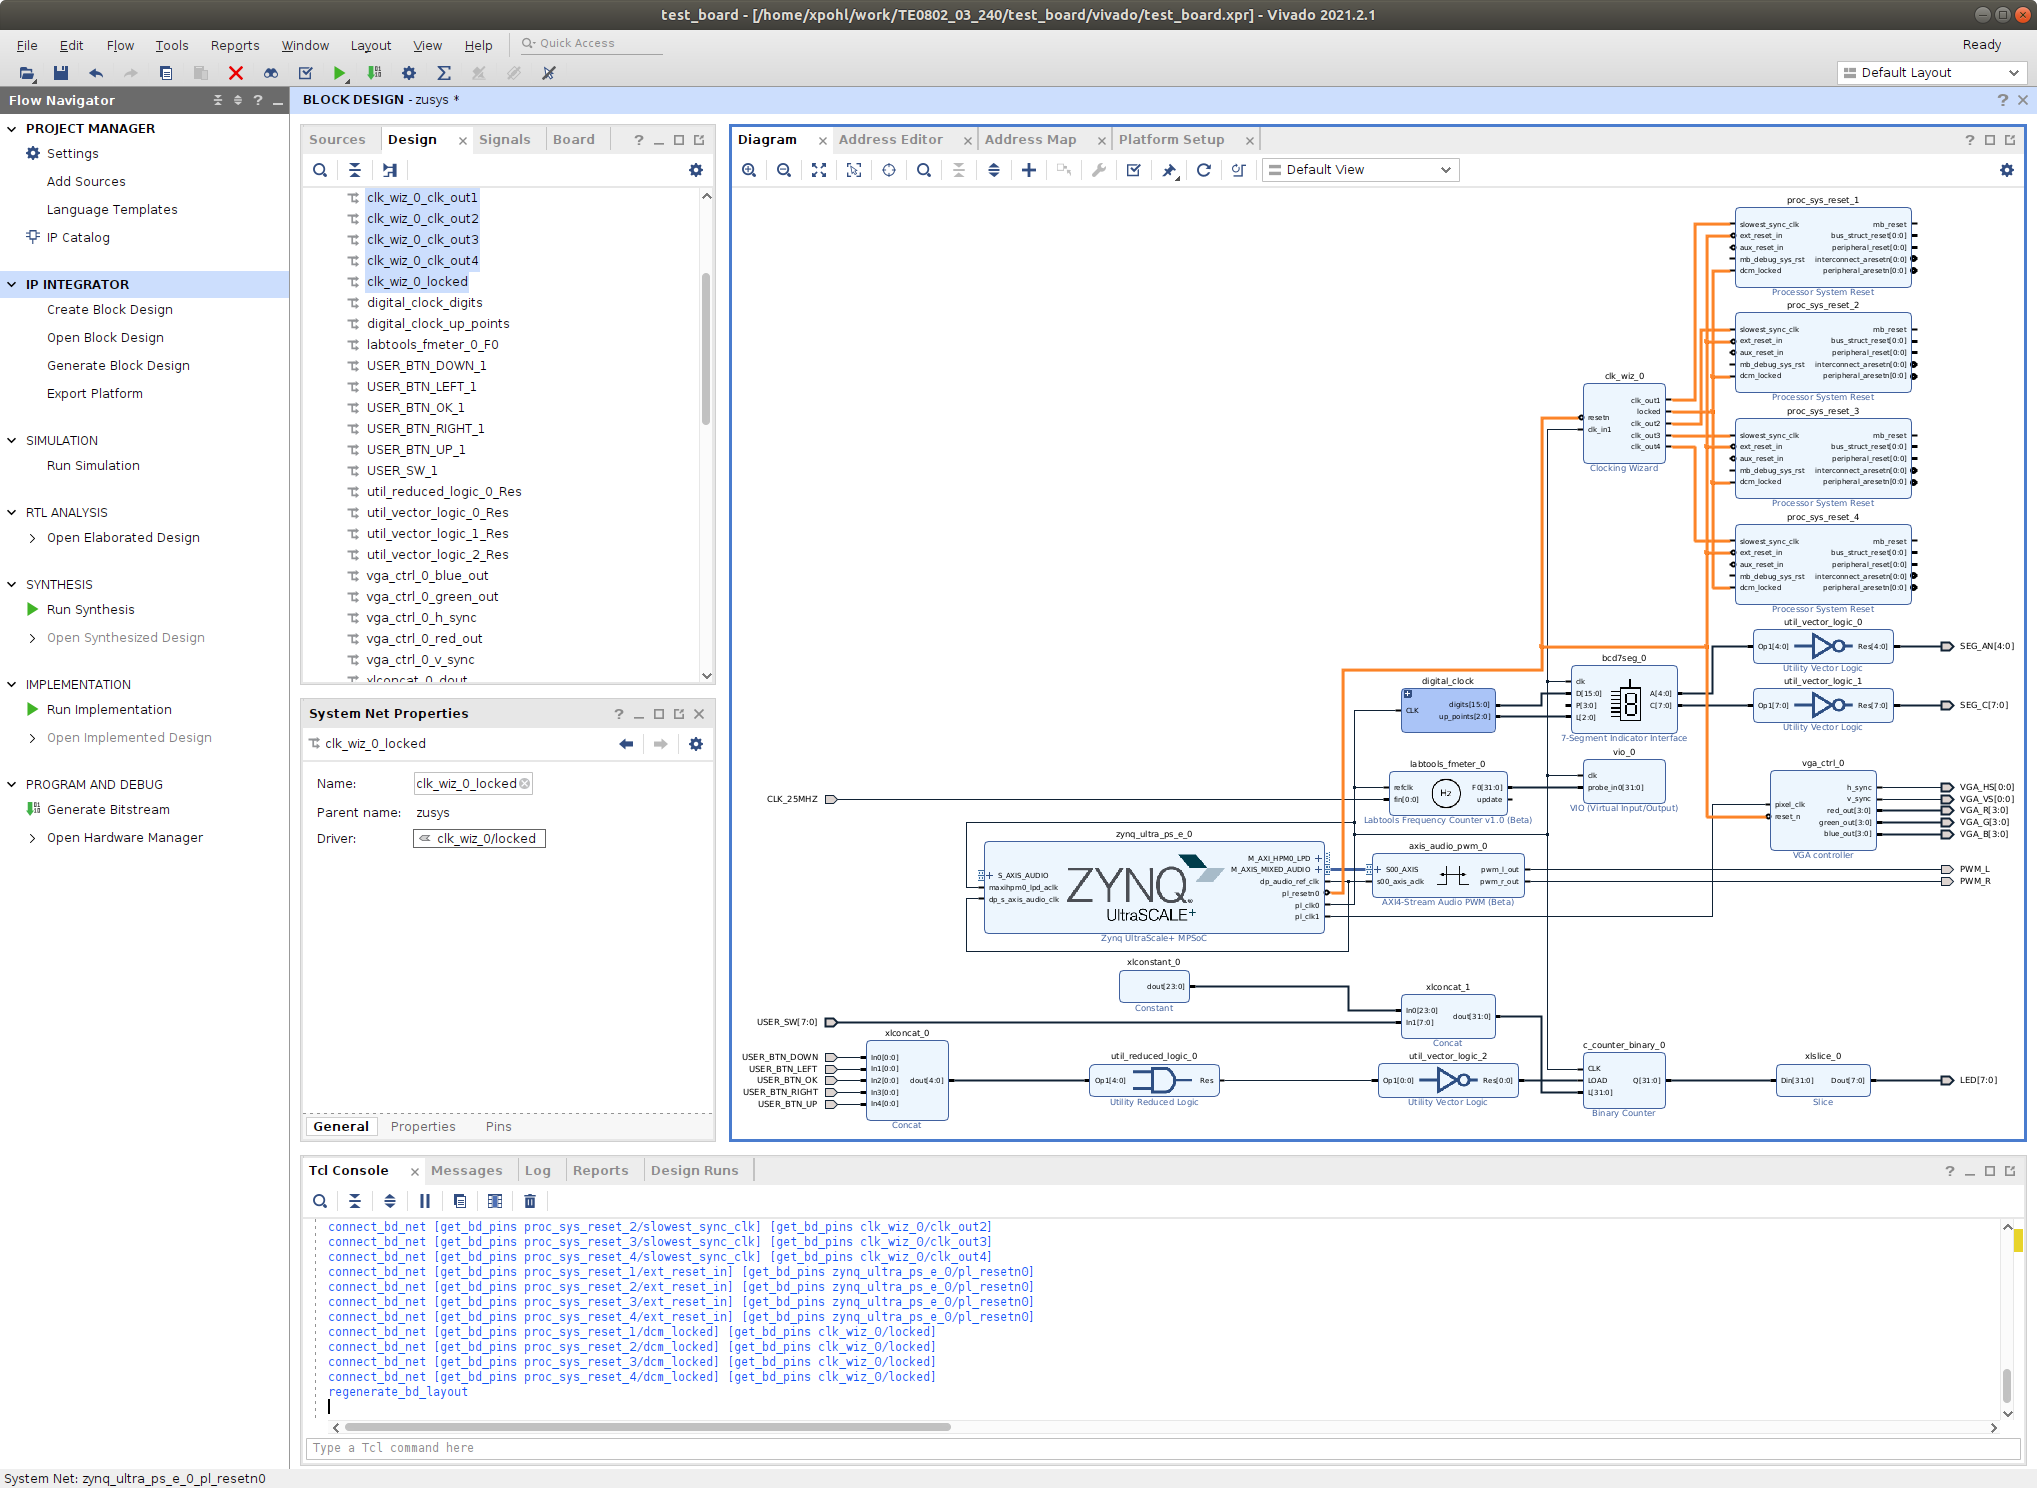
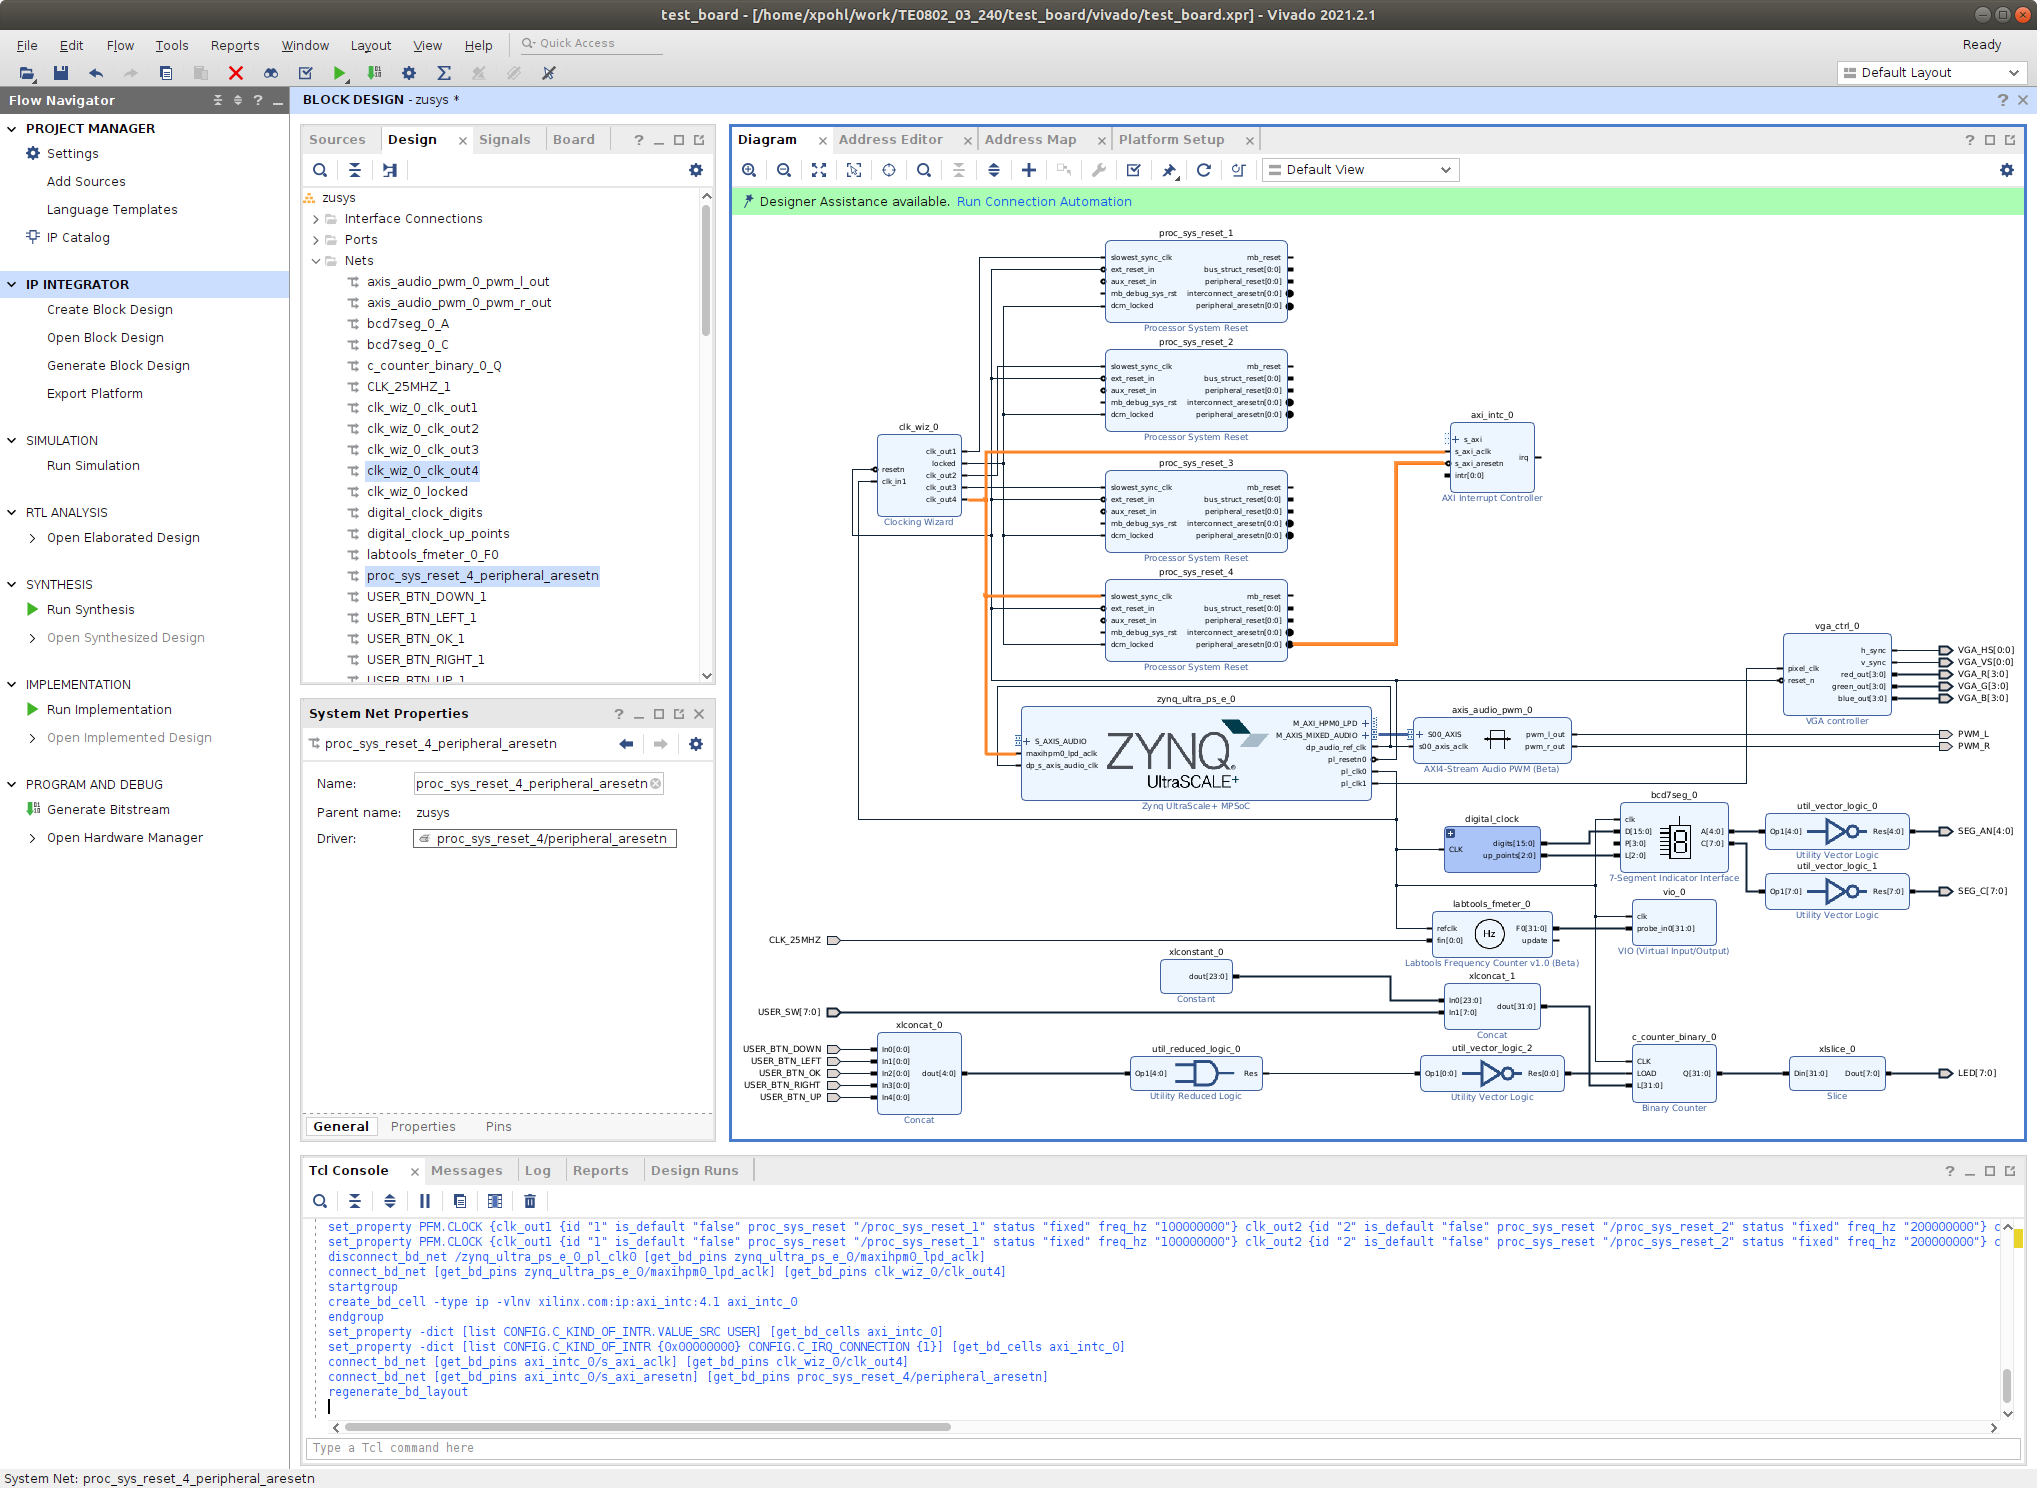
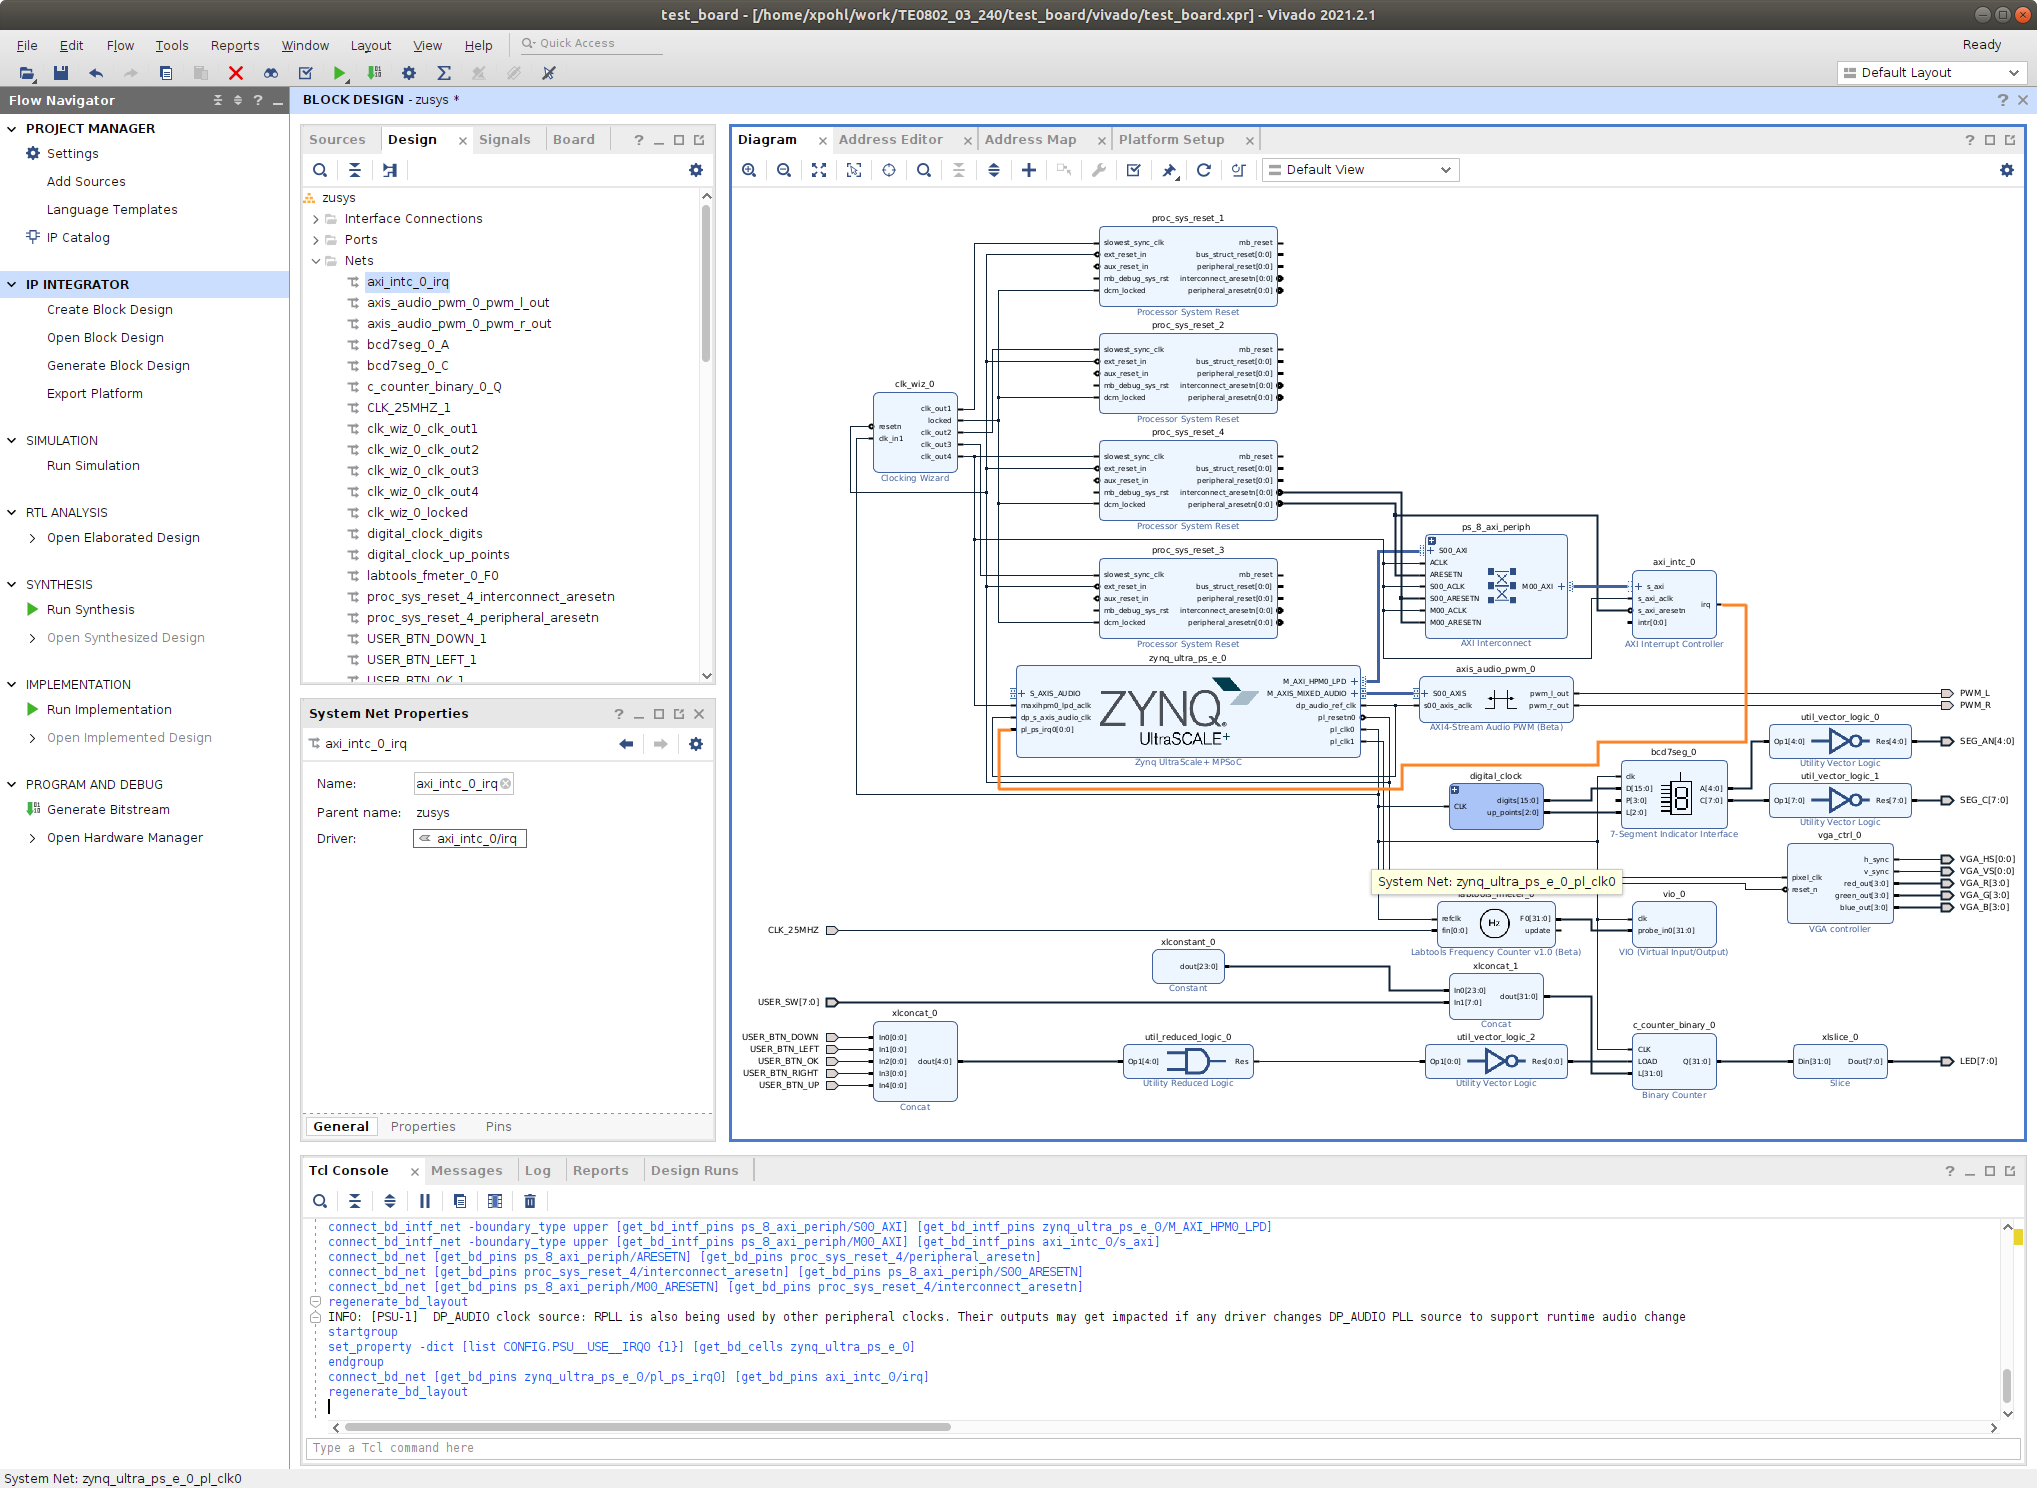
In Vivado window Sources, click on zusys_wrapper and next on zusys.bd to open the HW diagram in IP integrator:
| Scroll Title | ||
|---|---|---|
| ||
|
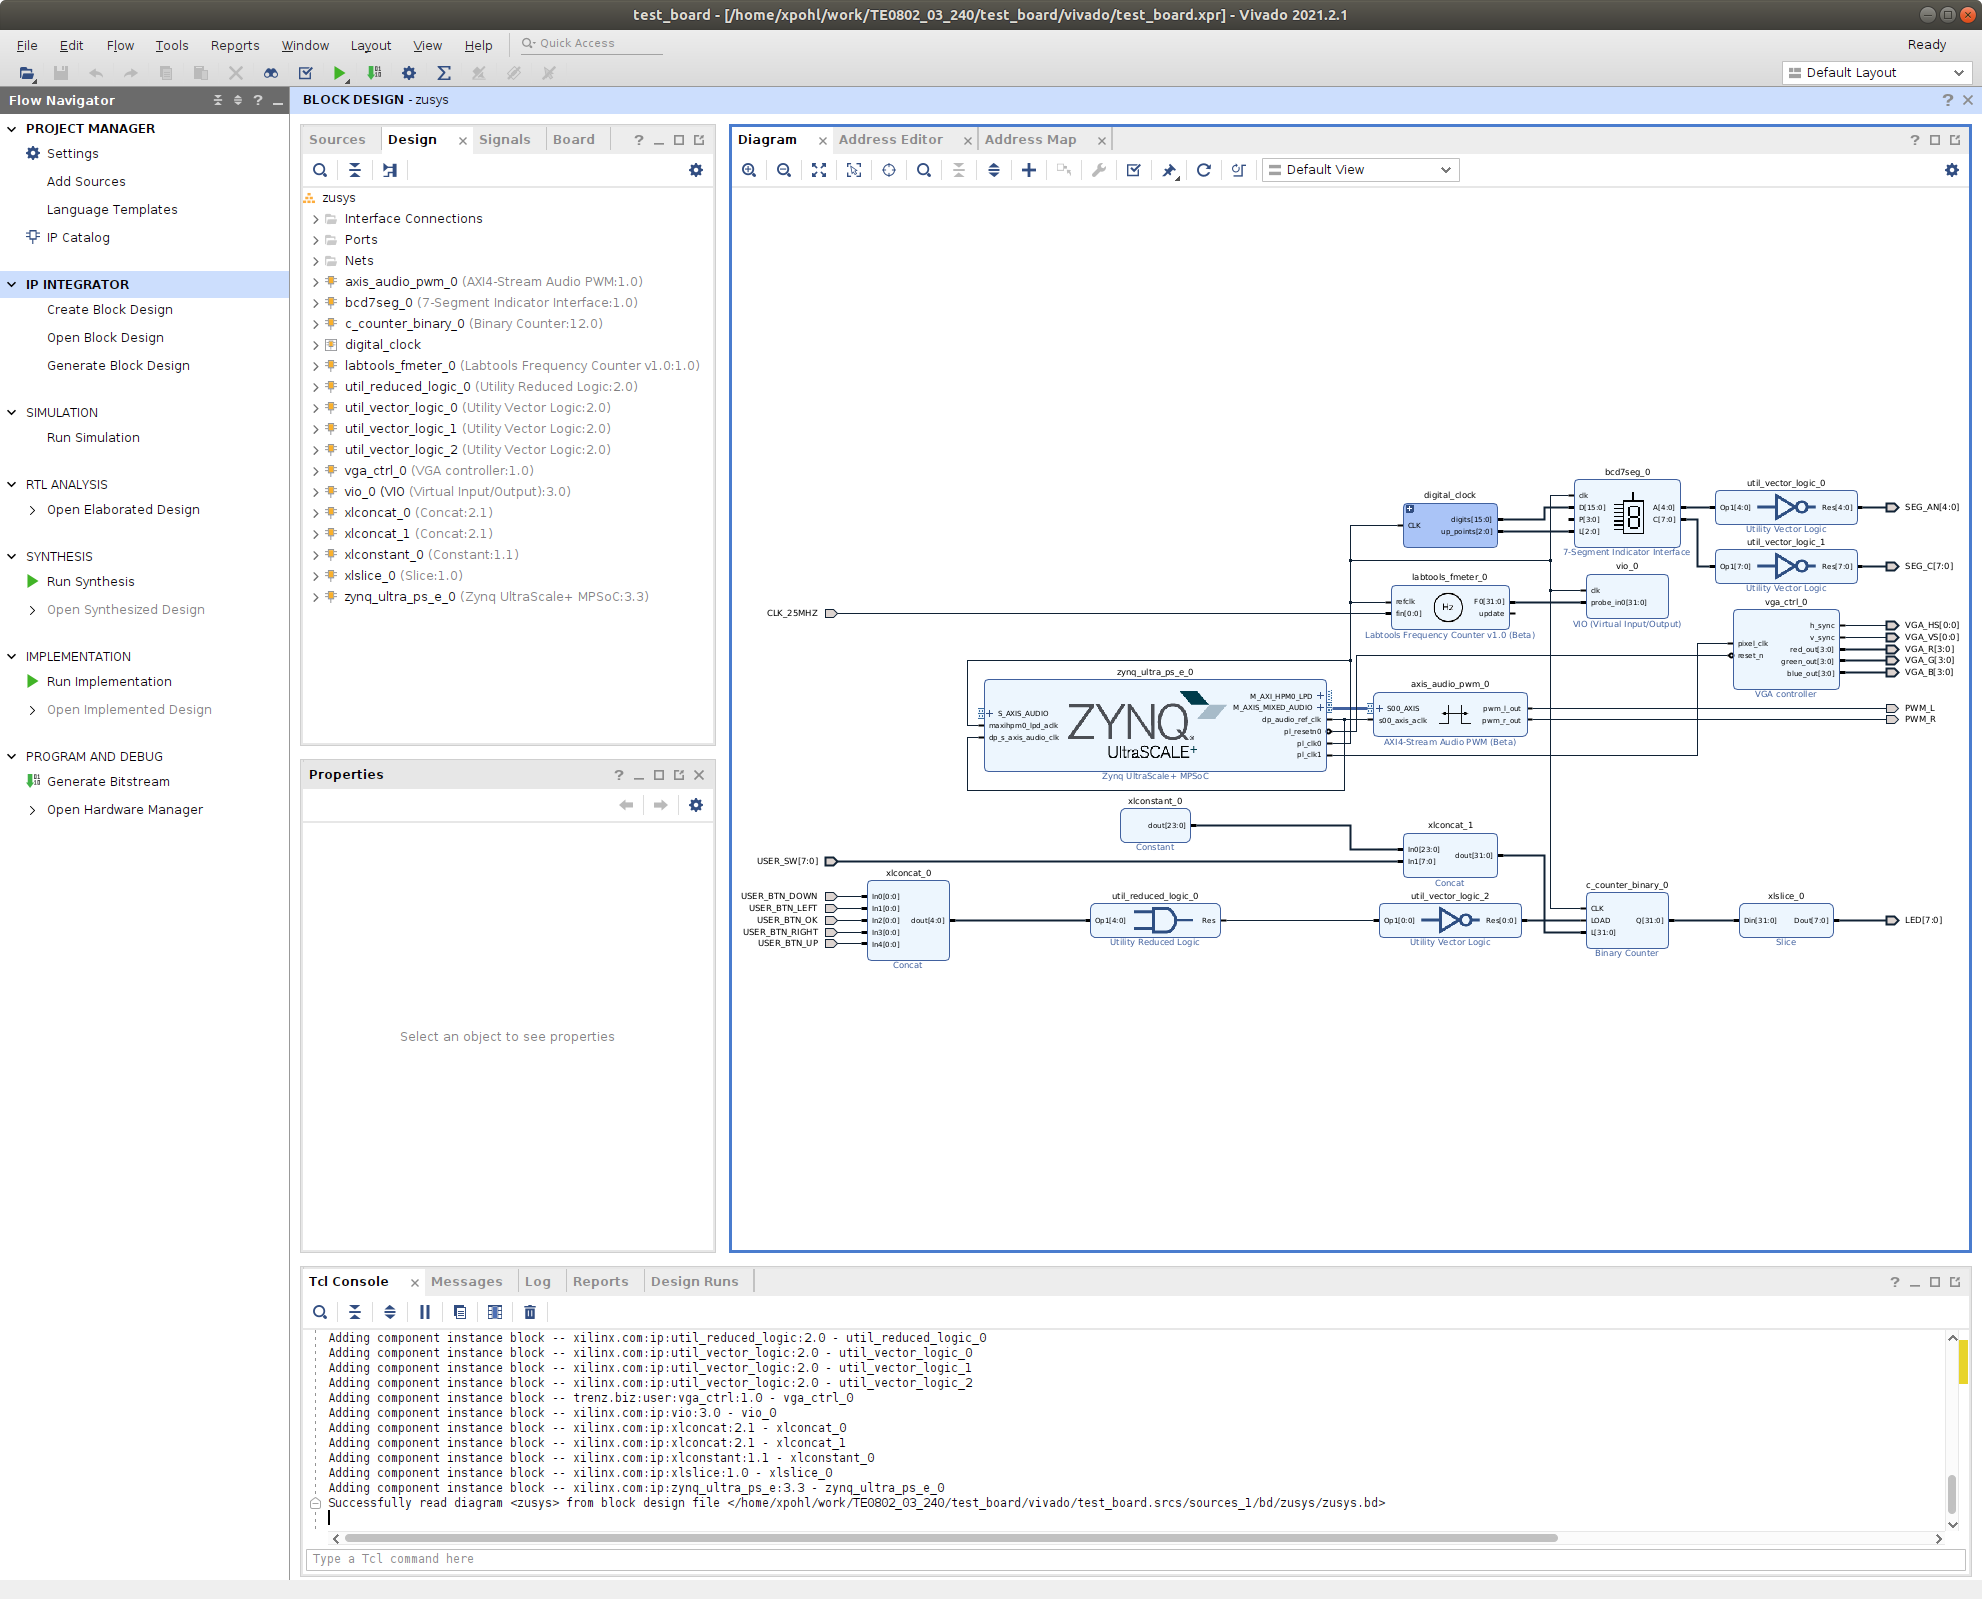
It is possible to display diagram in separate window by clicking on float icon in upper right corner of the diagram.
| Scroll Title | ||
|---|---|---|
| ||
|
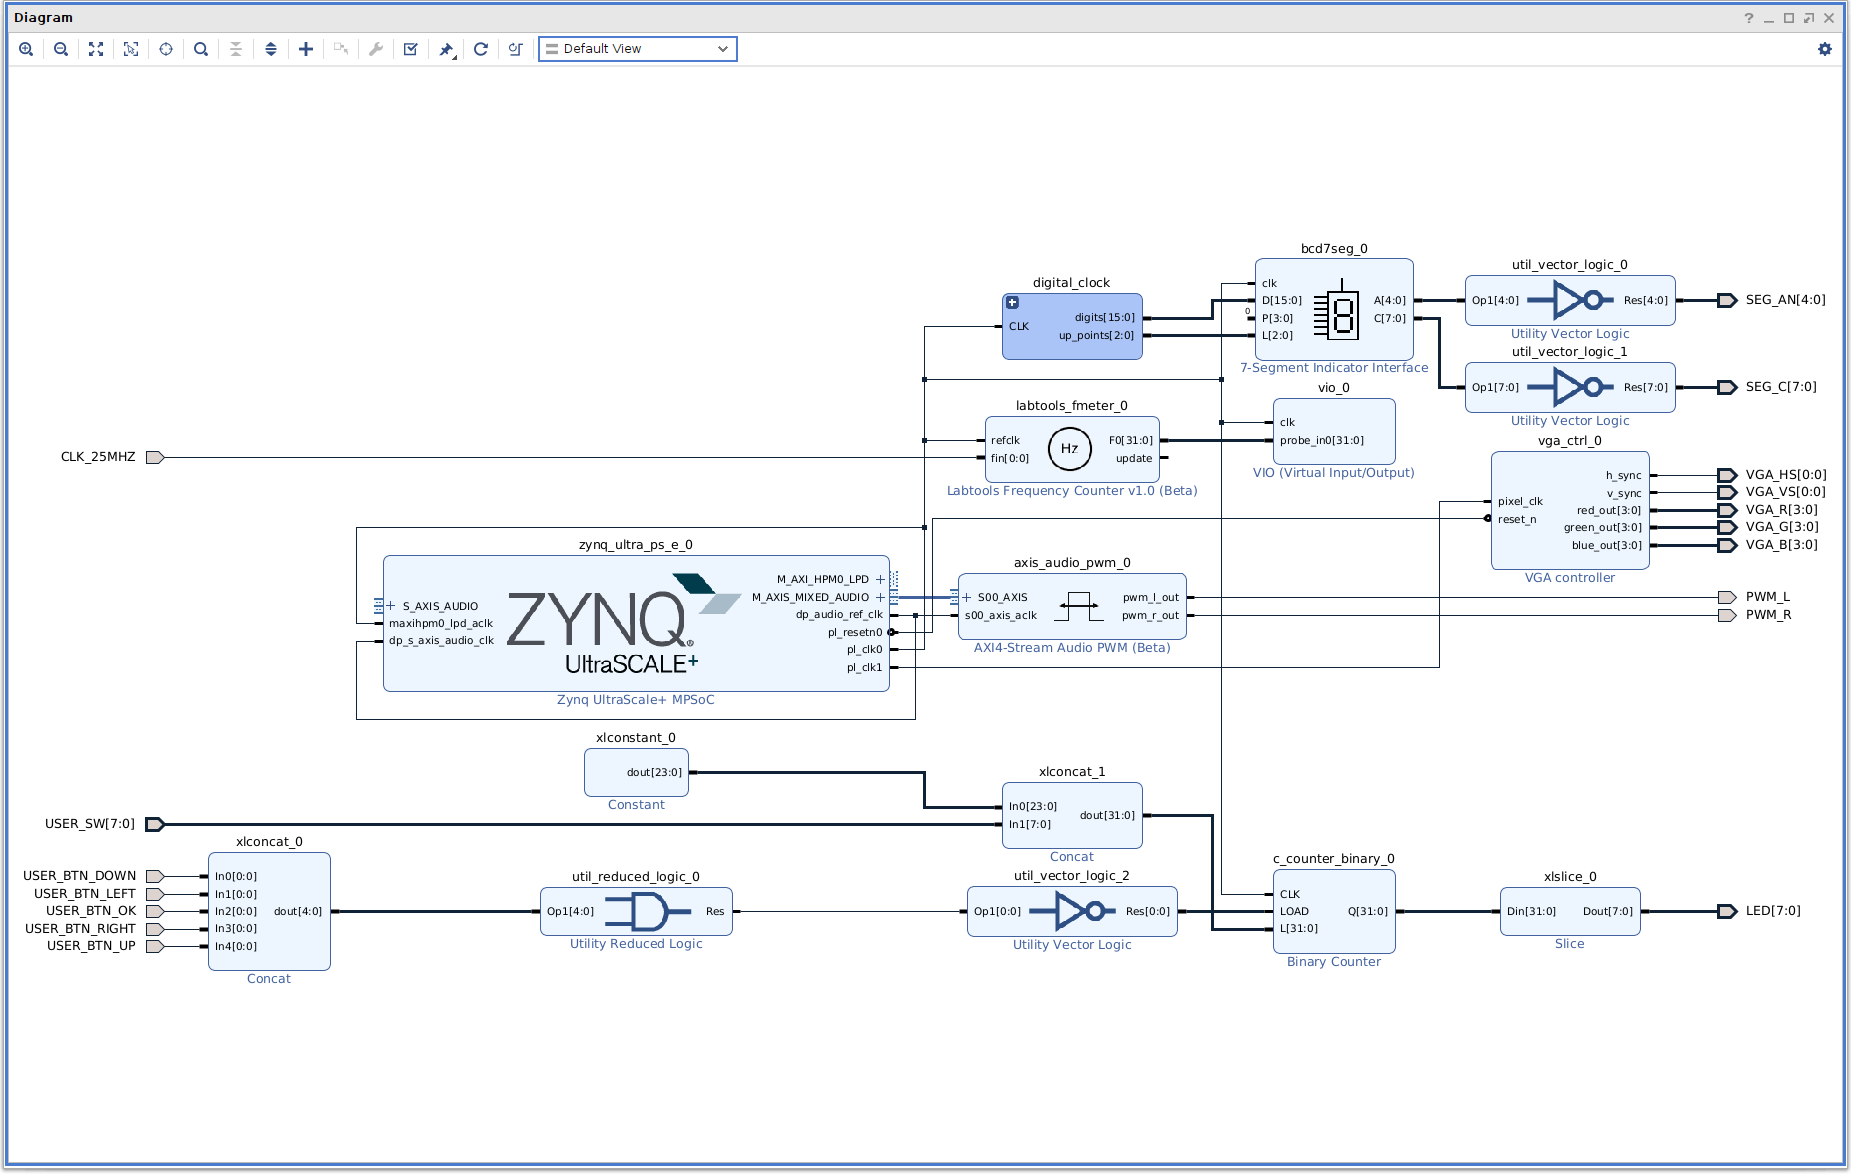
Zynq Ultrascale+ block is configured for the Trenz TE0802 test_board Linux Design.
This is starting point for the standard PetaLinux system supported by Trenz with steps for generation of the PetaLinux system. Parameters of this system and compilation steps are described on Trenz Wiki pages:
TE0802 Test Board - Public Docs - Trenz Electronic Wiki (trenz-electronic.de)
Follow steps described in these wiki pages if you would like to create fixed, not extensible Vitis platform.
The Extensible Vitis platform generation steps are described in next paragraphs.
Create Extensible Vitis platform
| Scroll Ignore | ||||||||||||||||
|---|---|---|---|---|---|---|---|---|---|---|---|---|---|---|---|---|
| ||||||||||||||||
To implement hardware this tutorial offers two alternatives: Fast Track or Manual Track:
- Choose Fast Track to use TCL script to do the same modifications as in manual track case automatically,
- Select Manual Track path if you want to see all required hardware modifications required for custom platform.
Fast Track
Block Design of the Vivado project must be opened for this step. Copy following TCL Code to the TCL comand console of Vivado:
| Code Block | ||||||
|---|---|---|---|---|---|---|
| ||||||
#activate extensible platform
set_property platform.extensible true [current_project]
save_bd_design

set_property PFM_NAME [string map {part0 zusys} [string map {trenz.biz trenz} [current_board_part]]] [get_files zusys.bd]
set_property platform.design_intent.embedded {true} [current_project]
set_property platform.design_intent.datacenter {false} [current_project]
set_property platform.design_intent.server_managed {false} [current_project]
set_property platform.design_intent.external_host {false} [current_project]
set_property platform.default_output_type {sd_card} [current_project]
set_property platform.uses_pr {false} [current_project]
save_bd_design

#add clocking wizard
startgroup
create_bd_cell -type ip -vlnv xilinx.com:ip:clk_wiz:6.0 clk_wiz_0
endgroup

#clocking wizard config
set_property -dict [list CONFIG.CLKOUT2_USED {true} CONFIG.CLKOUT3_USED {true} CONFIG.CLKOUT4_USED {true} CONFIG.CLKOUT2_REQUESTED_OUT_FREQ {200.000} CONFIG.CLKOUT3_REQUESTED_OUT_FREQ {400.000} CONFIG.CLKOUT4_REQUESTED_OUT_FREQ {240.000} CONFIG.RESET_TYPE {ACTIVE_LOW} CONFIG.MMCM_CLKOUT1_DIVIDE {6} CONFIG.MMCM_CLKOUT2_DIVIDE {3} CONFIG.MMCM_CLKOUT3_DIVIDE {5} CONFIG.NUM_OUT_CLKS {4} CONFIG.RESET_PORT {resetn} CONFIG.CLKOUT2_JITTER {102.086} CONFIG.CLKOUT2_PHASE_ERROR {87.180} CONFIG.CLKOUT3_JITTER {90.074} CONFIG.CLKOUT3_PHASE_ERROR {87.180} CONFIG.CLKOUT4_JITTER {98.767} CONFIG.CLKOUT4_PHASE_ERROR {87.180}] [get_bd_cells clk_wiz_0]

#connect clocking wizard inputs
connect_bd_net [get_bd_pins clk_wiz_0/clk_in1] [get_bd_pins zynq_ultra_ps_e_0/pl_clk0]
connect_bd_net [get_bd_pins clk_wiz_0/resetn] [get_bd_pins zynq_ultra_ps_e_0/pl_resetn0]


#add reset cores
startgroup
create_bd_cell -type ip -vlnv xilinx.com:ip:proc_sys_reset:5.0 proc_sys_reset_1
create_bd_cell -type ip -vlnv xilinx.com:ip:proc_sys_reset:5.0 proc_sys_reset_2
create_bd_cell -type ip -vlnv xilinx.com:ip:proc_sys_reset:5.0 proc_sys_reset_3
create_bd_cell -type ip -vlnv xilinx.com:ip:proc_sys_reset:5.0 proc_sys_reset_4
endgroup

#connect reset cores
connect_bd_net [get_bd_pins clk_wiz_0/clk_out1] [get_bd_pins proc_sys_reset_1/slowest_sync_clk]
connect_bd_net [get_bd_pins clk_wiz_0/clk_out2] [get_bd_pins proc_sys_reset_2/slowest_sync_clk]
connect_bd_net [get_bd_pins clk_wiz_0/clk_out3] [get_bd_pins proc_sys_reset_3/slowest_sync_clk]
connect_bd_net [get_bd_pins clk_wiz_0/clk_out4] [get_bd_pins proc_sys_reset_4/slowest_sync_clk]
connect_bd_net [get_bd_pins clk_wiz_0/locked] [get_bd_pins proc_sys_reset_1/dcm_locked]
connect_bd_net [get_bd_pins clk_wiz_0/locked] [get_bd_pins proc_sys_reset_2/dcm_locked]
connect_bd_net [get_bd_pins clk_wiz_0/locked] [get_bd_pins proc_sys_reset_3/dcm_locked]
connect_bd_net [get_bd_pins clk_wiz_0/locked] [get_bd_pins proc_sys_reset_4/dcm_locked]
connect_bd_net [get_bd_pins proc_sys_reset_1/ext_reset_in] [get_bd_pins zynq_ultra_ps_e_0/pl_resetn0]
connect_bd_net [get_bd_pins proc_sys_reset_2/ext_reset_in] [get_bd_pins zynq_ultra_ps_e_0/pl_resetn0]
connect_bd_net [get_bd_pins proc_sys_reset_3/ext_reset_in] [get_bd_pins zynq_ultra_ps_e_0/pl_resetn0]
connect_bd_net [get_bd_pins proc_sys_reset_4/ext_reset_in] [get_bd_pins zynq_ultra_ps_e_0/pl_resetn0]

# add clocks to platform
set_property PFM.CLOCK {clk_out1 {id "1" is_default "false" proc_sys_reset "/proc_sys_reset_1" status "fixed" freq_hz "100000000"} clk_out2 {id "2" is_default "false" proc_sys_reset "/proc_sys_reset_2" status "fixed" freq_hz "200000000"} clk_out3 {id "3" is_default "false" proc_sys_reset "/proc_sys_reset_3" status "fixed" freq_hz "400000000"} clk_out4 {id "4" is_default "true" proc_sys_reset "/proc_sys_reset_4" status "fixed" freq_hz "240000000"}} [get_bd_cells /clk_wiz_0]

#add interrupt core
startgroup
create_bd_cell -type ip -vlnv xilinx.com:ip:axi_intc:4.1 axi_intc_0
endgroup

#config interrupt core
set_property -dict [list CONFIG.C_KIND_OF_INTR.VALUE_SRC USER] [get_bd_cells axi_intc_0]
set_property -dict [list CONFIG.C_KIND_OF_INTR {0x00000000} CONFIG.C_IRQ_CONNECTION {1}] [get_bd_cells axi_intc_0]

#connect interrupt core
connect_bd_net [get_bd_pins axi_intc_0/s_axi_aclk] [get_bd_pins clk_wiz_0/clk_out4]
connect_bd_net [get_bd_pins axi_intc_0/s_axi_aresetn] [get_bd_pins proc_sys_reset_4/peripheral_aresetn]
disconnect_bd_net /zynq_ultra_ps_e_0_pl_clk0 [get_bd_pins zynq_ultra_ps_e_0/maxihpm0_lpd_aclk]
connect_bd_net [get_bd_pins zynq_ultra_ps_e_0/maxihpm0_lpd_aclk] [get_bd_pins clk_wiz_0/clk_out4]

startgroup
create_bd_cell -type ip -vlnv xilinx.com:ip:axi_interconnect:2.1 axi_interconnect_0
endgroup
set_property -dict [list CONFIG.NUM_MI {1}] [get_bd_cells axi_interconnect_0]
connect_bd_net [get_bd_pins axi_interconnect_0/ACLK] [get_bd_pins clk_wiz_0/clk_out4]
connect_bd_net [get_bd_pins axi_interconnect_0/ARESETN] [get_bd_pins proc_sys_reset_4/peripheral_aresetn]
connect_bd_net [get_bd_pins axi_interconnect_0/S00_ARESETN] [get_bd_pins proc_sys_reset_4/interconnect_aresetn]
connect_bd_net [get_bd_pins axi_interconnect_0/M00_ARESETN] [get_bd_pins proc_sys_reset_4/interconnect_aresetn]
connect_bd_net [get_bd_pins axi_interconnect_0/S00_ACLK] [get_bd_pins clk_wiz_0/clk_out4]
connect_bd_net [get_bd_pins axi_interconnect_0/M00_ACLK] [get_bd_pins clk_wiz_0/clk_out4]

connect_bd_intf_net [get_bd_intf_pins zynq_ultra_ps_e_0/M_AXI_HPM0_LPD] -boundary_type upper [get_bd_intf_pins axi_interconnect_0/S00_AXI]
connect_bd_intf_net -boundary_type upper [get_bd_intf_pins axi_interconnect_0/M00_AXI] [get_bd_intf_pins axi_intc_0/s_axi]

#rename interconnect
set_property name ps8_0_axi_periph [get_bd_cells axi_interconnect_0]

#add zynqUS interrupt inputs and connect intr IP core
startgroup
set_property -dict [list CONFIG.PSU__USE__IRQ0 {1}] [get_bd_cells zynq_ultra_ps_e_0]
endgroup
connect_bd_net [get_bd_pins axi_intc_0/irq] [get_bd_pins zynq_ultra_ps_e_0/pl_ps_irq0]

# add interrputs to platform
set_property PFM.IRQ {intr { id 0 range 32 }} [get_bd_cells /axi_intc_0]

# add axi buses to platform
set_property PFM.AXI_PORT {M_AXI_HPM0_FPD {memport "M_AXI_GP" sptag "GP0" memory "" is_range "false"} M_AXI_HPM1_FPD {memport "M_AXI_GP" sptag "GP1" memory "" is_range "false"} S_AXI_HPC0_FPD {memport "S_AXI_HP" sptag "HPC0" memory "" is_range "false"} S_AXI_HPC1_FPD {memport "S_AXI_HP" sptag "HPC1" memory "" is_range "false"} S_AXI_HP0_FPD {memport "S_AXI_HP" sptag "HP0" memory "" is_range "false"} S_AXI_HP1_FPD {memport "S_AXI_HP" sptag "HP1" memory "" is_range "false"} S_AXI_HP2_FPD {memport "S_AXI_HP" sptag "HP2" memory "" is_range "false"} S_AXI_HP3_FPD {memport "S_AXI_HP" sptag "HP3" memory "" is_range "false"}} [get_bd_cells /zynq_ultra_ps_e_0]

#add interconnect ports to platform
set_property PFM.AXI_PORT {M01_AXI {memport "M_AXI_GP" sptag "" memory "" is_range "false"} M02_AXI {memport "M_AXI_GP" sptag "" memory "" is_range "false"} M03_AXI {memport "M_AXI_GP" sptag "" memory "" is_range "false"} M04_AXI {memport "M_AXI_GP" sptag "" memory "" is_range "false"} M05_AXI {memport "M_AXI_GP" sptag "" memory "" is_range "false"} M06_AXI {memport "M_AXI_GP" sptag "" memory "" is_range "false"} M07_AXI {memport "M_AXI_GP" sptag "" memory "" is_range "false"}} [get_bd_cells /ps8_0_axi_periph]

# add addresses to unmapped peripherals
assign_bd_address

#save
save_bd_design

#save project XPR name
global proj_xpr
set proj_xpr [current_project]
append proj_xpr .xpr

#close project
close_project

# reopen project
open_project $proj_xpr

# open block design
open_bd_design [current_project].srcs/sources_1/bd/zusys/zusys.bd

#validate
#validate_bd_design |
This script modifies the Initial platform Block design into the Extensible platform Block design and also defines define Platform Setup configuration.
In Vivado, open the design explorer and Platform description.
The fast track result is identical to the manually performed modifications described in next sections. In Vivado, save block design by clicking on icon “Save Block Design”.
| Scroll Title | ||
|---|---|---|
| ||
 |
Continue the design path with Validate Design.
Manual Track
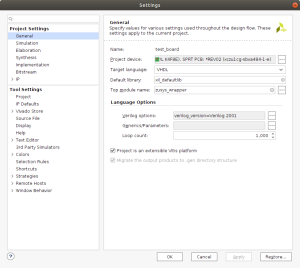
In Vivado project, click in Flow Navigator on Settings. In opened Settings window, select General in Project Settings, select Project is an extensible Vitis platform. Click on OK.
| Scroll Title | ||
|---|---|---|
| ||
|
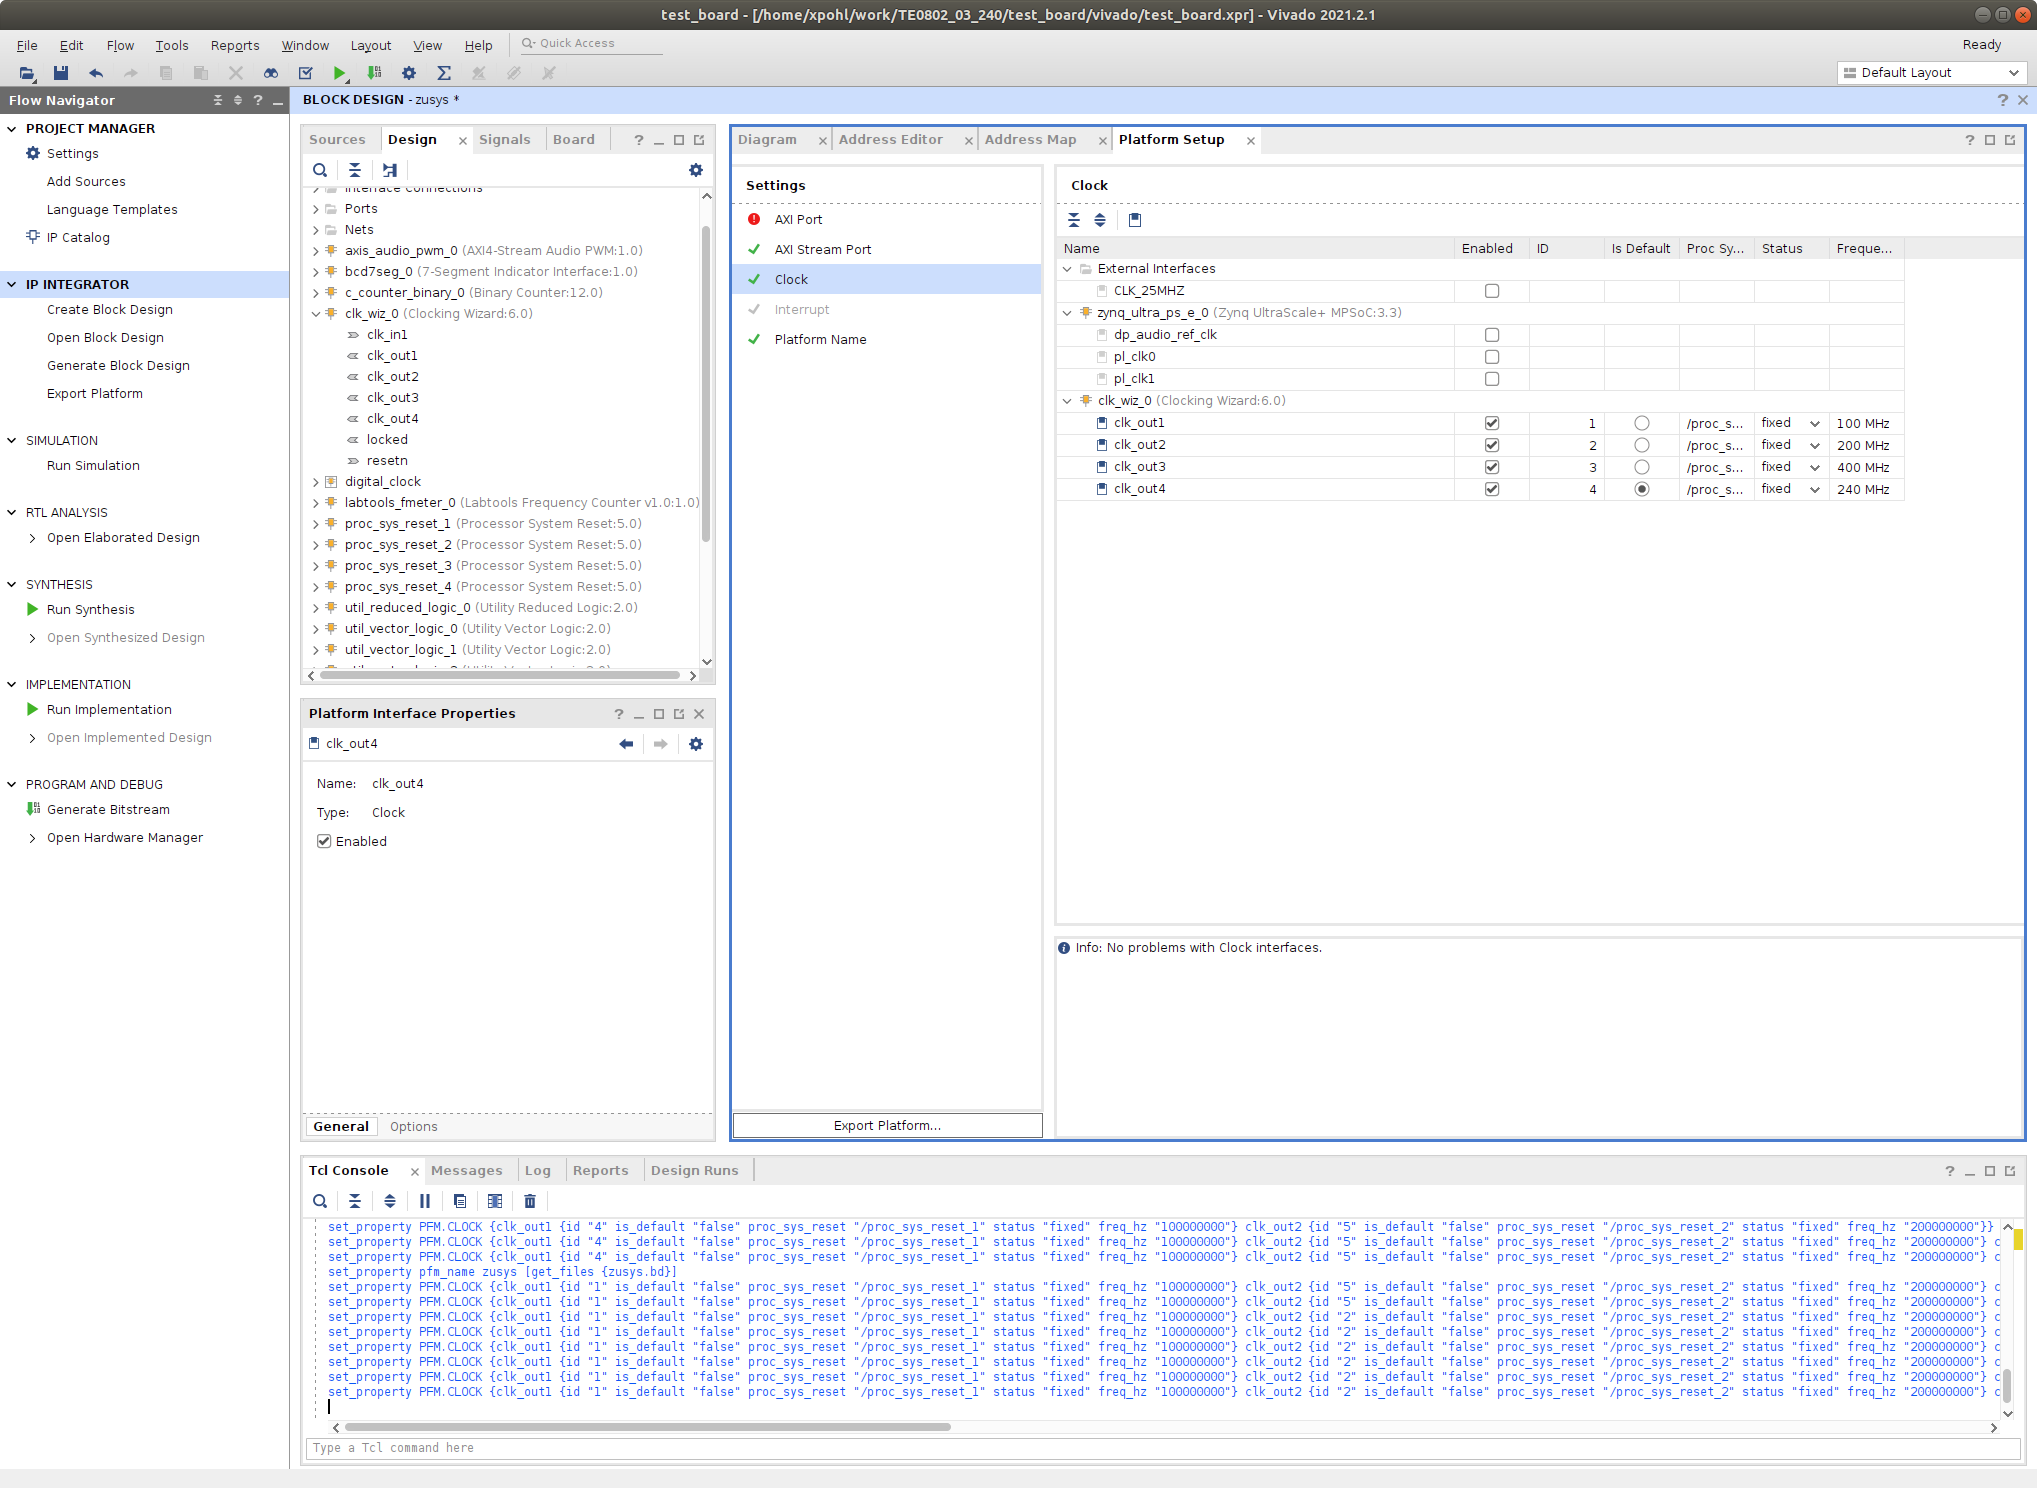
IP Integrator of project set up as an extensible Vitis platform has an additional Platform Setup window.
Add multiple clocks and processor system reset IPs
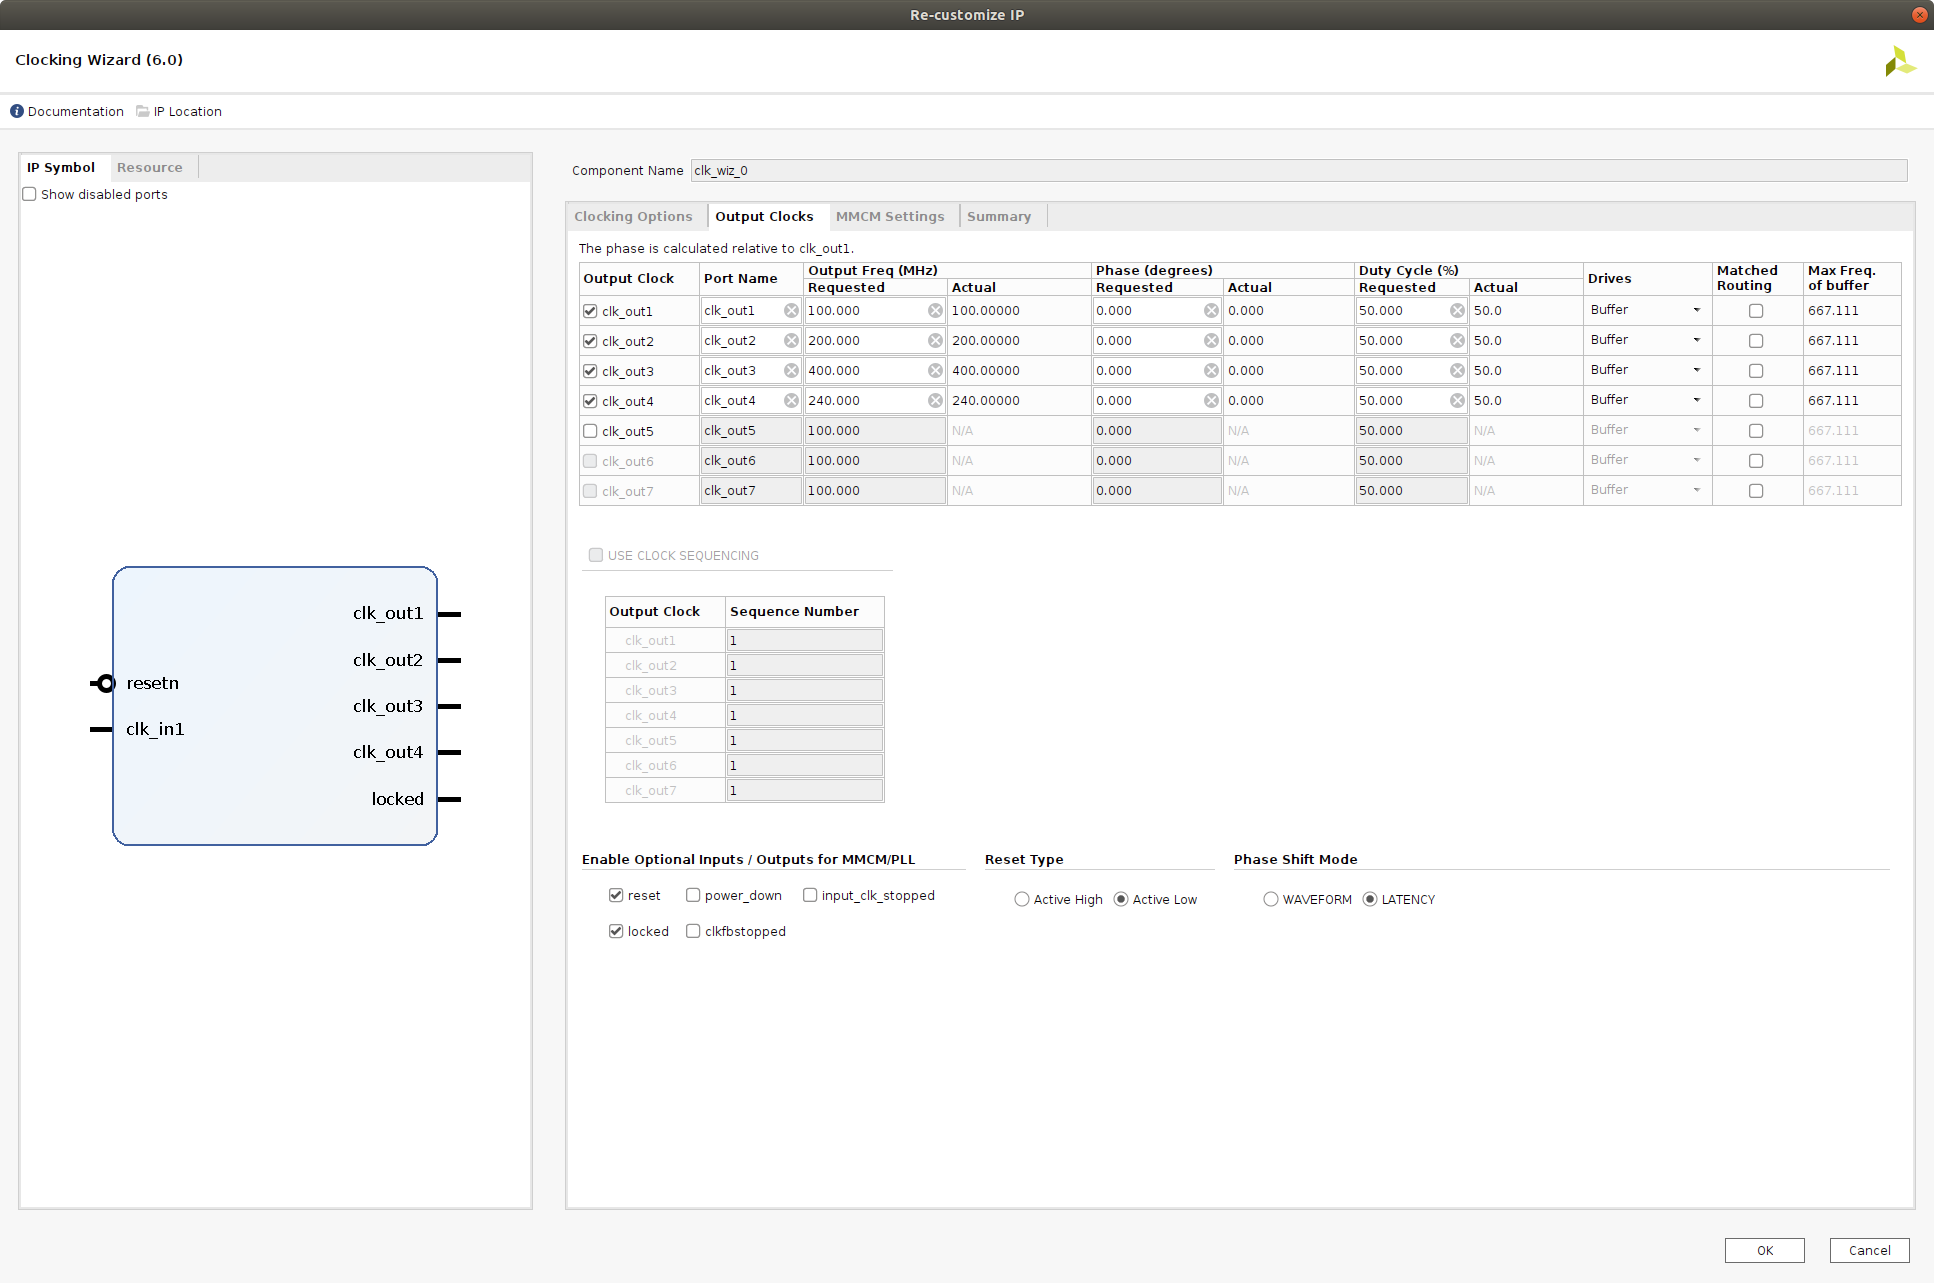
In IP Integrator Diagram Window, right click, select Add IP and add Clocking Wizard IP clk_wiz_0. Double-click on the IP to Re-customize IP window. Select Output Clocks panel. Select four clocks with frequency 100, 200, 400 and 240 MHz.
100 MHz clock will serve as low speed clock.
200 MHz and 400 MHz clock will serve as clock for possible AI engine.
240 MHz clock will serve as the default extensible platform clock. By default, Vitis will compile HW IPs with this default clock.
Set reset type from the default Active High to Active Low.
| Scroll Title | ||
|---|---|---|
| ||
|
Clik on OK to close the Re-customize IP window.
Connect input resetn of clk_wiz_0 with output pl_resetn0 of zynq_ultra_ps_e_0.
Connect input clk_in1 of clk_wiz_0 with output pl_clk0 of zynq_ultra_ps_e_0.
| Scroll Title | ||
|---|---|---|
| ||
|
Add and connect four Processor System Reset blocks for each generated clock.
Add four Processor System reset blocks and name them proc_sys_reset_1, proc_sys_reset_2, proc_sys_reset_3 and proc_sys_reset_4.
Connect input slowest_sync_clk of proc_sys_reset_1 to clk_out1 of clk_wiz_0.
Connect input slowest_sync_clk of proc_sys_reset_2 to clk_out2 of clk_wiz_0.
Connect input slowest_sync_clk of proc_sys_reset_3 to clk_out3 of clk_wiz_0.
Connect input slowest_sync_clk of proc_sys_reset_4 to clk_out4 of clk_wiz_0.
Connect inputs ext_reset_in of proc_sys_reset_1, proc_sys_reset_2, proc_sys_reset_3 and proc_sys_reset_4 to output pl_resetn0 of zynq_ultra_ps_e_0.
Connect inputs dcm_locked of proc_sys_reset_1, proc_sys_reset_2, proc_sys_reset_3 and proc_sys_reset_4 to output locked of clk_wiz_0.
| Scroll Title | ||
|---|---|---|
| ||
|
Open Platform Setup window of IP Integrator to define Clocks. In Settings, select Clock.
In “Enabled” column select all four defined clocks clk_out1, clk_out2, clk_out3, clk_out4 of clk_wiz_0 block.
In “ID” column keep the default Clock ID: 1, 2, 3, 4
In “Is Default” column, select clk_out4 (with ID=4) as the default clock. One and only one clock must be selected as default clock.
| Scroll Title | ||
|---|---|---|
| ||
|
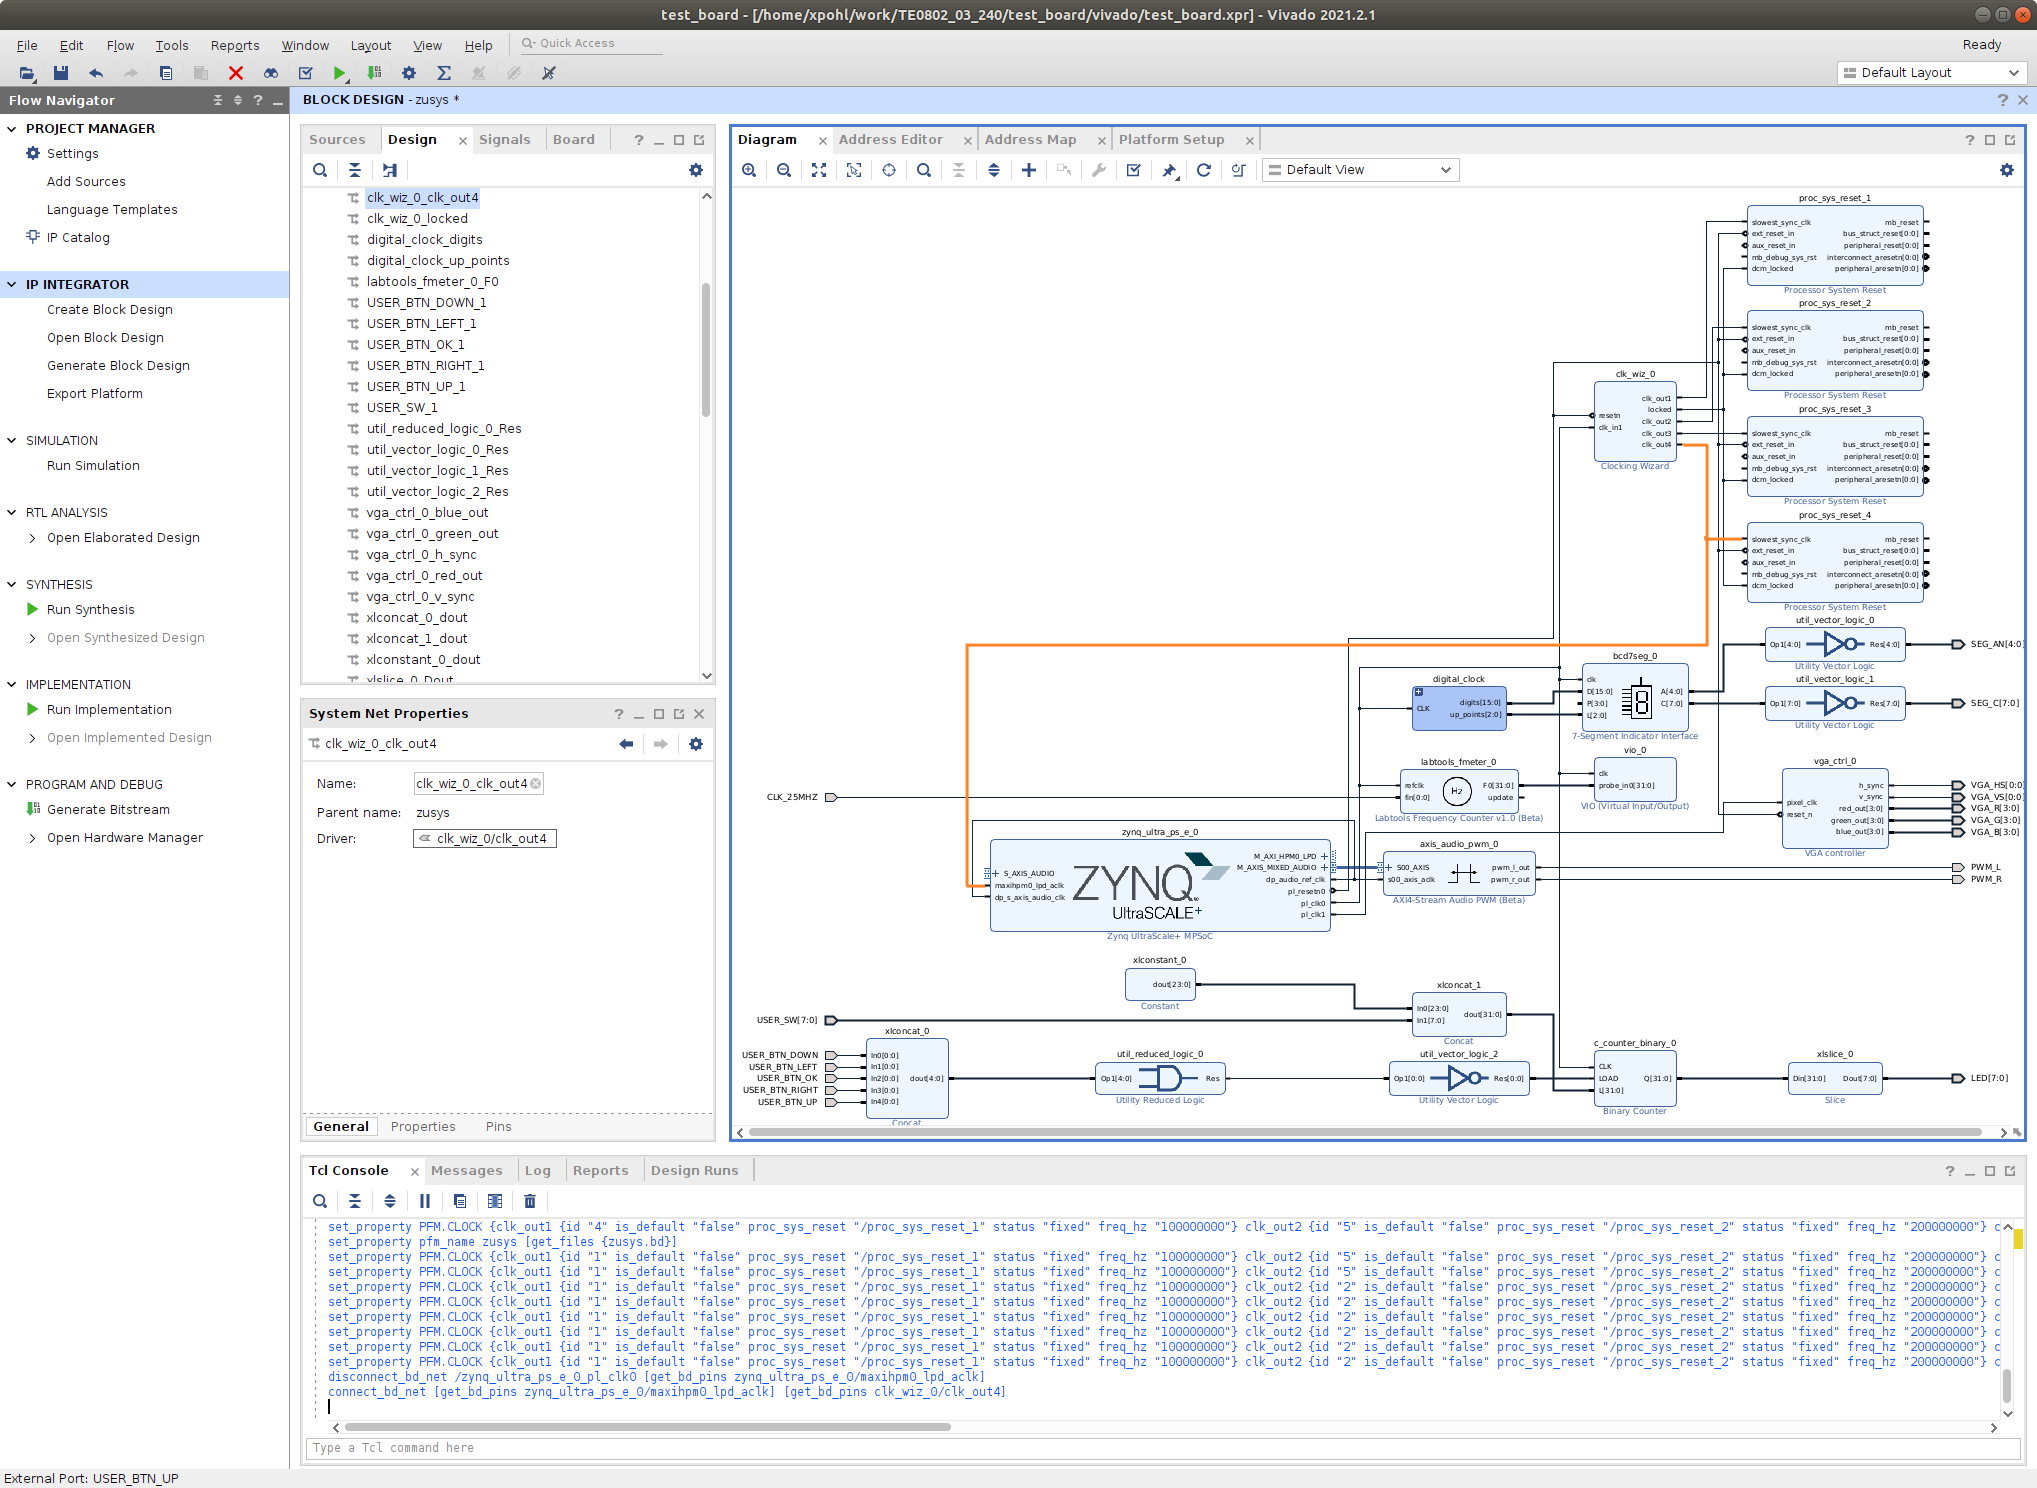
Disconnect input pin maxihpm0_lpd_aclk of zynq_ultra_ps_e_0. This net is driven by clock output pl_clk0 of zynq_ultra_ps_e_0.
Connect input pin maxihpm0_lpd_aclk of zynq_ultra_ps_e_0 to the 240 MHz clk_out4 of clk_wiz_0 IP block.
These two modifications are made to support the axi-lite interface of an interrupt controller operating at 240 MHz clock, identical with the default extendable platform clock.
| Scroll Title | ||
|---|---|---|
| ||
|
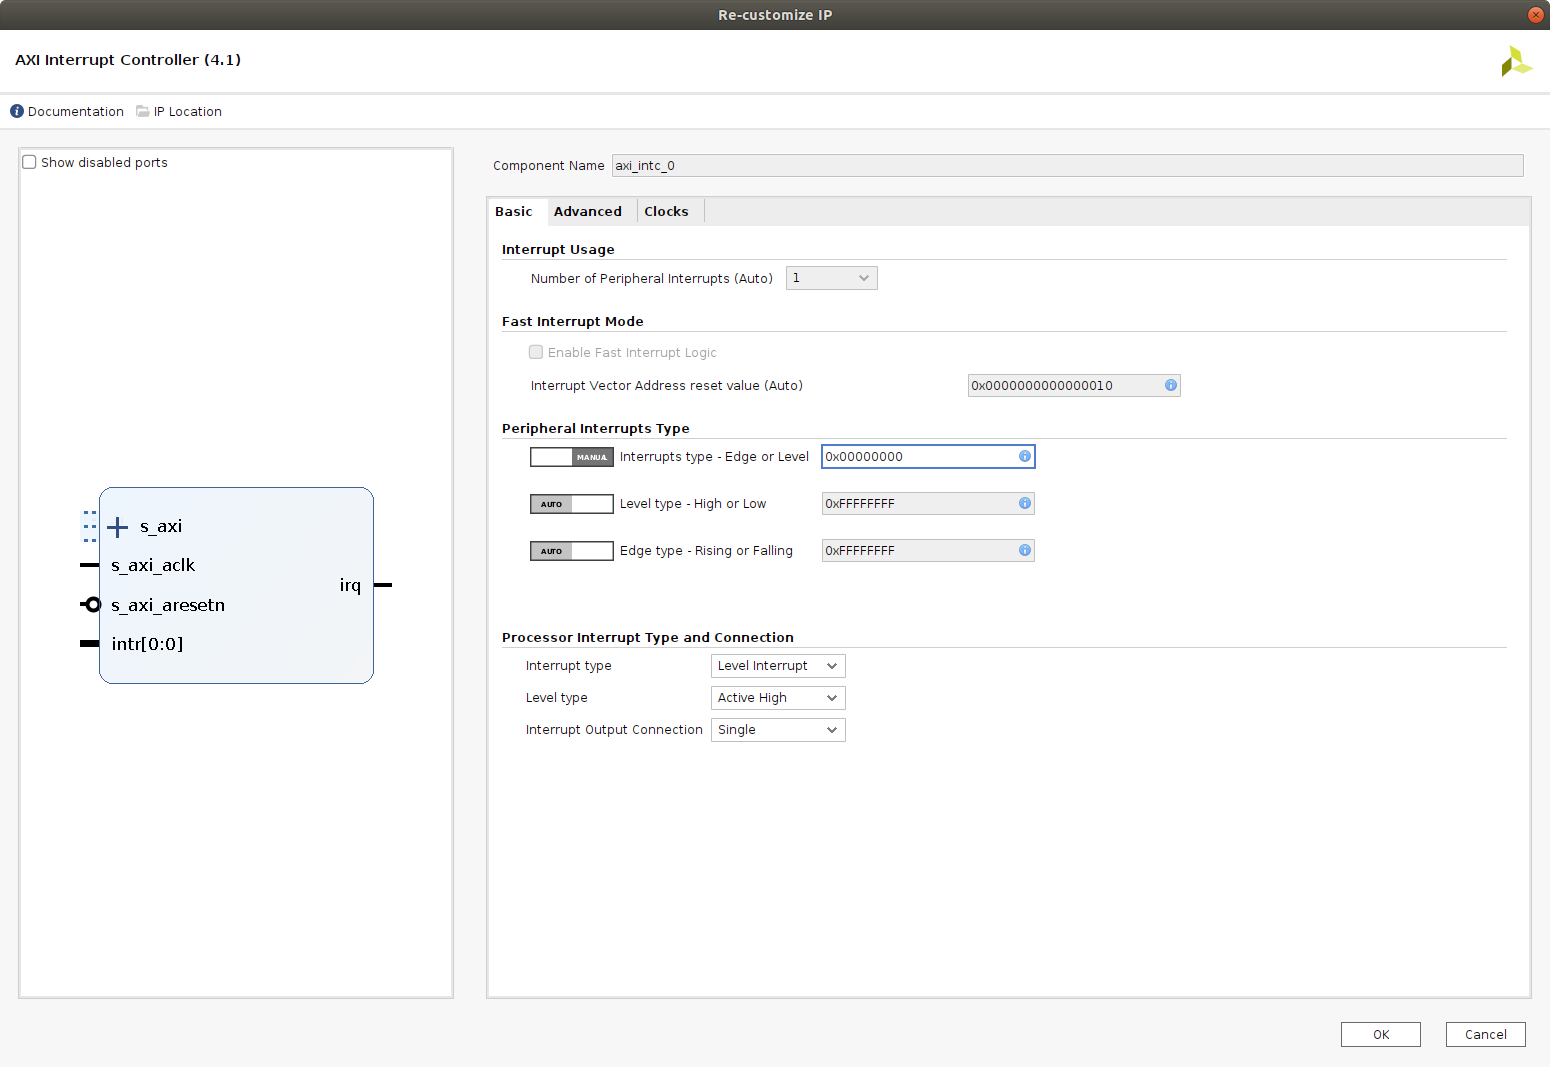
Add, customize and connect the AXI Interrupt Controller
Add AXI Interrupt Controller IP axi_intc_0.
Double-click on axi_intc_0 to re-customize it.
In “Processor Interrupt Type and Connection” section select the “Interrupt Output Connection” from “Bus” to “Single”.
In “Peripherial Interrupt Type” section, change the “Interrupts Types Edge or Level” from AUTO to MANUAL. Change the corresponding value from 0xFFFFFFFF to 0x00000000.
Click on OK to accept these changes.
| Note |
|---|
| This re-configuration is manually setting all interrupts as level interrupts. With this setting, the PetaLinux automatically creates correct description of the interrupt controller in the device tree. The Vitis extensible flow generates HW IP blocks with level interrupts. |
| Note |
|---|
| In case of user defined edge interrupts, the corresponding interrupt description will be added in an customised, interrupt controller description section of the user-defined device tree file ~/work/TE0802_03_240/test_board/os/petalinux/project-spec/meta-user/recipes-bsp/device-tree/files/system-user.dtsi For the default extensible TE0802_03_240_pfm platform it is not needed. |
| Scroll Title | ||
|---|---|---|
| ||
 |
Connect interrupt controller clock input s_axi_aclk of axi_intc_0 to clock output clk_out4 of clk_wiz_0. It is the default, 240 MHz clock of the extensible platform.
Connect interrupt controller input s_axi_aresetn of axi_intc_0 to output peripheral_aresetn[0:0] of proc_sys_reset_4 . It is the reset block for default, 240 MHz clock of the extensible platform.
| Scroll Title | ||
|---|---|---|
| ||
 |
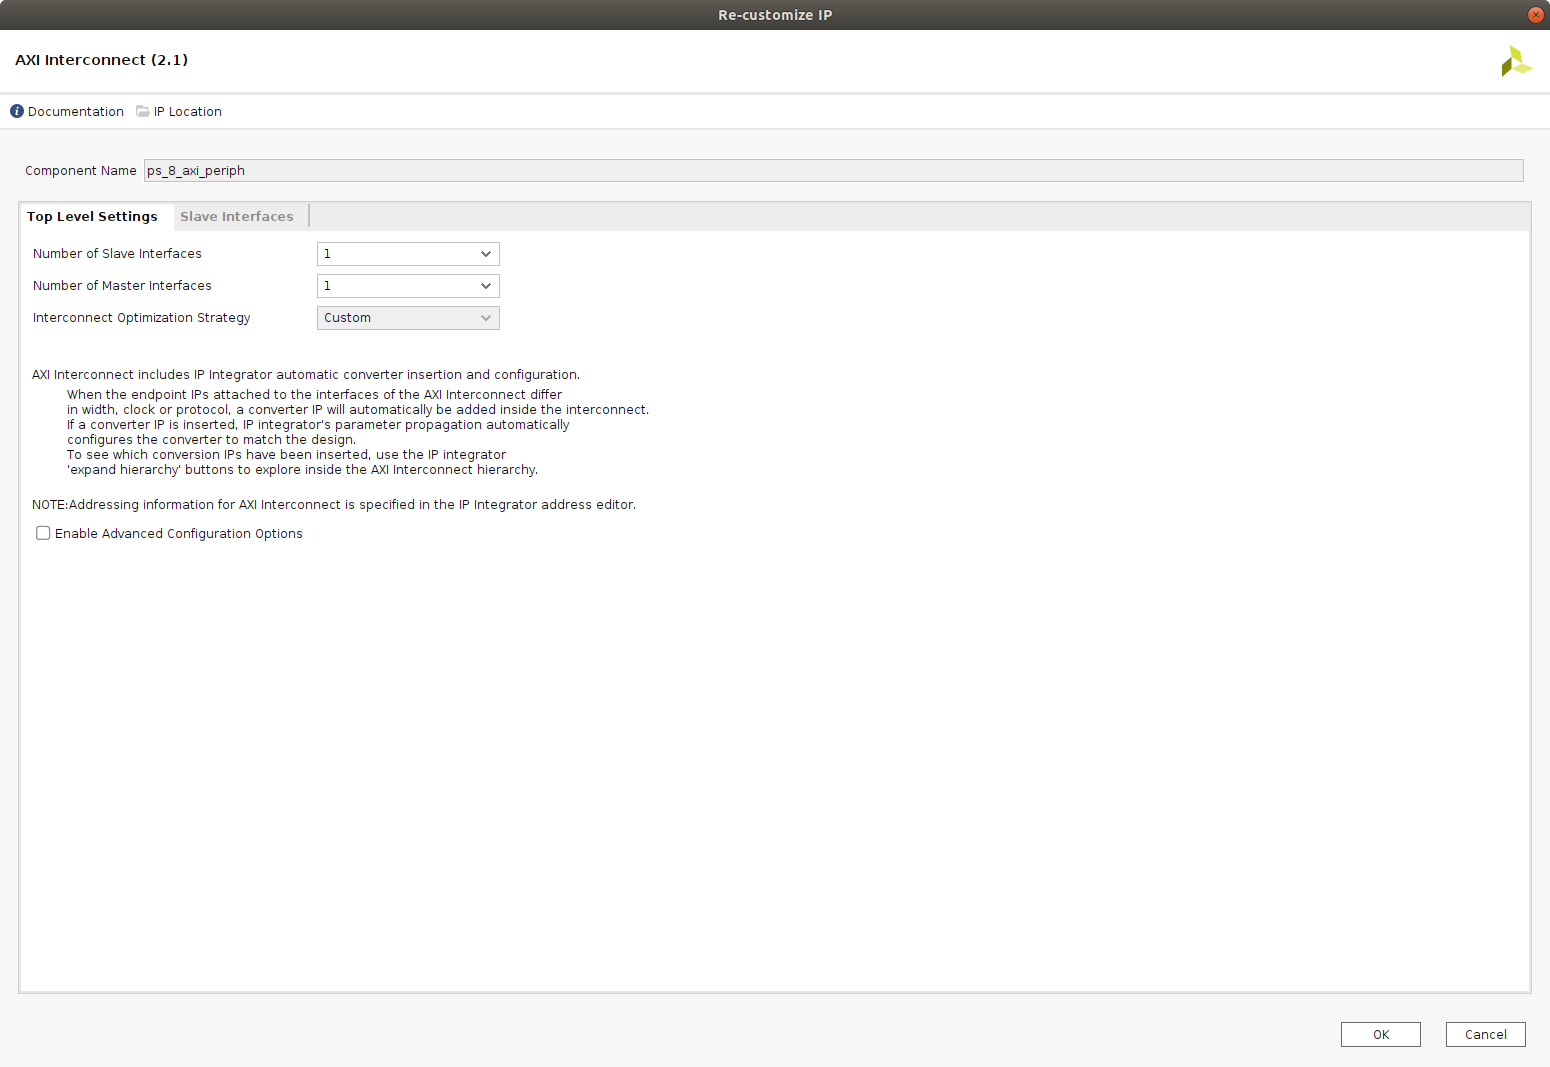
Add AXI Interconnect IP and name it ps_8_axi_periph.
Double click the IP core and set the number of Slave Interfaces and Master Interfaces both to one.
Click OK to customize core.
| Scroll Title | ||
|---|---|---|
| ||
 |
Connect ports of ps_8_axi_periph core as follows:
Connect ports ACLK, S00_ACLK, M00_ACLK to clk_wiz_0 port clk_out4
Connect port S00_AXI to M_AXI_HPM0_LPD of zynq_ultra_ps_e_0
Connect port M00_AXI to axi_intc_0 port s_axi
Connect port ARESETN to proc_sys_reset_4 port peripheral_aresetn[0:0]
Connect ports S00_ARESETN and M00_ARESETN to proc_sys_reset4 port interconnect_aresetn[0:0]
| Scroll Title | ||
|---|---|---|
| ||
|
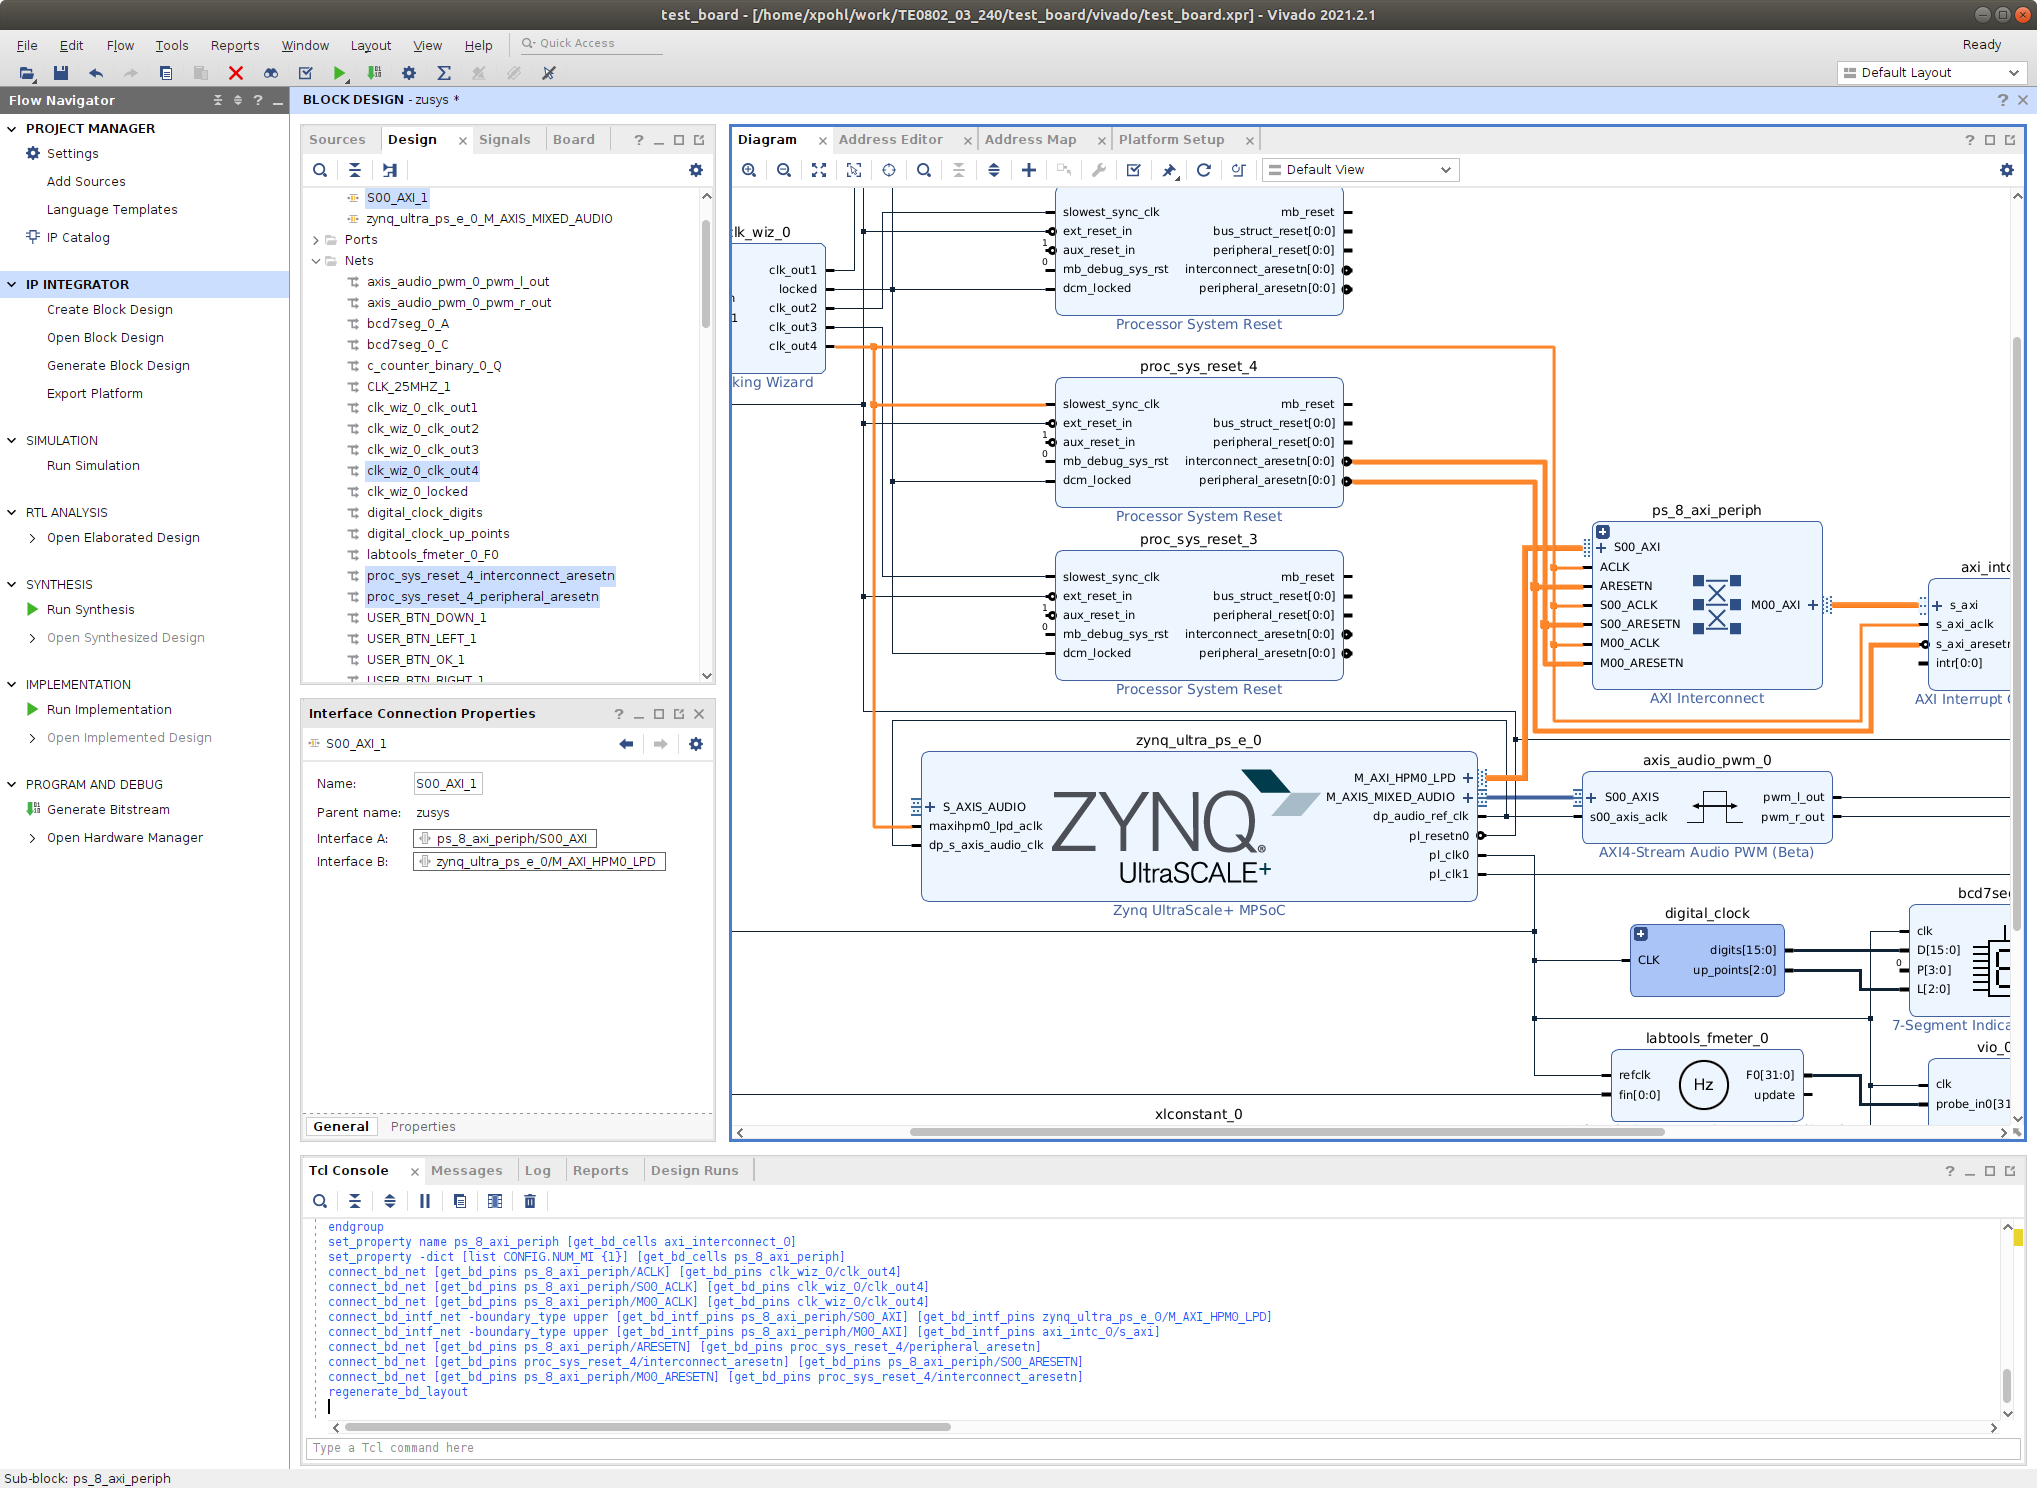
Vitis extensible design flow will be expanding the AXI interconnect ps_8_axi_periph for interfacing and configuration of registers of generated HW IP blocks with the default extensible platform clock 240 MHz.
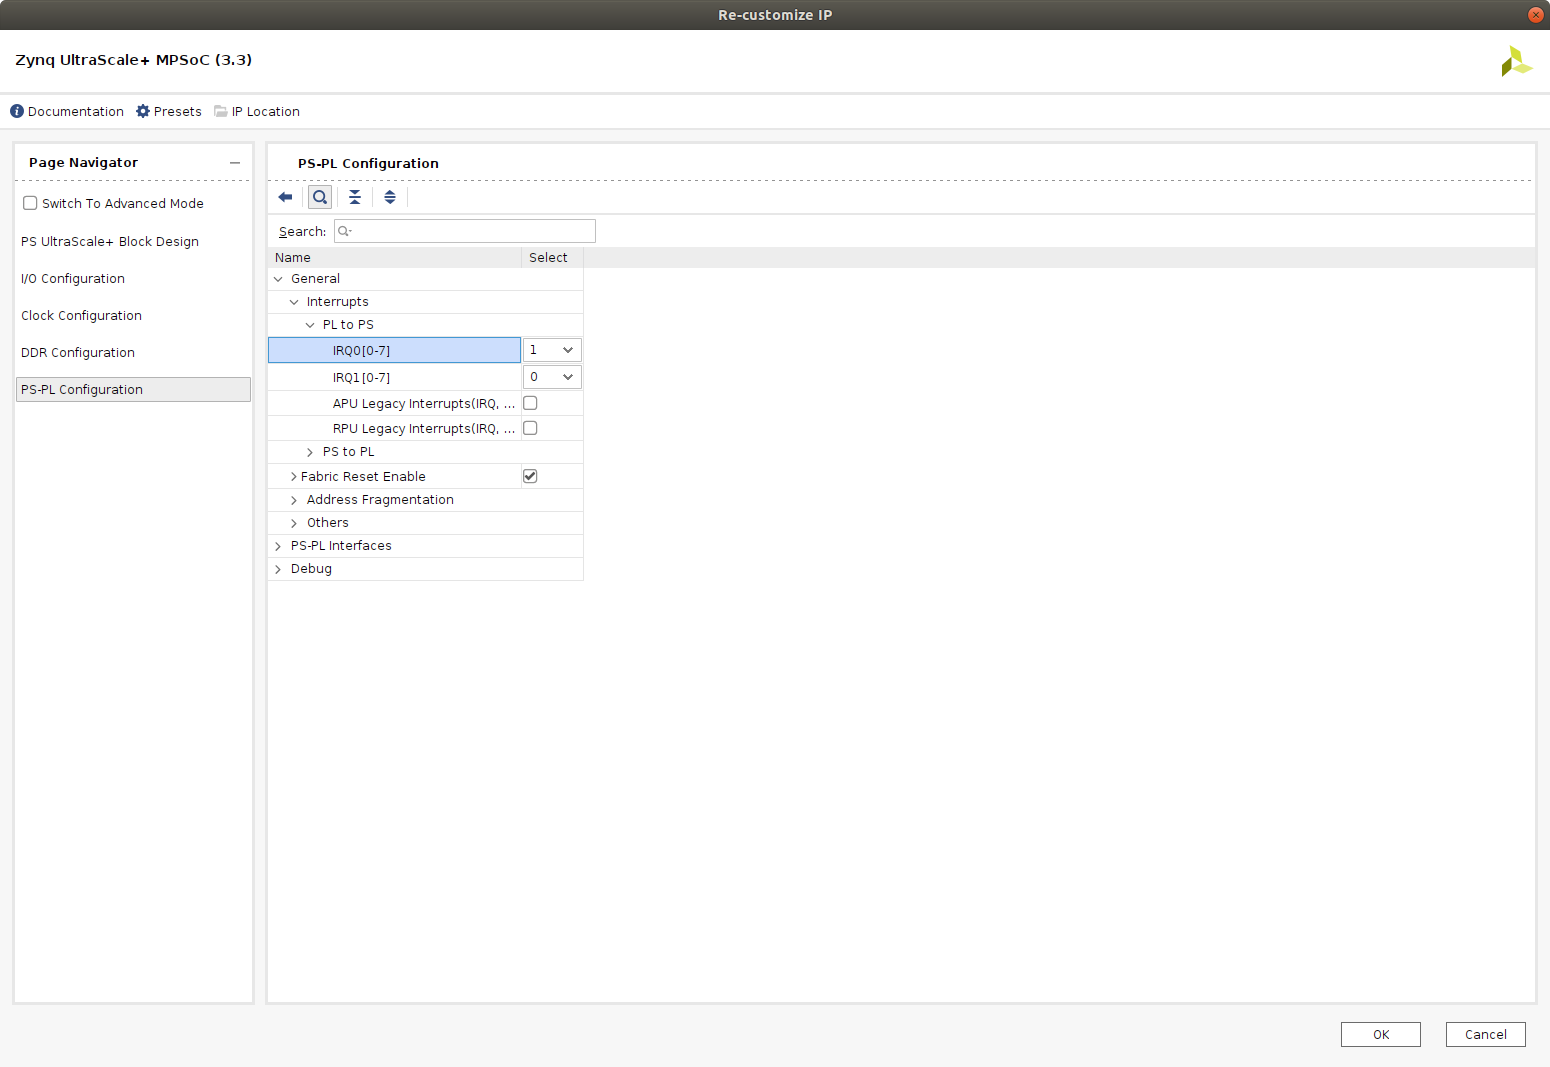
Double-click on zynq_ultra_ps_e_0 to re-customize it by enabling of an interrupt input pl_ps_irq0[0:0]. Click OK.
| Scroll Title | ||
|---|---|---|
| ||
 |
Connect the interruptinput pl_ps_irq0[0:0] of zynq_ultra_ps_e_0 block with output irq of axi_intc_0 block.
| Scroll Title | ||
|---|---|---|
| ||
 |
In Platform Setup, select “Interrupt” and enable intr in the “Enabled” column.
| Scroll Title | ||
|---|---|---|
| ||
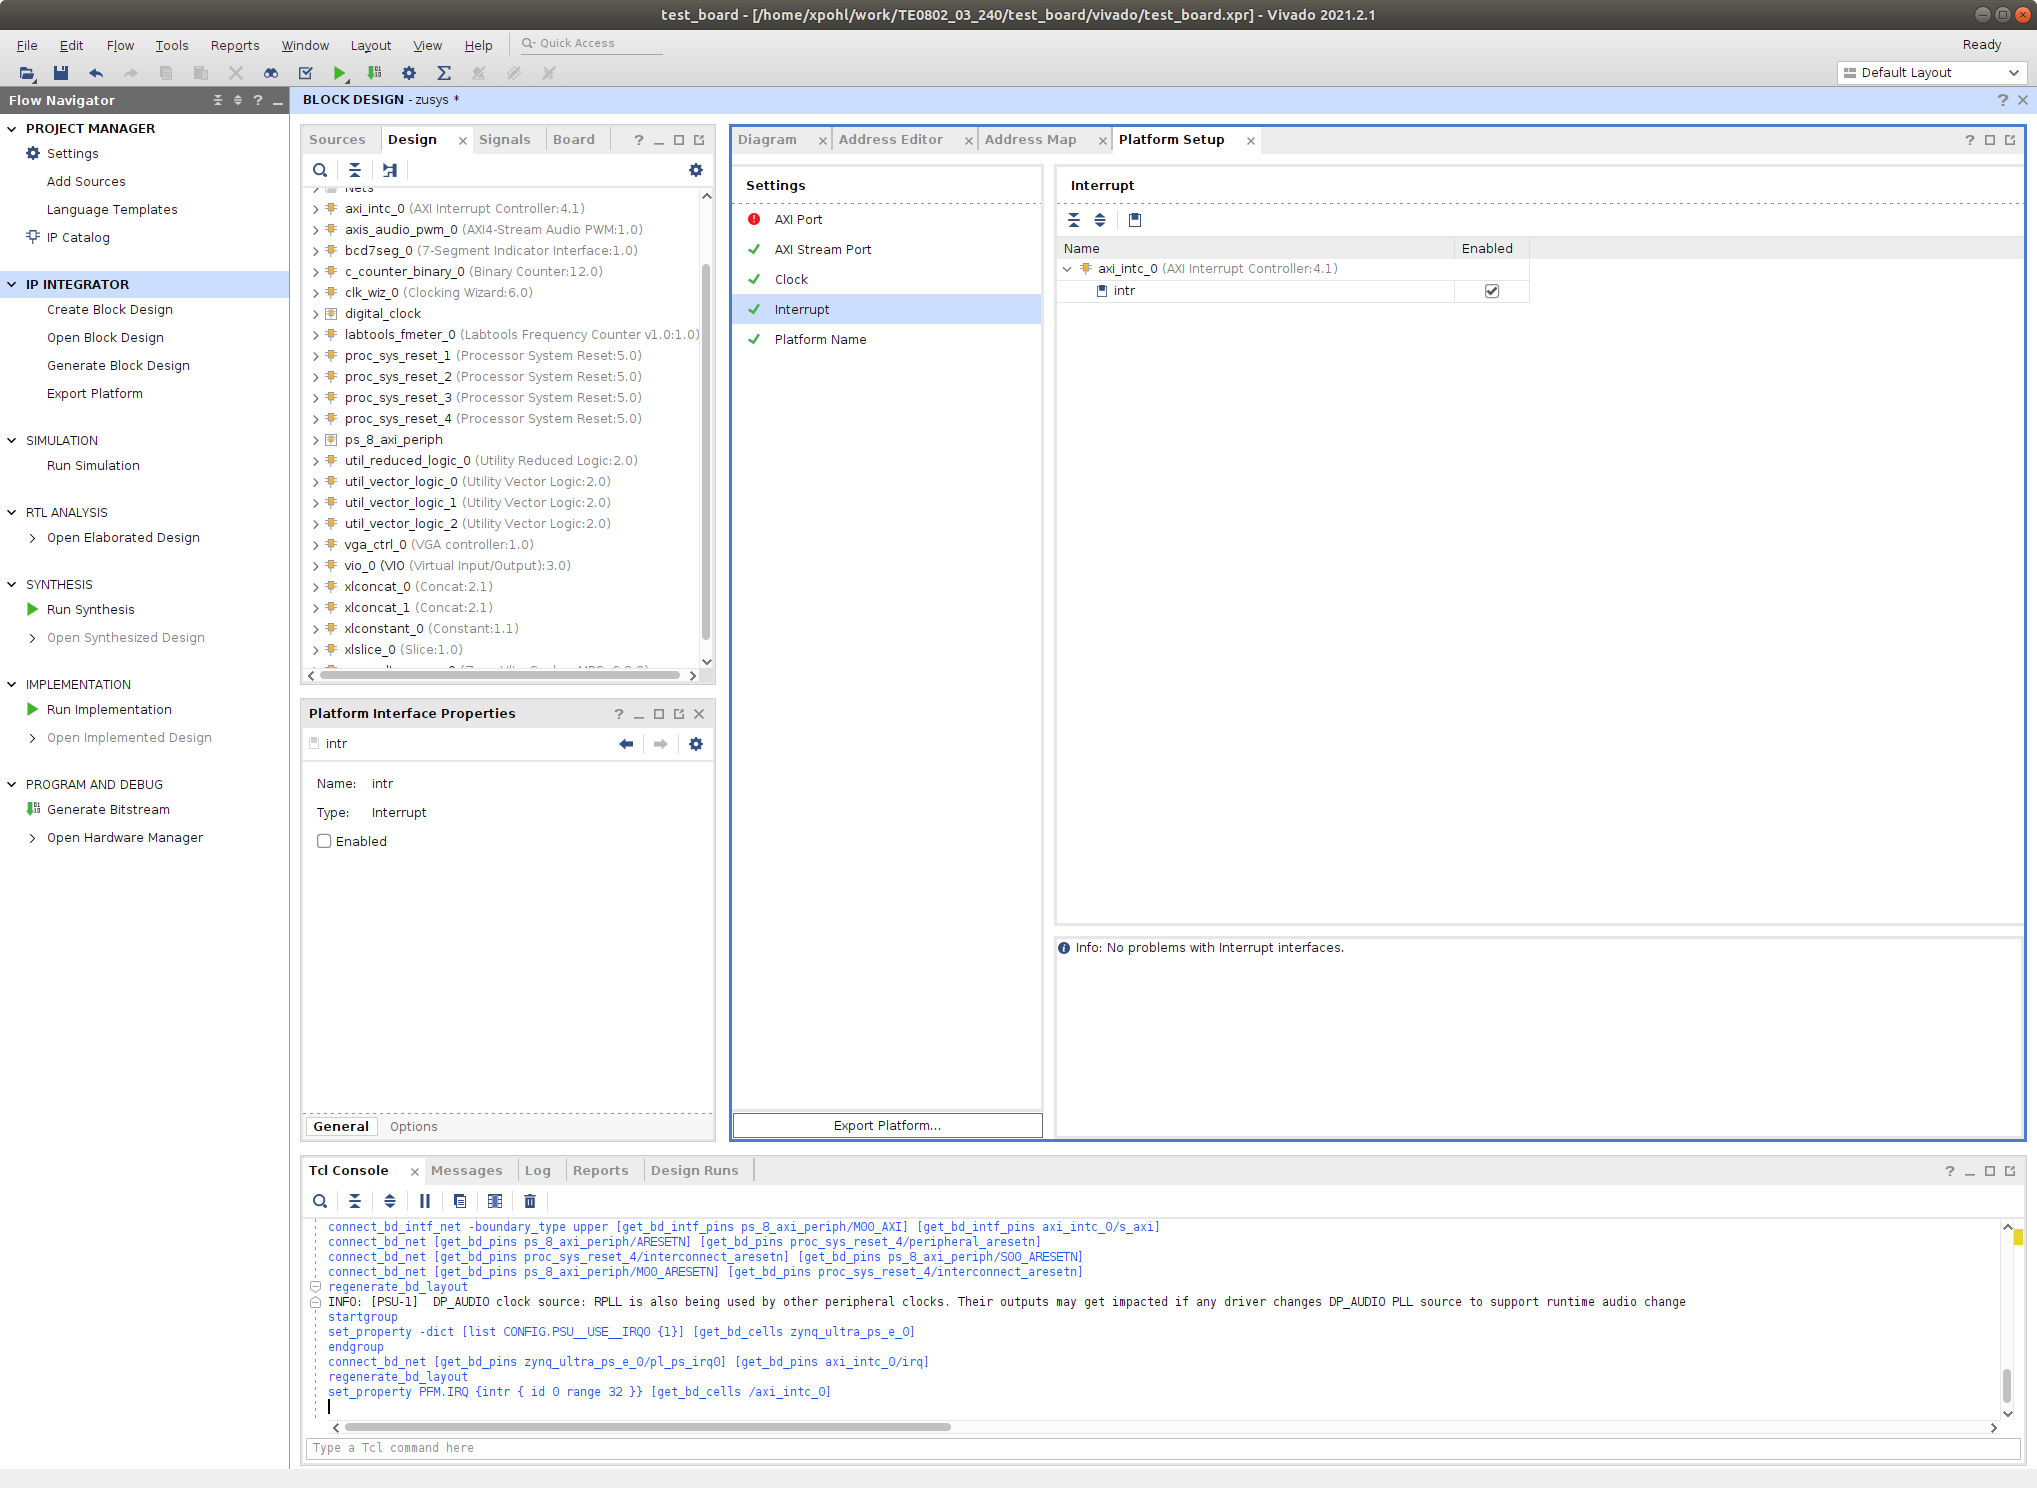 |
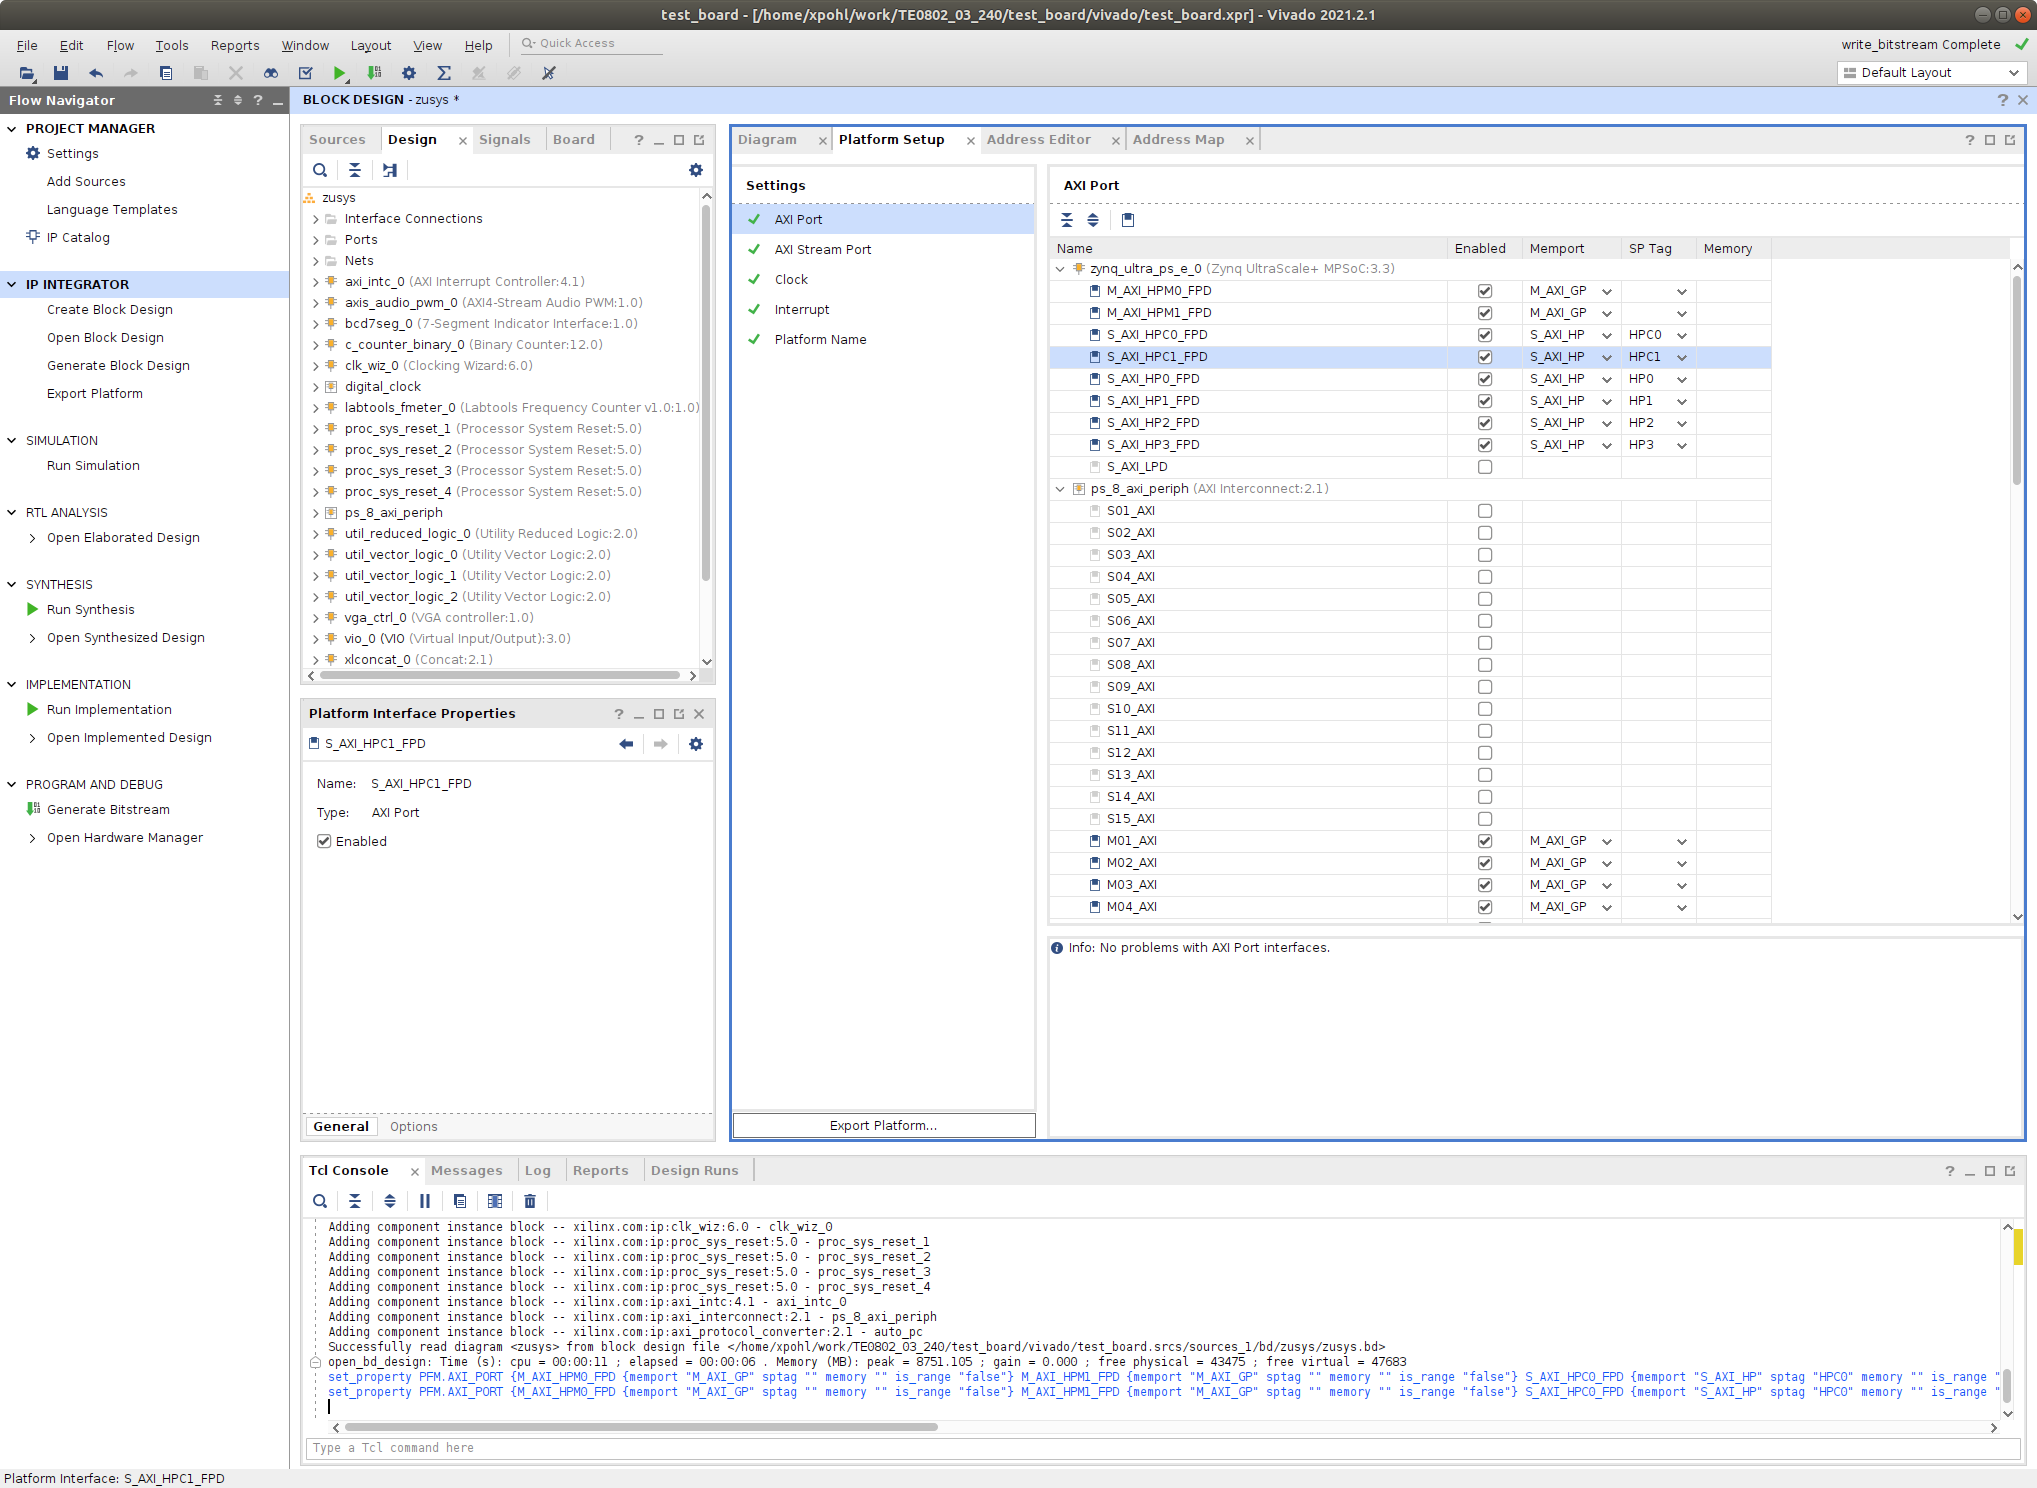
In Platform Setup, select AXI Port for zynq_ultra_ps_e_0:
Select M_AXI_HPM0_FPD and M_AXI_HPM1_FPD in column “Enabled”.
Select S_AXI_HPC0_FPD and S_AXI_HPC1_FPD in column “Enabled”.
For S_AXI_HPC0_FPD, change S_AXI_HPC to S_AXI_HP in column “Memport”.
For S_AXI_HPC1_FPD, change S_AXI_HPC to S_AXI_HP in column “Memport”.
Select S_AXI_HP0_FPD, S_AXI_HP1_FPD, S_AXI_HP2_FPD, S_AXI_HP3_FPD in column “Enabled”.
Type into the “sptag” column the names for these 6 interfaces so that they can be selected by v++ configuration during linking phase. HPC0, HPC1, HP0, HP1, HP2, HP3
| Scroll Title | ||
|---|---|---|
| ||
|
In “Platform Setup”, select AXI Ports for ps8_0_axi_periph:
Select M01_AXI, M02_AXI, M03_AXI, M04_AXI, M05_AXI, M06_AXI and M07_AXI in column “Enabled”.
| Scroll Title | ||
|---|---|---|
| ||
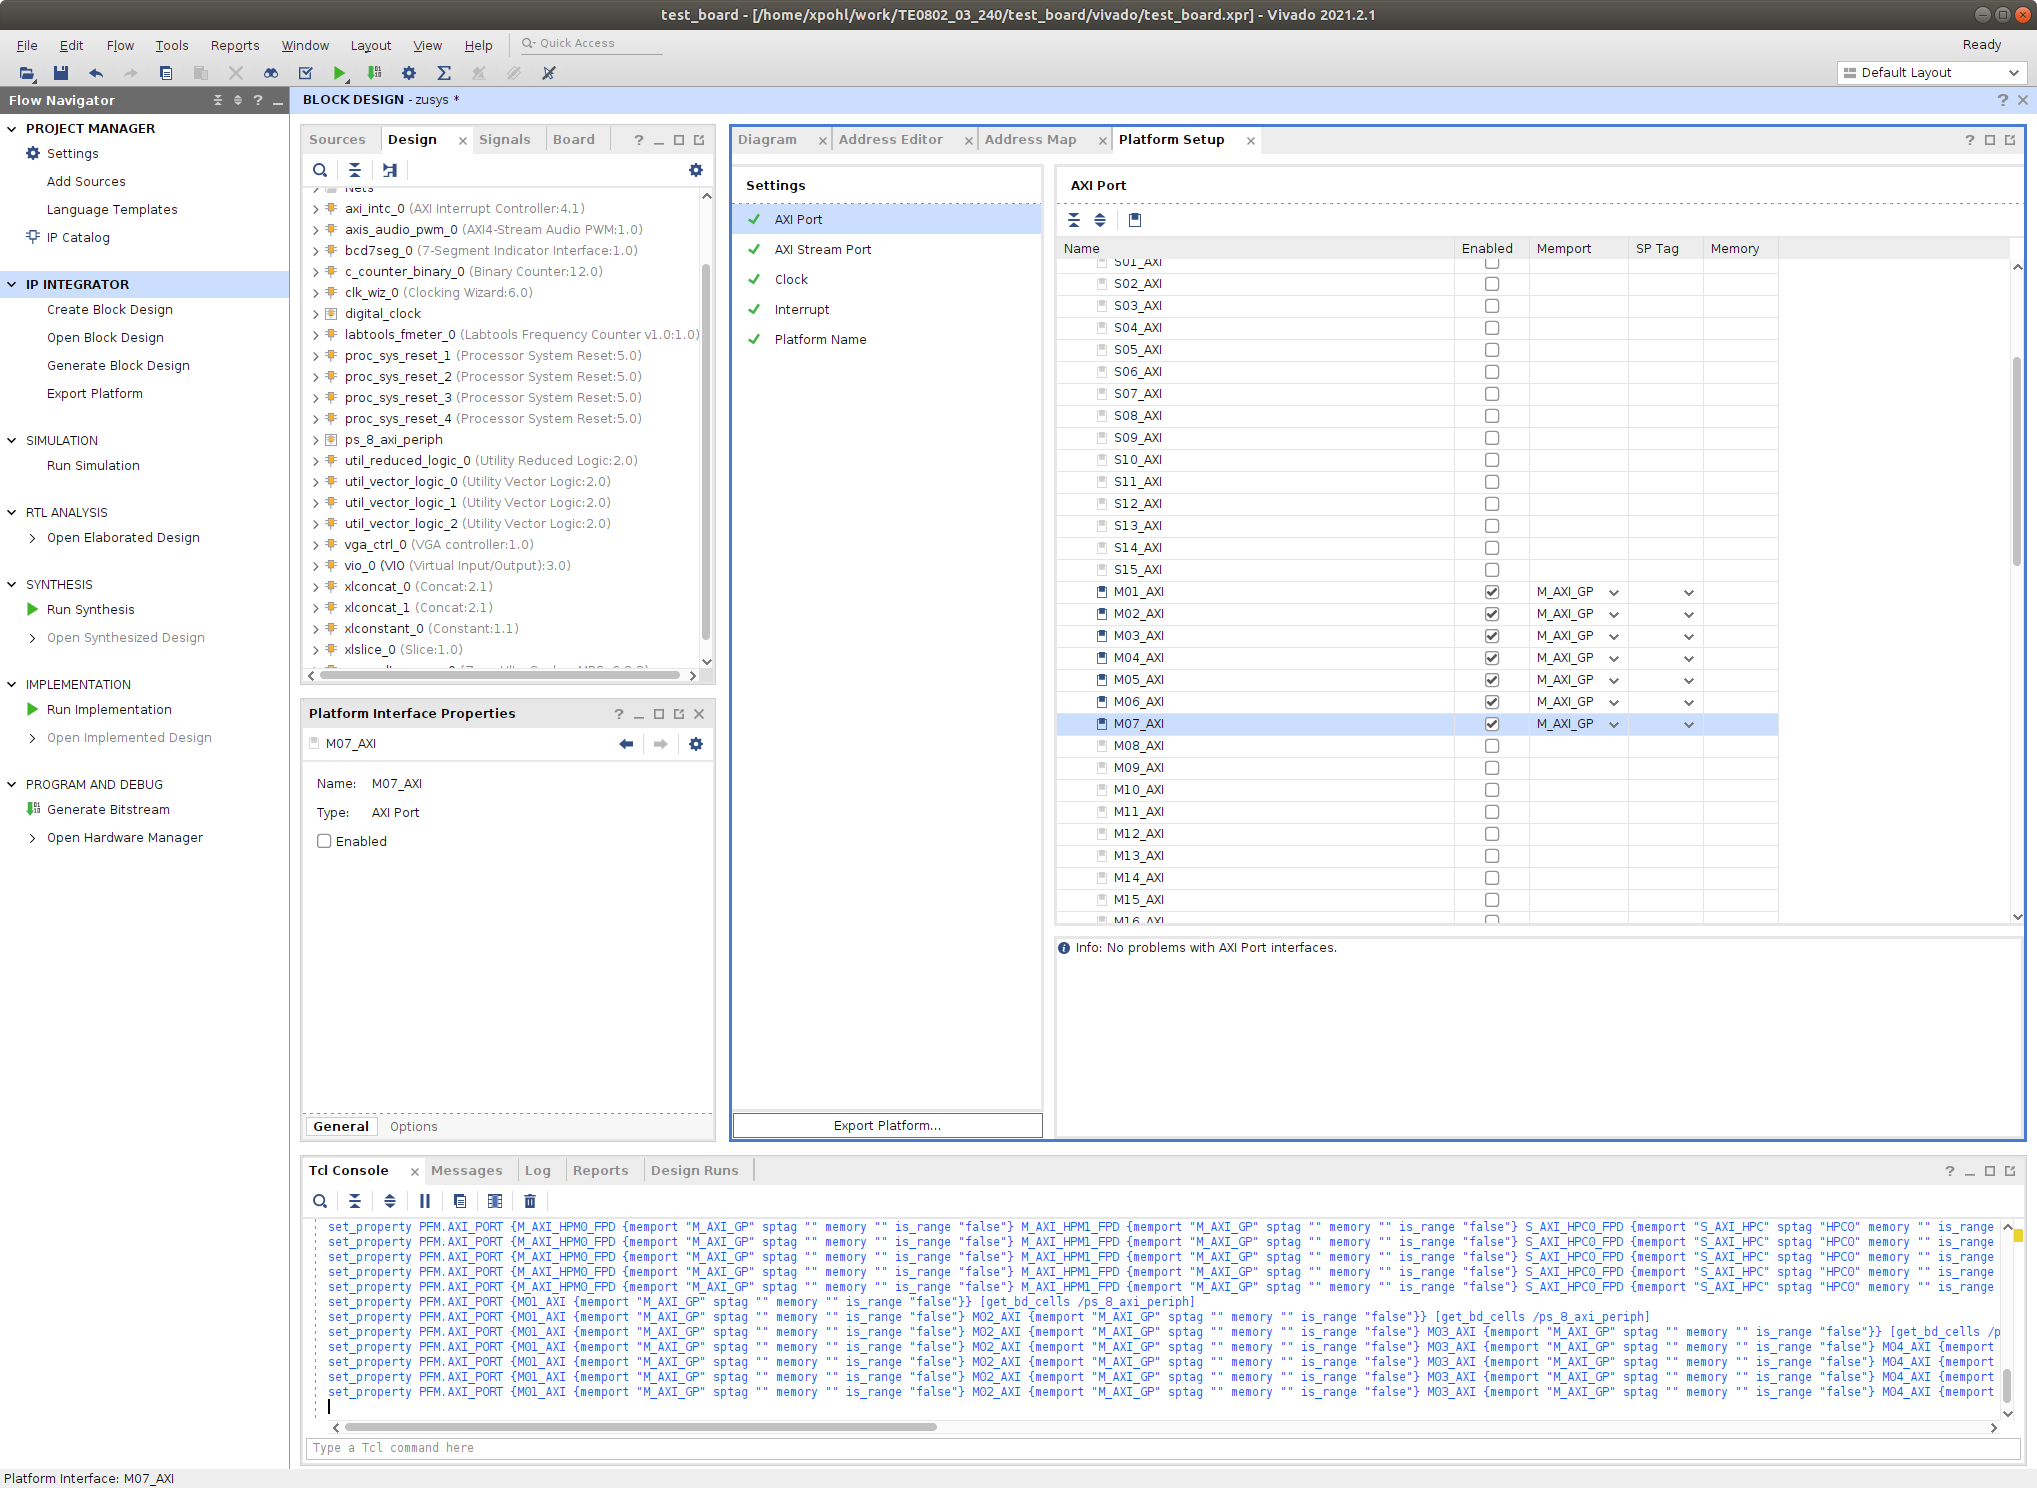 |
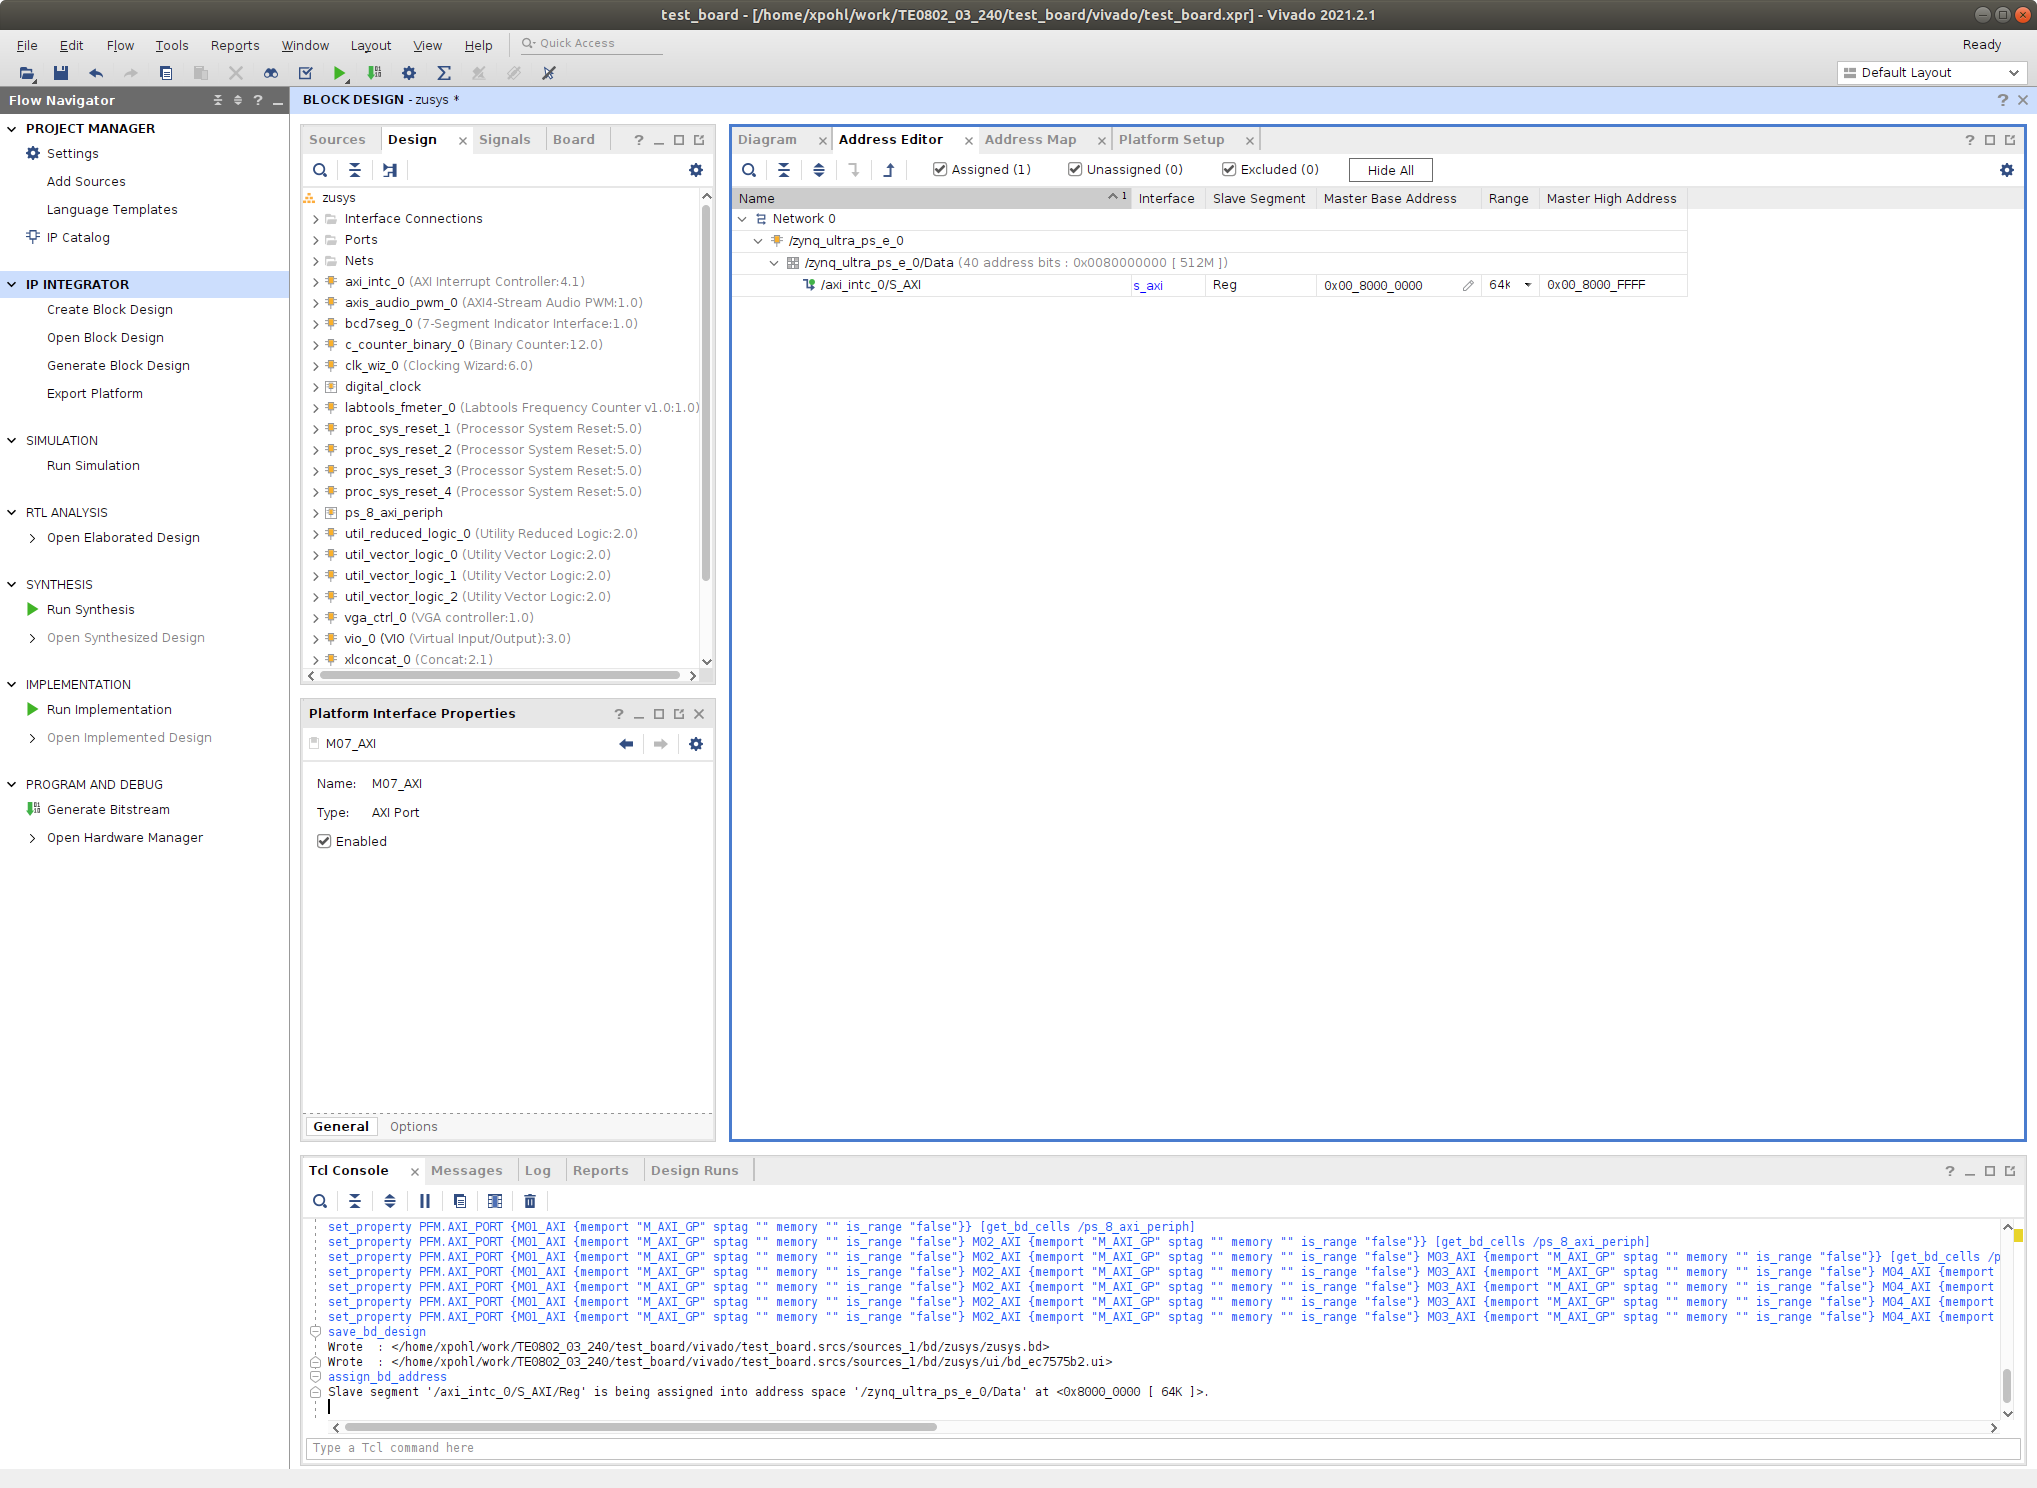
Open Address Editor tab, right-click to tab window and choose Assign All in popup menu to add address to interrupt controller.
| Scroll Title | ||
|---|---|---|
| ||
|
The modifications of the default design for the extensible platform are completed, now.
In Vivado, save block design by clicking on icon “Save Block Design”.
Continue the design path with Validate Design.
Validate Design
| Scroll Ignore | ||||||||||||||||
|---|---|---|---|---|---|---|---|---|---|---|---|---|---|---|---|---|
| ||||||||||||||||
Results of HW creation via Manual Track or Fast Track are identical.
Open diagram by clicking on zusys.bd if not already open.
In Diagram window, validate design by clicking on “Validate Design” icon.
| Scroll Title | ||
|---|---|---|
| ||
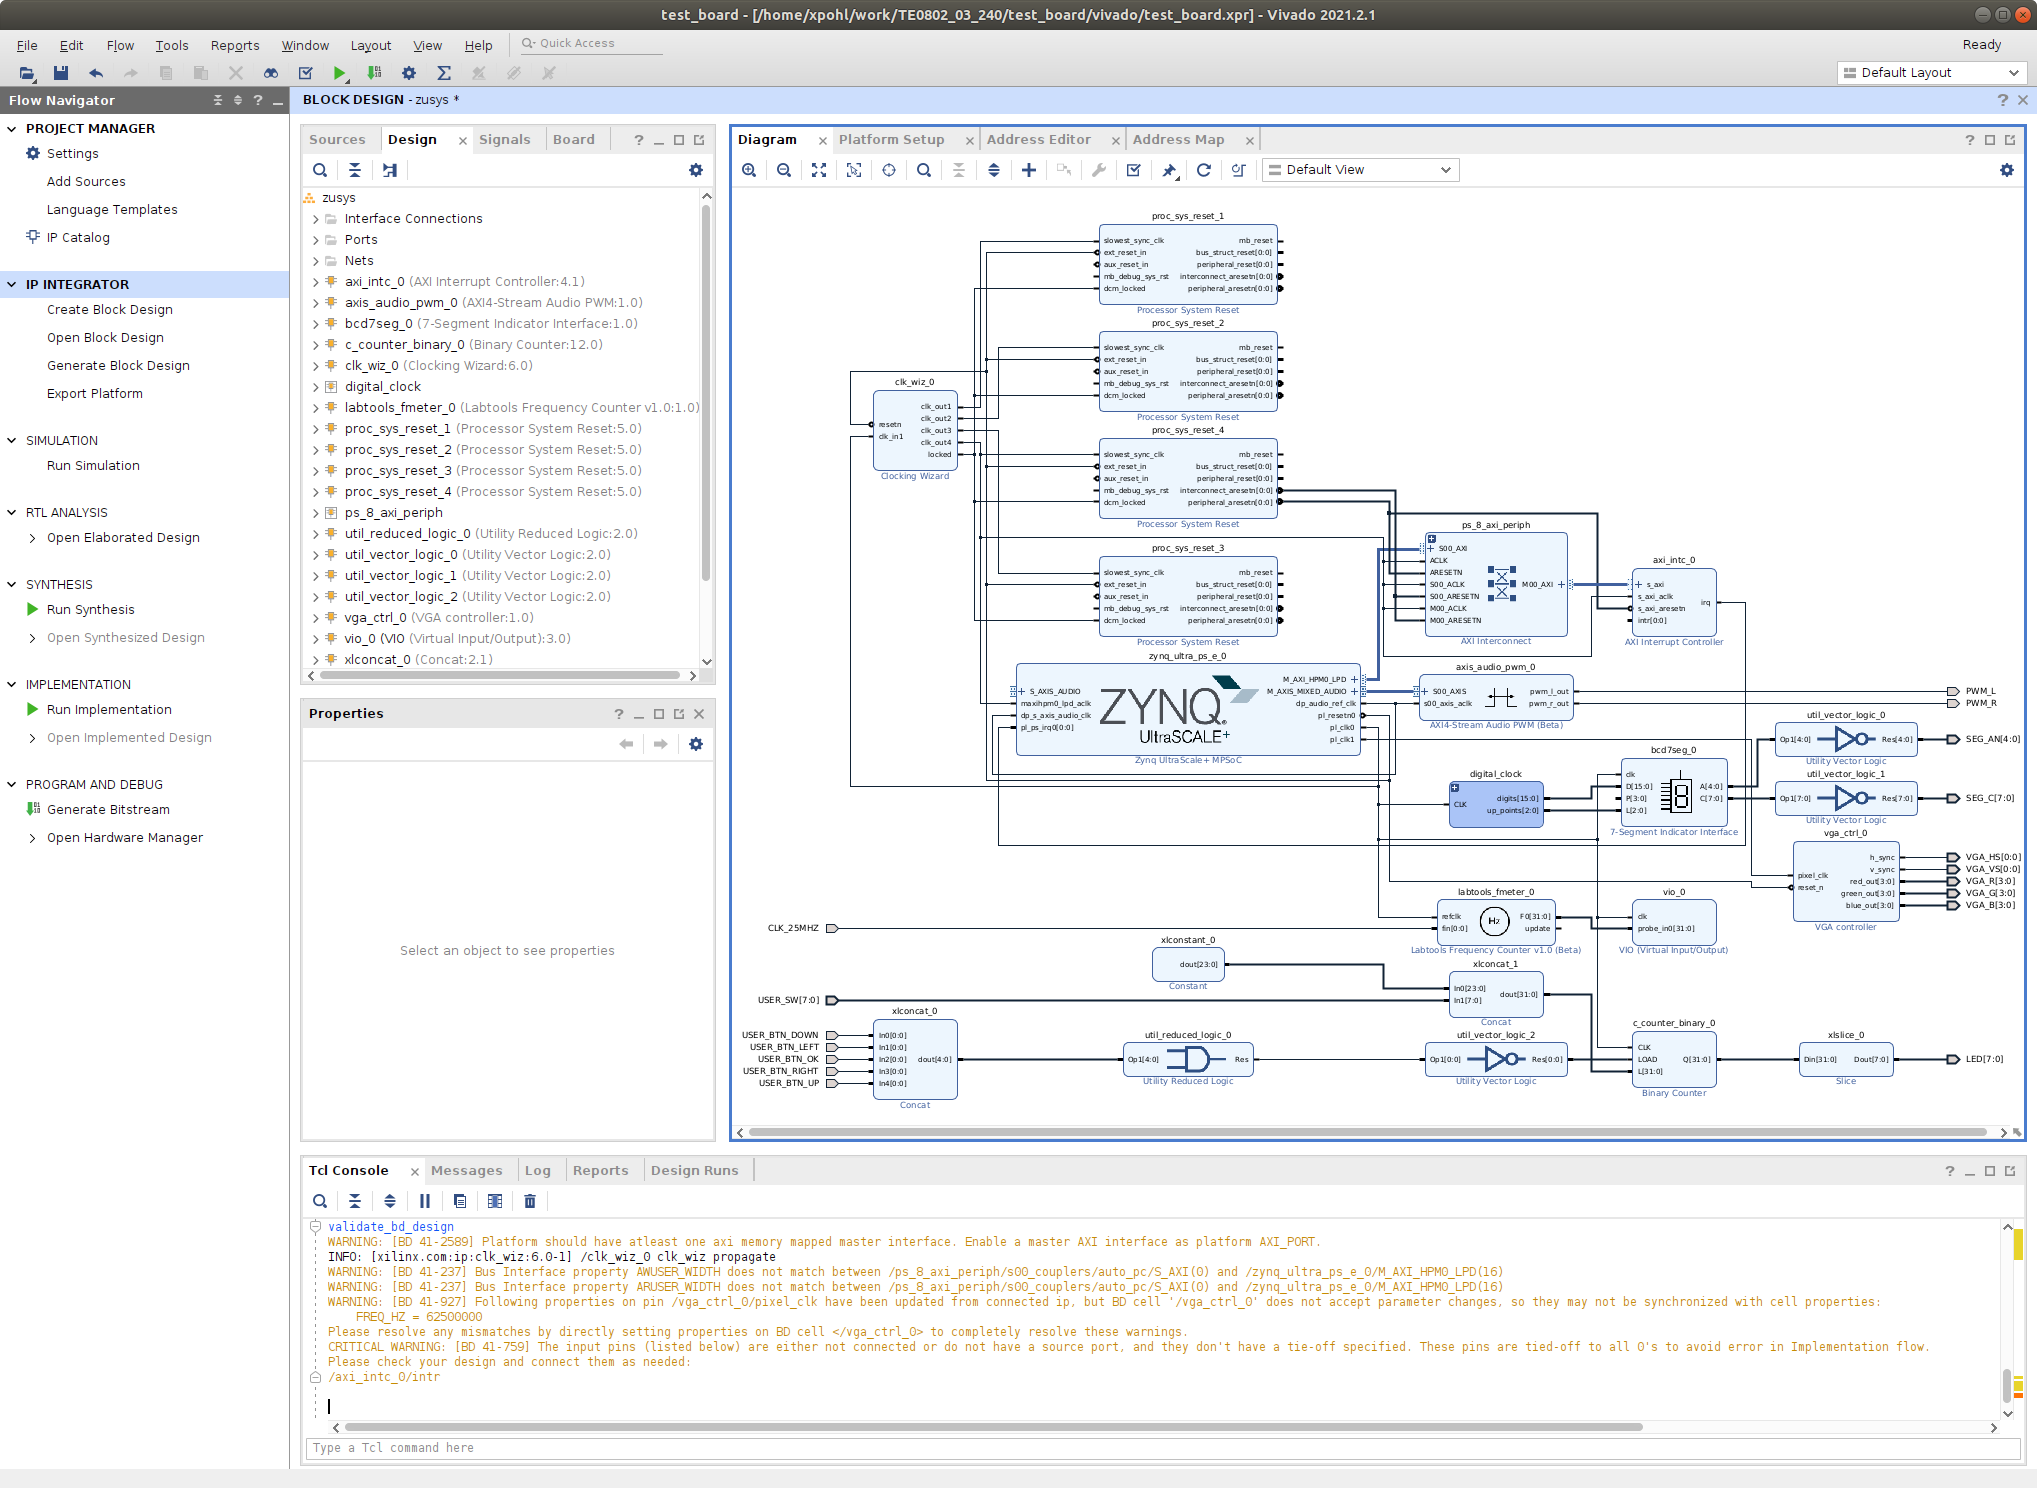  |
Received Critical Messages window indicates that input intr[0:0] of axi_intc_0 is not connected. This is expected. The Vitis extensible design flow will connect this input to interrupt outputs from generated HW IPs.
Click OK.
| Warning |
|---|
Known Issue: Sometimes an error in validation process may occur reporting create_pfm function is not known. Workaroud is to save block desing, close vivado tool and reopen again using command ./vivado_open_existing_project_guimode.sh command to correclty load platform export API. After that, validation should work. |
| Note |
|---|
| You can generate pdf of the block diagram by clicking to any place in diagram window and selecting “Save as PDF File”. Use the offered default file name: ~/work/TE0802_03_240/test_board/vivado/zusys.pdf |
Compile Created HW and Custom SW with Trenz Scripts
| Scroll Ignore | ||||||||||||||||
|---|---|---|---|---|---|---|---|---|---|---|---|---|---|---|---|---|
| ||||||||||||||||
In Vivado Tcl Console, type following script and execute it by Enter. It will take some time to compile HW. HW design and to export the corresponding standard XSA package with included bitstream.
| Code Block | ||
|---|---|---|
| ||
TE::hw_build_design -export_prebuilt |
An archive for standard non- extensible system is created:
~/work/TE0802_03_240/test_board/vivado/test_board_1cg_s1gb.xsa
In Vivado Tcl Console, type the following script and execute it by Enter. It will take some time to compile.
| Code Block | ||
|---|---|---|
| ||
TE::sw_run_vitis -all |
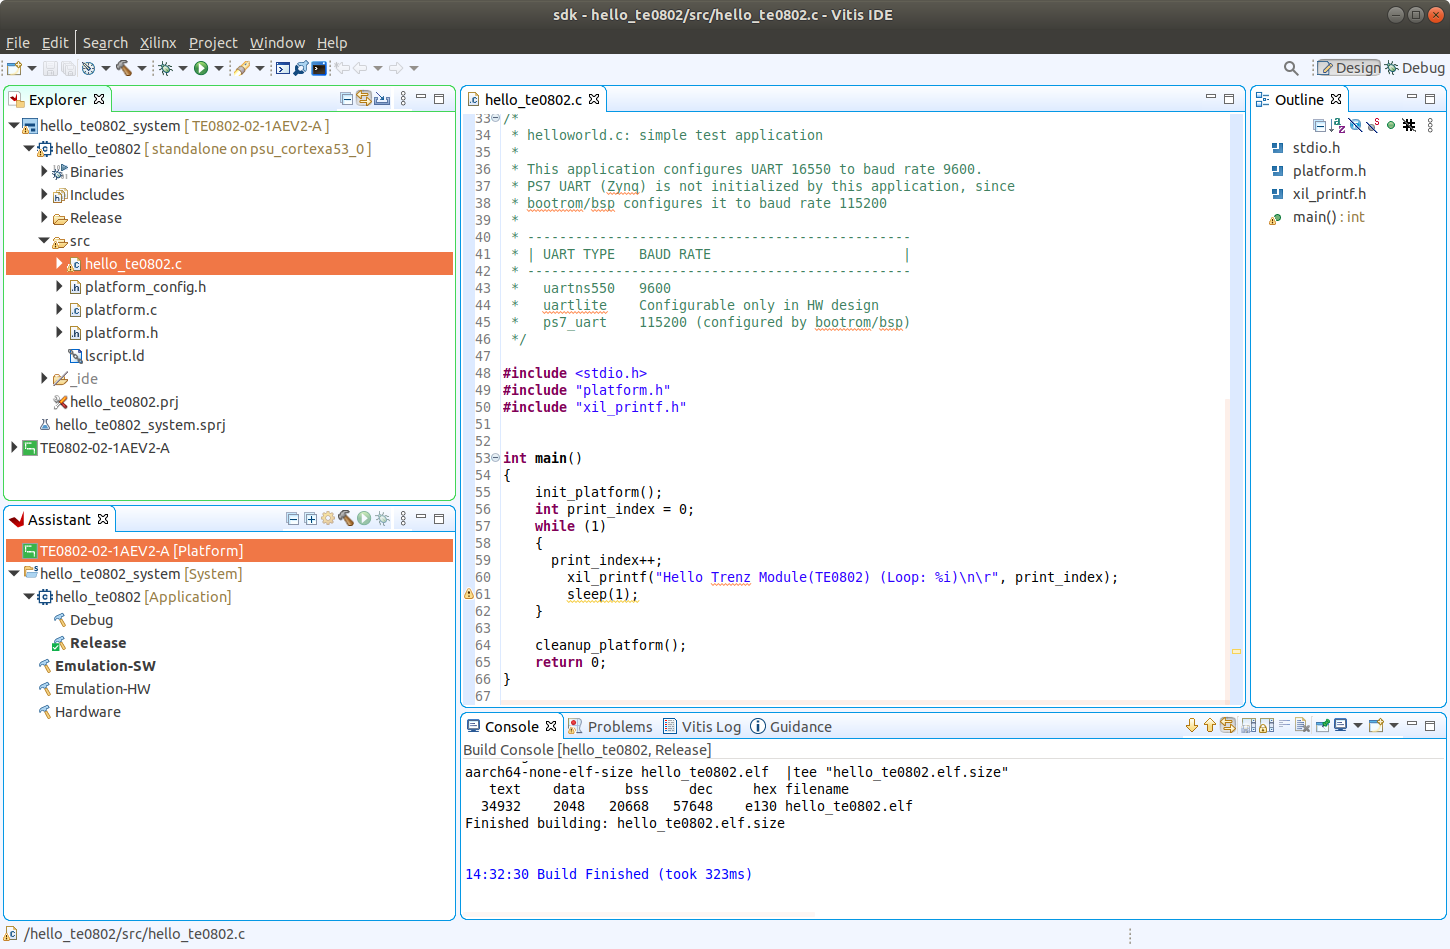
After the script controlling SW compilation is finished, the Vitis SDK GUI is opened.
Close the Vitis “Welcome” page.
Compile the two included SW projects.
Standalone custom Vitis platform TE0802-02-1AEV2-A has been created and compiled.
| Scroll Title | ||
|---|---|---|
| ||
 |
The TE0802-02-1AEV2-A Vitis platform includes Trenz Electronic custom first stage boot loader in folder zynqmp_fsbl. It includes SW extension specific for the Trenz module initialisation.
This custom zynqmp_fsbl project has been compiled into executable file fsbl.elf. It is located in: ~/work/TE0802_03_240/test_board/prebuilt/software/1cg_s1gb/fsbl.elf
This customised first stage boot loader is needed for the Vitis extensible platform.
We have used the standard Trenz scripts to generate it for next use in the extensible platform.
Exit the opened Vitis SDK project.
In Vivado top menu select File->Close Project to close project. Click OK.
In Vivado top menu select File->Exit to close Vivado. Click OK.
The exported Vitis Extensible Hardware platform named test_board_1cg_s1gb.xsa can be found in the vivado folder.
Copy Created Custom First Stage Boot Loader
| Scroll Ignore | ||||||||||||||||
|---|---|---|---|---|---|---|---|---|---|---|---|---|---|---|---|---|
| ||||||||||||||||
Up to now, StarterKit directory has been used for all development.
~/work/TE0802_03_240/test_board
Create new folders:
~/work/TE0802_03_240/test_board_pfm/pfm/boot
~/work/TE0802_03_240/test_board_pfm/pfm/sd_dir
Copy the recently created custom first stage boot loader executable file from
~/work/TE0802_03_240/test_board/prebuilt/software/1cg_s1gb/fsbl.elf
to
~/work/TE0802_03_240/test_board_pfm/pfm/boot/fsbl.elf
Building Platform OS and SDK
| Scroll Ignore | ||||||||||||||||
|---|---|---|---|---|---|---|---|---|---|---|---|---|---|---|---|---|
| ||||||||||||||||
Configuration of the Default Trenz Petalinux for the Vitis Extensible Platform
| Scroll Ignore | ||||||||||||||||
|---|---|---|---|---|---|---|---|---|---|---|---|---|---|---|---|---|
| ||||||||||||||||
Change directory to the default Trenz Petalinux folder
~/work/TE0802_03_240/test_board/os/petalinux
Source Vitis and Petalinux scripts to set environment for access to Vitis and PetaLinux tools.
| Code Block | ||
|---|---|---|
| ||
$ source /tools/Xilinx/Vitis/2021.2/settings64.sh $ source ~/petalinux/2021.2/settings.sh |
Configure petalinux with the test_board_1cg_s1gb.xsa for the extensible design flow by executing:
| Code Block | ||
|---|---|---|
| ||
$ petalinux-config --get-hw-description=~/work/TE0802_03_240/test_board/vivado |
| Scroll Title | ||
|---|---|---|
| ||
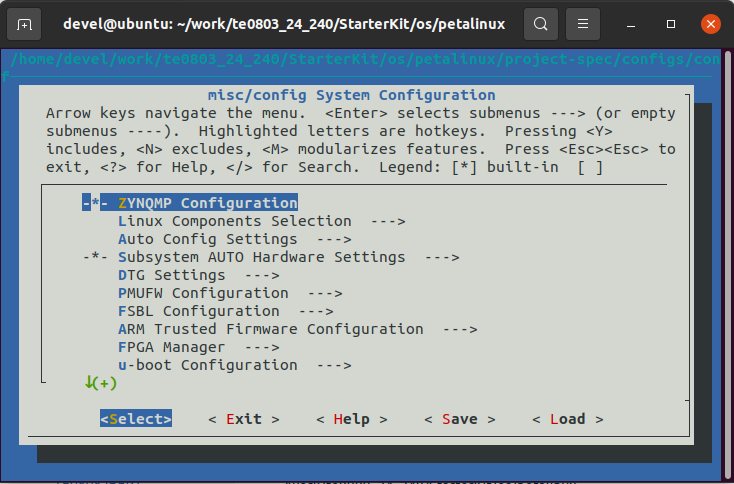 |
Select Exit->Yes to close this window.
Customize Root File System, Kernel, Device Tree and U-boot
| Scroll Ignore | ||||||||||||||||
|---|---|---|---|---|---|---|---|---|---|---|---|---|---|---|---|---|
| ||||||||||||||||
In text editor, append definition of 32 interrupts by this text:
| Code Block | ||
|---|---|---|
| ||
&amba {	zyxclmm_drm {
		compatible = "xlnx,zocl";
		status = "okay";
		reg = <0x0 0xA0000000 0x0 0x10000>;
		interrupt-parent = <&axi_intc_0>;
		interrupts = <0  4>, <1  4>, <2  4>, <3  4>,
			     <4  4>, <5  4>, <6  4>, <7  4>,
			     <8  4>, <9  4>, <10 4>, <11 4>,
			     <12 4>, <13 4>, <14 4>, <15 4>,
			     <16 4>, <17 4>, <18 4>, <19 4>,
			     <20 4>, <21 4>, <22 4>, <23 4>,
			     <24 4>, <25 4>, <26 4>, <27 4>,
			     <28 4>, <29 4>, <30 4>, <31 4>;
	};
}; |
to the system-user.dtsi file located in folder:
~/work/TE0802_03_240/test_board/os/petalinux/project-spec/meta-user/recipes-bsp/device-tree/files/
Download the Vitis-AI 2.0
repository.Repository
In browser, open page:
https://github.com/Xilinx/Vitis-AI/tree/2.0
Clik on green Code button and download Vitis-AI-2.0.zip file.
Unzip Vitis-AI-2.0.zip file to directory ~/Downloads/Vitis-AI.
Copy ~/Downloads/Vitis-AI to ~/vitis_ai_2_0
Delete Vitis-AI-2.0.zip, delete ~/Downloads/Vitis-AI, clean trash.
The directory ~/vitis_ai_2_0 contains the Vitis-AI 2.0 framework, now.To install the
Download and Install Packages with Images and Videos for Vitis-AI 2.0
Use your PC to download image and video packages:
https://www.xilinx.com/bin/public/openDownload?filename=0 version of shared libraries into rootfs (when generating system image by PetaLinux) we have to copy recepies recipes-vitis-ai to the Petalinux project :Copy
~/vitis_ai_2library_r2.0/tools/Vitis-AI-Recipes/recipes-vitis-ai
to
.0_images.tar.gz
https://www.xilinx.com/bin/public/openDownload?filename=vitis_ai_library_r2.0.0_video.tar.gz
https://www.xilinx.com/bin/public/openDownload?filename=vitis_ai_runtime_r2.0.0_image_video.tar.gz
Extract downloaded files into Vitis-AI repository. Files will be added to existing folder structure:
| Code Block | ||
|---|---|---|
| ||
$ tar xvzf vitis_ai_library_r2.0.0_images.tar.gz -C ~/vitis_ai_2_0/demo/Vitis-AI-Library/
$ tar xvzf vitis_ai_library_r2.0.0_video.tar.gz -C ~/vitis_ai_2_0/demo/Vitis-AI-Library/
$ tar xzvf vitis_ai_runtime_r2.0.0_image_video.tar.gz -C ~/vitis_ai_2_0/demo/VART/ |
To install the Vitis-AI 2.0 version of shared libraries into PetaLinux rootfs (when generating system image by PetaLinux) we have to copy recepies recipes-vitis-ai to the Petalinux project :
Copy
~/vitis_ai_2_0/tools/Vitis-AI-Recipes/recipes-vitis-ai
to
~/work/TE0802_03_240/test_board/os/petalinux/project-spec/meta-~/work/TE0802_03_240/test_board/os/petalinux/project-spec/meta-user/In text editor, append these lines:
| Code Block | ||
|---|---|---|
| ||
CONFIG_xrt CONFIG_xrt-dev CONFIG_zocl CONFIG_opencl-clhpp-dev CONFIG_opencl-headers-dev CONFIG_packagegroup-petalinux-opencv CONFIG_packagegroup-petalinux-opencv-dev CONFIG_dnf CONFIG_e2fsprogs-resize2fs CONFIG_parted CONFIG_resize-part CONFIG_packagegroup-petalinux-vitisai CONFIG_packagegroup-petalinux-self-hosted CONFIG_cmake CONFIG_packagegroup-petalinux-vitisai-dev CONFIG_mesa-megadriver CONFIG_packagegroup-petalinux-x11 CONFIG_packagegroup-petalinux-v4lutils CONFIG_packagegroup-petalinux-matchbox CONFIG_vitis-ai-library CONFIG_vitis-ai-library-dev CONFIG_vitis-ai-library-dbg CONFIG_packagegroup-core-ssh-dropbear CONFIG_imagefeature-ssh-server-dropbear CONFIG_imagefeature-ssh-server-openssh CONFIG_openssh CONFIG_openssh-sftp-server CONFIG_openssh-sshd CONFIG_openssh-scp CONFIG_imagefeature-package-management |
to the user-rootfsconfig file:
~/work/TE0802_03_240/test_board/os/petalinux/project-spec/meta-user/conf/user-rootfsconfig
xrt, xrt-dev and zocl are required for Vitis acceleration flow.
dnf is for package management.
parted, e2fsprogs-resize2fs and resize-part can be used for ext4 partition resize.
Other included packages serve for natively building Vitis AI applications on target board and for running Vitis-AI demo applications with GUI.
The viti-ai-library* packages will enable use of the Vitis-AI 2.0 recepies for installation of the correspoding Vitis-AI 2.0 libraries into rootfs of PetaLinux.
Call Petalinux configuration, from the Ubuntu terminal:
| Code Block | ||
|---|---|---|
| ||
$ petalinux-config -c rootfs |
Select all user packages.All packages will have to have an asterisk. Go throught all packages again and unselect two related to dropbear which must be turned off.
Dropbear is the default SSH tool in Vitis Base Embedded Platform. If OpenSSH is used to replace Dropbear, the system could achieve faster data transmission speed over ssh. Created Vitis extensible platform applications may use remote display feature. Using of OpenSSH can improve the display experience.
Exit rootfs configuration.
Disable CPU IDLE in Kernel Config
| Scroll Ignore | ||||||||||||||||
|---|---|---|---|---|---|---|---|---|---|---|---|---|---|---|---|---|
| ||||||||||||||||
CPU IDLE would cause processors get into IDLE state (WFI) when the processor is not in use. When JTAG is connected, the hardware server on host machine talks to the processor regularly. If it talks to a processor in IDLE status, the system will hang because of incomplete AXI transactions.
So, it is recommended to disable the CPU IDLE feature during project development phase.
It can be re-enabled after the design has completed to save power in final products.
Launch kernel config:
| Code Block | ||
|---|---|---|
| ||
$ petalinux-config -c kernel |
Ensure the following items are TURNED OFF by entering 'n' in the [ ] menu selection:
CPU Power Management->CPU Idle->CPU idle PM support
CPU Power Management->CPU Frequency scaling->CPU Frequency scaling
Exit and Yes to Save changes.
Add EXT4 rootfs Support
| Scroll Ignore | ||||||||||||||||
|---|---|---|---|---|---|---|---|---|---|---|---|---|---|---|---|---|
| ||||||||||||||||
Let PetaLinux generate EXT4 rootfs. In terminal, execute:
| Code Block | ||
|---|---|---|
| ||
$ petalinux-config |
Go to Image Packaging Configuration.
Enter into Root File System Type
Select Root File System Type EXT4
Set the “Device node” of SD device to value
/dev/mmcblk0p2
Exit and Yes to save changes.
Let Linux Use EXT4 rootfs During Boot
| Scroll Ignore | ||||||||||||||||
|---|---|---|---|---|---|---|---|---|---|---|---|---|---|---|---|---|
| ||||||||||||||||
The setting of which rootfs to use during boot is controlled by bootargs. We would change bootargs settings to allow Linux to boot from EXT4 partition.
In terminal, execute:
| Code Block | ||
|---|---|---|
| ||
$ petalinux-config |
Change DTG settings->Kernel Bootargs->generate boot args automatically to NO.
Update User Set Kernel Bootargs to:
earlycon console=ttyPS0,115200 clk_ignore_unused root=/dev/mmcblk0p2 rw rootwait cma=512M
Click OK, Exit three times and Save.
Build PetaLinux Image
| Scroll Ignore | ||||||||||||||||
|---|---|---|---|---|---|---|---|---|---|---|---|---|---|---|---|---|
| ||||||||||||||||
In terminal, build the PetaLinux project by executing:
| Code Block | ||
|---|---|---|
| ||
$ petalinux-build |
The PetaLinux image files will be generated in the directory:
~/work/TE0802_03_240/test_board/os/petalinux/images/linux
Generation of PetaLinux takes some time and requires Ethernet connection and sufficient free disk space.
Create Petalinux SDK
| Scroll Ignore | ||||||||||||||||
|---|---|---|---|---|---|---|---|---|---|---|---|---|---|---|---|---|
| ||||||||||||||||
The SDK is used by Vitis tool to cross compile applications for newly created platfom.
In terminal, execute:
| Code Block | ||
|---|---|---|
| ||
$ petalinux-build --sdk |
The generated sysroot package sdk.sh will be located in directory
~/work/TE0802_03_240/test_board/os/petalinux/images/linux
Generation of SDK package takes some time and requires sufficient free disk space.
Time needed for these two steps depends also on number of allocated processor cores.
Copy Files for Extensible Platform
| Scroll Ignore | ||||||||||||||||
|---|---|---|---|---|---|---|---|---|---|---|---|---|---|---|---|---|
| ||||||||||||||||
Copy these four files:
| Scroll Title | ||||||
|---|---|---|---|---|---|---|
| ||||||
|
Rename the copied file u-boot-dtb.elf to u-boot.elf
The directory
~/work/TE0802_03_240/test_board_pfm/pfm/boot
contains these five files:
- bl31.elf
- fsbl.elf
- pmufw.elf
- system.dtb
- u-boot.elf
Copy files:
| Scroll Title | ||||||
|---|---|---|---|---|---|---|
| ||||||
|
Copy file:
| Scroll Title | ||||||
|---|---|---|---|---|---|---|
| ||||||
|
| Note | |||||
|---|---|---|---|---|---|
init.sh is an place-holder for user defined bash code to be executed after the boot:
|
Create Extensible Platform zip File
| Scroll Ignore | ||||||||||||||||
|---|---|---|---|---|---|---|---|---|---|---|---|---|---|---|---|---|
| ||||||||||||||||
Create new directory tree:
~/work/TE0802_03_240_move/test_board/os/petalinux/images/linux
~/work/TE0802_03_240_move/test_board/Vivado
~/work/TE0802_03_240_move/test_board_pfm/pfm/boot ~/work/TE0802_03_240_move/test_board_pfm/pfm/sd_dir
Copy all files from the directory:
| Scroll Title | |||||||||||||||
|---|---|---|---|---|---|---|---|---|---|---|---|---|---|---|---|
| |||||||||||||||
|
Zip the directory
~/work/TE0802_03_240_move
into ZIP archive:
~/work/TE0802_03_240_move.zip
The archive TE0802_03_240_move.zip can be used to create extensible platform on the same or on an another PC with installed Ubuntu 20.04 and Vitis tools, with or without installed Petalinux. The archive includes all needed components, including the Xilinx xrt library and the script sdk.sh serving for generation of the sysroot .
The archive has size approximately 3.6 GB and it is valid only for the initially selected module (03).
This is the TE0802-02-1AEV2-A HW board with xczu1cg-sbva484-1-e device with 1 GB memory.
The extensible Vitis platform will have the default clock 240 MHz.
Move the TE0802_03_240_move.zip file to an PC disk drive.
Delete temporary folder and archive:
~/work/TE0802_03_240_move
~/work/TE0802_03_240_move.zip
Clean the Ubuntu Trash.
Generation of SYSROOT
| Scroll Ignore | ||||||||||||||||
|---|---|---|---|---|---|---|---|---|---|---|---|---|---|---|---|---|
| ||||||||||||||||
This part of development can be direct continuation of the previous Petalinux configuration and compilation steps.
| Note |
|---|
| Alternatively, it is also possible to implement all next steps on an Ubuntu 20.04 without installed PetaLinux Only the Ubuntu 20.04 and Vitis/Vivado installation is needed. All required files created in the PetaLinux for the specific module (03) are present in the archive: TE0802_03_240_move.zip In this case, unzip the archive to the directory: ~/work/TE0802_03_240_move and copy all content of directories to ~/work/TE0802_03_240 Delete the TE0802_03_240_move.zip file and the ~/work/TE0802_03_240_move directory to save filesystem space. |
In Ubuntu terminal, change the working directory to:
~/work/TE0802_03_240/test_board/os/petalinux/images/linux
In Ubuntu terminal, execute script enabling access to Vitis 2021 tools.
Execution of script serving for setting up PetaLinux environment is not necessary:
| Code Block | ||
|---|---|---|
| ||
$ source /tools/Xilinx/Vitis/2021.2/settings64.sh |
In Ubuntu terminal, execute script
| Code Block | ||
|---|---|---|
| ||
$ ./sdk.sh -d ~/work/TE0802_03_240/test_board_pfm |
SYSROOT directories and files for PC and for Zynq Ultrascale+ will be created in:
~/work/TE0802_03_240/test_board_pfm/sysroots/x86_64-petalinux-linux
~/work/TE0802_03_240/test_board_pfm/sysroots/cortexa72-cortexa53-xilinx-linux
Once created, do not move these sysroot directories (due to some internally created paths).
Generation of Extensible Platform for Vitis
| Scroll Ignore | ||||||||||||||||
|---|---|---|---|---|---|---|---|---|---|---|---|---|---|---|---|---|
| ||||||||||||||||
In Ubuntu terminal, change the working directory to:
~/work/TE0802_03_240/test_board_pfm
Start the Vitis tool by executing
| Code Block | ||
|---|---|---|
| ||
$ vitis & |
In Vitis “Launcher”, set the workspace for the extensible platform compilation:
~/work/TE0802_03_240/test_board_pfm
Click on “Launch” to launch Vitis
Close Welcome page.
In Vitis, select in the main menu: File -> New -> Platform Project
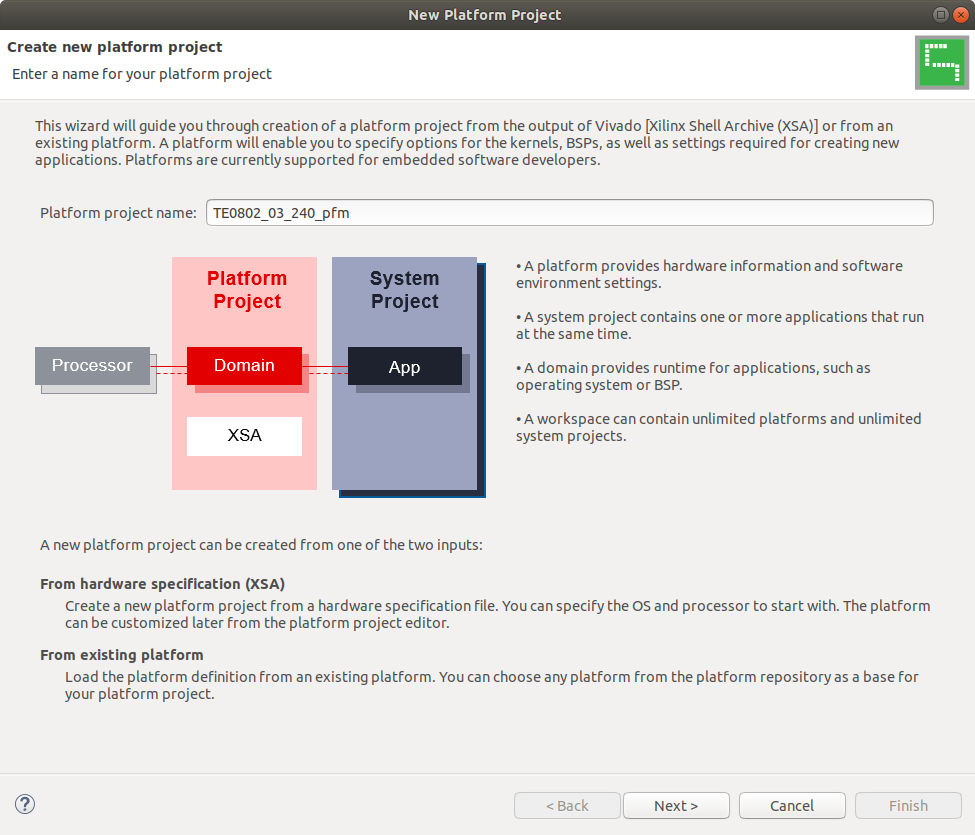
Type name of the extensible platform: TE0802_03_240_pfm. Click Next.
| Scroll Title | ||
|---|---|---|
| ||
 |
Choose for hardware specification for the platform file:
~/work/TE0802_03_240/test_board/vivado/test_board_1cg_s1gb.xsa
In “Software specification” select Operating system: linux
In “Boot Components” unselect Generate boot components
(these components have been already generated by Vivado and PetaLinux design flow)
New window TE0802_03_240_pfm is opened.
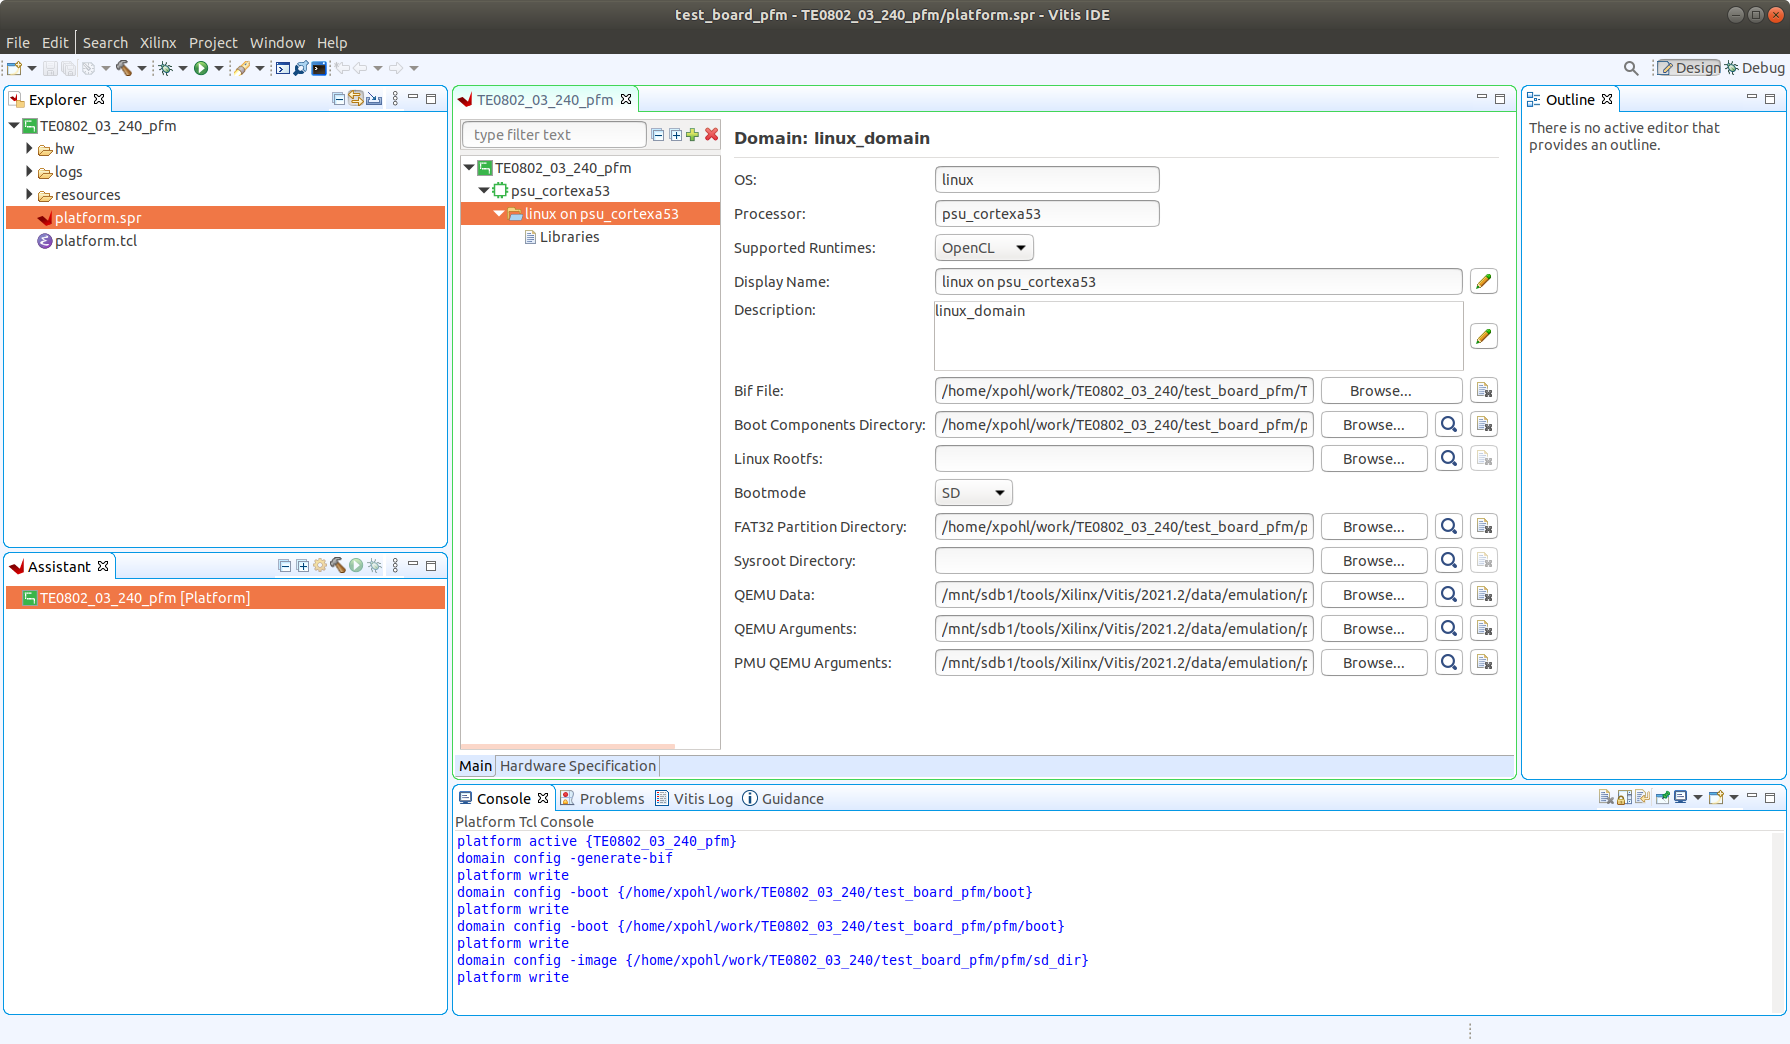
Click on linux on psu_cortex53 to open window Domain: linux_domain
In “Description”: write xrt
In “Bif File” find and select the pre-defied option: Generate Bif
In “Boot Components Directory” select:
~/work/TE0802_03_240/test_board_pfm/pfm/boot
In “FAT32 Partition Directory” select:
~/work/TE0802_03_240/test_board_pfm/pfm/sd_dir
| Scroll Title | ||
|---|---|---|
| ||
 |
In Vitis IDE “Explorer” section, click on TE0802_03_240_pfm to highlight it.
Right-click on the highlighted TE0802_03_240_pfm and select build project in the open submenu. Platform is compiled in few seconds.
Close the Vitis tool by selection: File -> Exit.
| Scroll Title | ||
|---|---|---|
| ||
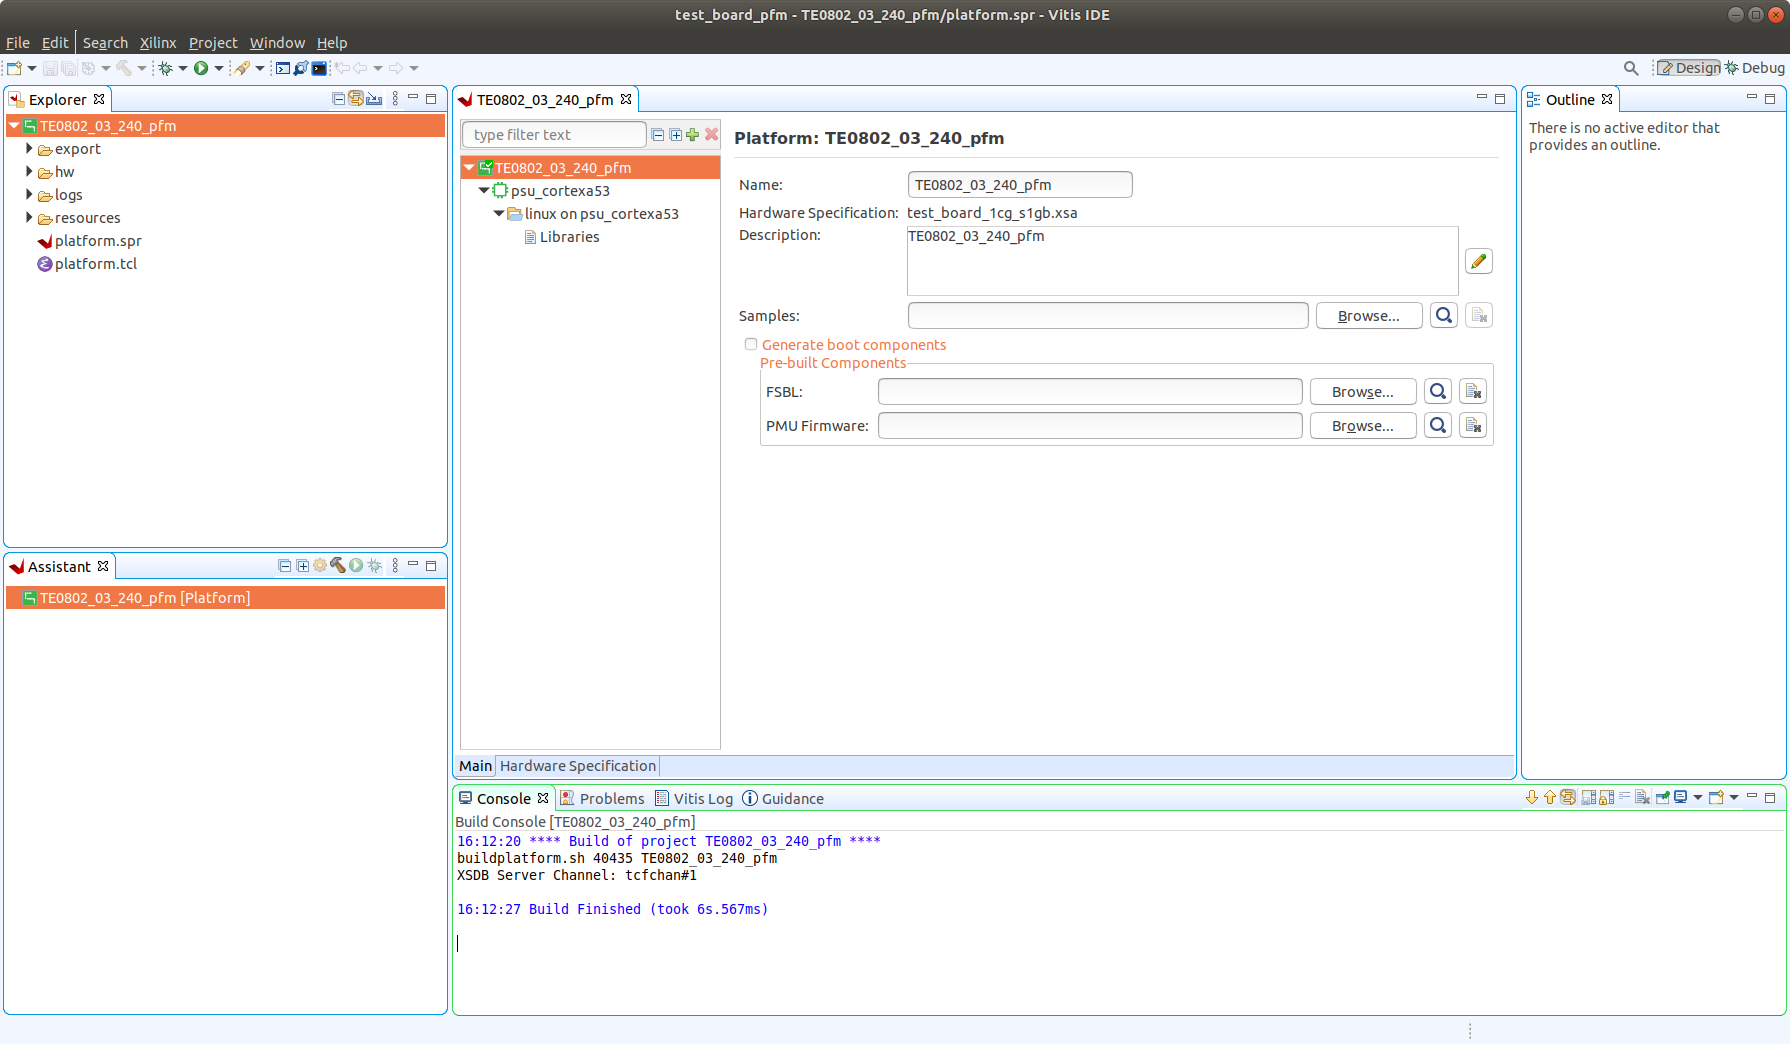 |
Vits extensible platform TE0802_03_240_pfm has been created in the directory:
~/work/TE0802_03_240/test_board_pfm/TE0802_03_240_pfm/export/TE0802_03_240_pfm
Platform Usage
| Scroll Ignore | ||||||||||||||||
|---|---|---|---|---|---|---|---|---|---|---|---|---|---|---|---|---|
| ||||||||||||||||
Test 1: Read Platform Info
| Scroll Ignore | ||||||||||||||||
|---|---|---|---|---|---|---|---|---|---|---|---|---|---|---|---|---|
| ||||||||||||||||
With Vitis environment setup, platforminfo tool can report XPFM platform information.
| Code Block | ||
|---|---|---|
| ||
platforminfo ~/work/TE0802_03_240/test_board_pfm/TE0802_03_240_pfm/export/TE0802_03_240_pfm/TE0802_03_240_pfm.xpfm |
| Code Block | ||||
|---|---|---|---|---|
| ||||
==========================
Basic Platform Information
==========================
Platform:           TE0802_03_240_pfm
File:               /home/xpohl/work/TE0802_03_240/test_board_pfm/TE0802_03_240_pfm/export/TE0802_03_240_pfm/TE0802_03_240_pfm.xpfm
Description:
TE0802_03_240_pfm


=====================================
Hardware Platform (Shell) Information
=====================================
Vendor:                           vendor
Board:                            zusys
Name:                             zusys
Version:                          1.0
Generated Version:                2021.2.1
Hardware:                         1
Software Emulation:               1
Hardware Emulation:               1
Hardware Emulation Platform:      0
FPGA Family:                      zynquplus
FPGA Device:                      xczu1cg
Board Vendor:                     trenz.biz
Board Name:                       trenz.biz:te0802_1cg_1e:1.0
Board Part:                       xczu1cg-sbva484-1-e

=================
Clock Information
=================
  Default Clock Index: 4
  Clock Index:         1
    Frequency:         100.000000
  Clock Index:         2
    Frequency:         200.000000
  Clock Index:         3
    Frequency:         400.000000
  Clock Index:         4
    Frequency:         240.000000

==================
Memory Information
==================
  Bus SP Tag: HP0
  Bus SP Tag: HP1
  Bus SP Tag: HP2
  Bus SP Tag: HP3
  Bus SP Tag: HPC0
  Bus SP Tag: HPC1

=============================
Software Platform Information
=============================
Number of Runtimes:            1
Default System Configuration:  TE0802_03_240_pfm
System Configurations:
  System Config Name:                      TE0802_03_240_pfm
  System Config Description:               TE0802_03_240_pfm
  System Config Default Processor Group:   linux_domain
  System Config Default Boot Image:        standard
  System Config Is QEMU Supported:         1
  System Config Processor Groups:
    Processor Group Name:      linux on psu_cortexa53
    Processor Group CPU Type:  cortex-a53
    Processor Group OS Name:   linux
  System Config Boot Images:
    Boot Image Name:           standard
    Boot Image Type:
    Boot Image BIF:            TE0802_03_240_pfm/boot/linux.bif
    Boot Image Data:           TE0802_03_240_pfm/linux_domain/image
    Boot Image Boot Mode:      sd
    Boot Image RootFileSystem:
    Boot Image Mount Path:     /mnt
    Boot Image Read Me:        TE0802_03_240_pfm/boot/generic.readme
    Boot Image QEMU Args:      TE0802_03_240_pfm/qemu/pmu_args.txt:TE0802_03_240_pfm/qemu/qemu_args.txt
    Boot Image QEMU Boot:
    Boot Image QEMU Dev Tree:
Supported Runtimes:
Runtime: OpenCL |
Test 2: Run Vector Addition Example
| Scroll Ignore | ||||||||||||||||
|---|---|---|---|---|---|---|---|---|---|---|---|---|---|---|---|---|
| ||||||||||||||||
Create new directory test_board_test_vadd to test Vitis extendable flow example “vector addition”
~/work/TE0802_03_240/test_board_test_vadd
Current directory structure:
~/work/TE0802_03_240/test_board
~/work/TE0802_03_240/test_board_pfm
~/work/TE0802_03_240/test_board_test_vadd
Change working directory:
| Code Block | ||
|---|---|---|
| ||
$cd ~/work/TE0802_03_240/test_board_test_vadd |
In Ubuntu terminal, start Vitis by:
| Code Block | ||
|---|---|---|
| ||
$ vitis & |
In Vitis IDE Launcher, select your working directory
~/work/TE0802_03_240/test_board_test_vadd
Click on Launch to launch Vitis.
Select File -> New -> Application project. Click Next.
Skip welcome page if shown.
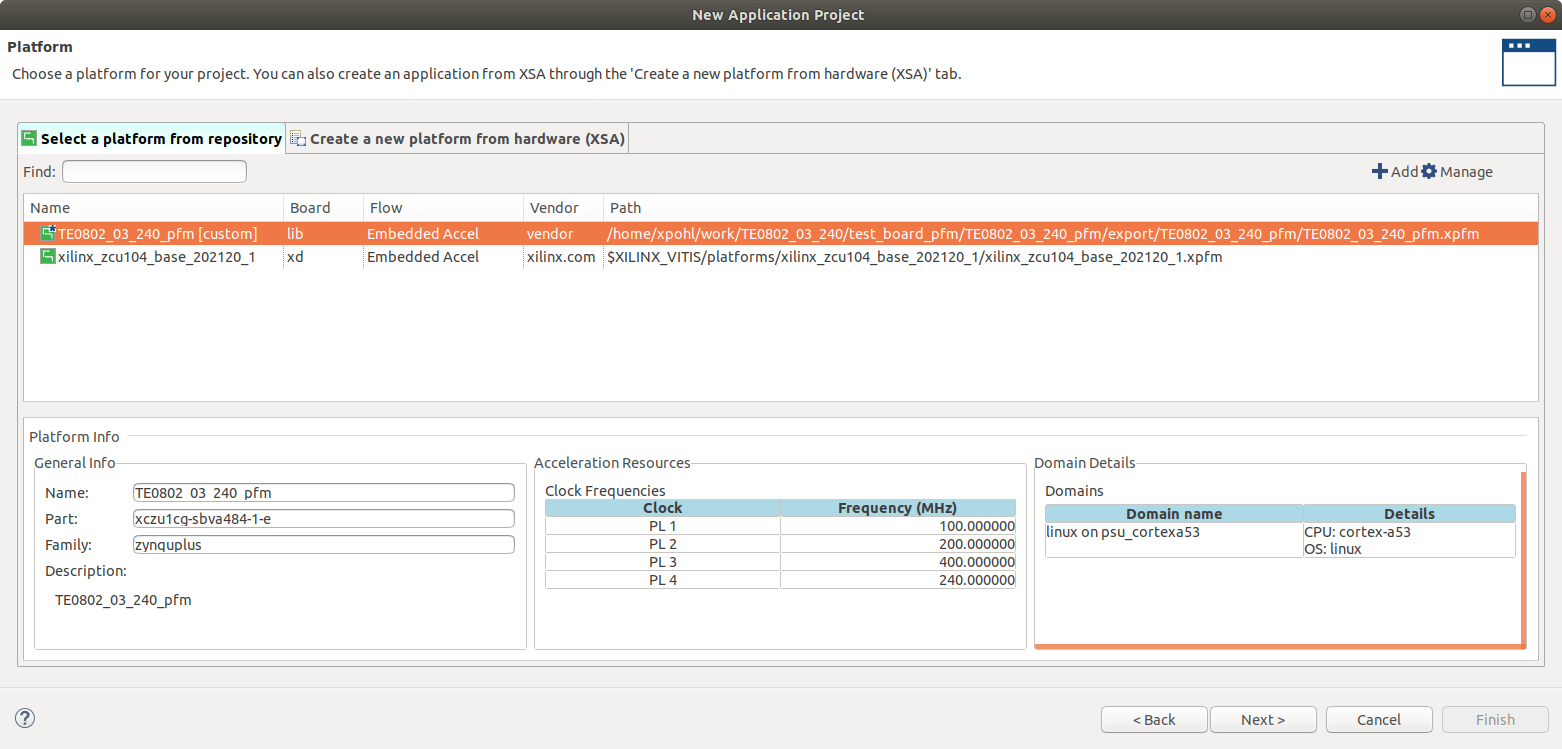
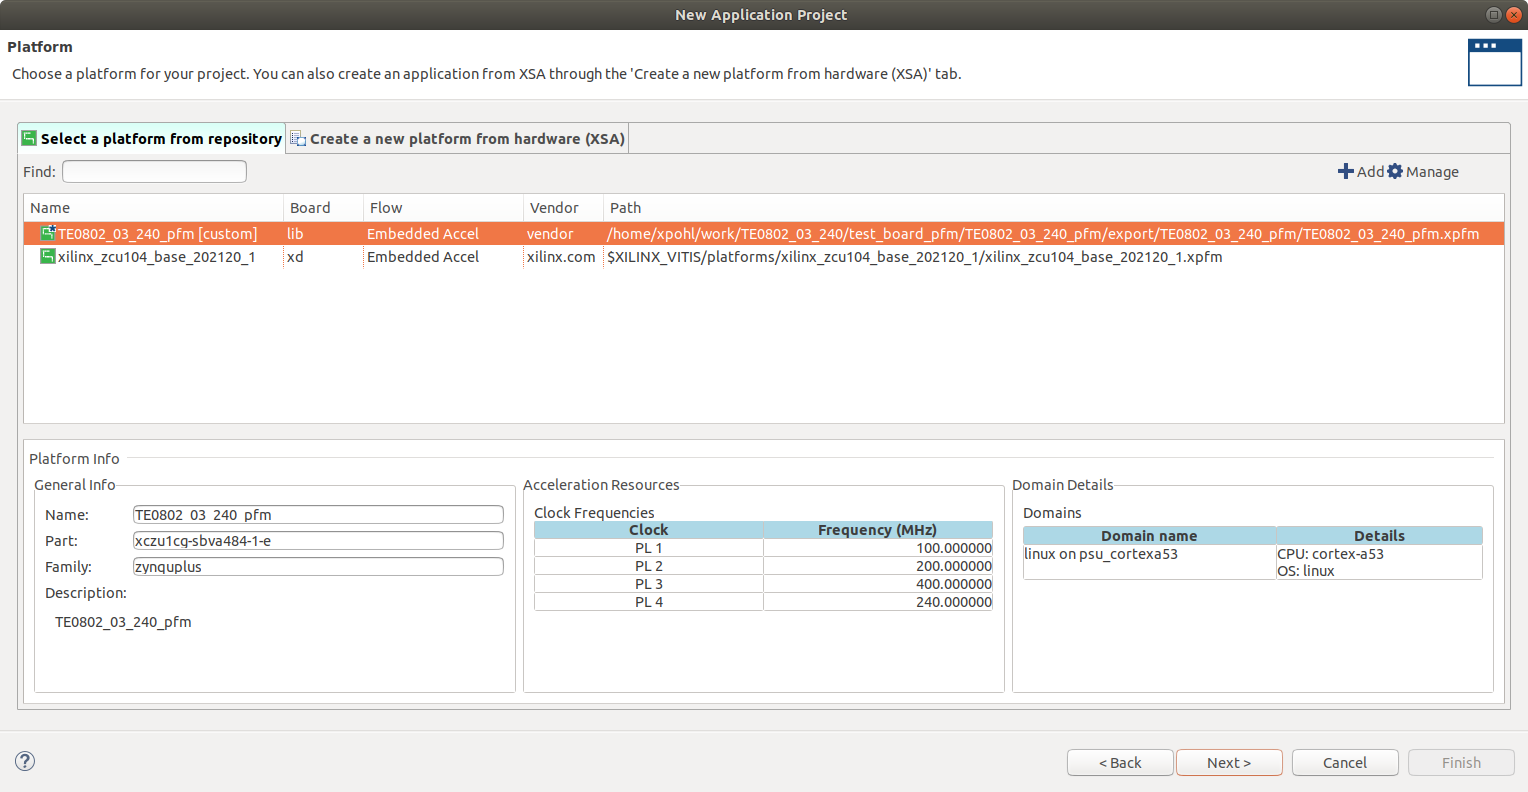
Click on “+ Add” icon and select the custom extensible platform TE0802_03_240_pfm[custom] in the directory:
~/work/TE0802_03_240/test_board_pfm/TE0802_03_240_pfm/export/TE0802_03_240_pfm
We can see available PL clocks and frequencies.
| Note |
|---|
| PL4 with 240 MHz clock is has been set as default in the platform creation process. |
| Scroll Title | ||
|---|---|---|
| ||
 |
Click Next.
In “Application Project Details” window type into Application project name: test_vadd
Click Next.
In “Domain window” type (or select by browse):
“Sysroot path”:
~/work/TE0802_03_240/test_board_pfm/sysroots/cortexa72-cortexa53-xilinx-linux
“Root FS”:
~/work/TE0802_03_240/test_board/os/petalinux/images/linux/rootfs.ext4
“Kernel Image”:
~/work/TE0802_03_240/test_board/os/petalinux/images/linux/Image
Click Next.
In “Templates window”, if not done before, update “Vitis IDE Examples” and “Vitis IDE Libraries”.
Select Host Examples
In “Find”, type: “vector add” to search for the “Vector Addition” example.
Select: “Vector Addition”
Click Finish
New project template is created.
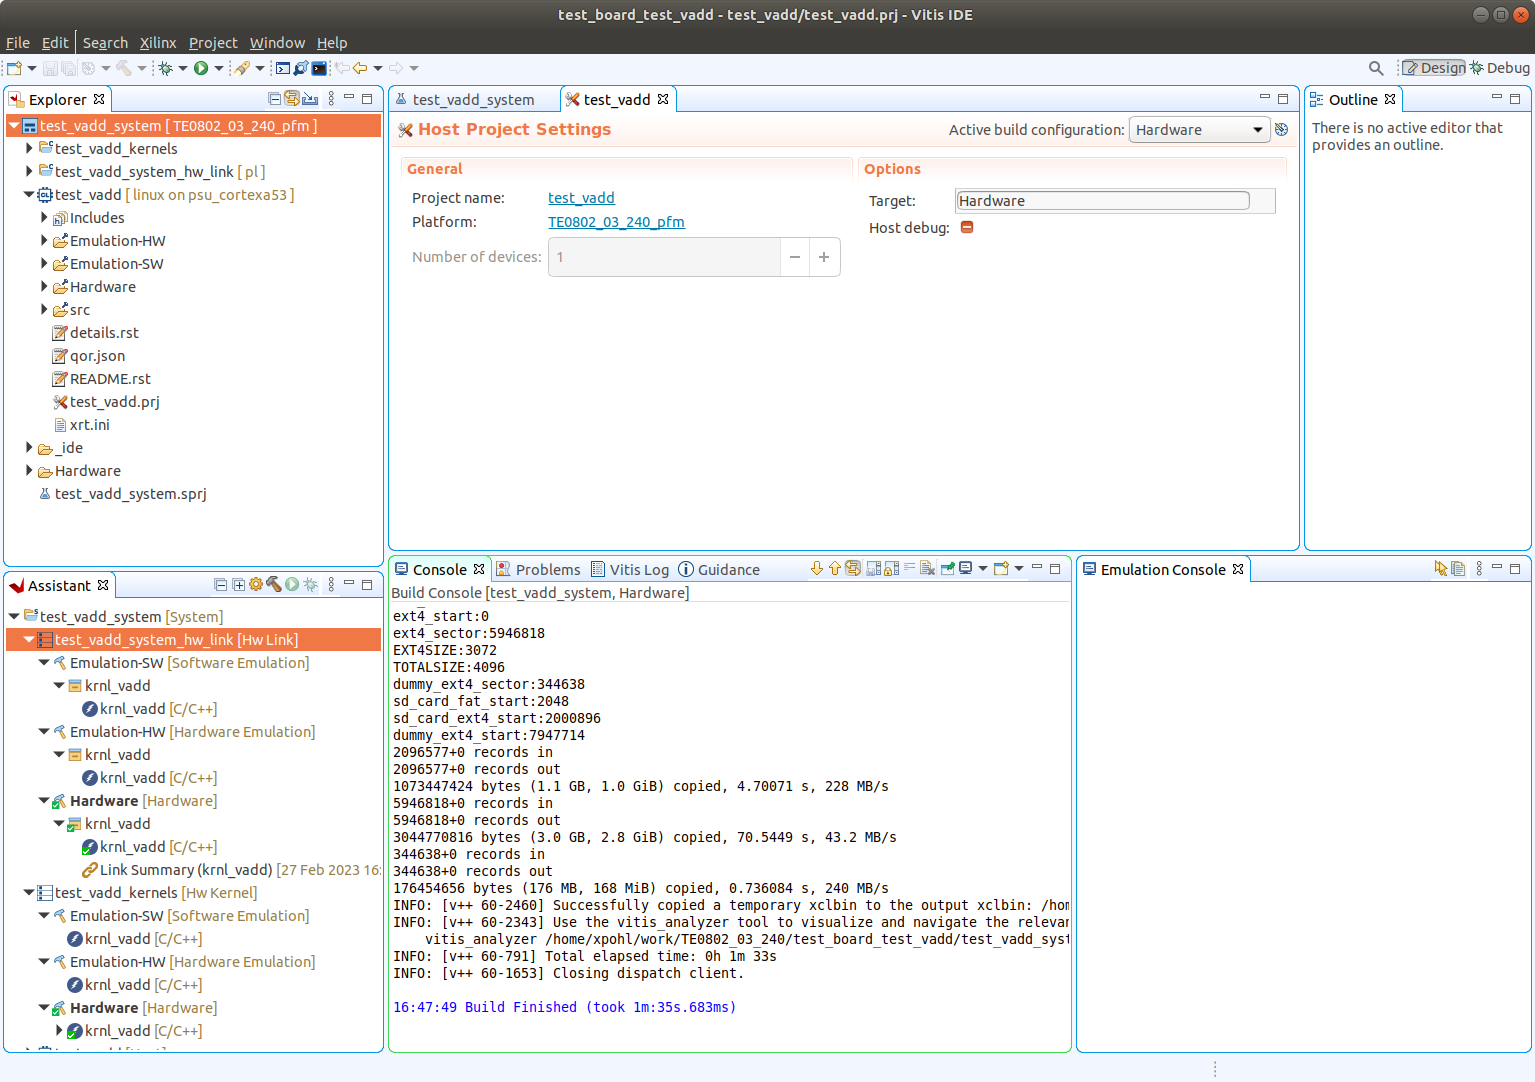
In test_vadd window menu “Active build configuration” switch from “SW Emulation” to “Hardware”.
In “Explorer” section of Vitis IDE, click on: test_vadd_system[TE0802_03_240_pfm] to select it.
Right Click on: test_vadd_system[TE0802_03_240_pfm] and select in the opened sub-menu:
Build project
Vitis will compile:
In test_vadd_kernels subproject, compile the krnl_vadd from C++ SW to HDL HW IP source code
In test_vadd_system_hw_link subproject, compile the krnl_vadd HDL together with TE0802_03_240_pfm into new, extended HW design with new accelerated (krnl_vadd) will run on the default 240 MHz clock. This step can take some time.
In test_vadd subproject, compile the vadd.cpp application example.
| Scroll Title | ||
|---|---|---|
| ||
 |
Run Compiled Example Application
| Scroll Ignore | ||||||||||||||||
|---|---|---|---|---|---|---|---|---|---|---|---|---|---|---|---|---|
| ||||||||||||||||
The sd_card.img file is output of the compilation and packing by Vitis. It is located in directory:
~/work/TE0802_03_240/test_board_test_vadd/test_vadd_system/Hardware/package/sd_card.img
Write the sd card image from the sd_card.img file to SD card.
| Note |
|---|
| In Windows Pro 10 (or Windows 11 Pro) PC, inst all program Win32DiskImager for this task. Win32 Disk Imager can write raw disk image to removable devices. https://win32diskimager.org/ |
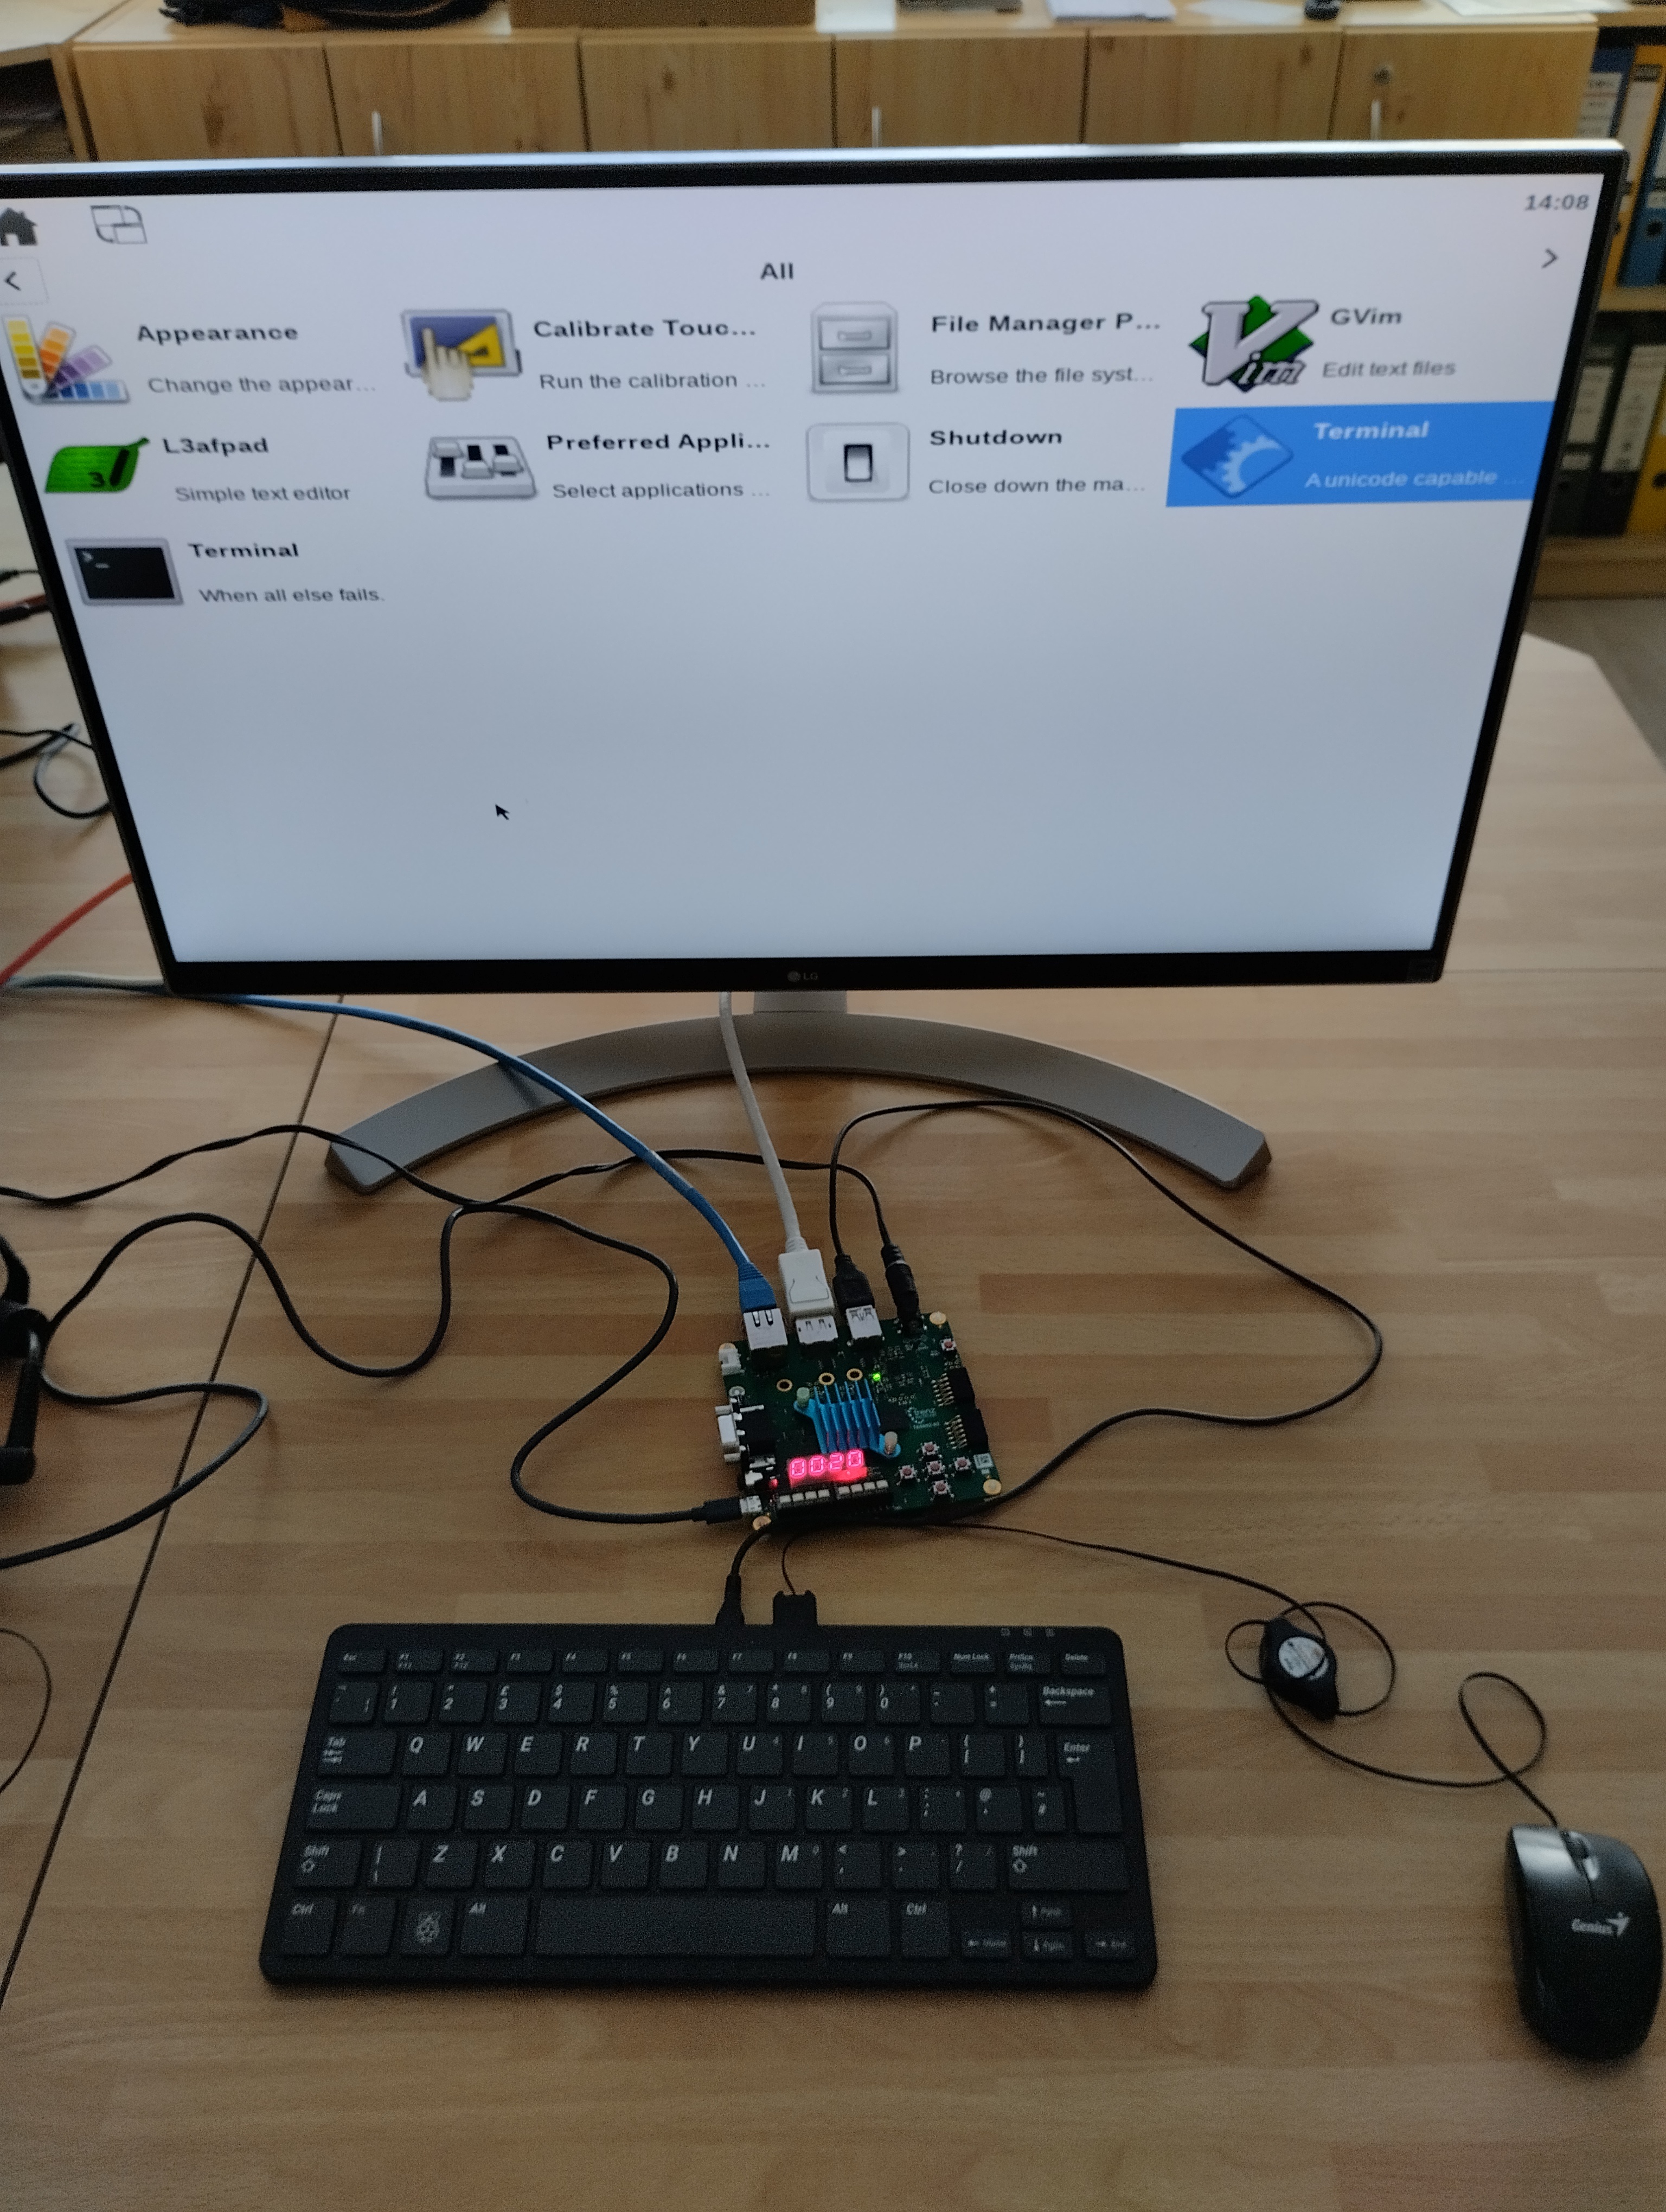
Insert the SD card to the TE0802 board.
Connect USB Keyboard and USB Mouse to the TE0802 board.
Connect Ethernet cable to the TE0802 board.
Connect Monitor to the Display Port connector of the TE0802 board.
Power on the TE0802 board.
Connect PC USB terminal (115200 bps) to the TE0802 board.
In PC, find the assigned serial line COM port number for the USB terminal. In case of Win 10 use device manager.
In PC, open serial line terminal with the assigned COM port number. Speed 115200 bps.
X11 screen opens on Display port.
Mouse and keyboard connected to the TE0802 board can be used.
Click on “Terminal” icon (A Unicode capable rxvt)
Terminal opens as an X11 graphic window.
In terminal, use keyboard connected to the TE0802 board and type:
| Code Block | ||
|---|---|---|
| ||
sh-5.0# cd /media/sd-mmcblk0p1/ sh-5.0# ./test_vadd krnl_vadd.xclbin |
The application test_vadd should run with this output:
| Code Block | ||
|---|---|---|
| ||
sh-5.0# cd /media/sd-mmcblk0p1/ sh-5.0# ./test_vadd krnl_vadd.xclbin INFO: Reading krnl_vadd.xclbin Loading: 'krnl_vadd.xclbin' Trying to program device[0]: edge Device[0]: program successful! TEST PASSED sh-5.0# |
The Vitis application has been compiled to HW and evaluated on custom system
with extensible custom TE0802_03_240_pfm platform.
Close the rxvt terminal emulator by click ”x” icon (in the upper right corner) or by typing:
| Code Block | ||
|---|---|---|
| ||
# exit |
In X11, click ”Shutdown” icon to close down safely.
System is halted. Messages relate to halt of the system can be seen on the USB terminal).
The Display Port output is switched off.
The SD card can be safely removed from the TE0802 board, now.
The TE0802 board can be disconnected from power.
| Note | ||||||||||
|---|---|---|---|---|---|---|---|---|---|---|
The display resolution can be adjusted temporarily by user command in TE0802 terminal:
The TE0802 board uses simple version of an X11 GUI on monitor with Display Port. |
Test 3: Vitis-AI Demo
| Scroll Ignore | ||||||||||||||||
|---|---|---|---|---|---|---|---|---|---|---|---|---|---|---|---|---|
| ||||||||||||||||
This test implements simple AI demo to verify DPU integration to our custom extensible platform. This tutorial follows Xilix Vitis Tutorial for zcu104 with necessary fixes and customizations required for our case.
Create and Build Vitis Design
| Scroll Ignore | ||||||||||||||||
|---|---|---|---|---|---|---|---|---|---|---|---|---|---|---|---|---|
| ||||||||||||||||
Create new directory test_board_dpu_trd to test Vitis extendable flow example “dpu trd”
~/work/TE0802_03_240/test_board_dpu_trd
Current directory structure:
~/work/TE0802_03_240/test_board
~/work/TE0802_03_240/test_board_pfm
~/work/TE0802_03_240/test_board_test_vadd
~/work/TE0802_03_240/test_board_dpu_trd
Change working directory:
| Code Block | ||
|---|---|---|
| ||
$cd ~/work/TE0802_03_240/test_board_dpu_trd |
In Ubuntu terminal, start Vitis by:
| Code Block | ||
|---|---|---|
| ||
$ vitis |
In Vitis IDE Launcher, select your working directory
~/work/TE0802_03_240/test_board_dpu_trd
Click on Launch to start Vitis.
Add Vitis-AI Repository to Vitis
| Scroll Ignore | ||||||||||||||||
|---|---|---|---|---|---|---|---|---|---|---|---|---|---|---|---|---|
| ||||||||||||||||
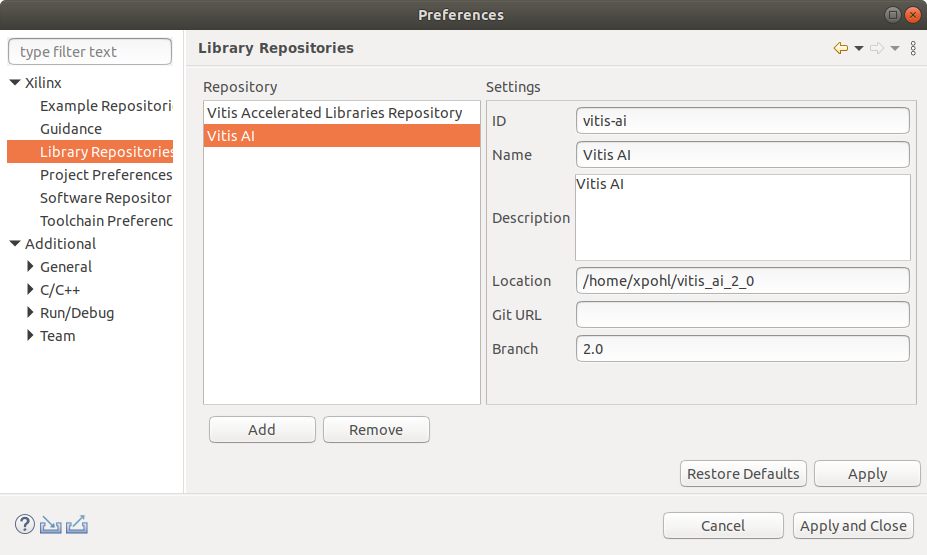
Open menu Window → Preferences
Go to Library Repository tab
Add Vitis-AI by clicking Add button and fill the form as shown below, use absolute path to your home folder in field "Location":
| Scroll Title | ||
|---|---|---|
| ||
 |
Click Apply and Close.
| Info |
|---|
Field "Location" says that the Vitis-AI repository from github has been cloned into ~/vitis_ai_2_0 folder, already in the stage of Petalinux configuration. It is the same Vitis-AI 2.0 package downloaded from the branch 2.0. Use the absolute path to your home directory. It depends on the user name. The user name in the figure is "xpohl". Replace it by your user name. |
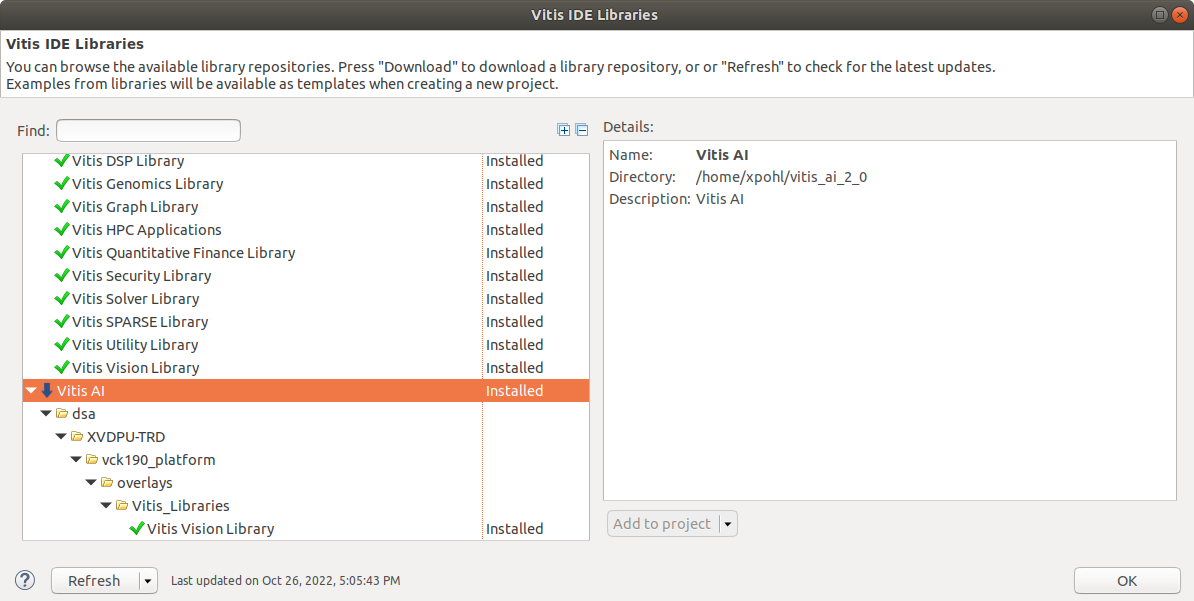
Correctly added library appears in Libraries:
Open menu Xilinx → Libraries...
You can find there just added Vitis-AI library marked as "Installed".
| Scroll Title | ||
|---|---|---|
| ||
|
Create a Vitis-AI Design for our TE0803_24_240 custom platform
| Scroll Ignore | ||||||||||||||||
|---|---|---|---|---|---|---|---|---|---|---|---|---|---|---|---|---|
| ||||||||||||||||
Select File -> New -> Application project. Click Next.
Skip welcome page if it is shown.
Click on “+ Add” icon and select the custom extensible platform TE0802_03_240_pfm[custom] in the directory:
~/work/TE0802_03_240/test_board_pfm/TE0802_03_240_pfm/export/TE0802_03_240_pfm
We can see available PL clocks and frequencies.
| Note |
|---|
| PL4 with 240 MHz clock is has been set as default in the platform creation process. |
| Scroll Title | ||
|---|---|---|
| ||
 |
Click Next.
In “Application Project Details” window type into Application project name: dpu_trd
Click Next.
In “Domain window” type (or select by browse):
“Sysroot path”:
~/work/TE0802_03_240/test_board_pfm/sysroots/cortexa72-cortexa53-xilinx-linux
“Root FS”:
~/work/TE0802_03_240/test_board/os/petalinux/images/linux/rootfs.ext4
“Kernel Image”:
~/work/TE0802_03_240/test_board/os/petalinux/images/linux/Image
Click Next.
In “Templates window”, if not done before, update “Vitis IDE Examples” and “Vitis IDE Libraries”.
In “Find”, type: “dpu” to search for the “DPU Kernel (RTL Kernel)” example.
Select: “DPU Kernel (RTL Kernel)”
| Scroll Title | ||
|---|---|---|
| ||
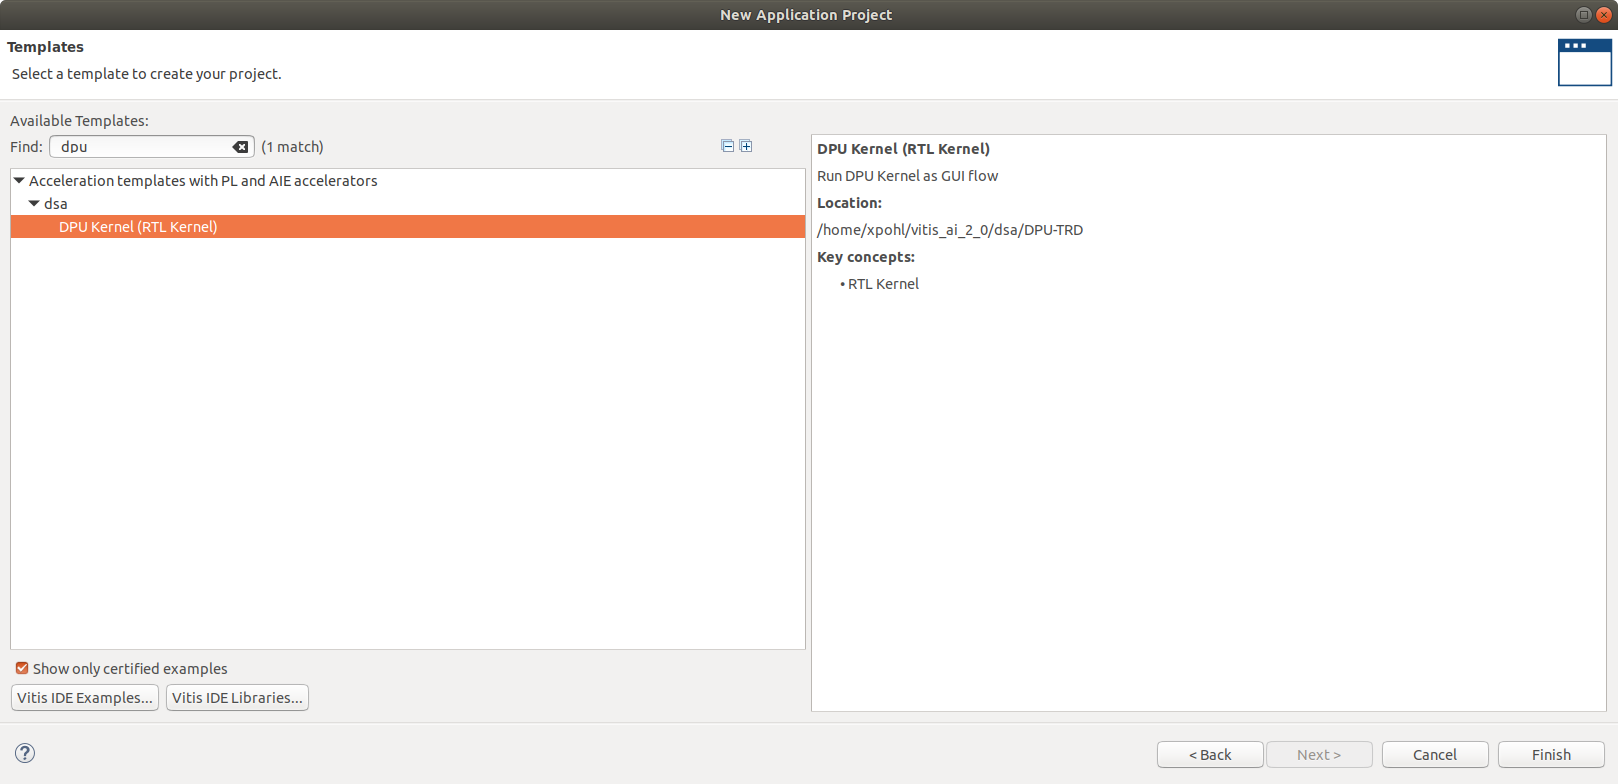 |
Click Finish
New project template is created.
In dpu_trd window menu “Active build configuration” switch from “SW Emulation” to “Hardware”.
| Info |
|---|
| File dpu_conf.vh located at dpu_trd_kernels/src/prj/Vitis directory contains DPU configuration. |
In Project Explorer expand: dpu_trd_kernels → src → prj → Vitis and open file dpu_conf.vh.
Replace all content of dpu_conf.vh file by following DPU connfiguration and save the file:
| Code Block | ||
|---|---|---|
| ||
//Setting the arch of DPU, For more details, Please read the PG338
/*====== Architecture Options ======*/
// |------------------------------------------------------|
// | Support 8 DPU size
// | It relates to model. if change, must update model
// +------------------------------------------------------+
// | `define B512
// +------------------------------------------------------+
// | `define B800
// +------------------------------------------------------+
// | `define B1024
// +------------------------------------------------------+
// | `define B1152
// +------------------------------------------------------+
// | `define B1600
// +------------------------------------------------------+
// | `define B2304
// +------------------------------------------------------+
// | `define B3136
// +------------------------------------------------------+
// | `define B4096
// |------------------------------------------------------|
`define B800
// |------------------------------------------------------|
// | If the FPGA has Uram. You can define URAM_EN parameter
// | if change, Don't need update model
// +------------------------------------------------------+
// | for zcu104 : `define URAM_ENABLE
// +------------------------------------------------------+
// | for zcu102 : `define URAM_DISABLE
// |------------------------------------------------------|
`define URAM_DISABLE
//config URAM
`ifdef URAM_ENABLE
`define def_UBANK_IMG_N 5
`define def_UBANK_WGT_N 17
`define def_UBANK_BIAS 1
`elsif URAM_DISABLE
`define def_UBANK_IMG_N 0
`define def_UBANK_WGT_N 0
`define def_UBANK_BIAS 0
`endif
// |------------------------------------------------------|
// | You can use DRAM if FPGA has extra LUTs
// | if change, Don't need update model
// +------------------------------------------------------+
// | Enable DRAM : `define DRAM_ENABLE
// +------------------------------------------------------+
// | Disable DRAM : `define DRAM_DISABLE
// |------------------------------------------------------|
`define DRAM_DISABLE
//config DRAM
`ifdef DRAM_ENABLE
`define def_DBANK_IMG_N 1
`define def_DBANK_WGT_N 1
`define def_DBANK_BIAS 1
`elsif DRAM_DISABLE
`define def_DBANK_IMG_N 0
`define def_DBANK_WGT_N 0
`define def_DBANK_BIAS 0
`endif
// |------------------------------------------------------|
// | RAM Usage Configuration
// | It relates to model. if change, must update model
// +------------------------------------------------------+
// | RAM Usage High : `define RAM_USAGE_HIGH
// +------------------------------------------------------+
// | RAM Usage Low : `define RAM_USAGE_LOW
// |------------------------------------------------------|
`define RAM_USAGE_LOW
// |------------------------------------------------------|
// | Channel Augmentation Configuration
// | It relates to model. if change, must update model
// +------------------------------------------------------+
// | Enable : `define CHANNEL_AUGMENTATION_ENABLE
// +------------------------------------------------------+
// | Disable : `define CHANNEL_AUGMENTATION_DISABLE
// |------------------------------------------------------|
`define CHANNEL_AUGMENTATION_ENABLE
// |------------------------------------------------------|
// | DepthWiseConv Configuration
// | It relates to model. if change, must update model
// +------------------------------------------------------+
// | Enable : `define DWCV_ENABLE
// +------------------------------------------------------+
// | Disable : `define DWCV_DISABLE
// |------------------------------------------------------|
`define DWCV_ENABLE
// |------------------------------------------------------|
// | Pool Average Configuration
// | It relates to model. if change, must update model
// +------------------------------------------------------+
// | Enable : `define POOL_AVG_ENABLE
// +------------------------------------------------------+
// | Disable : `define POOL_AVG_DISABLE
// |------------------------------------------------------|
`define POOL_AVG_ENABLE
// |------------------------------------------------------|
// | support multiplication of two feature maps
// | It relates to model. if change, must update model
// +------------------------------------------------------+
// | Enable : `define ELEW_MULT_ENABLE
// +------------------------------------------------------+
// | Disable : `define ELEW_MULT_DISABLE
// |------------------------------------------------------|
`define ELEW_MULT_ENABLE
// +------------------------------------------------------+
// | RELU Type Configuration
// | It relates to model. if change, must update model
// +------------------------------------------------------+
// | `define RELU_RELU6
// +------------------------------------------------------+
// | `define RELU_LEAKYRELU_RELU6
// |------------------------------------------------------|
`define RELU_LEAKYRELU_RELU6
// |------------------------------------------------------|
// | DSP48 Usage Configuration
// | Use dsp replace of lut in conv operate
// | if change, Don't need update model
// +------------------------------------------------------+
// | `define DSP48_USAGE_HIGH
// +------------------------------------------------------+
// | `define DSP48_USAGE_LOW
// |------------------------------------------------------|
`define DSP48_USAGE_LOW
// |------------------------------------------------------|
// | Power Configuration
// | if change, Don't need update model
// +------------------------------------------------------+
// | `define LOWPOWER_ENABLE
// +------------------------------------------------------+
// | `define LOWPOWER_DISABLE
// |------------------------------------------------------|
`define LOWPOWER_DISABLE
// |------------------------------------------------------|
// | DEVICE Configuration
// | if change, Don't need update model
// +------------------------------------------------------+
// | `define MPSOC
// +------------------------------------------------------+
// | `define ZYNQ7000
// |------------------------------------------------------|
`define MPSOC
|
This modification is necessary for succsessfull implementation of the DPU on used board.
Go to dpu_trd_system_hw_link, expland it and double click on dpu_trd_system_hw_link.prj.
Remove sfm_xrt_top kernel from binary container by right clicking on it and choosing remove.
Reduce number of DPU kernels to one.
Configure connection of DPU kernels
| Scroll Ignore | ||||||||||||||||
|---|---|---|---|---|---|---|---|---|---|---|---|---|---|---|---|---|
| ||||||||||||||||
On the same tab right click on dpu and choose Edit V++ Options
| Scroll Title | ||
|---|---|---|
| ||
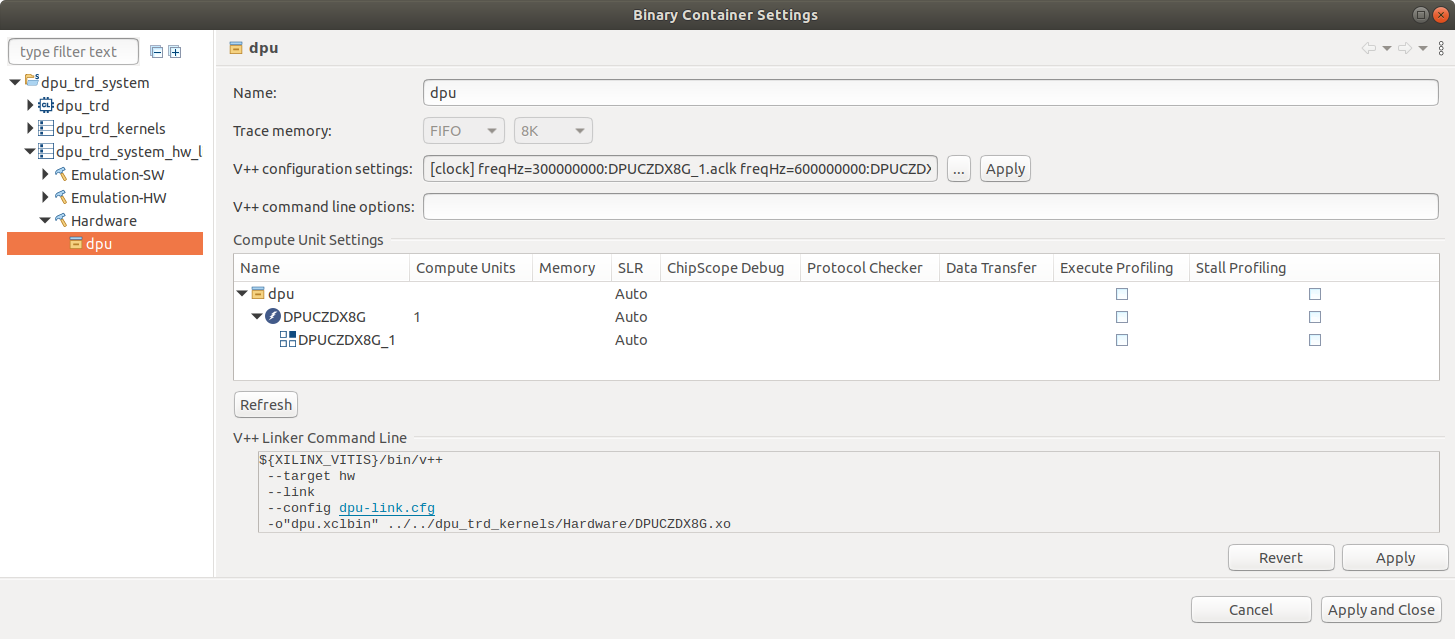 |
Click "..." button on the line of V++ Configuration Settings and modify configuration as follows:
| Code Block | ||
|---|---|---|
| ||
[clock] freqHz=200000000:DPUCZDX8G_1.aclk freqHz=400000000:DPUCZDX8G_1.ap_clk_2 [connectivity] sp=DPUCZDX8G_1.M_AXI_GP0:HPC0 sp=DPUCZDX8G_1.M_AXI_HP0:HP2 sp=DPUCZDX8G_1.M_AXI_HP2:HP3 |
Click "Apply and Close" to accept edited changes.
Build DPU_TRD
| Scroll Ignore | ||||||||||||||||
|---|---|---|---|---|---|---|---|---|---|---|---|---|---|---|---|---|
| ||||||||||||||||
In “Explorer” section of Vitis IDE, click on: dpu_trd_system[TE0803_24_240_pfm] to select it.
Right Click on: dpu_trd_system[TE0803_24_240_pfm] and select in the opened sub-menu:
Build project
Run DPU_TRD on Board
| Scroll Ignore | ||||||||||||||||
|---|---|---|---|---|---|---|---|---|---|---|---|---|---|---|---|---|
| ||||||||||||||||
Write sd_card.img to SD card using SD card reader.
The sd_card.img file is output of the compilation and packing by Vitis. It is located in directory:
~/work/TE0802_03_240/test_board_dpu_trd/dpu_trd_system/Hardware/package/
| Note |
|---|
| In Windows Pro 10 (or Windows 11 Pro) PC, inst all program Win32DiskImager for this task. Win32 Disk Imager can write raw disk image to removable devices. https://win32diskimager.org/ |
Boot the board and open terminal on the board either by connecting serial console connection, or by opening ethernet connection to ssh server on the board, or by opening terminal directly using window manager on board. Continue using the embedded board terminal.
| Info |
|---|
Detailed guide how to run embedded board and connect to it can be found in Run Compiled Example Application for Vector Addition. |
Add files needed to run DPU demos
| Scroll Ignore | ||||||||||||||||
|---|---|---|---|---|---|---|---|---|---|---|---|---|---|---|---|---|
| ||||||||||||||||
Download archive with models and qos scripts to your PC from link below:
Use SFTP connection to the board and upload archive to the board folder /home/root
Prepare Linux Setup to run DPU demos
| Scroll Ignore | ||||||||||||||||
|---|---|---|---|---|---|---|---|---|---|---|---|---|---|---|---|---|
| ||||||||||||||||
Check ext4 partition size by:
| Code Block | ||
|---|---|---|
| ||
root@petalinux:~# cd / root@petalinux:~# df . Filesystem 1K-blocks Used Available Use% Mounted on /dev/root 564048 398340 122364 77% / |
Resize partition
| Code Block | ||
|---|---|---|
| ||
root@petalinux:~# resize-part /dev/mmcblk0p2 /dev/mmcblk0p2 Warning: Partition /dev/mmcblk0p2 is being used. Are you sure you want to continue? parted: invalid token: 100% Yes/No? yes End? [2147MB]? 100% Information: You may need to update /etc/fstab. resize2fs 1.45.3 (14-Jul-2019) Filesystem at /dev/mmcblk0p2 is mounted on /media/sd-mmcblk0p2; o[ 72.751329] EXT4-fs (mmcblk0p2): resizing filesystem from 154804 to 1695488 blocks n-line resizing required old_desc_blocks = 1, new_desc_blocks = 1 [ 75.325525] EXT4-fs (mmcblk0p2): resized filesystem to 1695488 The filesystem on /dev/mmcblk0p2 is now 1695488 (4k) blocks long. |
Check ext4 partition size again, you should see:
| Code Block | ||
|---|---|---|
| ||
root@petalinux:~# df . -h Filesystem Size Used Available Use% Mounted on /dev/root 6.1G 390.8M 5.4G 7% / |
| Note |
|---|
| The available size would be different according to your SD card size. |
Unpack archive install models, set QoS using provided scripts:
| Code Block | ||
|---|---|---|
| ||
root@petalinux:~# cd /home/root root@petalinux:~# tar xvzf models.tar.gz root@petalinux:~# mkdir -p /usr/share/vitis_ai_library/models root@petalinux:~# cp -r /home/root/models/densebox_640_360 /usr/share/vitis_ai_library/models root@petalinux:~# mkdir resnet50 root@petalinux:~# cp /home/root/models/resnet50/resnet50.xmodel /home/root/resnet50 root@petalinux:~# ./models/dpu_sw_optimize/zynqmp/zynqmp_dpu_optimize.sh |
Change Display port resolution (use the same command as in test_vadd example):
| Code Block | ||
|---|---|---|
| ||
root@petalinux:~# export DISPLAY=:0.0 root@petalinux:~# xrandr --output DP-1 --mode 800x600 |
Set path to Xilinx Firmware:
| Code Block | ||
|---|---|---|
| ||
root@petalinux:~# export XLNX_VART_FIRMWARE=/mnt/sd-mmcblk0p1/dpu.xclbin |
Check if DPU is up and running:
| Code Block | ||
|---|---|---|
| ||
root@petalinux:~# xdputil query |
Output should look like:
| Code Block | ||
|---|---|---|
| ||
{
    "DPU IP Spec":{
        "DPU Core Count":1,
        "DPU Target Version":"v1.4.1",
        "IP version":"v3.4.0",
        "generation timestamp":"2021-12-15 10-30-00",
        "git commit id":"706bd10",
        "git commit time":2112151029,
        "regmap":"1to1 version"
    },
    "VAI Version":{
        "libvart-runner.so":"Xilinx vart-runner Version: 2.0.0-d02dcb6041663dbc7ecbc0c6af9fafa087a789de  2023-02-27-12:41:36 ",
        "libvitis_ai_library-dpu_task.so":"Xilinx vitis_ai_library dpu_task Version: 2.0.0-d02dcb6041663dbc7ecbc0c6af9fafa087a789de  2022-01-20 07:11:10 [UTC] ",
        "libxir.so":"Xilinx xir Version: xir-d02dcb6041663dbc7ecbc0c6af9fafa087a789de 2023-02-27-12:40:08",
        "target_factory":"target-factory.2.0.0 d02dcb6041663dbc7ecbc0c6af9fafa087a789de"
    },
    "kernels":[
        {
            "DPU Arch":"DPUCZDX8G_ISA0_B800_01000030F6012201",
            "DPU Frequency (MHz)":300,
            "IP Type":"DPU",
            "Load Parallel":2,
            "Load augmentation":"enable",
            "Load minus mean":"disable",
            "Save Parallel":2,
            "XRT Frequency (MHz)":300,
            "cu_addr":"0x80010000",
            "cu_handle":"0xaaaad562f2d0",
            "cu_idx":0,
            "cu_mask":1,
            "cu_name":"DPUCZDX8G:DPUCZDX8G_1",
            "device_id":0,
            "fingerprint":"0x1000030f6012201",
            "name":"DPU Core 0"
        }
     ]
}]
} |
| Info |
|---|
The xdputil utility reports DPU frequency 300 MHz regardless real value set in the project (200 MHz). |
Upload and build demo applications
| Scroll Ignore | ||||||||||||||||
|---|---|---|---|---|---|---|---|---|---|---|---|---|---|---|---|---|
| ||||||||||||||||
Use SFTP and copy resnet50 and facedetect demos from your PC to TE0802 board.
Copy folder ~/vitis_ai_2_0/demo/Vitis-AI-Library/samples/facedetect to folder /home/root on TE0802 board.
Copy folder ~/vitis_ai_2_0/demo/VART/resnet50 to folder /home/root on TE0802 board.
Copy folder ~/vitis_ai_2_0/demo/VART/common to folder /home/root on TE0802 board.
Copy folder ~/vitis_ai_2_0/demo/VART/images to folder /home/root on TE0802 board.
Build facedetect and resnet50 demo:
| Code Block | ||
|---|---|---|
| ||
root@petalinux:~# cd /home/root/facedetect root@petalinux:~/facedetect# ./build.sh root@petalinux:~/facedetect# cd /home/root/resnet50 root@petalinux:~/resnet50# ./build.sh |
Run the resnet50 application and observe the result.
| Code Block |
|---|
root@petalinux:~# cd /home/root/resnet50 root@petalinux:~/resnet50# ./resnet50 resnet50.xmodel WARNING: Logging before InitGoogleLogging() is written to STDERR I0309 17:08:56.273248 1641 main.cc:292] create running for subgraph: subgraph_conv1 Image : 001.jpg top[0] prob = 0.982662 name = brain coral top[1] prob = 0.008502 name = coral reef top[2] prob = 0.006621 name = jackfruit, jak, jack top[3] prob = 0.000543 name = puffer, pufferfish, blowfish, globefish top[4] prob = 0.000330 name = eel subgraph_conv1 Image : 001.jpg top[0] prob = 0.982662 name = brain coral top[1] prob = 0.008502 name = coral reef top[2] prob = 0.006621 name = jackfruit, jak, jack top[3] prob = 0.000543 name = puffer, pufferfish, blowfish, globefish top[4] prob = 0.000330 name = eel |
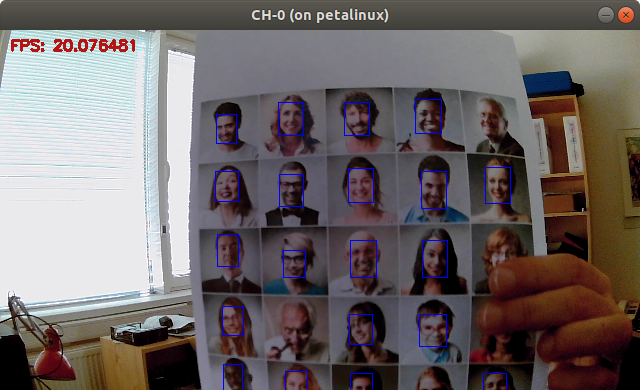
Connect USB webcam and run facedetect demo with live USB webcam input:
| Code Block | ||
|---|---|---|
| ||
root@petalinux:~# cd facedetect
root@petalinux:~/facedetect# ./test_video_facedetect densebox_640_360 0 -t 1

[ WARN:0] global /usr/src/debug/opencv/4.4.0-r0/git/modules/videoio/src/cap_gstreamer.cpp (935) open OpenCV | GStreamer warning: Cannot query video position: status=0, value=-1, duration=-1
WARNING: Logging before InitGoogleLogging() is written to STDERR
I0309 16:51:43.543998 1518 demo.hpp:744] DPU model size=640x360 |
| Note | |||||
|---|---|---|---|---|---|
The TE0802 board is running the PetaLinux OS and drives simple version of an X11 GUI on monitor with Display Port. Application facedetect performing face detector on USB camera video source and using the densebox 640x360 model inference accelerated on DPU. |
Test performance of densebox_640_360 model inferenceConnect USB webcam and run facedetect demo:
| Code Block | ||
|---|---|---|
| ||
root@petalinux:~# cd facedetect root@petalinux:~/facedetect# ./test_video_facedetect densebox_640_360 0 -t 1 [ WARN:0] global /usr/src/debug/opencv/4.4.0-r0/git/modules/videoio/src/cap_gstreamer.cpp (935) open OpenCV | GStreamer warning: Cannot query video position: status=0, value=-1, duration=-1 WARNING: Logging before InitGoogleLogging() is written to STDERR I0309 16:51:43.543998 1518 demo.hpp:744] DPU model size=640x360 | ||
| Note |
| Scroll Title | ||
|---|---|---|
| ||
 |
performance_facedetect densebox_640_360 test_performance_facedetect.list

WARNING: Logging before InitGoogleLogging() is written to STDERR
I0309 23:24:30.028218  1827 benchmark.hpp:184] writing report to <STDOUT>
I0309 23:24:30.029206  1827 benchmark.hpp:211] waiting for 0/30 seconds, 1 threads running
I0309 23:24:40.029515  1827 benchmark.hpp:211] waiting for 10/30 seconds, 1 threads running
I0309 23:24:50.030093  1827 benchmark.hpp:211] waiting for 20/30 seconds, 1 threads running
I0309 23:25:00.030671  1827 benchmark.hpp:219] waiting for threads terminated
FPS=55.0399
E2E_MEAN=18163.3
DPU_MEAN=15576.6
It can be seen that DPU core can perform up to 55 densebox_640_360 model inferences per second.
Additional Vitis AI 2.0 demos
| Scroll Ignore | ||||||||||||||||
|---|---|---|---|---|---|---|---|---|---|---|---|---|---|---|---|---|
| ||||||||||||||||
Some other demos from the Vitis AI 2.0 library can be compiled on the test board and executed on the test board with identical DPU. However, it requires also to compile their network model to DPU architecture.
Vitis AI 2.0 demos work in several modes:
- From a image stored in a file with output in form of text to console or image displayed on the X11 desktop.
- From sequence of images stored in several files with output in form of text to console or images displayed on the X11 desktop
- From USB 2/3 web camera input video with output in form video displayed on the X11 remote desktop.
Starting point for exploration of these Vitis AI 2.0 examples is this Xilinx www page.
Vitis AI 2.0 is Here! (xilinx.com)
Starting point for exploration of Vitis acceleration flow is Vitis Accel Examples' Repository (project templates are already downloaded in Vitis):
GitHub - Xilinx/Vitis_Accel_Examples at 2021.2
Filesystem on M.2 PCIe SSD Drive
| Scroll Ignore | ||||||||||||||||
|---|---|---|---|---|---|---|---|---|---|---|---|---|---|---|---|---|
| ||||||||||||||||
TE0802 board is features the M.2 PCIe slot (U5). It optionally allow to run Petalinux OS from SSD drive instead of SD Card to reach higher capacity and better performance. To move filesystem generated by dpu_trd project, follow steps below:
- Build dpu_trd project and write sd_card.img to SD card as already explained in dpu_trd demo section.
- Equip the board with compatible PCIe SSD drive. This guide is using Samsung SSD 970 EVO Plus 500GB.
- Boot the board and continue in board terminal.
Identify your target device:
Code Block root@petalinux:~# parted -l
Find in terminal ouput a snippet related to your new device to find a name of your new device:
Code Block Model: Samsung SSD 970 EVO Plus 500GB (nvme) Disk /dev/nvme0n1: 500GB Sector size (logical/physical): 512B/512B Partition Table: unknown Disk Flags:
The device name is in our case /dev/nvme0n1
Unmount the device if already mounted
Code Block root@petalinux:~# umount /dev/nvme0n1
Format the drive, create single partition and reboot the board:
Code Block root@petalinux:~# mkfs.ext4 /dev/nvme0n1 mke2fs 1.45.6 (20-Mar-2020) Discarding device blocks: done Creating filesystem with 122096646 4k blocks and 30531584 inodes Filesystem UUID: a8bbe2fb-1388-4bbd-87c8-ad65eb8094a3 Superblock backups stored on blocks: 32768, 98304, 163840, 229376, 294912, 819200, 884736, 1605632, 2654208, 4096000, 7962624, 11239424, 20480000, 23887872, 71663616, 78675968, 102400000 Allocating group tables: done Writing inode tables: done Creating journal (262144 blocks): done Writing superblocks and filesystem accounting information: done root@petalinux:~# rebootAfter reboot, the new drive will be automounted to /run/media/nvme0n1
- Install all OS files to new device. You can use one of two options. The first, remount current filesystem on SD card read only and copy it to the new drive (option a). This method preserves all modifications you have already done to the filesystem on SD card. The second, use rootfs.ext4 file to restore OS filesystem to its initial state (option b)
Remount root filesystem read only and copy it to the new drive, then reboot:
Code Block root@petalinux:~# mount -r -o remount / root@petalinux:~# cp -r /mnt/sd-mmcblk0p2/* /run/media/nvme0n1/ root@petalinux:~# reboot
Use SFTP to transmit file ~/work/TE0802_03_240/test_board/os/petalinux/images/linux/rootfs.ext4 to folder /run/media/nvme0n1 on TE0802 board.
Create folder where rootfs.ext4 will be mounted:Code Block root@petalinux:~# mkdir -p /mnt/rootfs
Mount rootfs.ext4 file, copy filesystem, unmount and reboot:
Code Block root@petalinux:~# mount -o loop /run/media/nvme0n1/rootfs.ext4 /mnt/rootfs root@petalinux:~# cp -r /mnt/rootfs/* /run/media/nvme0n1 root@petalinux:~# umount /mnt/rootfs root@petalinux:~# reboot
Stop the autoboot when boot process is instructing you about the option and continue in u-boot terminal:
Code Block Hit any key to stop autoboot: 0 ZynqMP>
Modify boot arguments to boot from SSD drive:
Code Block ZynqMP> setenv bootargs "earlycon console=ttyPS0,115200 clk_ignore_unused root=/dev/nvme0n1 rw rootwait cma=512M"
Save the boot arguments permanently or skip next step is you want to boot from nvme drive only once:
Code Block ZynqMP> saveenv
Boot the board from nvme drive:
Code Block ZynqMP> boot
Note The previous file system is still available on SD card, mounted to /mnt/sd-mmcblk0p2, but not used. It is possible to switch the boot process back to SD card by setting bootargs in u-boot terminal by command:
setenv bootargs "earlycon console=ttyPS0,115200 clk_ignore_unused root=/dev/mmcblk0p2 rw rootwait cma=512M"
| Page properties | ||||
|---|---|---|---|---|
| ||||
decide free what's the best why to describe changes from standard reference design to get Vitis AI design. → Maybe add TCL code blox which automatically change the standard design? In case you has any question, let me know. |
| Scroll pdf ignore | ||||||
|---|---|---|---|---|---|---|
|
Overview
Content Tools