Einleitung → Bildchen's der module
The modules of the the AnalogMax series offer software demonstrations of their basic functionality and
communication interface.
This manuel provides a step by step guide for installing the required software and running the demos in general
For the ease of access and programability the programming language Python(since version 3.5) has been chosen.
The project Jupyter provides an excellent and open source entry for beginners.
Jupyter files are called Notebooks and have the ending name.ipynb, this manuel refers to them as demo.
The following description of steps applies in its details to computers running windows, for other
operation systems they are in general similar.
So running and editing the Demos requires the following steps:
- Step 1 - Installation of Anaconda respectively jupyter
- Step 2 - Installion of "pyserial"
- Step 3 - Driver installation for the module
- Step 4 - Making the demos accessible for jupyter
- Step 5 - Starting Jupyter
- Step 6 - Opening a demo
- Step 7 - Alter the comport to yours
- Step 8 - Run the Notebook
- Annotations
Installation of Anaconda respectively jupyter
The simplest way to get the demos running in Jupyter is accomplished throw the installion of Anaconda.
This will install more than is needed but nearly all requierementsin one step.
The Anaconda website provides detailed instructions on how to install the application, just follow the link
http://docs.anaconda.com/anaconda/install/windows/
If the installer offers you the installation of optional application, just skip those, they are
not needed to run the demos or edit their code.
Installation of Pyserial
At least with Anaconda installation on Windows, pyserial (python serial port support library) is not
included and has to be installed. This can be done froma Anaconda command prompt. To open the
Anaconda command prompt, just press the windows key, type Anaconda prompt and open it. Enter
conda install -c anaconda pyserial
into the command prompt an press enter. This starts the search for software dependencies of pyserial,
to prceed you are asked to confirm the installtion, press Y to confirm.
The console shows a message when pyserial is installed and thereafter the console is no longer needed
and can be closed.
Driver installation for the module
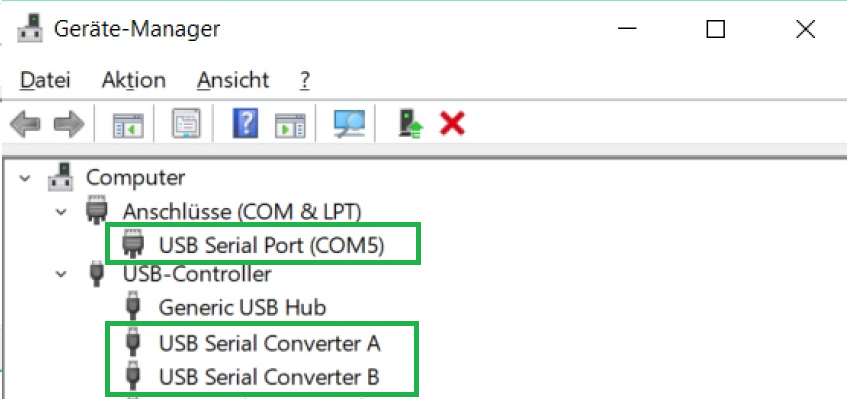
The communication with a module supposes a comport, and therefor a driver is requiered.
When connecting the modul with your computer, windows starts the Automatic driver Installation,
but often the automatic driver installation fails and the driver needs to be installed manually.
So it is best practice to connect the module, give the opperation system some time, and check
afterwards in the device manager for the apperance of a "comport" and two devices labeld
"USB Serial Convert A and B".
The device manager can be opened either via a right mouse click onto the windows symbole
or by pressing the windows button and typing device manager.
When instead two devices labeld "Arrow USB Blaster" are listed under "other devices", the manuell
approach has to betaken.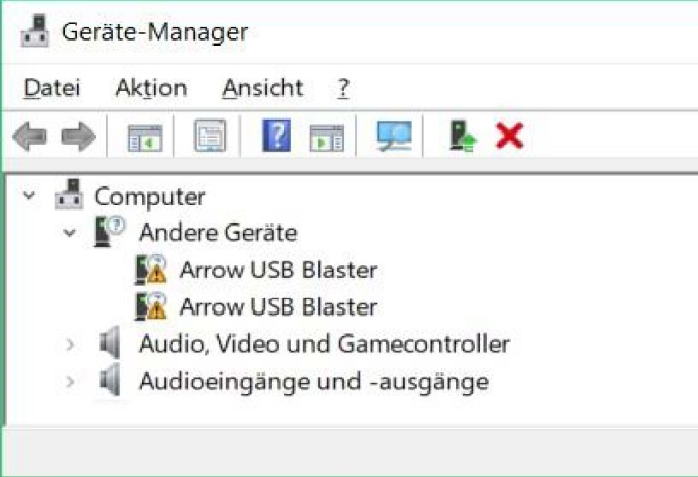
Update driver / context menu
Through a right mouse click on each device, a context menue opens. Chose "Update driver" afterwordds chose
"Search automatically for updated driver software", this proper driver installtion changes the devices names
into USB Serial Converter A & B, in addition, also the a comport is installed.
Check its number (“ComX” ) and memorize it for the later use within the demos.
In dependency to the modules firmware, the driver installation can lead to the appearance of two comports,
in this instance, the higher numbered comport is of importance.
Making the demos accessible for jupyter
The demos for a module are compressed into a zip archieve and need to be extracted, to be accessible for
Jupyter. Jupyter has access to the user folder, so a convenient way is to copy the extracted demo folder
into your users folder, for example:
C:\Users\Username\distribution-folder
Starting Jupyter
Alternative kann man auch einfach nur Jupyter starten, es öffnet sich als Konsolenfenster, dass nicht
geschlßen werden, wohl aber minimiert werden darf
To start Jupyter, press the windows key and type Jupyter, this pressents "Jupyter Notebook (AnacondaX)" to you,
To open Jupyter, press the windows key and type Jupyter, this pressents "Jupyter Notebook (AnacondaX)" to you,
from which one can start Jupyter
Opening it does several things,
leads to the start of the Jupyter server, and a consol, which displays status messages of the Jupyter
server. The console must be open all the time, you want Jupyter to run. You can minimize it.
Simultaneously the Jupyter client is opened als a page inside your default browser.
When you no longer
it opens a console, in which Jupyter messages are displayed and also your default browser
press the windows key and type Anaconda
Navigator. Anaconda opens and to open jupyter, click launch, in the screenshot below, marked within
the red rectangle.
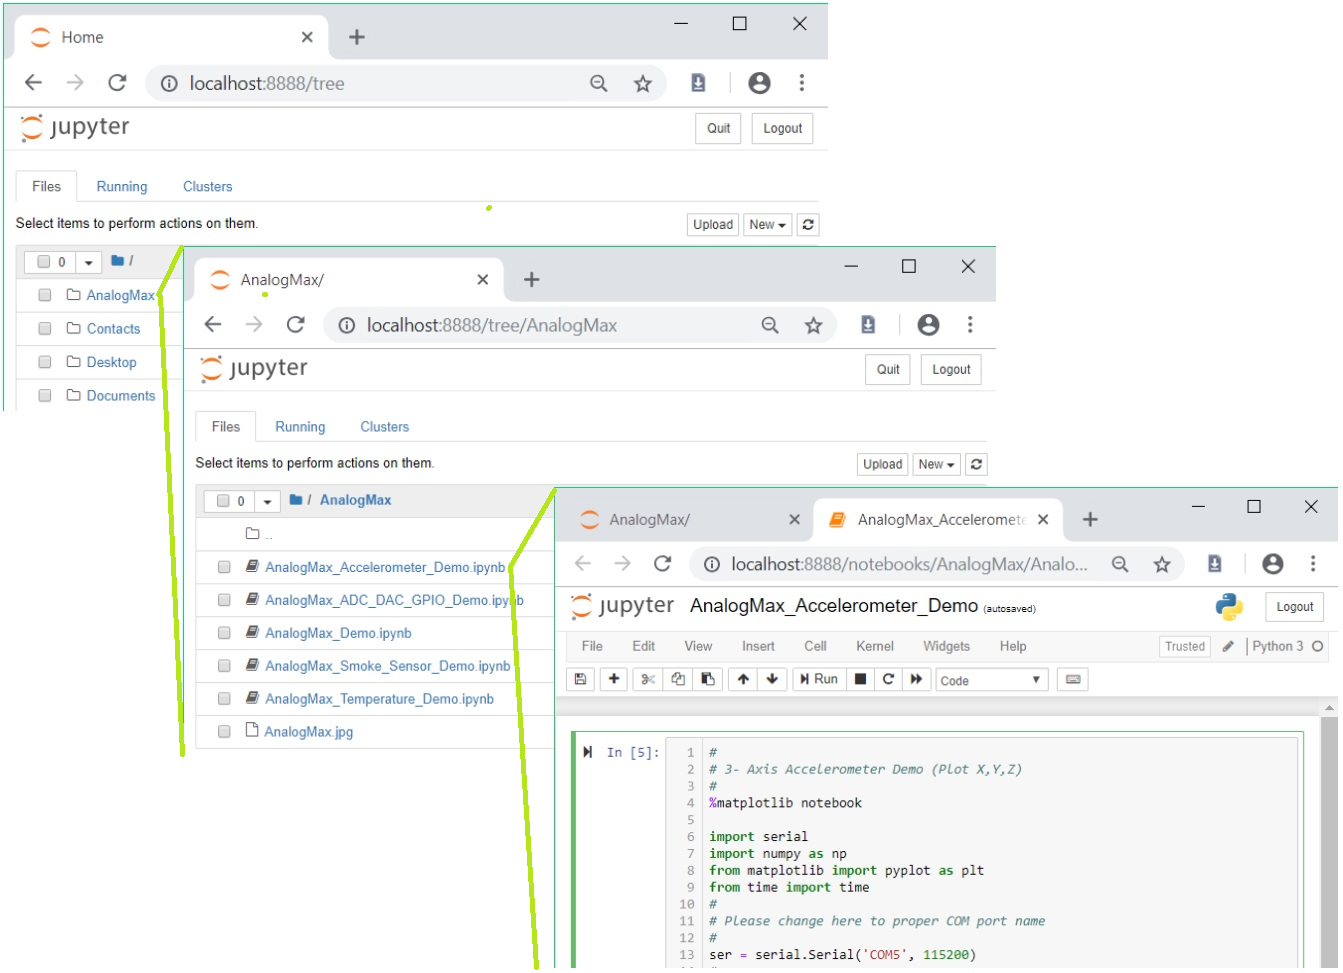
The application opens a tab inside your browser which displays your user folder.
Opening a demo
In our case, a left click on the demo
folder opens it an from there one can open a demo.
In the pictures below the steps are:
- Home folder
- Folder - AnalogMax
- Demo - AnalogMax_Accelerometer_Demo
Hints for the Notebook use:
IPython (Interactive Python) - is a command shell for interactive computing in multiple programming languages, originally developed for the Python programming language
ipywidgets - Interactive Widgets/GUI elements for the Jupyter Notebook
Step 7 - Show linenumber / Starting with clearing the caches
Clicking on the folder AnalogMax opens it.
Choose a demo and another click opens
the demo in a new tab.
Overview
Content Tools