You are viewing an old version of this page. View the current version.

Compare with Current View Page History

« Previous Version 20 Next »

Beta Version description page is under construction

  1. Enable CPU virtualisation in BIOS
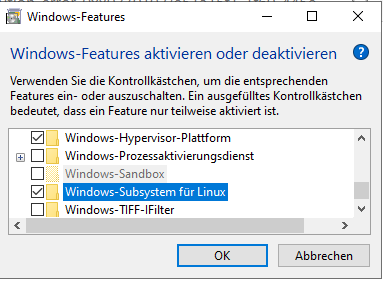
  2. Open Windows Features
    1. Enable Windows-Subsystem for Linux
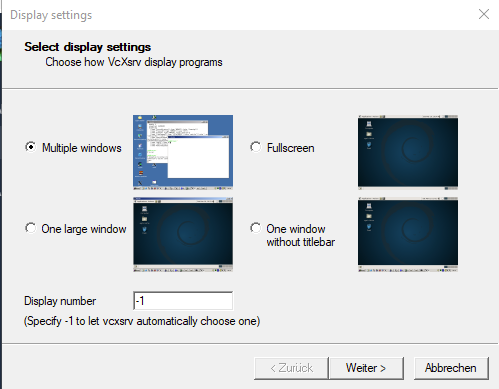
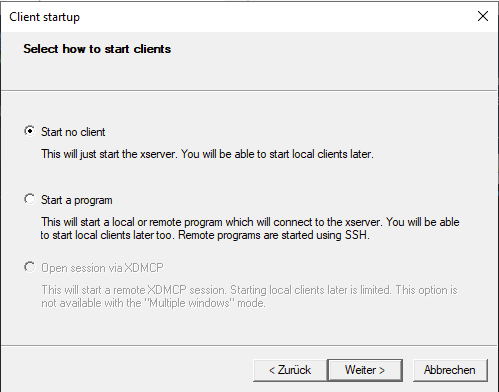
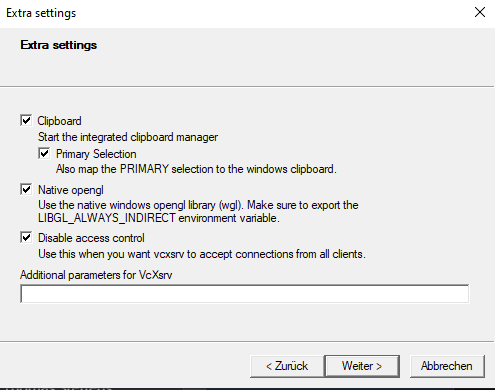
  1. Powershell as Admin:
    1. dism.exe /online /enable-feature /featurename:Microsoft-Windows-Subsystem-Linux /all /norestart
    2. dism.exe /online /enable-feature /featurename:VirtualMachinePlatform /all /norestart
  2. Reboot
  3. Download and install: https://wslstorestorage.blob.core.windows.net/wslblob/wsl_update_x64.msi
  4. Powershell as Admin:
    1. wsl --set-default-version 2
  1. Download Linux Distribution:https://docs.microsoft.com/de-de/windows/wsl/install-manual
    1. Install Vivado/Vitis/Petalinux  supported Linux OS ( "Ubuntu 18.04 LTS" for 2020.2)
  2. Open Powershell as Admin
    1. Add-AppxPackage <download path>\Ubuntu_1804.2019.522.0_x64.appx
  3. (optional) WSL Configuration on linux console:
    1.  sudo vim /etc/wsl.conf
      1. [wsl2]
        memory=<size>GB
        processors=<cnt>

    2. Other options: https://docs.microsoft.com/en-us/windows/wsl/wsl-config
  1. Linux console:
    1. sudo vim /etc/wsl.conf
      1. [network]
        generateResolvConf = false
  2. Powershell console:
    1. wsl --shutdown
  3. Get DNS Server IP over powershell:
    1. ipconfig -all
  4. Restart Linux (over powershell or win start button → Ubuntu)
  5. Linux console:
    1. sudo vim /etc/resolv.conf
      • nameserver <DNS IP>
    2. (in case file can't be wrote):
      1. sudo rm /etc/.resolv.conf.swp
  1. Install VcXsrv
  2. Start VcXrvc (XLaunch)


  3. Linux console:
    1. sudo apt update && sudo apt upgrade
    2. sudo apt install xfce4
    3. sudo apt install build-essential

    4. sudo apt install net-tools

    5. sudo apt install xrdp -y && sudo systemctl enable xrdp
  4. Linux console:

    1. export DISPLAY=<host IP>:0.0

    2. export LIBGL_ALWAYS_INDIRECT=1

  5. (optional) Add environment to auto start of new console :
    1. sudo vim /etc/bash.bashrc
      1. export DISPLAY=<host IP>:0.0

      2. export LIBGL_ALWAYS_INDIRECT=1

      3. sudo /etc/init.d/dbus start
      4. sudo /etc/init.d/xrdp start
  1. Start Ubuntu App (Windows Start Button → Ubuntu)
  2. Add username and password
  3. Update packet manager:
    1. sudo apt update && sudo apt upgrade
  4. Install:
    1. sudo apt install xfce4 xrdp
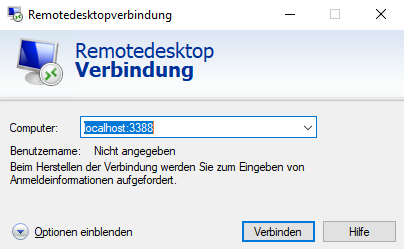
  5. Modify Remote Port
    1. sudo sed -i 's/3389/3388/g' /etc/xrdp/xrdp.ini
  6. Start XRDP Server 
    1. sudo /etc/init.d/xrdp start
  7. (optional) XRDP autostart :
    1. sudo vim /etc/bash.bashrc
      1. sudo /etc/init.d/xrdp start
  8. Connect via RDP(Win10 Remote Desktop Connection):
    1. localhost:3388

  1. Open explore
  2. Right click on PC icon --> Connect network drive
  3. Select drive
  4. Add to folder \\wsl$\Ubuntu-18.04
  5. Click Finish
  1. Install browser
    1. sudo apt-get install firefox
  2. change console from dash to bash

    1. sudo dpkg-reconfigure dash 

      1. Press "No" to disable dash and activate default bash
  3. Enable i386 architecture

    1. sudo dpkg --add-architecture i386
      sudo apt-get update

  4. Download and run plnx-env-setup.sh:  https://www.xilinx.com/support/answers/73296.html

    1. sudo ./plnx-env-setup.sh

  5. Install(in case script did not install all) 

    1. sudo apt-get install iproute2 gawk python3 python build-essential gcc git make net-tools libncurses5-dev tftpd zlib1g-dev libssl-dev flex bison libselinux1 gnupg wget git diffstat chrpath socat xterm autoconf libtool tar unzip texinfo zlib1g-dev gcc-multilib automake zlib1g:i386 screen pax gzip cpio python3-pip python3-pexpect xz-utils debianutils iputils-ping python3-git python3-jinja2 libegl1-mesa libsdl1.2-dev pylint3 -y

  1. Download Xilinx Vitis All OS installer Single-File(Includes Vitis, Vivado and Petalinux downloader):
    1. Downloads (xilinx.com)
  2. Extracted Files on linux drive
    1. tar -xvf Xilinx_Unified_2020.2_1118_1232.tar.gz
  3. Create Folder /tools/Xilinx
    1. sudo mkdir /tools
    2. sudo mkdir /tools/Xilinx
  4. Change owner to user
    1. sudo chown <owner>:<owner> /tools/Xilinx

  5. Install Vitis

    1. run xsetup

    2. select Vitis on default installation path
  6. Vivado License
    1. Open Xilinx License manager and chose Copy License and select your license file
    2. In case license file is node-locked and shared with WinOS:
      1. sudo vim /etc/bash.bashrc
        1. sudo ip link set dev bond0 address xx:xx:xx:xx:xx:xx
          1. (use MAC from Win OS)
  7. Install petalinux
    1. run xsetup
    2. select petalinux on default installation path
  8. Add source environment to auto start of new console :
    1. sudo vim /etc/bash.bashrc
      1. source /tools/Xilinx/PetaLinux/2020.2/tool/settings.sh

  • No labels